1. ആമുഖം
This manual provides detailed instructions for the safe and effective use of the ANENG V01B Digital Multimeter. The ANENG V01B is a battery-powered, true-RMS, auto-ranging digital multimeter featuring a 4000-count LCD display with backlight and flashlight functionality. It is designed for measuring various electrical parameters in automotive, electrical, and general testing applications.

ചിത്രം 1: മുൻഭാഗം view of the ANENG V01B Digital Multimeter, showing the display, function dial, and input jacks.
പ്രധാന സവിശേഷതകൾ:
- 4000 കൗണ്ട്സ് എൽസിഡി ഡിസ്പ്ലേ
- യഥാർത്ഥ RMS അളവ്
- Auto-Ranging Functionality
- Backlight and Flashlight
- ബാറ്ററിയിൽ പ്രവർത്തിക്കുന്ന പ്രവർത്തനം
2 സുരക്ഷാ വിവരങ്ങൾ
WARNING: To avoid possible electric shock, fire, or personal injury, please read all safety information before using the product. Improper use can lead to severe injury or death.
- Always ensure the multimeter is in the correct function and range before making measurements.
- ഒരു ശ്രേണിയിലും പരമാവധി ഇൻപുട്ട് മൂല്യങ്ങൾ കവിയരുത്.
- Inspect test leads for damage before each use. Do not use if insulation is damaged or bare metal is exposed.
- Do not use the multimeter if it appears damaged or if it is not operating properly.
- വോളുമായി പ്രവർത്തിക്കുമ്പോൾ ശ്രദ്ധിക്കുക.tag30V AC RMS, 42V പീക്ക്, അല്ലെങ്കിൽ 60V DC എന്നിവയ്ക്ക് മുകളിലുള്ള es. ഈ വോള്യങ്ങൾtagഒരു ഷോക്ക് അപകടമാണ്.
- സർക്യൂട്ടിലേക്കുള്ള വൈദ്യുതി ബന്ധം എപ്പോഴും വിച്ഛേദിച്ച് ഉയർന്ന വോള്യം ഉള്ള എല്ലാ വൈദ്യുതിയും ഡിസ്ചാർജ് ചെയ്യുക.tagപ്രതിരോധം, തുടർച്ച, ഡയോഡുകൾ അല്ലെങ്കിൽ കപ്പാസിറ്റൻസ് അളക്കുന്നതിന് മുമ്പ് ഇ കപ്പാസിറ്ററുകൾ.
- The device is rated for 600V CAT I. Do not use for measurements in CAT II, CAT III, or CAT IV environments.
- കൃത്യമായ റീഡിംഗുകൾ ഉറപ്പാക്കാൻ കുറഞ്ഞ ബാറ്ററി സൂചകം ദൃശ്യമാകുമ്പോൾ ബാറ്ററികൾ മാറ്റിസ്ഥാപിക്കുക.
- സ്ഫോടനാത്മകമായ വാതകം, നീരാവി അല്ലെങ്കിൽ പൊടി നിറഞ്ഞ അന്തരീക്ഷത്തിൽ മീറ്റർ പ്രവർത്തിപ്പിക്കരുത്.
3. ഉൽപ്പന്നം കഴിഞ്ഞുview
3.1. ഘടകങ്ങൾ
The ANENG V01B multimeter consists of the following main components:
- LCD ഡിസ്പ്ലേ: അളക്കൽ റീഡിംഗുകൾ, യൂണിറ്റുകൾ, പ്രവർത്തന സൂചകങ്ങൾ എന്നിവ കാണിക്കുന്നു.
- Function Rotary Dial: ആവശ്യമുള്ള അളക്കൽ പ്രവർത്തനം തിരഞ്ഞെടുക്കുന്നു.
- ഇൻപുട്ട് ജാക്കുകൾ: Terminals for connecting test leads.
- ഫംഗ്ഷൻ ബട്ടണുകൾ: For additional features like HOLD, Backlight, and Range selection.
- ബാറ്ററി കമ്പാർട്ട്മെൻ്റ്: ബാറ്ററി ഇൻസ്റ്റാളേഷനായി പിന്നിൽ സ്ഥിതിചെയ്യുന്നു.
- പിൻവലിക്കാവുന്ന സ്റ്റാൻഡ്: On the back for convenient viewing.
- ഫ്ലാഷ്ലൈറ്റ്: Integrated for illuminating work areas.
3.2. അളവുകൾ

Figure 2: Product dimensions of the ANENG V01B Multimeter. Approximate measurements are 119.5mm (length) x 61.7mm (width) x 31.9mm (thickness).

Figure 3: Display dimensions and test lead length. The display measures approximately 44.5mm x 27mm. Test lead bus length is approximately 790mm (31.1 inches).
4. സജ്ജീകരണം
4.1. ബാറ്ററി ഇൻസ്റ്റാളേഷൻ
- മൾട്ടിമീറ്റർ ഓഫാക്കിയിട്ടുണ്ടെന്ന് ഉറപ്പാക്കുക.
- ഉപകരണത്തിന്റെ പിൻഭാഗത്ത് ബാറ്ററി കമ്പാർട്ട്മെന്റ് കവർ കണ്ടെത്തുക.
- ബാറ്ററി കവർ ഉറപ്പിക്കുന്ന സ്ക്രൂ നീക്കം ചെയ്യാൻ ഒരു സ്ക്രൂഡ്രൈവർ ഉപയോഗിക്കുക.
- ബാറ്ററി കവർ നീക്കം ചെയ്യുക.
- Insert two AAA batteries, observing the correct polarity (+ and -) as indicated inside the compartment.
- ബാറ്ററി കവർ മാറ്റി സ്ക്രൂ ഉപയോഗിച്ച് സുരക്ഷിതമാക്കുക.
Figure 4: Battery slot and product back shell. The back shell includes a retractable bracket and a high-brightness flashlight.
4.2. ടെസ്റ്റ് ലീഡുകൾ ബന്ധിപ്പിക്കുന്നു
- "COM" (കോമൺ) ഇൻപുട്ട് ജാക്കിലേക്ക് കറുത്ത ടെസ്റ്റ് ലീഡ് തിരുകുക.
- Insert the red test lead into the appropriate input jack for your measurement:
- വാല്യംtage (V), Resistance (Ω), Capacitance (F), Diode, Continuity, Frequency (Hz), and NCV measurements, insert the red lead into the "VΩHz" jack.
- For Current (mA) measurements, insert the red lead into the "mA" jack.
- For High Current (10A) measurements, insert the red lead into the "10A MAX FUSED" jack.

Figure 5: Test line interface showing the input jacks for connecting test leads.
5. പ്രവർത്തന നിർദ്ദേശങ്ങൾ
5.1. പവർ ഓൺ/ഓഫ്
Turn the rotary dial from the "OFF" position to any desired measurement function to power on the multimeter. To power off, turn the rotary dial back to the "OFF" position.
The multimeter features an ഓട്ടോ പവർ ഓഫ് function to conserve battery life. It will automatically power off after a period of inactivity. Press any button or turn the rotary dial to wake it up.

Figure 6: Function turntable for selecting measurement modes.
5.2. ഫംഗ്ഷൻ തിരഞ്ഞെടുക്കൽ
Rotate the central dial to select the desired measurement function. The available functions include:
- V~ (AC Voltage) / V- (DC Voltagഇ): Measures alternating or direct current voltage. Use the "SEL" button to switch between AC and DC.
- mV~ (AC Millivolt) / mV- (DC Millivolt): Measures low alternating or direct current voltage. Use the "SEL" button to switch between AC and DC.
- Ω (Resistance): Measures electrical resistance.
- Hz (Frequency) / % (Duty Cycle): Measures frequency or duty cycle.
- NCV (നോൺ-കോൺടാക്റ്റ് വോളിയംtagഇ): എസി വോള്യം കണ്ടെത്തുന്നുtagനേരിട്ട് ബന്ധപ്പെടാതെ ഇ.
- A~ (AC Current) / A- (DC Current): Measures alternating or direct current (10A range). Use the "SEL" button to switch between AC and DC.
- mA~ (AC Milliamps) / mA- (DC Milliamps): Measures low alternating or direct current. Use the "SEL" button to switch between AC and DC.
- Diode / Continuity / Capacitance: Measures diode forward voltage drop, checks circuit continuity, or measures capacitance. Use the "SEL" button to cycle through these functions.
5.3. ബട്ടൺ പ്രവർത്തനങ്ങൾ
- വിൽക്കുക: Selects between different measurement modes within a single rotary dial position (e.g., AC/DC voltage, Diode/Continuity/Capacitance).
- HOLD / *:
- Press briefly to activate Data Hold, freezing the current reading on the display. Press again to release.
- Press and hold to turn the display backlight ON or OFF.
- Press and hold to turn the flashlight ON or OFF (located on the back of the device).
5.4. Millivolt Value Jump (Correct Phenomenon)
When measuring in the millivolt (mV) range, it is normal to observe a non-zero reading even when the test leads are not connected to a circuit. This phenomenon can occur due to:
- Excessive changes in ambient temperature and humidity.
- Strong electric field or magnetic field interference.
To confirm the meter is functioning correctly, short-circuit the red and black test pens. The display should return to zero (0.00 mV). If it does not, ensure the corresponding input hole is inserted into the red and black pen line correctly.
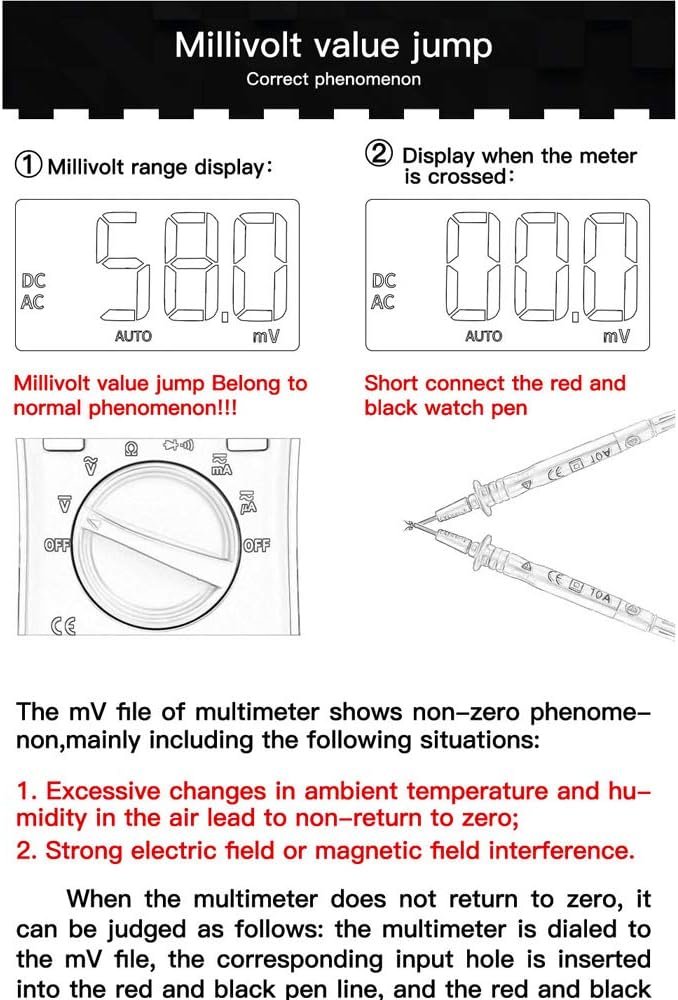
Figure 7: Explanation of millivolt range display behavior and how to short-circuit test leads to verify zero.
6. പരിപാലനം
6.1. വൃത്തിയാക്കൽ
പരസ്യം ഉപയോഗിച്ച് കേസ് തുടയ്ക്കുകamp തുണിയും നേരിയ ഡിറ്റർജന്റും. അബ്രാസീവ്സുകളോ ലായകങ്ങളോ ഉപയോഗിക്കരുത്. ഇൻപുട്ട് ടെർമിനലുകൾ അഴുക്കും ഈർപ്പവും ഇല്ലാതെ സൂക്ഷിക്കുക.
6.2. ബാറ്ററി മാറ്റിസ്ഥാപിക്കൽ
ബാറ്ററി ചിഹ്നം എപ്പോൾ [battery icon] appears on the LCD, the batteries must be replaced. Refer to Section 4.1 for detailed battery installation instructions.
6.3. ഫ്യൂസ് മാറ്റിസ്ഥാപിക്കൽ
If the current measurement function fails, the fuse may need replacement. The ANENG V01B uses two fuses:
- 10A MAX FUSED: For the 10A current range.
- 600V CAT I FUSED 400mA: For the mA current range.
WARNING: To prevent damage to the multimeter or personal injury, always replace blown fuses with fuses of the specified type and rating.
- Ensure the multimeter is turned OFF and test leads are disconnected.
- Remove the battery compartment cover and batteries as described in Section 4.1.
- Carefully remove the back casing screws (if any, beyond battery cover) to access the internal circuit board.
- Locate the blown fuse(s) and gently remove them.
- Install new fuses of the correct type and rating.
- Reassemble the multimeter, ensuring all screws are tightened.
7. പ്രശ്നപരിഹാരം
| പ്രശ്നം | സാധ്യമായ കാരണം | പരിഹാരം |
|---|---|---|
| ഡിസ്പ്ലേ ഇല്ല അല്ലെങ്കിൽ മങ്ങിയ ഡിസ്പ്ലേ | Dead or low batteries; Multimeter OFF | Replace batteries; Turn rotary dial to a function. |
| തെറ്റായ വായനകൾ | Wrong function selected; Test leads improperly connected; Blown fuse (for current); Environmental interference (for mV) | Select correct function; Ensure leads are in correct jacks; Check/replace fuses; Refer to Millivolt Value Jump section. |
| കറന്റ് അളക്കൽ ഇല്ല | Blown fuse for current range | Replace the appropriate fuse (10A or 400mA). |
| "OL" or "OVER" displayed | Measurement exceeds selected range; Open circuit | Select a higher range (if not auto-ranging); Check for open circuit in the component/circuit. |
8 സ്പെസിഫിക്കേഷനുകൾ
| പരാമീറ്റർ | വിശദാംശങ്ങൾ |
|---|---|
| പ്രദർശിപ്പിക്കുക | 4000 കൗണ്ട്സ് എൽസിഡി |
| അളക്കൽ തരം | യഥാർത്ഥ RMS ഡിജിറ്റൽ മൾട്ടിമീറ്റർ |
| റേഞ്ചിംഗ് | ഓട്ടോ-റേഞ്ചിംഗ് |
| പവർ ഉറവിടം | Battery Powered (AAA batteries) |
| സുരക്ഷാ റേറ്റിംഗ് | 600V CAT I |
| അളവുകൾ (L x W x T) | ഏകദേശം. 119.5mm x 61.7mm x 31.9mm |
| Test Lead Length | Approx. 790mm (31.1 inches) |
| ഫീച്ചറുകൾ | Backlight, Flashlight, Data Hold, Auto Power Off, NCV |
| മോഡൽ നമ്പർ | V01B |
9. വാറൻ്റിയും പിന്തുണയും
For warranty information or technical support, please refer to the documentation provided with your purchase or contact the seller directly. Keep your purchase receipt as proof of purchase.


