1. ആമുഖം
This manual provides detailed instructions for the proper setup, operation, and maintenance of your SmallRig Mini Ball Head, model BUT2665. Please read this manual thoroughly before use to ensure optimal performance and longevity of the product.

Image 1.1: SmallRig Mini Ball Head BUT2665. This image displays the main components including the ball head, quick release plate, and the included 3/8 inch to 1/4 inch screw adapter.
2. ഉൽപ്പന്ന ഘടകങ്ങൾ
The SmallRig Mini Ball Head BUT2665 includes the following key components:
- ദ്രുത റിലീസ് പ്ലേറ്റ്: Arca-type compatible plate with a 1/4" screw for attaching cameras.
- Ball Head Knob: Used to lock and unlock the ball joint for tilt and swivel adjustments.
- Panning Knob: Used to lock and unlock the base for 360° panoramic rotation.
- 360° Panning Dial: Marked in 5° increments for precise panoramic adjustments.
- ബബിൾ ലെവൽ: Integrated for accurate horizontal alignment.
- 3/8" Thread Hole: Located at the base for mounting onto tripods or monopods.
- 1/4" to 3/8" Screw Adapter: Included for broader compatibility with mounting platforms.
- Anti-fall Screws: On the quick release plate to prevent accidental camera detachment.

Image 2.1: Labeled diagram of the SmallRig Mini Ball Head components. This image highlights the quick release plate, 1/4" screw, bubble level, ball head knob, panning knob, 3/8" thread hole, and 360° panning dial.
3. സജ്ജീകരണ നിർദ്ദേശങ്ങൾ
- Mounting the Ball Head to a Tripod/Monopod:
Locate the 3/8" thread hole at the base of the ball head. Screw the ball head onto the 3/8" screw of your tripod or monopod. If your tripod has a 1/4" screw, use the included 1/4" to 3/8" screw adapter by first screwing it into the ball head's 3/8" thread, then mounting it onto your tripod.
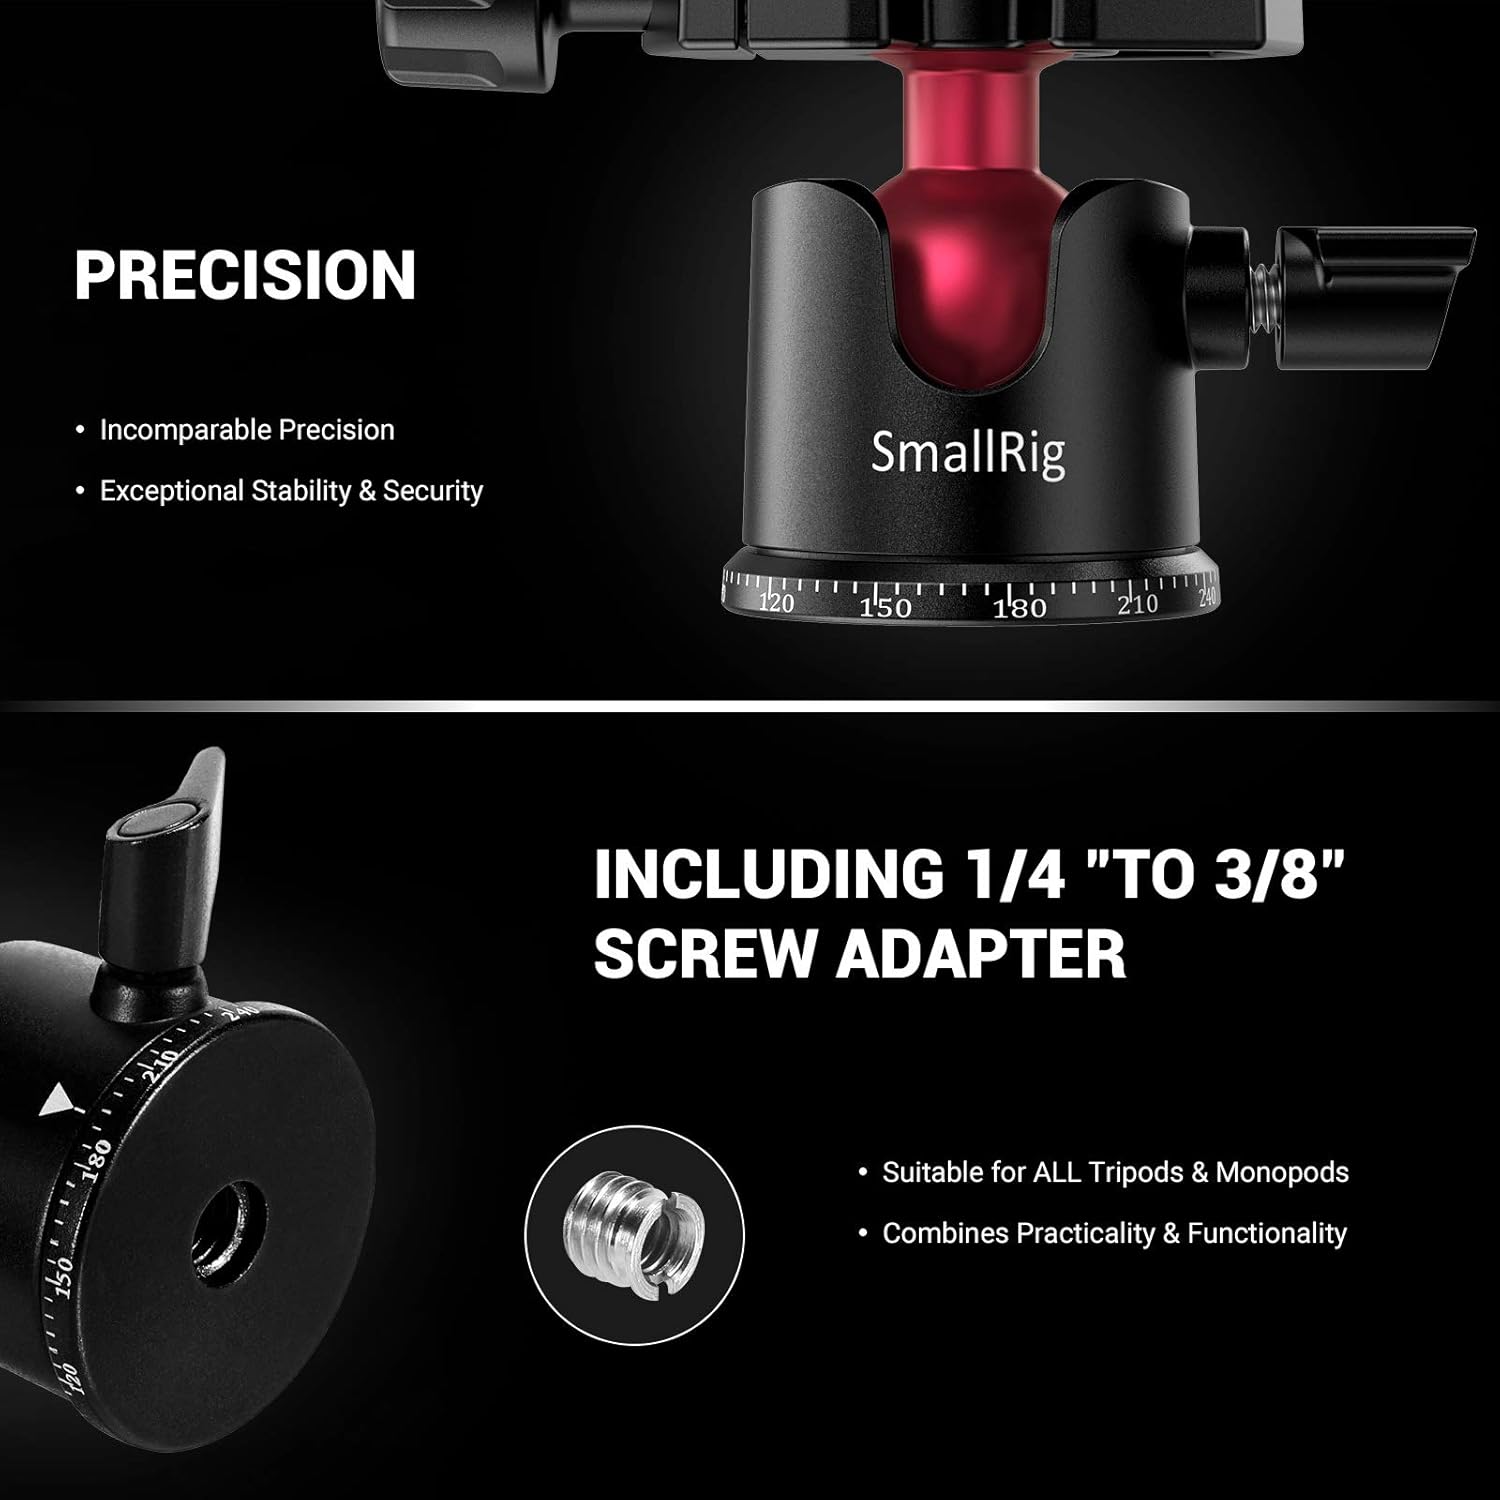
Image 3.1: The 1/4" to 3/8" screw adapter and the 3/8" thread hole for tripod mounting.
- Attaching Your Camera to the Quick Release Plate:
Unscrew the 1/4" screw on the quick release plate. Align the screw with the tripod mount hole on the bottom of your camera. Tighten the screw securely. Ensure the anti-fall screws on the quick release plate are engaged to prevent accidental camera release.
- Securing the Quick Release Plate to the Ball Head:
ക്വിക്ക് റിലീസ് cl അഴിക്കുകamp on the ball head. Slide the quick release plate with your camera attached into the clamp. Ensure it is fully seated and then tighten the clamp securely until the camera is firmly held in place.

Image 3.2: Various angles of the ball head and quick release plate, illustrating how the camera attaches and the plate secures.
4. പ്രവർത്തന നിർദ്ദേശങ്ങൾ
- Adjusting Camera Angle (Ball Head Knob):
To adjust the tilt or swivel of your camera, loosen the Ball Head Knob. Position your camera to the desired angle (up to -90°/+45° front tilt and -50°/+50° lateral tilt). Once the desired angle is achieved, tighten the Ball Head Knob firmly to secure the camera in place.

Image 4.1: Demonstrating camera angle adjustment using the ball head knob.
- Panoramic Rotation (Panning Knob and Dial):
For horizontal panoramic movements, loosen the Panning Knob located at the base of the ball head. The 360° Panning Dial, marked in 5° increments, allows for precise rotation. Rotate the camera to the desired panoramic position. Tighten the Panning Knob to lock the rotation.
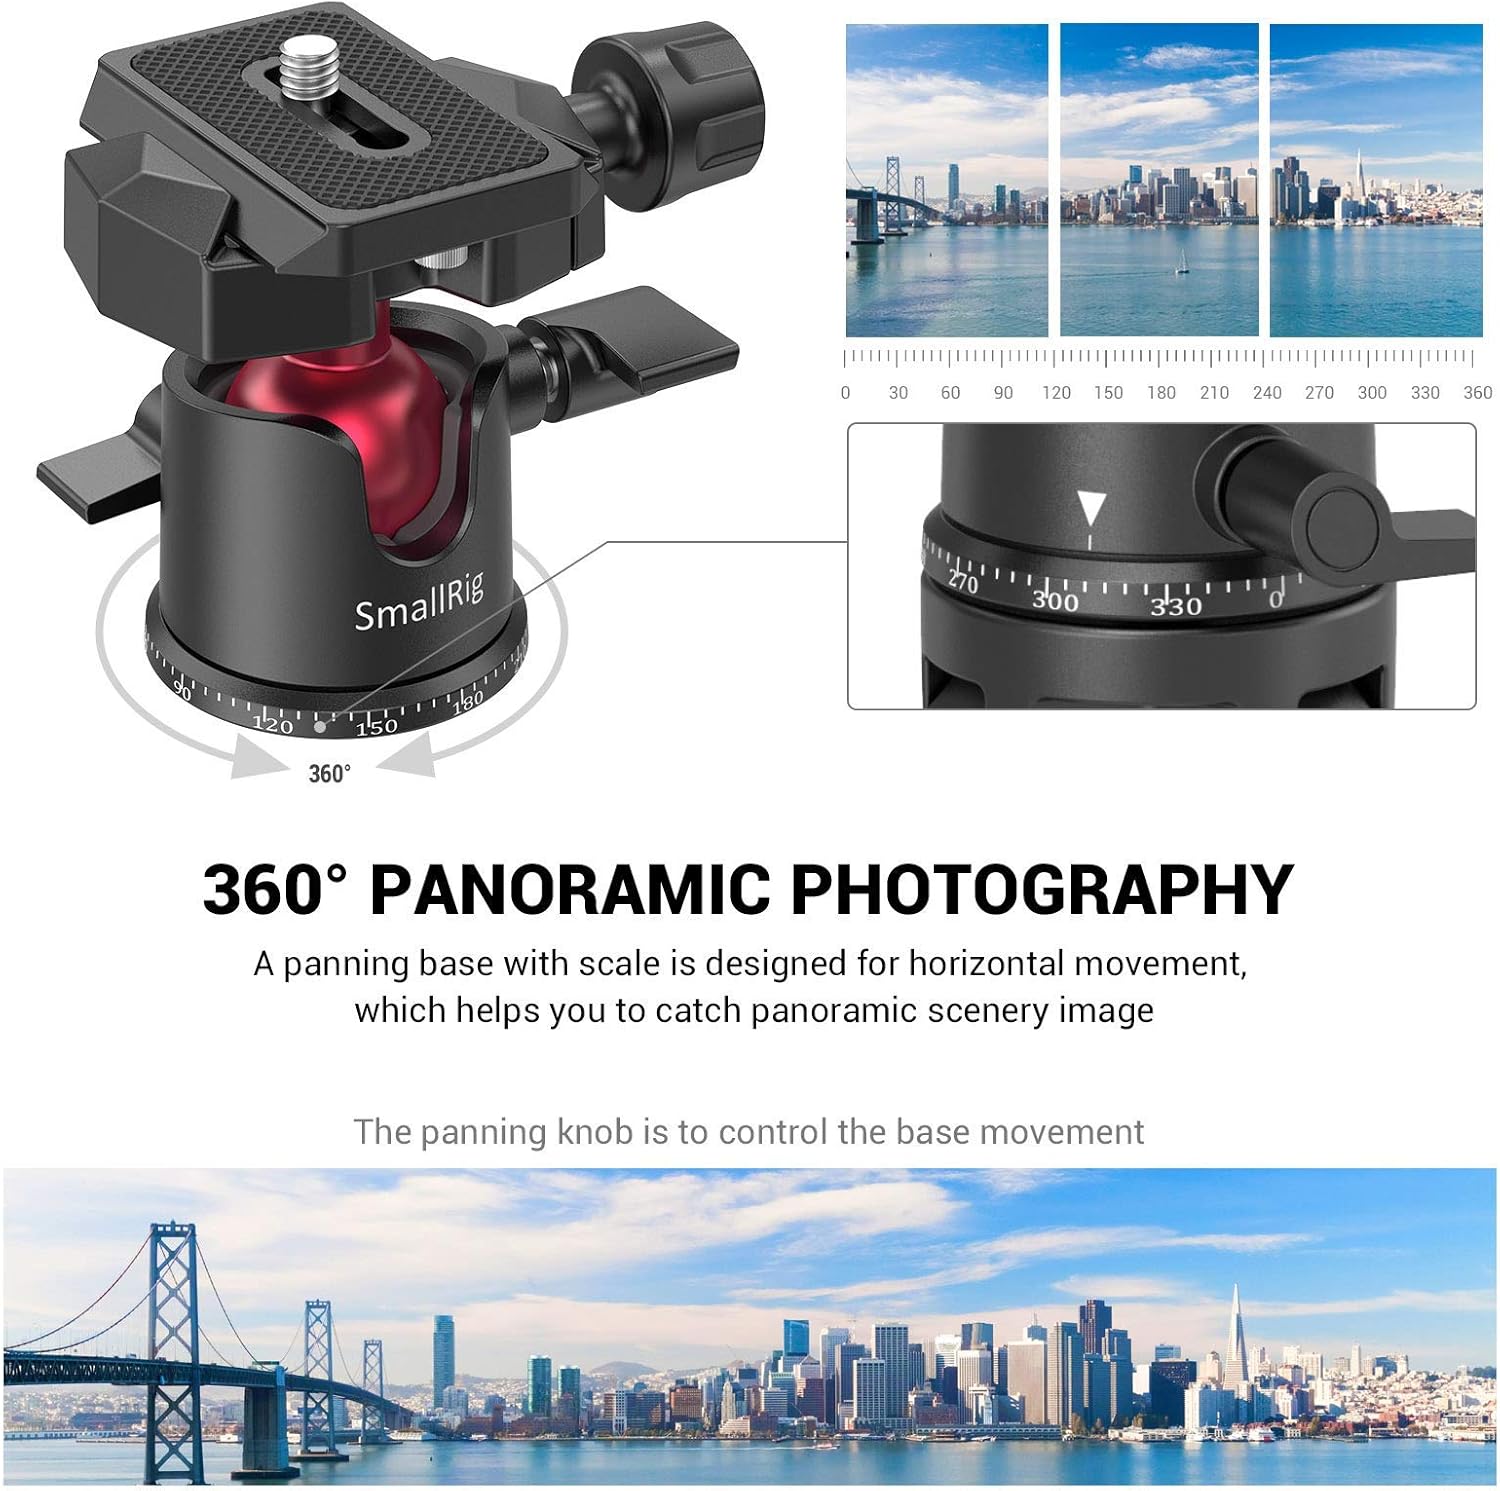
Image 4.2: The 360° panoramic base with its scale for accurate horizontal movement.

ചിത്രം 4.3: ഒരു മുൻample of a panoramic image, demonstrating the capability of the ball head's panning function.
- ബബിൾ ലെവൽ ഉപയോഗിച്ച്:
The integrated bubble level assists in achieving a perfectly horizontal setup. Adjust the tripod legs or the ball head's tilt until the bubble is centered within the level indicator.
5. പരിപാലനം
- വൃത്തിയാക്കൽ: Use a soft, dry cloth to clean the ball head. For stubborn dirt, a slightly damp തുണി ഉപയോഗിക്കാം, തുടർന്ന് ഉടനടി ഉണക്കുക. ഉരച്ചിലുകൾ ഉണ്ടാക്കുന്ന ക്ലീനറുകളോ ലായകങ്ങളോ ഒഴിവാക്കുക.
- ലൂബ്രിക്കേഷൻ: The ball joint is designed for smooth operation and typically does not require lubrication. If movement becomes stiff, consult SmallRig support.
- സംഭരണം: Store the ball head in a dry, dust-free environment when not in use.
- പരിശോധന: Periodically check all screws and knobs for tightness. Ensure the quick release plate mechanism operates smoothly and securely.
6. പ്രശ്നപരിഹാരം
- Camera not secure on quick release plate:
Ensure the 1/4" screw is fully tightened to the camera and the quick release clamp on the ball head is firmly secured. Verify that the anti-fall screws are engaged.
- പന്തിന്റെ തലയുടെ ചലനം ദൃഢമോ അയഞ്ഞതോ ആണ്:
Adjust the Ball Head Knob. If it's too stiff, loosen it slightly. If it's too loose, tighten it. Do not overtighten.
- Panoramic rotation is stiff or loose:
Adjust the Panning Knob. Ensure it is loosened for rotation and tightened for locking.
- Limited vertical tilt range:
In some configurations, especially with larger cameras or specific tripod mounts, the quick release plate or camera body may contact the tripod mount when tilting vertically. Ensure sufficient clearance. An additional spacer may be required in certain setups to achieve full vertical tilt without obstruction.

Image 6.1: Vertical camera orientation. Ensure adequate clearance between the camera/plate and the tripod base during extreme tilts.
- Product failure or damage:
Discontinue use immediately. Contact SmallRig customer support for assistance.
7 സ്പെസിഫിക്കേഷനുകൾ
| ഫീച്ചർ | വിശദാംശങ്ങൾ |
|---|---|
| മോഡൽ നമ്പർ | എന്നാൽ 2665 |
| മെറ്റീരിയൽ | അലുമിനിയം അലോയ് |
| പരമാവധി ലോഡ് കപ്പാസിറ്റി | 4.4 പൗണ്ട് (2 കി.ഗ്രാം) |
| ഉൽപ്പന്ന അളവുകൾ | 3.15 x 2.56 x 2.36 ഇഞ്ച് (80 x 65 x 60 മിമി) |
| ഇനത്തിൻ്റെ ഭാരം | 6.6 ഔൺസ് (188 ഗ്രാം) |
| Mounting Screw (Top) | 1/4" |
| Mounting Thread (Base) | 3/8" (with 1/4" to 3/8" adapter included) |
| പനോരമിക് റൊട്ടേഷൻ | 360° |
| ഫ്രണ്ട് ടിൽറ്റ് | -90°/+45° |
| ലാറ്ററൽ ടിൽറ്റ് | -50°/+50° |
| ദ്രുത റിലീസ് പ്ലേറ്റ് | ആർക്ക-തരം അനുയോജ്യം |
| അനുയോജ്യമായ ഉപകരണങ്ങൾ | DSLR cameras, camcorders, smartphones (with adapter), GoPro (with adapter) |
8. വാറൻ്റിയും പിന്തുണയും
വാറൻ്റി വിവരങ്ങൾ: Specific warranty terms and conditions for the SmallRig Mini Ball Head BUT2665 are provided with your product packaging or can be found on the official SmallRig webസൈറ്റ്. വാറന്റി ക്ലെയിമുകൾക്കായി നിങ്ങളുടെ വാങ്ങലിന്റെ തെളിവ് സൂക്ഷിക്കുക.
ഉപഭോക്തൃ പിന്തുണ: For technical assistance, troubleshooting, or warranty inquiries, please visit the official SmallRig website or contact their customer service department. Contact details are typically available on the product packaging or the SmallRig webസൈറ്റ്.


