ആമുഖം
This manual provides essential information for the safe and efficient operation of your Overmax MULTIPIC 3.5 Projector. Please read it thoroughly before use and retain it for future reference.
സുരക്ഷാ വിവരങ്ങൾ
മുന്നറിയിപ്പ്: തീയോ വൈദ്യുതാഘാതമോ ഉണ്ടാകാനുള്ള സാധ്യത കുറയ്ക്കുന്നതിന്, ഈ ഉപകരണം മഴയിലോ ഈർപ്പത്തിലോ തുറന്നുകാട്ടരുത്.
- Do not block any ventilation openings. Ensure adequate space around the projector for proper airflow.
- റേഡിയറുകൾ, ഹീറ്റ് രജിസ്റ്ററുകൾ, സ്റ്റൗകൾ, അല്ലെങ്കിൽ മറ്റ് ഉപകരണങ്ങൾ (ഉൾപ്പെടെ) പോലെയുള്ള താപ സ്രോതസ്സുകൾക്ക് സമീപം ഇൻസ്റ്റാൾ ചെയ്യരുത്. ampലൈഫയറുകൾ) ചൂട് ഉത്പാദിപ്പിക്കുന്നത്.
- പവർ കോർഡ് നടക്കാനോ നുള്ളിയെടുക്കാനോ സംരക്ഷിക്കുക, പ്രത്യേകിച്ചും പ്ലഗുകൾ, സ re കര്യപ്രദമായ റെസപ്റ്റാക്കലുകൾ, അവർ ഉപകരണത്തിൽ നിന്ന് പുറത്തുകടക്കുന്ന സ്ഥലം.
- നിർമ്മാതാവ് വ്യക്തമാക്കിയ അറ്റാച്ച്മെൻ്റുകൾ/ആക്സസറികൾ മാത്രം ഉപയോഗിക്കുക.
- മിന്നൽ കൊടുങ്കാറ്റുകളുടെ സമയത്തോ ദീർഘനേരം ഉപയോഗിക്കാത്ത സമയത്തോ ഈ ഉപകരണം അൺപ്ലഗ് ചെയ്യുക.
- എല്ലാ സേവനങ്ങളും യോഗ്യതയുള്ള സേവന ഉദ്യോഗസ്ഥർക്ക് റഫർ ചെയ്യുക. പവർ സപ്ലൈ കോർഡ് അല്ലെങ്കിൽ പ്ലഗ് കേടാകുക, ദ്രാവകം ഒഴുകുകയോ ഉപകരണങ്ങൾ ഉപകരണത്തിലേക്ക് വീഴുകയോ ചെയ്യുക, ഉപകരണം മഴയോ ഈർപ്പമോ സമ്പർക്കം പുലർത്തുക, സാധാരണയായി പ്രവർത്തിക്കാത്തത് എന്നിങ്ങനെയുള്ള ഏതെങ്കിലും വിധത്തിൽ ഉപകരണത്തിന് കേടുപാടുകൾ സംഭവിക്കുമ്പോൾ സേവനം ആവശ്യമാണ്. , അല്ലെങ്കിൽ ഉപേക്ഷിച്ചു.
- l ചെയ്യുമ്പോൾ പ്രൊജക്ടർ ലെൻസിലേക്ക് നേരിട്ട് നോക്കരുത്amp ഓണാണ്.
പാക്കേജ് ഉള്ളടക്കം
പാക്കേജിൽ എല്ലാ ഇനങ്ങളും ഉണ്ടെന്ന് ഉറപ്പാക്കുക:
- Overmax MULTIPIC 3.5 Projector
- റിമോട്ട് കൺട്രോൾ
- പവർ കേബിൾ
- HDMI കേബിൾ
- AV Cable (RCA)
- ഉപയോക്തൃ മാനുവൽ (ഈ പ്രമാണം)
ഉൽപ്പന്നം കഴിഞ്ഞുview
Familiarize yourself with the projector's components and connection ports.

ചിത്രം 1: Overmax MULTIPIC 3.5 Projector and Remote Control. This image displays the projector from the front-right angle, showing the lens, the Overmax logo, ventilation grilles, and the included remote control.

ചിത്രം 2: Top Panel Controls. This image highlights the manual focus and keystone correction dials, along with the directional pad and function buttons on the top surface of the projector.

ചിത്രം 3: Rear Connection Panel. This view shows the AV input, two HDMI ports (HDMI1, HDMI2), and a USB port for connecting various devices.

ചിത്രം 4: Side VGA Port. This image displays the VGA (D-sub) input port located on the side of the projector, used for connecting older computers or monitors.
സജ്ജമാക്കുക
1. പ്രാരംഭ പ്ലേസ്മെന്റ്
Place the projector on a stable, flat surface or mount it on a tripod or ceiling. Ensure the projector is positioned at an appropriate distance from the projection surface to achieve the desired screen size.
2. പവർ കണക്ഷൻ
- പ്രൊജക്ടറിന്റെ പവർ ഇൻപുട്ടിലേക്ക് പവർ കേബിൾ ബന്ധിപ്പിക്കുക.
- പവർ കേബിളിന്റെ മറ്റേ അറ്റം അനുയോജ്യമായ ഒരു ഇലക്ട്രിക്കൽ ഔട്ട്ലെറ്റിലേക്ക് പ്ലഗ് ചെയ്യുക.
- ഉപകരണം ഓണാക്കാൻ പ്രൊജക്ടറിലോ റിമോട്ട് കൺട്രോളിലോ ഉള്ള പവർ ബട്ടൺ അമർത്തുക.
3. ബാഹ്യ ഉപകരണങ്ങൾ ബന്ധിപ്പിക്കുന്നു
The MULTIPIC 3.5 supports various input sources:
- എച്ച്ഡിഎംഐ: Use an HDMI cable to connect devices like laptops, Blu-ray players, or gaming consoles to the HDMI1 or HDMI2 ports.
- USB: മീഡിയ പ്ലേ ചെയ്യാൻ USB പോർട്ടിലേക്ക് ഒരു USB ഡ്രൈവ് ചേർക്കുക. fileനേരിട്ട്.
- വി.ജി.എ: Connect older computers using a VGA cable to the D-sub port.
- ഓഫ്: Use the included AV cable to connect devices with composite video and stereo audio outputs.
4. വൈഫൈ കണക്ഷൻ
To access online features like YouTube or screen mirroring, connect the projector to a Wi-Fi network.
- Navigate to the projector's settings menu.
- Select "Network" or "Wi-Fi settings".
- ലിസ്റ്റിൽ നിന്ന് നിങ്ങൾക്ക് ആവശ്യമുള്ള വൈഫൈ നെറ്റ്വർക്ക് തിരഞ്ഞെടുക്കുക.
- ആവശ്യപ്പെടുകയാണെങ്കിൽ നെറ്റ്വർക്ക് പാസ്വേഡ് നൽകുക.

ചിത്രം 5: Projector Wi-Fi Connectivity. This image illustrates the projector's ability to connect wirelessly to a Wi-Fi router for internet access and streaming.
5. Screen Mirroring (Miracast / AirPlay)
The projector supports wireless display from compatible smartphones, tablets, and computers.
- Ensure both the projector and your mobile device are connected to the same Wi-Fi network.
- On the projector, select the Miracast or AirPlay input source.
- On your mobile device, activate the screen mirroring function (e.g., "Smart View" ആൻഡ്രോയിഡിൽ, "സ്ക്രീൻ മിററിംഗ്" iOS-ൽ).
- ലഭ്യമായ ഉപകരണങ്ങളുടെ പട്ടികയിൽ നിന്ന് പ്രൊജക്ടർ തിരഞ്ഞെടുക്കുക.
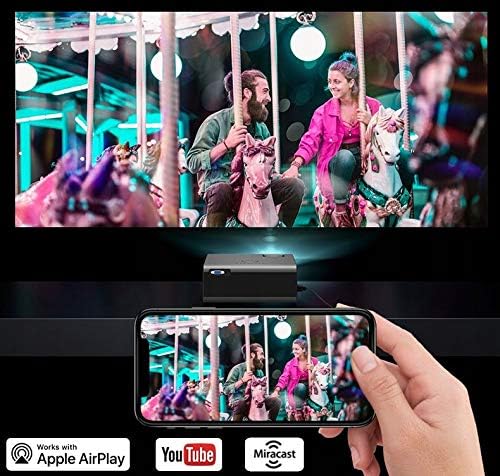
ചിത്രം 6: Wireless Screen Mirroring. This image demonstrates a smartphone wirelessly casting its display to the projector, utilizing Miracast or AirPlay functionality.
പ്രവർത്തന നിർദ്ദേശങ്ങൾ
1. അടിസ്ഥാന നിയന്ത്രണങ്ങൾ
The projector can be controlled using the on-device buttons or the included remote control.
- പവർ ബട്ടൺ: പ്രൊജക്ടർ ഓണാക്കുകയോ ഓഫാക്കുകയോ ചെയ്യുന്നു.
- ഉറവിട ബട്ടൺ: Cycles through input sources (HDMI1, HDMI2, USB, VGA, AV, Miracast/AirPlay).
- നാവിഗേഷൻ ബട്ടണുകൾ (മുകളിലേക്ക്/താഴേക്ക്/ഇടത്/വലത്/ശരി): മെനുകൾ നാവിഗേറ്റ് ചെയ്യുന്നതിനും തിരഞ്ഞെടുപ്പുകൾ സ്ഥിരീകരിക്കുന്നതിനും ഉപയോഗിക്കുന്നു.
- മെനു ബട്ടൺ: പ്രധാന ക്രമീകരണ മെനുവിലേക്ക് പ്രവേശിക്കുന്നു.
- ബാക്ക്/എക്സിറ്റ് ബട്ടൺ: മുമ്പത്തെ സ്ക്രീനിലേക്ക് മടങ്ങുന്നു അല്ലെങ്കിൽ നിലവിലെ മെനുവിൽ നിന്ന് പുറത്തുകടക്കുന്നു.
2 ചിത്ര ക്രമീകരണം
- ഫോക്കസ്: Rotate the focus ring on the projector lens (refer to Figure 2) until the image appears sharp and clear.
- കീസ്റ്റോൺ തിരുത്തൽ: Adjust the keystone dial (refer to Figure 2) to correct trapezoidal distortion if the projector is not perfectly perpendicular to the screen.
- വീക്ഷണ അനുപാതം: In the settings menu, you can change the aspect ratio between 16:9 and 4:3 to match your content. The image can also be rotated 180 degrees for ceiling mounting.

ചിത്രം 7: Display Resolution Example. This image illustrates the native 1280x720 resolution capability of the projector, providing clear visuals.
3. ഓഡിയോ ക്രമീകരണങ്ങൾ
The built-in speaker can be adjusted for different audio profiles:
- Access the audio settings in the main menu.
- Select from three preset modes: Music, Voice, or Movie.
- An advanced equalizer is available for fine-tuning audio parameters.
- For external audio, connect speakers or headphones to the audio output port.
4. Using Built-in Applications
The projector comes with pre-installed applications like YouTube and KoalaTV.
- Ensure the projector is connected to a Wi-Fi network.
- From the main interface, select the desired application icon.
- Use the remote control to navigate and select content within the application.
മെയിൻ്റനൻസ്
1. എൽamp ജീവിതം
പ്രൊജക്ടർ എൽamp is designed for extended operation, with an estimated lifespan of up to 50,000 hours. No regular lamp replacement is typically required under normal usage conditions.

ചിത്രം 8: Internal Optical System. This diagram illustrates the sophisticated optical components and light path within the projector, contributing to its image quality and lamp ദീർഘായുസ്സ്.
2. വൃത്തിയാക്കൽ
- ലെൻസ്: Gently wipe the projector lens with a soft, lint-free cloth specifically designed for optical surfaces. Do not use abrasive cleaners.
- പുറം: Clean the projector's exterior with a soft, dry cloth. For stubborn marks, a slightly damp തുണി ഉപയോഗിക്കാം, തുടർന്ന് ഉണങ്ങിയ തുണി ഉപയോഗിക്കാം.
- വെന്റിലേഷൻ ഓപ്പണിംഗുകൾ: Periodically check and clean the ventilation grilles to prevent dust buildup, which can affect performance and lifespan. Use a soft brush or compressed air.
ട്രബിൾഷൂട്ടിംഗ്
| പ്രശ്നം | സാധ്യമായ കാരണം | പരിഹാരം |
|---|---|---|
| ചിത്രമൊന്നും പ്രദർശിപ്പിച്ചിട്ടില്ല | Power not connected; Incorrect input source; Cable not properly connected. | Check power cable; Select correct input source (HDMI, USB, VGA, AV); Ensure all cables are securely connected. |
| ചിത്രം മങ്ങിയതാണ് | ഫോക്കസ് ക്രമീകരിച്ചിട്ടില്ല; പ്രൊജക്ടർ സ്ക്രീനിൽ നിന്ന് വളരെ അടുത്താണ്/അകലെയാണ്. | Adjust the focus ring on the lens; Reposition the projector for optimal distance. |
| ചിത്രം ട്രപസോയിഡൽ ആണ് | Keystone not corrected. | കീസ്റ്റോൺ കറക്ഷൻ ഡയൽ ക്രമീകരിക്കുക. |
| ശബ്ദമില്ല | Volume too low; Muted; Incorrect audio output selected; External device audio issue. | Increase volume; Unmute; Check audio settings; Verify audio output on connected device. |
| Wi-Fi കണക്ഷൻ അസ്ഥിരമാണ് | Weak signal; Incorrect password; Router issue. | Ensure projector is within Wi-Fi range; Re-enter password; Restart router and projector. |
| റിമോട്ട് കൺട്രോൾ പ്രവർത്തിക്കുന്നില്ല | Batteries depleted; Obstruction between remote and projector; Remote sensor blocked. | Replace batteries; Remove obstructions; Ensure remote is pointed at the projector's IR sensor. |
സ്പെസിഫിക്കേഷനുകൾ
| ഫീച്ചർ | വിശദാംശങ്ങൾ |
|---|---|
| മോഡൽ | MULTIPIC 3.5 |
| ബ്രാൻഡ് | ഓവർമാക്സ് |
| ഡിസ്പ്ലേ ടെക്നോളജി | എൽഇഡി |
| നേറ്റീവ് റെസല്യൂഷൻ | 1280 x 720 (HD) |
| പിന്തുണയുള്ള റെസല്യൂഷൻ | Up to 1920 x 1080 (Full HD) |
| തെളിച്ചം | 2200 ല്യൂമെൻസ് |
| കോൺട്രാസ്റ്റ് റേഷ്യോ | 1500:1 |
| പരമാവധി ഇമേജ് വലുപ്പം | 150 ഇഞ്ച് |
| Lamp ജീവിതം | 50,000 മണിക്കൂർ വരെ |
| കണക്റ്റിവിറ്റി | 2x HDMI, 1x USB, 1x VGA (D-sub), 1x AV, Wi-Fi, Bluetooth, IR |
| പ്രത്യേക സവിശേഷതകൾ | Built-in Wi-Fi, YouTube, Miracast, AirPlay, Keystone Correction, Advanced Equalizer |
| പിന്തുണയ്ക്കുന്ന മീഡിയ ഫോർമാറ്റുകൾ | MPEG4, DIVX, XVID, AVI, WMA, MP3, JPEG, BMP, PNG, MOV |
| വീക്ഷണാനുപാതം | 16:9, 4:3 |
| അളവുകൾ (L x W x H) | 21.5 x 18.5 x 8.7 സെ.മീ |
| ഭാരം | 1.5 കി.ഗ്രാം |
| മൗണ്ടിംഗ് തരം | Tripod, Ceiling Mount |
വാറൻ്റിയും പിന്തുണയും
For warranty information and technical support, please refer to the official Overmax webസൈറ്റിൽ ബന്ധപ്പെടുക അല്ലെങ്കിൽ അവരുടെ ഉപഭോക്തൃ സേവനവുമായി നേരിട്ട് ബന്ധപ്പെടുക. വാങ്ങിയതിന്റെ തെളിവായി നിങ്ങളുടെ വാങ്ങൽ രസീത് സൂക്ഷിക്കുക.
കൂടുതൽ സഹായത്തിന്, ദയവായി സന്ദർശിക്കുക Overmax official webസൈറ്റ്.


