1. ആമുഖം
This manual provides detailed instructions for the installation, operation, and maintenance of your Phanteks Eclipse P500 Air Mid Tower Computer Case. Please read this manual thoroughly before beginning assembly or use to ensure proper functionality and safety.
The Phanteks Eclipse P500 Air is a mid-tower chassis designed for high airflow performance and versatile component support, including ATX, Micro ATX, Mini ITX, and E-ATX motherboards. It features a steel chassis with a tempered glass side panel and comes with three pre-installed 140mm D-RGB fans in the front.

ചിത്രം 1: മുൻഭാഗം view of the Phanteks Eclipse P500 Air Mid Tower Computer Case.
2. സജ്ജീകരണവും ഇൻസ്റ്റാളേഷനും
Follow these steps to install your computer components into the Phanteks Eclipse P500 Air chassis.
2.1 പായ്ക്ക് ചെയ്യലും പ്രാരംഭ പരിശോധനയും
- Carefully remove the chassis from its packaging.
- Inspect the chassis for any signs of damage during transit.
- Ensure all accessories (screws, cable ties, manual) are present.

ചിത്രം 2: പൊട്ടിത്തെറിച്ചു view showing removable panels and components for assembly.
2.2 സൈഡ് പാനലുകൾ നീക്കം ചെയ്യൽ
The tempered glass side panel is hinged and secured with magnets. Gently pull the panel open to access the interior. The solid side panel can be removed by unscrewing the thumbscrews at the rear and sliding it off.
2.3 മദർബോർഡ് ഇൻസ്റ്റാളേഷൻ
- Install the necessary motherboard standoffs for your motherboard form factor (ATX, Micro ATX, Mini ITX, E-ATX).
- നിങ്ങളുടെ മദർബോർഡ് സ്റ്റാൻഡ്ഓഫുകളിൽ ശ്രദ്ധാപൂർവ്വം സ്ഥാപിച്ച് സ്ക്രൂകൾ ഉപയോഗിച്ച് ഉറപ്പിക്കുക.

ചിത്രം 3: ഇൻ്റീരിയർ view of the chassis, illustrating motherboard mounting area and fan locations.
2.4 സ്റ്റോറേജ് ഡ്രൈവ് ഇൻസ്റ്റലേഷൻ
The case supports up to 10 x 3.5" internal bays and 3 x 2.5" internal bays.
- 3.5" Drives: Utilize the drive cages located in the PSU shroud area or behind the motherboard tray.
- 2.5" Drives: Mount 2.5" SSDs/HDDs to the dedicated brackets behind the motherboard tray.

ചിത്രം 4: പിൻഭാഗം view, highlighting cable management channels and 2.5" drive mounts.
2.5 പവർ സപ്ലൈ ഇൻസ്റ്റലേഷൻ
Install your ATX power supply into the dedicated compartment at the bottom rear of the chassis. Secure it with screws from the rear.
2.6 ഗ്രാഫിക്സ് കാർഡും എക്സ്പാൻഷൻ കാർഡ് ഇൻസ്റ്റാളേഷനും
- Remove the necessary PCI slot covers from the rear of the chassis.
- Insert your graphics card or other expansion cards into the motherboard's PCIe slots and secure them with screws.
- The case supports 7+3 PCI slots, allowing for vertical GPU mounting with an optional riser cable (not included).

Figure 5: Rear exterior view, detailing the PCI expansion slots and rear fan mount.
2.7 കേബിൾ മാനേജ്മെന്റ്
Utilize the integrated Velcro straps and cable ties provided to route and secure cables behind the motherboard tray. This improves airflow and aesthetics.
3. ഓപ്പറേഷൻ
The Phanteks Eclipse P500 Air features convenient front I/O ports and integrated D-RGB lighting controls.
3.1 ഫ്രണ്ട് I/O പാനൽ
The top front panel provides access to essential controls and ports:
- പവർ ബട്ടൺ: സിസ്റ്റം ഓൺ അല്ലെങ്കിൽ ഓഫ് ചെയ്യാൻ.
- LED Mode Button: Cycles through various D-RGB lighting effects.
- LED Color Button: Changes the color of the D-RGB lighting.
- 2 x USB 3.0 പോർട്ടുകൾ: For connecting USB 3.0 devices.
- മൈക്രോഫോൺ ജാക്ക്: ഓഡിയോ ഇൻപുട്ടിനായി.
- ഹെഡ്ഫോൺ ജാക്ക്: ഓഡിയോ ഔട്ട്പുട്ടിനായി.

Figure 6: Close-up of the top front I/O panel, showing USB ports, audio jacks, and LED controls.
3.2 D-RGB ലൈറ്റിംഗ് നിയന്ത്രണം
The three pre-installed 140mm D-RGB fans are controlled via the integrated D-RGB controller. Use the LED Mode and LED Color buttons on the front I/O panel to customize the lighting. The D-RGB lighting can also be optionally synchronized with compatible motherboards and software.
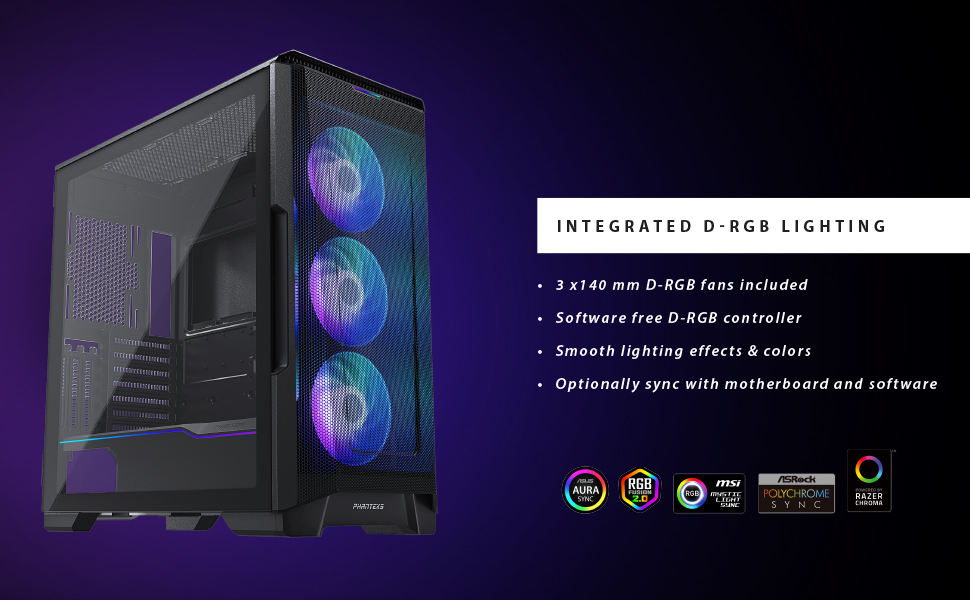
Figure 7: Illustration of the integrated D-RGB lighting effects on the front fans.
4. പരിപാലനം
Regular maintenance helps ensure optimal performance and longevity of your computer case.
4.1 പൊടി ഫിൽറ്റർ വൃത്തിയാക്കൽ
The Eclipse P500 Air features integrated dust filters on the front, top, and bottom (PSU intake) to prevent dust buildup. Regularly clean these filters to maintain optimal airflow.
- ഫ്രണ്ട് ഫിൽട്ടർ: The front mesh panel acts as a dust filter. It can be removed for cleaning.
- Top Filter: The magnetic top filter can be easily lifted off for cleaning.
- Bottom Filter: The PSU intake filter slides out from the rear for cleaning.
Use compressed air or a soft brush to remove accumulated dust. Do not use harsh chemicals or abrasive materials.
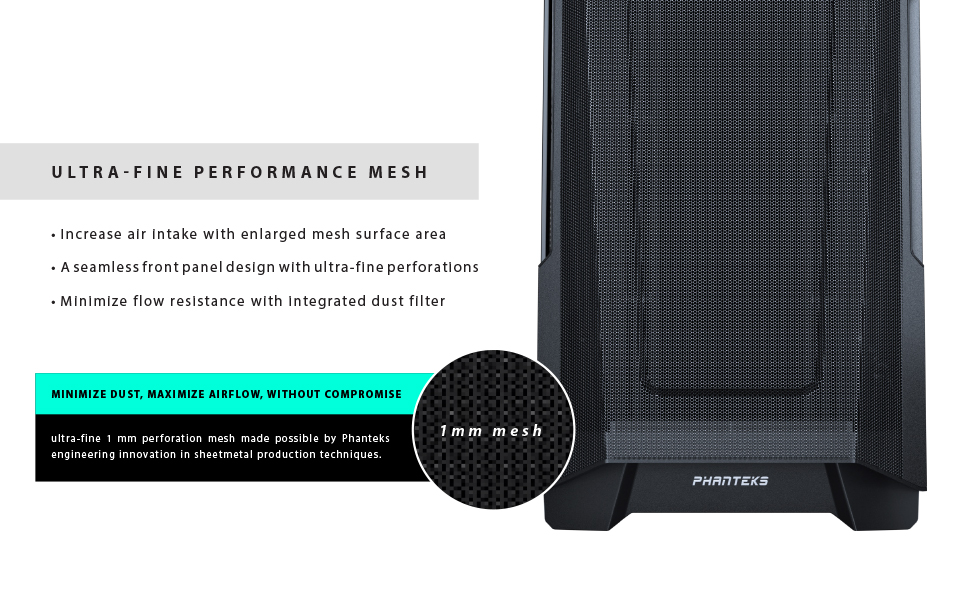
Figure 8: Detail of the ultra-fine mesh front panel, designed for dust filtration and airflow.
4.2 പൊതുവായ ശുചീകരണം
കേസിന്റെ പുറം പ്രതലങ്ങൾ മൃദുവായ, d തുണി ഉപയോഗിച്ച് തുടയ്ക്കുക.amp cloth. Avoid direct contact with electronic components inside the case.
5. പ്രശ്നപരിഹാരം
This section addresses common issues you might encounter during the setup or operation of your Phanteks Eclipse P500 Air case.
- സിസ്റ്റം ഓണാക്കുന്നില്ല:
- പവർ സപ്ലൈ വാൾ ഔട്ട്ലെറ്റുമായി ശരിയായി ബന്ധിപ്പിച്ചിട്ടുണ്ടെന്നും സ്വിച്ച് ഓൺ ചെയ്തിട്ടുണ്ടെന്നും ഉറപ്പാക്കുക.
- Verify that the power switch cable from the case is correctly connected to the motherboard's front panel header.
- എല്ലാ ആന്തരിക പവർ കണക്ഷനുകളും പരിശോധിക്കുക (24-പിൻ ATX, 8-പിൻ CPU, GPU-വേണ്ടിയുള്ള PCIe പവർ).
- D-RGB Fans Not Lighting Up:
- Confirm that the D-RGB cables from the fans are correctly connected to the integrated D-RGB controller or your motherboard's D-RGB header.
- Press the LED Mode and LED Color buttons on the front I/O panel to cycle through effects and colors.
- If connected to the motherboard, ensure the motherboard's RGB software is installed and configured correctly.
- മോശം വായുപ്രവാഹം/ഉയർന്ന താപനില:
- Clean all dust filters (front, top, bottom).
- Ensure fans are oriented correctly for optimal airflow (front intake, rear/top exhaust).
- Verify that no cables are obstructing airflow inside the case.
- Front USB Ports Not Functioning:
- Check that the USB 3.0 header cable from the case is securely connected to the corresponding header on your motherboard.
6 സ്പെസിഫിക്കേഷനുകൾ
Below are the detailed specifications for the Phanteks Eclipse P500 Air Mid Tower Computer Case (PH-EC500ATG_DWT01).
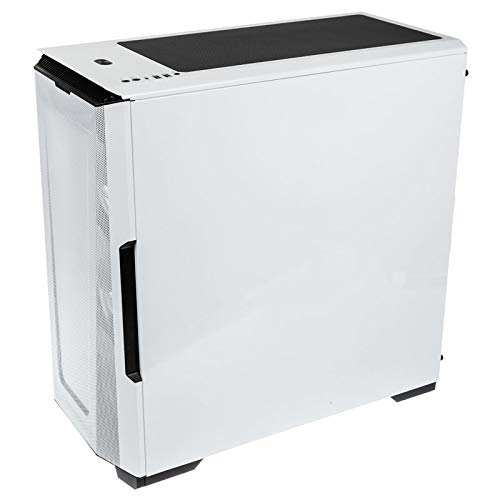
Figure 9: Manufacturer's specification table for the Eclipse P500 Air.
| ഫീച്ചർ | വിശദാംശങ്ങൾ |
|---|---|
| മോഡൽ നമ്പർ | PH-EC500ATG_DWT01 |
| ഫോം ഫാക്ടർ | മിഡ് ടവർ |
| അളവുകൾ (LxWxH) | 240 x 510 x 505 മിമി (9.45 x 20.1 x 19.9 ഇഞ്ച്) |
| മെറ്റീരിയലുകൾ | സ്റ്റീൽ ചേസിസ്, ടെമ്പർഡ് ഗ്ലാസ് |
| മദർബോർഡ് പിന്തുണ | E-ATX (up to 280mm wide), ATX, Micro ATX, Mini ITX, Mini ITX |
| ഫ്രണ്ട് I/O | 2 x USB 3.0, Microphone, Headphone, Power Button, LED Mode Button, LED Color Button |
| Internal 3.5" Bay | 10 (2x included, also supports 2.5" drives) |
| Internal 2.5" Bay | 3 (3x ഉൾപ്പെടെ) |
| പിസിഐ സ്ലോട്ടുകൾ | 7 + 3 (vertical) |
| മുൻകൂട്ടി ഇൻസ്റ്റാൾ ചെയ്ത ഫാനുകൾ | 3 x 140mm D-RGB fans (Front) |
| ഫാൻ സപ്പോർട്ട് (മുന്നിൽ) | 3 x 120 മിമി അല്ലെങ്കിൽ 3 x 140 മിമി |
| ആരാധക പിന്തുണ (മുകളിൽ) | 3 x 120 മിമി അല്ലെങ്കിൽ 2 x 140 മിമി |
| ഫാൻ സപ്പോർട്ട് (പിൻഭാഗം) | 1 x 120 മിമി അല്ലെങ്കിൽ 1 x 140 മിമി |
| റേഡിയേറ്റർ സപ്പോർട്ട് (ഫ്രണ്ട്) | Up to 360mm or 420mm |
| റേഡിയേറ്റർ സപ്പോർട്ട് (മുകളിൽ) | Up to 360mm or 280mm |
| റേഡിയേറ്റർ സപ്പോർട്ട് (പിൻഭാഗം) | 120 മിമി അല്ലെങ്കിൽ 140 മിമി |
| ജിപിയു ക്ലിയറൻസ് | 435 എംഎം / 17.2 ഇഞ്ച് |
| സിപിയു കൂളർ ഉയരം | 190 എംഎം / 7.5 ഇഞ്ച് |
| PSU ദൈർഘ്യം | 195 mm (250 mm if 2 HDD brackets are removed) |
| മൊത്തം ഭാരം | 8 കി.ഗ്രാം / 17.6 പൗണ്ട് |
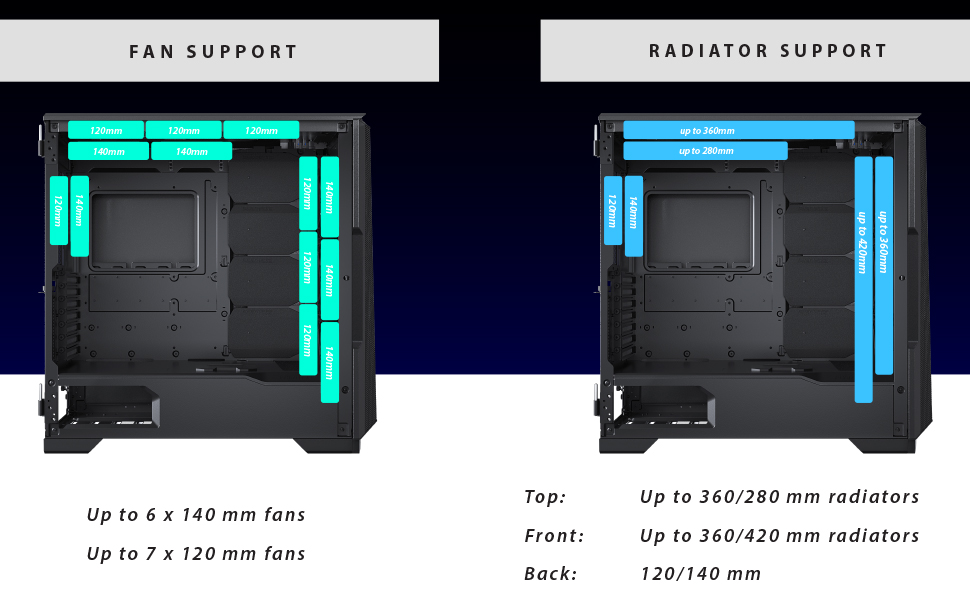
Figure 10: Visual representation of fan and radiator mounting options within the chassis.
7. വാറൻ്റിയും പിന്തുണയും
Phanteks provides a manufacturer's warranty for this product.
- വാറൻ്റി കാലയളവ്: 5 Years Manufacturer Warranty.
- For warranty claims or technical support, please contact Phanteks customer service or visit their official webസൈറ്റ്.
- വാറന്റി സാധൂകരണത്തിനായി നിങ്ങളുടെ വാങ്ങിയതിന്റെ തെളിവ് സൂക്ഷിക്കുക.
For further assistance, refer to the official Phanteks webസൈറ്റ് അല്ലെങ്കിൽ അവരുടെ പിന്തുണാ ചാനലുകളുമായി ബന്ധപ്പെടുക.


