പ്രധാനപ്പെട്ട സുരക്ഷാ വിവരങ്ങൾ
Please read these safety instructions carefully before using your GIGABYTE G27QC monitor. Keep this manual for future reference.
- തീപിടുത്തമോ ഷോക്കോ മൂലമുള്ള അപകടങ്ങൾ ഒഴിവാക്കാൻ മോണിറ്ററിനെ മഴയിലോ ഈർപ്പത്തിലോ തുറന്നുവെക്കരുത്.
- മോണിറ്റർ തുറക്കരുത് casing. ഉള്ളിൽ ഉപയോക്തൃ-സേവനയോഗ്യമായ ഭാഗങ്ങളൊന്നുമില്ല. എല്ലാ സേവനങ്ങളും യോഗ്യതയുള്ള സേവന ഉദ്യോഗസ്ഥരെ ഏൽപ്പിക്കുക.
- ശരിയായ വായുസഞ്ചാരം ഉറപ്പാക്കുക. വായുസഞ്ചാര ദ്വാരങ്ങൾ തടയരുത്.
- Use only the power adapter and cables provided by GIGABYTE.
- വീഴാതിരിക്കാൻ മോണിറ്റർ ഒരു സ്ഥിരതയുള്ളതും പരന്നതുമായ പ്രതലത്തിൽ വയ്ക്കുക.
- ഇടിമിന്നൽ ഉണ്ടാകുമ്പോഴോ ദീർഘനേരം ഉപയോഗിക്കാതിരിക്കുമ്പോഴോ പവർ ഔട്ട്ലെറ്റിൽ നിന്ന് മോണിറ്റർ ഊരിമാറ്റുക.
- Clean the screen with a soft, lint-free cloth. Avoid using liquid cleaners directly on the screen.
സജ്ജീകരണ ഗൈഡ്
പാക്കേജ് ഉള്ളടക്കം
പാക്കേജിൽ എല്ലാ ഇനങ്ങളും ഉണ്ടെന്ന് ഉറപ്പാക്കുക:
- GIGABYTE G27QC Monitor
- പവർ കേബിൾ
- HDMI കേബിൾ
- ഡിസ്പ്ലേപോർട്ട് (DP) കേബിൾ
- USB cable (Type-B to Type-A)
- ദ്രുത ആരംഭ ഗൈഡ് (QSG)
- വാറൻ്റി കാർഡ്
അസംബ്ലി നിർദ്ദേശങ്ങൾ
Follow these steps to assemble the monitor stand and base:
- മോണിറ്റർ അതിന്റെ പാക്കേജിംഗിൽ നിന്ന് ശ്രദ്ധാപൂർവ്വം നീക്കം ചെയ്യുക, അത് സംരക്ഷിതമായി സൂക്ഷിക്കുക.
- മോണിറ്റർ പാനലിൽ സ്റ്റാൻഡ് നെക്ക് ഘടിപ്പിക്കുക. അത് സുരക്ഷിതമായി സ്ഥലത്ത് ക്ലിക്ക് ചെയ്യുന്നുണ്ടെന്ന് ഉറപ്പാക്കുക.
- Attach the base to the stand neck and tighten the screws to secure it.
- കൂട്ടിച്ചേർത്ത മോണിറ്റർ ഒരു സ്ഥിരതയുള്ളതും പരന്നതുമായ പ്രതലത്തിൽ സ്ഥാപിക്കുക.

ചിത്രം: പിൻഭാഗം view of the GIGABYTE G27QC monitor showing the stand attachment.

ചിത്രം: സൈഡ് പ്രോfile of the GIGABYTE G27QC monitor, illustrating its slim design and stand.
മോണിറ്റർ ബന്ധിപ്പിക്കുന്നു
നിങ്ങളുടെ കമ്പ്യൂട്ടറിലേക്കും പവർ സ്രോതസ്സിലേക്കും മോണിറ്റർ ബന്ധിപ്പിക്കുക:
- പവർ കേബിൾ മോണിറ്ററിന്റെ പവർ ഇൻപുട്ടിലേക്കും തുടർന്ന് ഒരു പവർ ഔട്ട്ലെറ്റിലേക്കും ബന്ധിപ്പിക്കുക.
- For video input, connect either the DisplayPort cable (for 165Hz at 1440p) or an HDMI cable (for up to 144Hz at 1440p) from your computer's graphics card to the corresponding port on the monitor.
- Connect the USB cable (Type-B end to the monitor, Type-A end to your computer) to enable the monitor's USB 3.0 hub and OSD Sidekick software functionality.

ചിത്രം: പിൻഭാഗം view of the GIGABYTE G27QC monitor, highlighting the various input ports for connectivity.
മോണിറ്റർ പ്രവർത്തിക്കുന്നു
പവർ ചെയ്യുന്നത് ഓൺ/ഓഫ്
മോണിറ്റർ ഓണാക്കാനോ ഓഫാക്കാനോ അതിൽ സ്ഥിതിചെയ്യുന്ന പവർ ബട്ടൺ അമർത്തുക. മോണിറ്റർ സജീവമാകുമ്പോൾ പവർ ഇൻഡിക്കേറ്റർ ലൈറ്റ് പ്രകാശിക്കും.
ഓൺ-സ്ക്രീൻ ഡിസ്പ്ലേ (OSD) നാവിഗേഷൻ
The monitor features an intuitive OSD menu for adjusting settings. Use the joystick/buttons on the back or bottom of the monitor to navigate the menu. Alternatively, install the GIGABYTE OSD Sidekick software on your PC for convenient adjustments via your mouse and keyboard.

Image: Screenshot of the GIGABYTE OSD Sidekick software interface, allowing PC-based control of monitor settings.
ഡിസ്പ്ലേ ക്രമീകരണങ്ങൾ ക്രമീകരിക്കുന്നു
Key settings to adjust for optimal performance:
- റെസലൂഷൻ: Set to 2560x1440 for native QHD display.
- പുതുക്കൽ നിരക്ക്: Ensure your graphics card output is set to 165Hz for the smoothest experience.
- എഎംഡി ഫ്രീസിങ്ക് പ്രീമിയം പ്രോ: Enable this feature in both the monitor OSD and your graphics card control panel for tear-free gaming.
- വർണ്ണ ക്രമീകരണങ്ങൾ: Adjust brightness, contrast, gamma, and color temperature to your preference. The monitor supports 92% DCI-P3 (120% sRGB) color gamut.
- HDR: Enable HDR in your operating system and monitor settings for compatible content.
- Tactical Features: Explore features like Aim Stabilizer, Black Equalizer, and Dashboard through the OSD or OSD Sidekick for enhanced gaming.

Image: Illustration of the Aim Stabilizer feature, designed to reduce motion blur in fast-paced games.

Image: Visual representation of the Black Equalizer feature, enhancing visibility in dark areas without overexposing bright ones.

Image: Display of the Dashboard feature, showing real-time hardware information on screen.
എർഗണോമിക് അഡ്ജസ്റ്റ്മെന്റുകൾ
മോണിറ്റർ സ്റ്റാൻഡ് എർഗണോമിക് ക്രമീകരണങ്ങൾ അനുവദിക്കുന്നു:
- ടിൽറ്റ്: Adjust the screen's vertical angle for comfortable viewing.
- ഉയരം: Raise or lower the monitor to eye level to reduce neck strain.
- വെസ മൗണ്ട്: The monitor is compatible with 100x100mm VESA mounts for alternative mounting solutions.
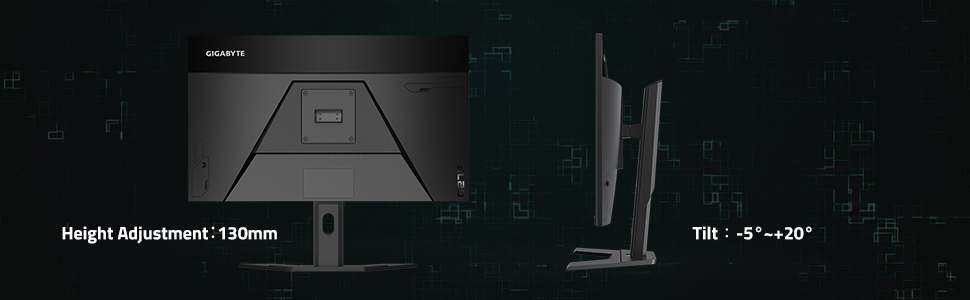
Image: Diagram illustrating the ergonomic tilt and height adjustment capabilities of the monitor stand.
മെയിൻ്റനൻസ്
മോണിറ്റർ വൃത്തിയാക്കൽ
മോണിറ്റർ സ്ക്രീൻ വൃത്തിയാക്കാൻ സി.asing:
- വൃത്തിയാക്കുന്നതിന് മുമ്പ് എപ്പോഴും മോണിറ്റർ അൺപ്ലഗ് ചെയ്യുക.
- മൃദുവായ, ലിൻ്റ് രഹിത തുണി ഉപയോഗിക്കുകampവെള്ളം അല്ലെങ്കിൽ ഉരച്ചിലുകളില്ലാത്ത സ്ക്രീൻ ക്ലീനർ ഉപയോഗിച്ച് നനയ്ക്കുക.
- സ്ക്രീനിലേക്കോ ഏതെങ്കിലും ദ്വാരങ്ങളിലേക്കോ നേരിട്ട് ദ്രാവകം തളിക്കരുത്.
- Avoid using benzene, thinner, ammonia-based cleaners, or abrasive pads.
സംഭരണം
When storing the monitor for an extended period, ensure it is powered off, unplugged, and stored in a cool, dry place away from direct sunlight and extreme temperatures. Use original packaging if available for best protection.
ട്രബിൾഷൂട്ടിംഗ്
നിങ്ങളുടെ മോണിറ്ററിൽ പ്രശ്നങ്ങൾ നേരിടുകയാണെങ്കിൽ, ഇനിപ്പറയുന്ന പൊതുവായ പ്രശ്നങ്ങളും പരിഹാരങ്ങളും പരിശോധിക്കുക:
പവർ ഇല്ല
- മോണിറ്ററിലേക്കും പവർ ഔട്ട്ലെറ്റിലേക്കും പവർ കേബിൾ സുരക്ഷിതമായി ബന്ധിപ്പിച്ചിട്ടുണ്ടോയെന്ന് പരിശോധിക്കുക.
- പവർ ഔട്ട്ലെറ്റ് ശരിയായി പ്രവർത്തിക്കുന്നുണ്ടോയെന്ന് പരിശോധിക്കുക.
- മോണിറ്ററിന്റെ പവർ ബട്ടൺ അമർത്തിയെന്ന് ഉറപ്പാക്കുക.
സിഗ്നൽ ഇല്ല / ശൂന്യമായ സ്ക്രീൻ
- Confirm that the video cable (DisplayPort or HDMI) is securely connected to both the monitor and your computer's graphics card.
- നിങ്ങളുടെ കമ്പ്യൂട്ടർ ഓണാണെന്നും സ്ലീപ്പ് മോഡിലല്ലെന്നും ഉറപ്പാക്കുക.
- Try a different video input port on the monitor and select it via the OSD menu.
- Test with a different video cable if possible.
Flickering or Distorted Image
- വീഡിയോ കേബിളിന് കേടുപാടുകൾ സംഭവിച്ചിട്ടുണ്ടോ അല്ലെങ്കിൽ കണക്ഷനുകൾ അയഞ്ഞിട്ടുണ്ടോ എന്ന് പരിശോധിക്കുക.
- നിങ്ങളുടെ ഗ്രാഫിക്സ് കാർഡ് ഡ്രൈവറുകൾ കാലികമാണെന്ന് ഉറപ്പാക്കുക.
- Adjust the refresh rate in your operating system display settings.
- Disable AMD FreeSync Premium Pro temporarily to see if it resolves the issue.
Ghosting or Motion Blur
- Adjust the "Overdrive" or "Response Time" setting in the monitor's OSD menu. Experiment with different levels (e.g., "Balanced") to find the optimal setting for your usage.
- Ensure the refresh rate is set correctly.
സാങ്കേതിക സവിശേഷതകൾ
| ഫീച്ചർ | സ്പെസിഫിക്കേഷൻ |
|---|---|
| മോഡൽ | G27QC |
| സ്ക്രീൻ വലിപ്പം | 27 ഇഞ്ച് |
| പാനൽ തരം | VA ഡിസ്പ്ലേ |
| റെസലൂഷൻ | 2560 x 1440 (QHD) |
| പുതുക്കിയ നിരക്ക് | 165Hz |
| പ്രതികരണ സമയം | 1ms (MPRT) |
| വക്രത | Native 1500R |
| വർണ്ണ ഗാമറ്റ് | 92% DCI-P3 / 120% sRGB |
| HDR പിന്തുണ | HDR റെഡി |
| അഡാപ്റ്റീവ് സമന്വയം | എഎംഡി ഫ്രീസിങ്ക് പ്രീമിയം പ്രോ |
| വീഡിയോ ഇൻപുട്ടുകൾ | 1x ഡിസ്പ്ലേ പോർട്ട് 1.4, 2x HDMI 2.0 |
| USB പോർട്ടുകൾ | 2x USB 3.0 |
| സ്പീക്കറുകൾ | 2 x 2W |
| വെസെ മൌണ്ട് | 100x100 മി.മീ |
| അളവുകൾ (LxWxH) | 14.54 x 24.17 x 2.89 ഇഞ്ച് (സ്റ്റാൻഡ് ഇല്ലാതെ) |
| ഭാരം | 20.9 പൗണ്ട് |

Image: Diagram showing the physical dimensions of the GIGABYTE G27QC monitor.
വാറൻ്റിയും പിന്തുണയും
വാറൻ്റി വിവരങ്ങൾ
The GIGABYTE G27QC monitor typically comes with a 3 വർഷത്തെ വാറൻ്റി covering both labor and parts. Please refer to the included warranty card for specific terms, conditions, and registration details applicable to your region.
ഉപഭോക്തൃ പിന്തുണ
For further assistance, technical support, or to download the latest drivers and OSD Sidekick software, please visit the official GIGABYTE webസൈറ്റ്:
You may also find helpful resources and FAQs on the product support page for your specific model.


