പ്രധാനപ്പെട്ട സുരക്ഷാ വിവരങ്ങൾ
Please read this manual carefully before using the camcorder. Keep this manual for future reference.
- Do not expose the camcorder to water or moisture.
- Avoid dropping or subjecting the camcorder to strong impacts.
- നിർദ്ദിഷ്ട ബാറ്ററികളും ചാർജിംഗ് ആക്സസറികളും മാത്രം ഉപയോഗിക്കുക.
- Keep the camcorder away from extreme temperatures and direct sunlight.
- Do not attempt to disassemble or repair the camcorder yourself. Contact customer support for assistance.
പാക്കേജ് ഉള്ളടക്കം
പാക്കേജിൽ എല്ലാ ഇനങ്ങളും ഉണ്ടെന്ന് ഉറപ്പാക്കുക:
- 1 x 2.7K Video Camera Camcorder
- 1 x ബാഹ്യ മൈക്രോഫോൺ
- 1 x റിമോട്ട് കൺട്രോൾ
- 1 x 32G SD Card
- 1 x ചുമക്കുന്ന ബാഗ്
- 1 x USB കേബിൾ
- 1 x ഉപയോക്തൃ മാനുവൽ
- 2 x 1500mAh റീചാർജ് ചെയ്യാവുന്ന ബാറ്ററികൾ

ഉൽപ്പന്നം കഴിഞ്ഞുview
പ്രധാന സവിശേഷതകൾ
- HD 4K Video & 48 Megapixel Images: Supports high-resolution video recording and crystal-clear still images.
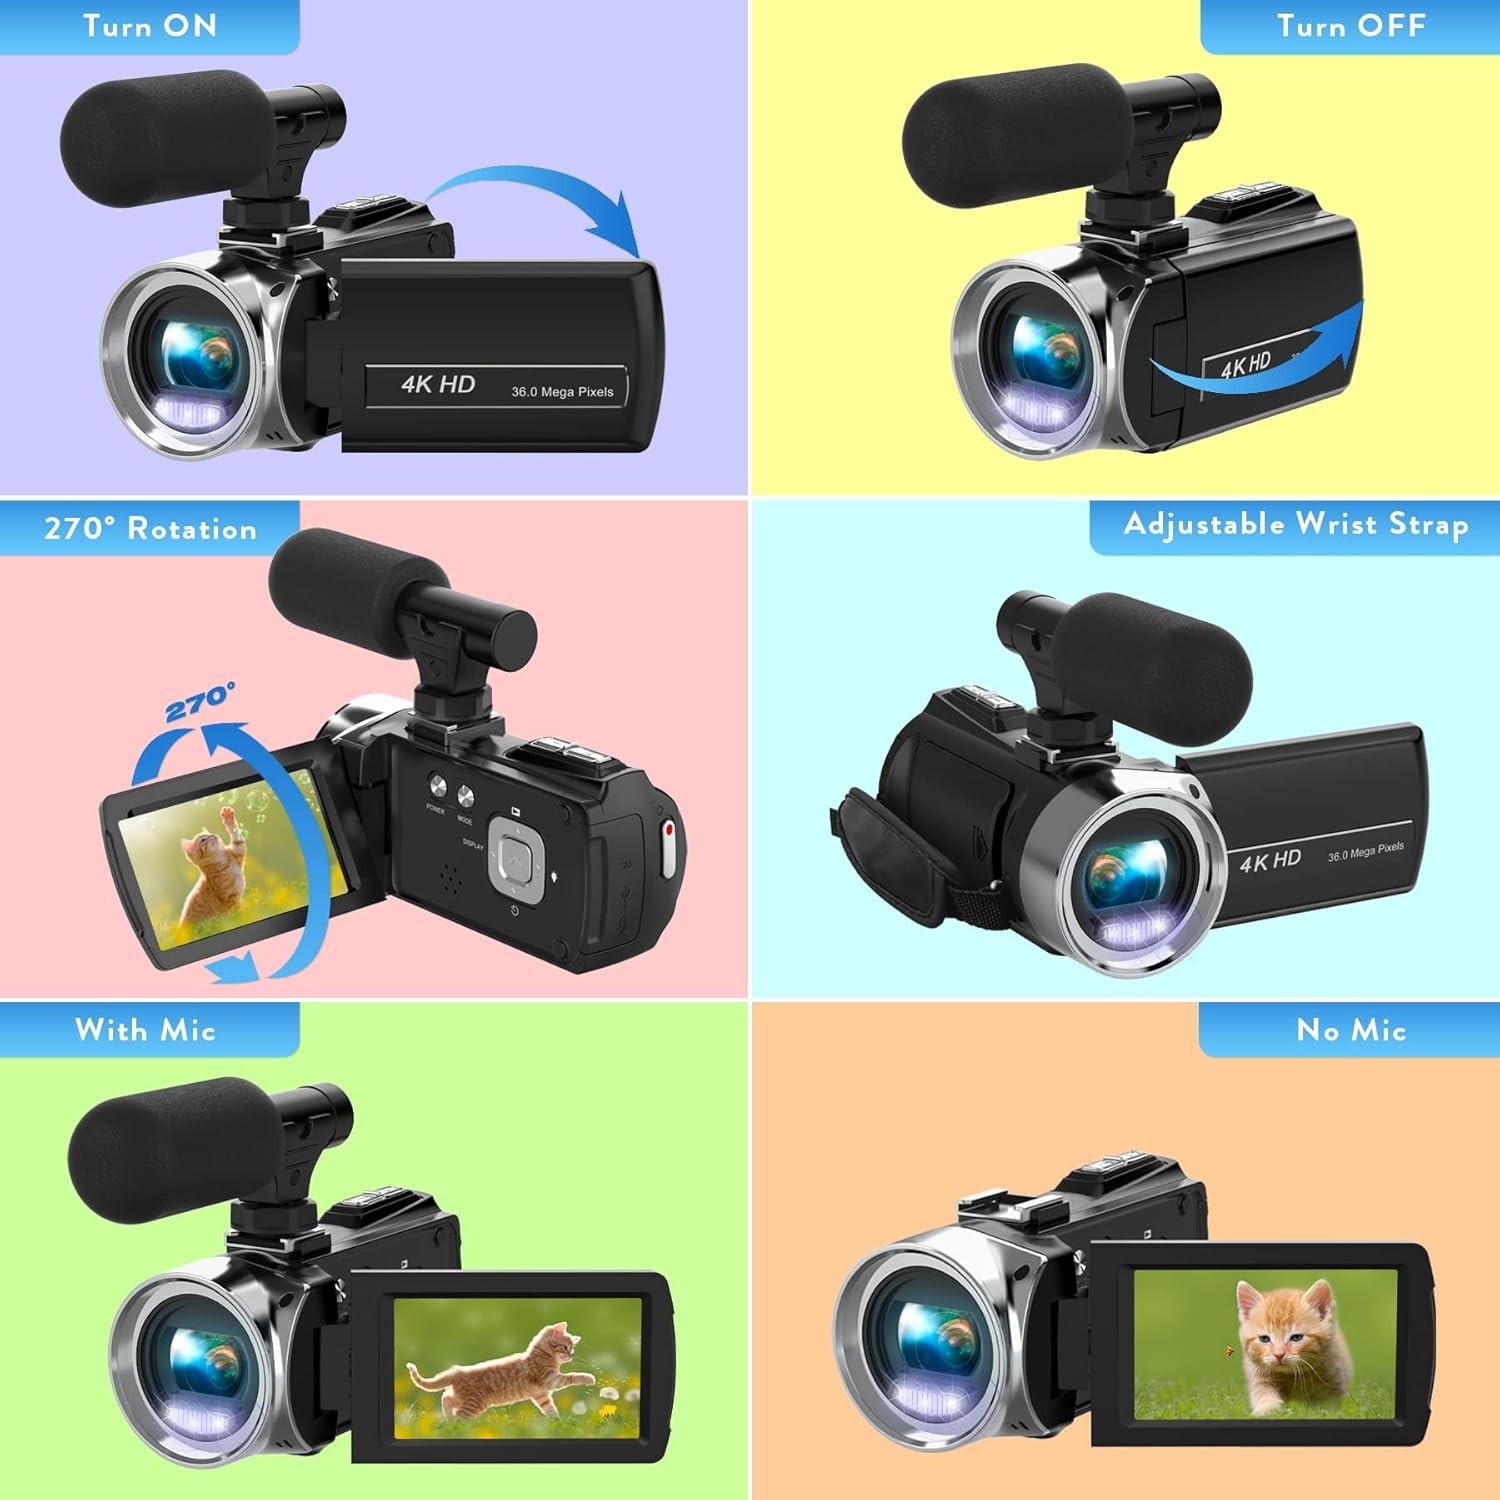
- 3.0 Inch / 270° Flip Touch Screen: ഫ്ലെക്സിബിൾ നൽകുന്നു viewing angles for easy operation and self-recording.
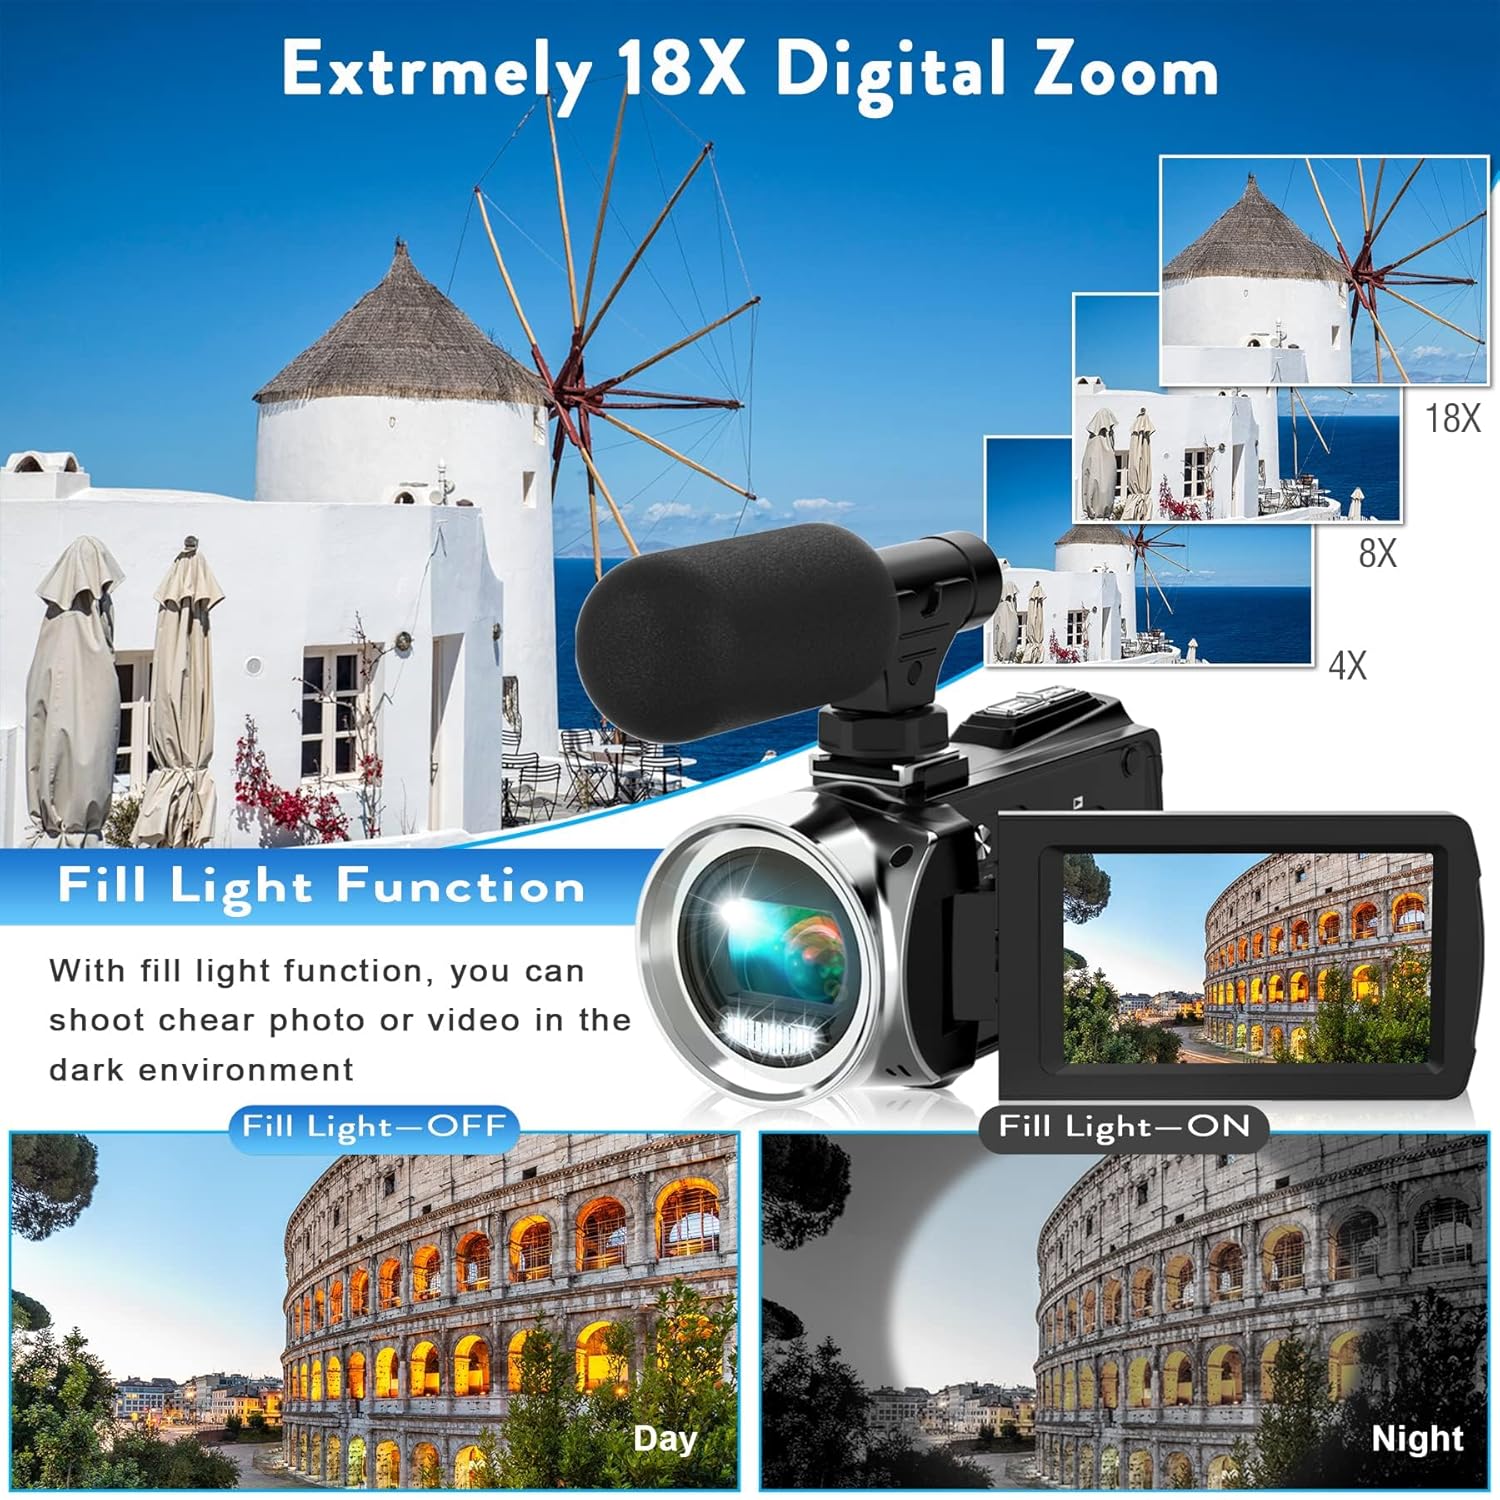
- 18X ഡിജിറ്റൽ സൂം: Allows for close-up shots from a distance.
- ബാഹ്യ മൈക്രോഫോൺ: Enhances audio quality by picking up crisp voice from multiple directions and reducing noise.
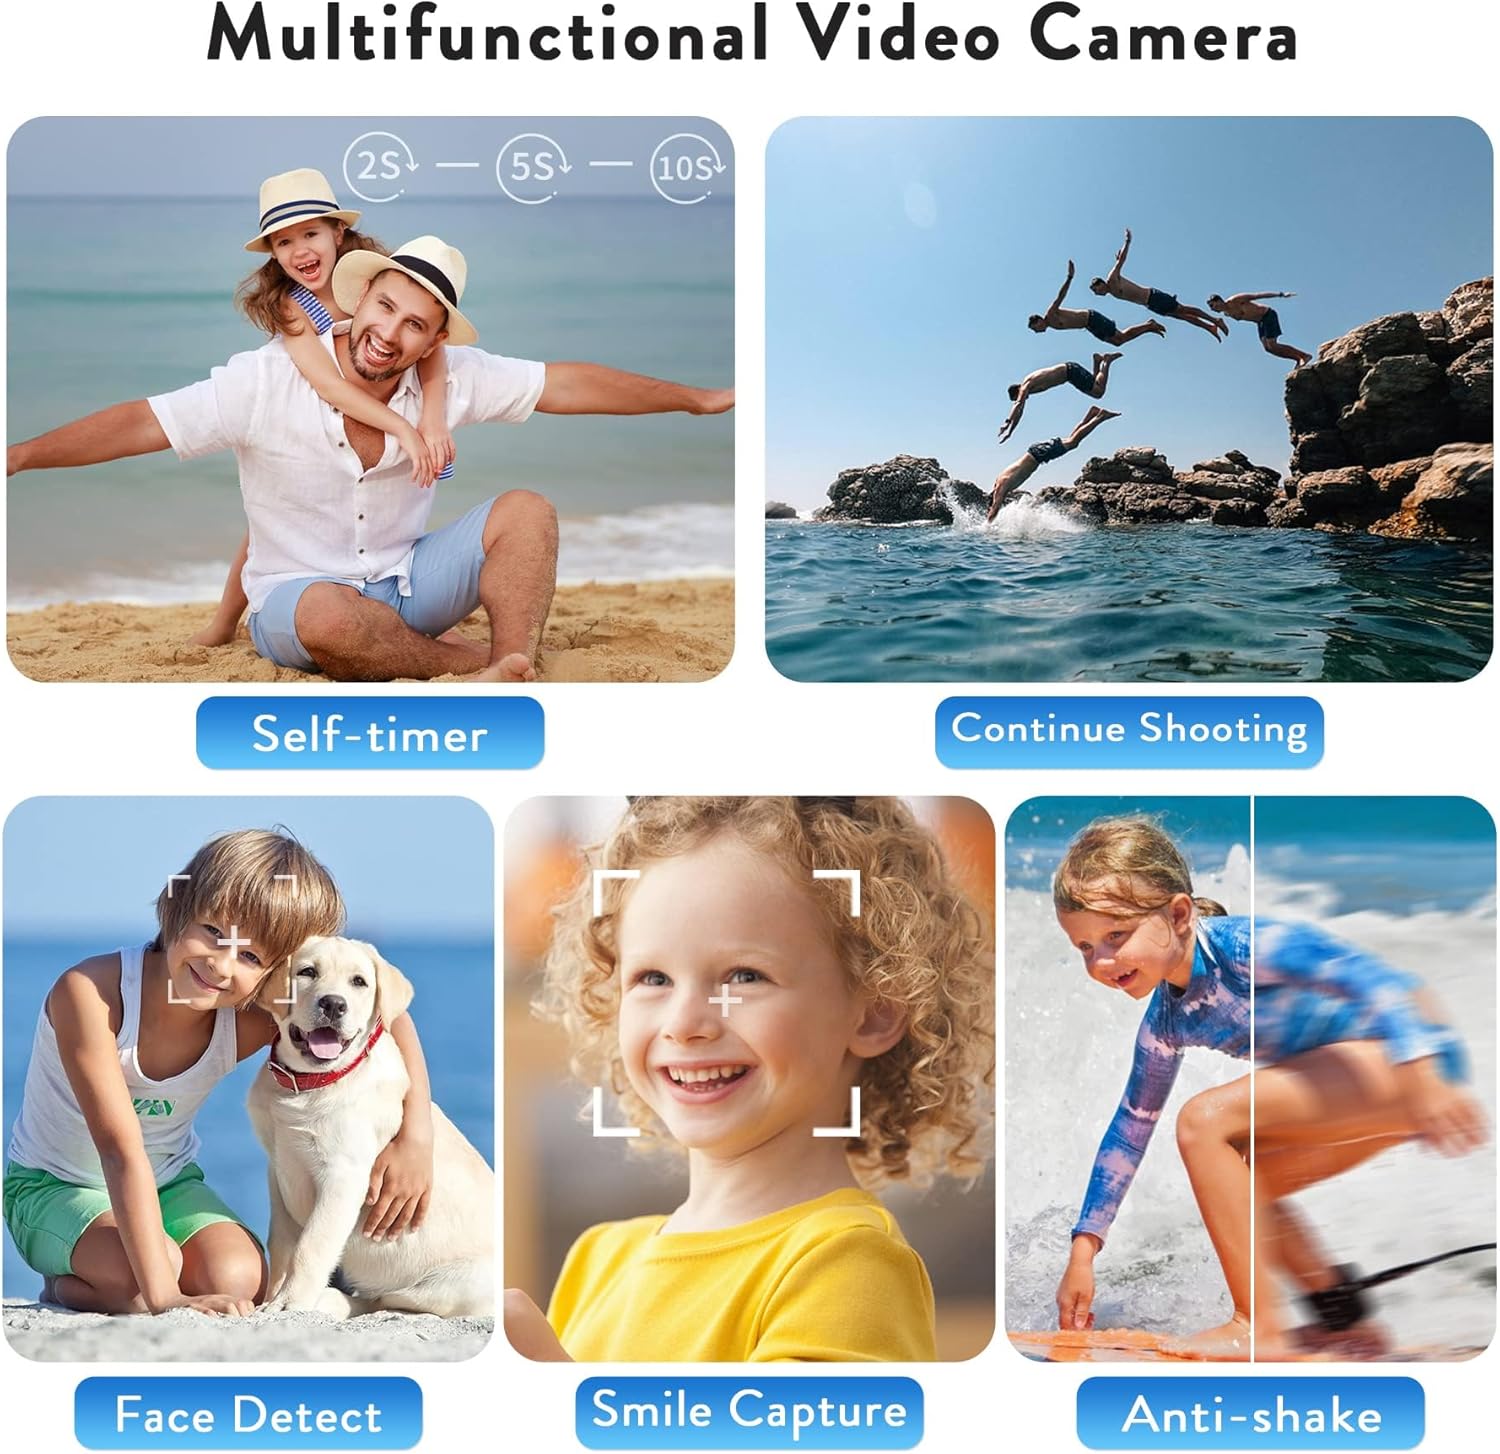
- മൾട്ടിഫങ്ഷണാലിറ്റി: Includes loop recording, time-lapse, self-timer, continuous shooting, pause function, ISO brightness control, TV output, smile capture, anti-shaking, and USB 2.0 connectivity.
- Webcam Function & Fill Light: ആയി ഉപയോഗിക്കാം webcam for live streaming and video calls, and features a built-in fill light for low-light conditions.
- ചാർജ് ചെയ്യുമ്പോൾ റെക്കോർഡിംഗ്: Supports continuous operation by allowing recording while connected to a power source.
സജ്ജമാക്കുക
1. ബാറ്ററി ചേർക്കുന്നു
- Locate the battery compartment on the bottom of the camcorder.
- കവർ തുറക്കാൻ ബാറ്ററി കമ്പാർട്ട്മെന്റ് ലാച്ച് സ്ലൈഡ് ചെയ്യുക.
- Insert the 1500mAh rechargeable battery, ensuring the correct orientation of the contacts.
- ബാറ്ററി കമ്പാർട്ട്മെന്റ് കവർ സുരക്ഷിതമായി സ്ഥലത്ത് ക്ലിക്ക് ചെയ്യുന്നത് വരെ അടയ്ക്കുക.
2. SD കാർഡ് ചേർക്കൽ
- ബാറ്ററി കമ്പാർട്ട്മെൻ്റ് കവർ തുറക്കുക.
- ബാറ്ററിയുടെ അടുത്തുള്ള SD കാർഡ് സ്ലോട്ട് കണ്ടെത്തുക.
- Insert the 32G SD card into the slot until it clicks. Ensure the card is inserted in the correct direction.
- ബാറ്ററി കമ്പാർട്ട്മെൻ്റ് കവർ അടയ്ക്കുക.
- പ്രധാനപ്പെട്ടത്: Format the SD card before first use (see Maintenance section).
3. Attaching the External Microphone
- Locate the hot shoe mount on top of the camcorder.
- Slide the external microphone into the hot shoe mount until it is secure.
- Connect the microphone's audio cable to the 'MIC' port located on the back of the camcorder.
- Adjust the microphone's sensitivity switch (OFF/LOW/HIGH) as needed.

4. പവർ ഓൺ/ഓഫ്
- പവർ ഓണാക്കാൻ: Open the LCD screen. The camcorder will automatically power on. Alternatively, press the 'POWER' button.
- പവർ ഓഫ് ചെയ്യാൻ: Close the LCD screen. The camcorder will automatically power off. Alternatively, press and hold the 'POWER' button.
കാംകോർഡർ പ്രവർത്തിപ്പിക്കൽ
1. അടിസ്ഥാന റെക്കോർഡിംഗ്
- Once powered on, the camcorder will be in video recording standby mode.
- Press the 'REC/STOP' button to start recording. The recording indicator will flash.
- Press the 'REC/STOP' button again to stop recording.
2. Using the Menu and Settings
- Press the 'MENU' button to access the settings menu.
- Use the 'UP' and 'DOWN' buttons to navigate through menu options.
- Press the 'OK' button to select an option or confirm a setting.
- Key settings include: Video Resolution, Recording Sound, Exposure, White Balance, Scenes, ISO, Image Quality, Frequency, LED Indicator Light, Auto Shutdown, Volume, and Date/Time.
3. സൂം ഫംഗ്ഷൻ
- Use the 'W' (Wide) and 'T' (Telephoto) buttons on the top of the camcorder to adjust the 18X digital zoom.
4. ഫോട്ടോ മോഡ്
- From video standby mode, press the 'MODE' button to switch to photo mode.
- Press the 'PHOTO' button to capture a still image.
5. പ്രത്യേക പ്രവർത്തനങ്ങൾ
- ലൂപ്പ് റെക്കോർഡിംഗ്: Continuously records video, overwriting the oldest fileമെമ്മറി കാർഡ് നിറയുമ്പോൾ s.
- സമയക്കുറവ്: Captures a series of still images at set intervals and combines them into a video.
- സ്വയം-ടൈമർ: Sets a delay before capturing a photo or starting a video.
- തുടർച്ചയായ ഷൂട്ടിംഗ്: വേഗത്തിൽ തുടർച്ചയായി ഒന്നിലധികം ഫോട്ടോകൾ എടുക്കുന്നു.
- പ്രവർത്തനം താൽക്കാലികമായി നിർത്തുക: Allows pausing and resuming video recording within the same file.
- ആന്റി ഷെയ്ക്കിംഗ്: Helps stabilize video footage.
- വെളിച്ചം നിറയ്ക്കുക: Provides additional illumination in dark environments.

കണക്റ്റിവിറ്റി
1. Webക്യാം ഫംഗ്ഷൻ
- Connect the camcorder to your computer using the provided USB cable.
- Select 'PC Camera' mode on the camcorder's screen.
- The camcorder can now be used as a webcam for applications like YouTube, Skype, TikTok, Facebook live streaming, or video calls.
2. TV Output
- Connect the camcorder to a TV using the USB cable.
- Select 'TV Output' mode on the camcorder.
- നിങ്ങൾക്ക് ഇപ്പോൾ കഴിയും view your recorded photos and videos on the TV screen.

മെയിൻ്റനൻസ്
1. ബാറ്ററി ചാർജിംഗ്
- Connect the camcorder to a power bank or PC using the USB cable for charging.
- The camcorder supports recording while charging, allowing for extended use.
- A fully charged 1500mAh battery provides approximately 90-120 minutes of continuous use.
2. SD കാർഡ് ഫോർമാറ്റിംഗ്
- It is crucial to format the SD card before its first use and periodically to maintain optimal performance.
- To format: Go to the 'MENU' settings, navigate to 'Format', and confirm.
3. വൃത്തിയാക്കൽ
- കാംകോർഡർ ബോഡി വൃത്തിയാക്കാൻ മൃദുവായതും ഉണങ്ങിയതുമായ തുണി ഉപയോഗിക്കുക.
- ലെൻസിന്, പോറലുകൾ ഒഴിവാക്കാൻ ഒരു പ്രത്യേക ലെൻസ് ക്ലീനിംഗ് തുണിയും ലായനിയും ഉപയോഗിക്കുക.
- കഠിനമായ രാസവസ്തുക്കളോ ഉരച്ചിലുകളോ ഉപയോഗിക്കരുത്.
ട്രബിൾഷൂട്ടിംഗ്
പൊതുവായ പ്രശ്നങ്ങളും പരിഹാരങ്ങളും
- ക്യാംകോർഡർ പവർ ഓൺ ചെയ്യുന്നില്ല: Ensure the battery is correctly inserted and fully charged. Try connecting to a power source.
- വീഡിയോ റെക്കോർഡ് ചെയ്യാൻ/ഫോട്ടോ എടുക്കാൻ കഴിയില്ല: Check if an SD card is inserted and formatted. Ensure there is sufficient storage space.
- മോശം ഇമേജ്/വീഡിയോ ഗുണമേന്മ: Verify lighting conditions. Adjust exposure, white balance, and ISO settings in the menu. Ensure the lens is clean.
- ഓഡിയോ പ്രശ്നങ്ങൾ: Check if the external microphone is properly connected and its sensitivity is set correctly. Ensure the camcorder's internal microphone is not obstructed.
- Screen is dark in webcam mode: Ensure adequate lighting in your environment. Adjust webcam settings on your computer if applicable.
സ്പെസിഫിക്കേഷനുകൾ
| ഫീച്ചർ | വിശദാംശങ്ങൾ |
|---|---|
| ബ്രാൻഡ് നാമം | ഹീഗോംൻ |
| ഇനം മോഡൽ നമ്പർ | TDV-1302 |
| ഇനത്തിൻ്റെ ഭാരം | 10.6 ഔൺസ് |
| പാക്കേജ് അളവുകൾ | 6.61 x 5.55 x 3.5 ഇഞ്ച് |
| ബാറ്ററികൾ | 1 ലിഥിയം അയോൺ ബാറ്ററികൾ ആവശ്യമാണ് (ഉൾപ്പെടുത്തിയിരിക്കുന്നു) |
| വർണ്ണ നാമം | കറുപ്പ് |
| പ്രത്യേക സവിശേഷതകൾ | Anti-Shake, Built-In Flash, Remote Control, Slow Motion, Time Lapse |
| ഫോട്ടോ സെൻസർ ടെക്നോളജി | CMOS |
| വീഡിയോ ക്യാപ്ചർ റെസല്യൂഷൻ | 2.7K |
| പരമാവധി ഫോക്കൽ ദൈർഘ്യം | 0.01 മില്ലിമീറ്റർ |
| പരമാവധി അപ്പേർച്ചർ | 2.8 മില്ലിമീറ്റർ |
| ഫ്ലാഷ് മെമ്മറി തരം | SD |
| വീഡിയോ ക്യാപ്ചർ ഫോർമാറ്റ് | MP4 |
| പിന്തുണയ്ക്കുന്ന ഓഡിയോ ഫോർമാറ്റ് | AAC, MP3, PCM, FLAC, Dolby Digital/AC-3 |
| സ്ക്രീൻ വലിപ്പം | 3 ഇഞ്ച് |
| കണക്റ്റിവിറ്റി ടെക്നോളജി | USB |
വാറൻ്റിയും പിന്തുണയും
For warranty information or technical support, please refer to the contact details provided in the packaging or visit the official Heegomn webസൈറ്റ്.
നിങ്ങൾക്ക് സന്ദർശിക്കാനും കഴിയും Heegomn Store on Amazon കൂടുതൽ ഉൽപ്പന്ന വിവരങ്ങൾക്കും ഉപഭോക്തൃ സേവന ഓപ്ഷനുകൾക്കും.


