1. ആമുഖം
This manual provides detailed instructions for the setup, operation, and maintenance of your Gain Express Digital Weather Station with three wireless indoor/outdoor sensors. Please read this manual thoroughly before using the device to ensure proper function and longevity.

Image 1: The main display unit and three wireless sensors of the weather station.
2. ഉൽപ്പന്ന സവിശേഷതകൾ
- Expansive LCD screen for clear readability from various angles.
- Displays indoor and outdoor temperature (°C/°F) and humidity.
- Integrated calendar (month/year) and time display.
- Supports up to 3 external wireless sensors for monitoring multiple locations.
- Alarm clock function with snooze.
- Touch control for temperature unit selection (°C or °F).
- Records maximum and minimum temperature and humidity readings.
3. പാക്കേജ് ഉള്ളടക്കം
പാക്കേജിൽ ഇനിപ്പറയുന്ന ഇനങ്ങൾ ഉൾപ്പെടുന്നു:
- 1 x Digital Weather Station Main Unit
- 3 x Wireless Sensors
- 1 x ഉപയോക്തൃ മാനുവൽ

Image 2: The weather station main unit, three wireless sensors, and product packaging.
4. സജ്ജീകരണ ഗൈഡ്
4.1 ബാറ്ററി ഇൻസ്റ്റാളേഷൻ
- ഓരോ വയർലെസ് സെൻസറിന്റെയും പിൻഭാഗത്തുള്ള ബാറ്ററി കമ്പാർട്ട്മെന്റ് തുറക്കുക.
- Insert 2 AAA batteries into each sensor, observing the correct polarity (+/-).
- ബാറ്ററി കമ്പാർട്ട്മെൻ്റ് സുരക്ഷിതമായി അടയ്ക്കുക.
- Open the battery compartment on the back of the main weather station unit.
- Insert 2 AAA batteries into the main unit, observing the correct polarity (+/-).
- ബാറ്ററി കമ്പാർട്ട്മെൻ്റ് സുരക്ഷിതമായി അടയ്ക്കുക.
4.2 Sensor Pairing and Channel Assignment
It is recommended to set all sensors and their respective channels before powering on the main unit for the first time.
- For each wireless sensor, locate the 'CH' button inside the battery compartment.
- Press the 'CH' button to assign a unique channel (1, 2, or 3) to each sensor. The channel number will appear on the sensor's small display. Ensure each of your three sensors is assigned a different channel.
- Once channels are assigned, power on the main unit. The main unit will automatically search for and connect to the sensors. This process may take up to three minutes for initial warm-up and data synchronization. During this time, initial readings may not be accurate.

Image 3: The three wireless sensors, ready for channel assignment and placement.
4.3 സെൻസർ പ്ലേസ്മെന്റ്
Place the wireless sensors in desired locations to monitor temperature and humidity. Common placements include:
- Do ട്ട്ഡോർ: Under an eave or in a protected area to shield from direct rain and sunlight.
- ഇൻഡോർ: In a kitchen, wine cellar, greenhouse, or other rooms where monitoring is desired.
Ensure sensors are within the effective transmission range of the main unit and away from large metal objects that could interfere with the signal.
Video 1: An instructional video demonstrating the setup and features of the Digital Weather Station.
5. പ്രവർത്തന നിർദ്ദേശങ്ങൾ
5.1 പ്രദർശനം പൂർത്തിയായിview
The main unit's LCD screen displays various information:
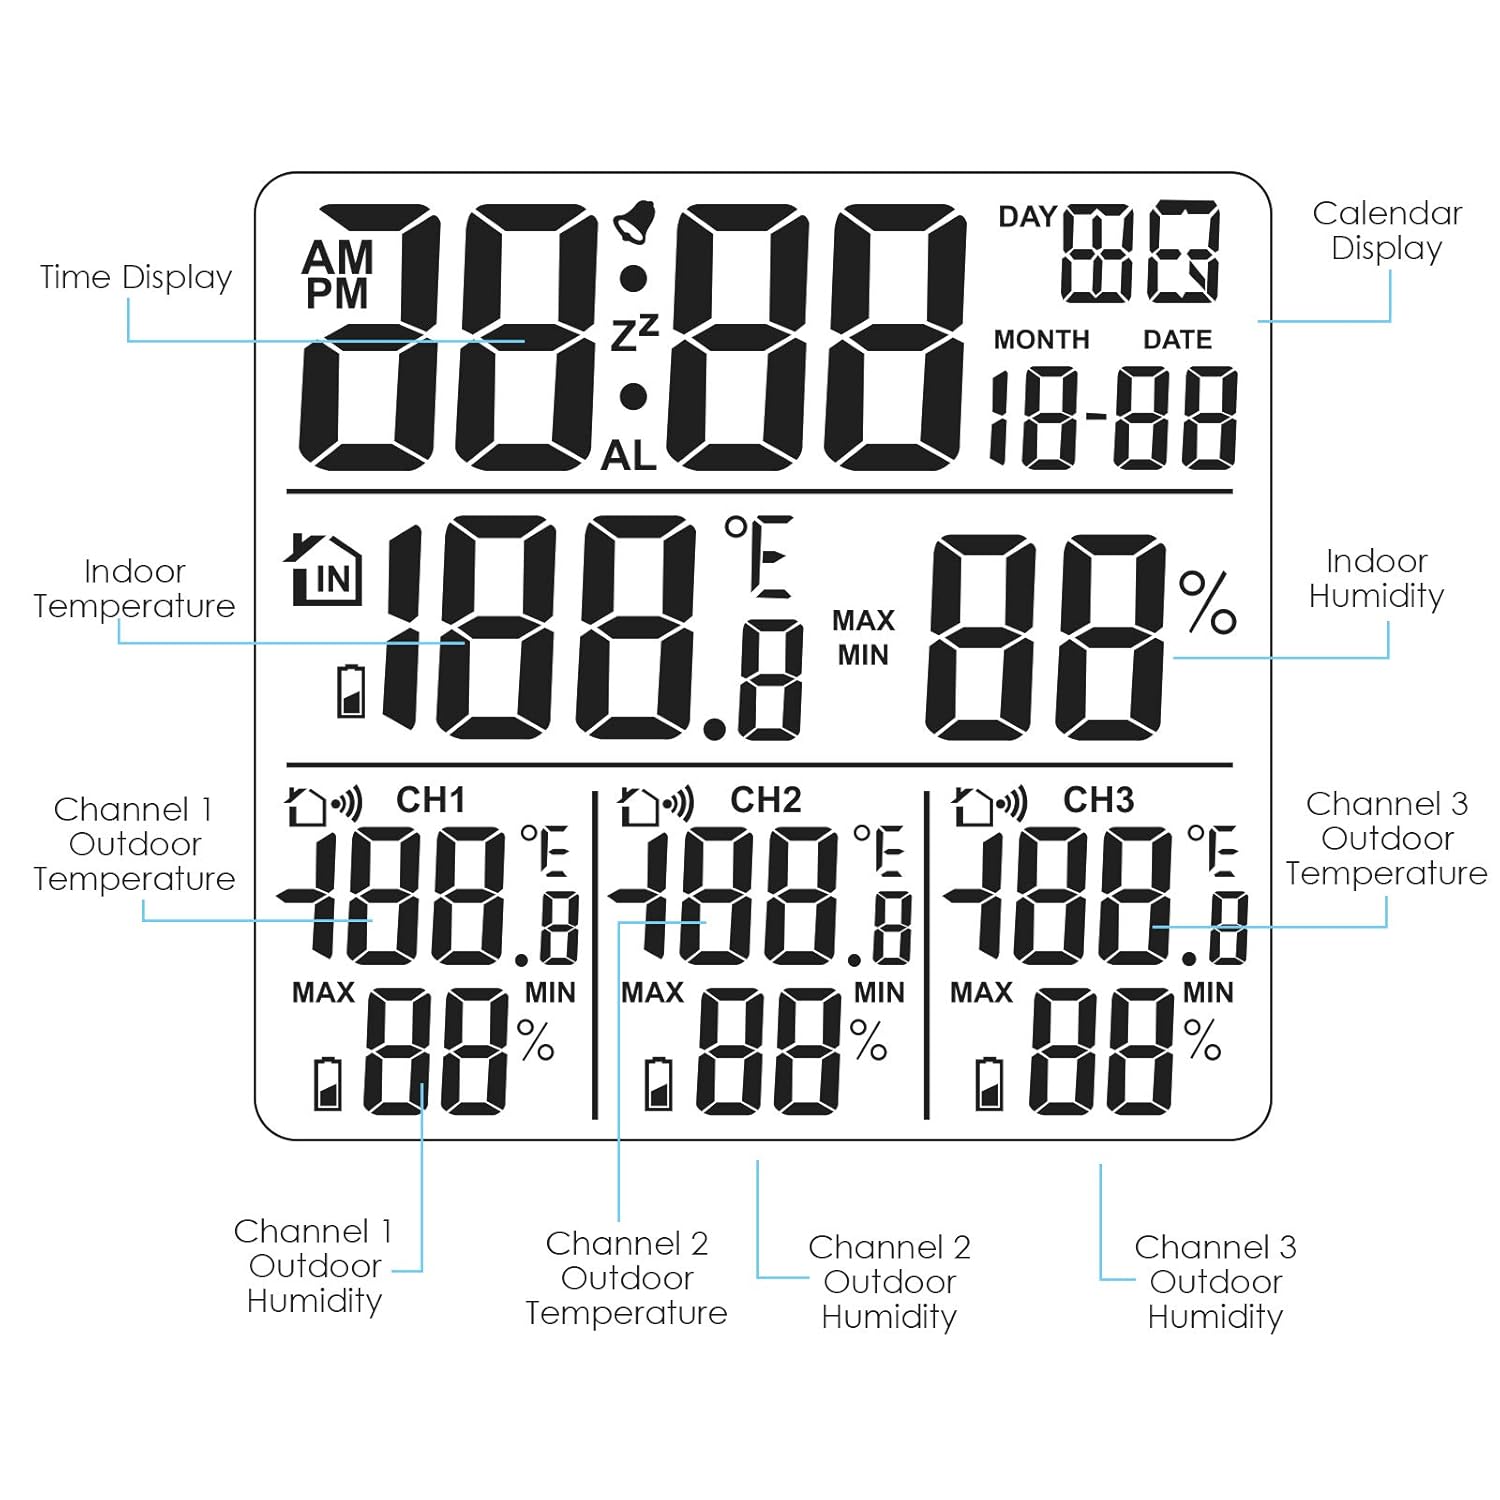
ചിത്രം 4: വിശദമായത് view of the weather station's LCD display with labels for each information segment.
- സമയ പ്രദർശനം: Shows current time (AM/PM).
- കലണ്ടർ ഡിസ്പ്ലേ: Shows day, month, and date.
- ഇൻഡോർ താപനിലയും ഈർപ്പവും: Readings from the main unit.
- Channel 1/2/3 Outdoor Temperature & Humidity: Readings from the respective wireless sensors.
5.2 ബട്ടൺ പ്രവർത്തനങ്ങൾ
The main unit features several buttons on its back for configuration and control:

Image 5: The back panel of the weather station, highlighting the function of each button.
- സജ്ജമാക്കുക: Enters setup mode for time, date, and alarm settings.
- അലാറം: Activates/deactivates the alarm and enters alarm setting mode.
- UP / MEM: Adjusts values upwards in setup mode; displays MAX/MIN records.
- താഴേക്ക് / °C/°F: Adjusts values downwards in setup mode; switches temperature unit between Celsius and Fahrenheit.
- CH: Cycles through sensor channels (1, 2, 3) or displays all channels.
- SNZ / LIGHT: Activates snooze function when alarm sounds; turns on backlight.
5.3 സമയവും തീയതിയും ക്രമീകരിക്കുക
- അമർത്തുക സെറ്റ് button to enter time/date setting mode.
- ഉപയോഗിക്കുക UP / MEM ഒപ്പം താഴേക്ക് / °C/°F മിന്നുന്ന മൂല്യം ക്രമീകരിക്കുന്നതിനുള്ള ബട്ടണുകൾ.
- അമർത്തുക സെറ്റ് again to confirm and move to the next setting (e.g., hour, minute, year, month, day).
- Repeat until all settings are configured.
5.4 അലാറം സജ്ജമാക്കുന്നു
- അമർത്തുക അലാറം അലാറം ക്രമീകരണ മോഡിൽ പ്രവേശിക്കാൻ ബട്ടൺ.
- ഉപയോഗിക്കുക UP / MEM ഒപ്പം താഴേക്ക് / °C/°F ആവശ്യമുള്ള അലാറം സമയം സജ്ജമാക്കാൻ ബട്ടണുകൾ.
- അമർത്തുക അലാറം സ്ഥിരീകരിക്കാൻ വീണ്ടും.
- അലാറം സജീവമാക്കുന്നതിനും നിർജ്ജീവമാക്കുന്നതിനും, അമർത്തുക അലാറം button outside of setting mode. An alarm icon will appear/disappear on the display.
- അലാറം മുഴങ്ങുമ്പോൾ, അമർത്തുക SNZ / LIGHT button to activate the snooze function for an additional 5 minutes.
5.5 Viewing MAX/MIN Records
അമർത്തുക UP / MEM button to cycle through the maximum and minimum recorded temperature and humidity values for indoor and each outdoor channel. The display will show 'MAX' or 'MIN' indicators.
6. പരിപാലനം
- Clean the device and sensors with a soft, dry cloth. Do not use abrasive cleaners or solvents.
- Avoid exposing the main unit to direct sunlight, extreme temperatures, or high humidity.
- Ensure outdoor sensors are protected from direct rain and snow to prolong their lifespan.
- Replace batteries when the low battery indicator appears on the display to ensure continuous operation and accurate readings.
7. പ്രശ്നപരിഹാരം
- No display on main unit: ബാറ്ററി പോളാരിറ്റി പരിശോധിച്ച് ബാറ്ററികൾ പുതിയതാണെന്ന് ഉറപ്പാക്കുക.
- No outdoor sensor readings: Ensure sensors have fresh batteries and are assigned unique channels (1, 2, or 3). Verify sensors are within range of the main unit. Re-sync by removing and reinserting batteries in both the sensor and main unit.
- കൃത്യമല്ലാത്ത വായനകൾ: Allow up to 3 minutes for sensors to warm up and stabilize after battery installation or power cycle. Ensure sensors are not exposed to direct heat sources or extreme cold beyond their operating range.
- Signal loss from outdoor sensor: This can occur if the sensor is placed too far from the main unit, or if there are significant obstructions (e.g., thick walls, large metal objects). Try relocating the sensor closer to the main unit or in a clearer line of sight. Extreme cold (below freezing) can also temporarily affect signal transmission.
8 സ്പെസിഫിക്കേഷനുകൾ
| ഫീച്ചർ | വിശദാംശങ്ങൾ |
|---|---|
| ഉൽപ്പന്ന അളവുകൾ | 4.72 x 4.33 x 1.18 ഇഞ്ച് |
| ഇനം മോഡൽ നമ്പർ | WEA-46 |
| ബാറ്ററികൾ ആവശ്യമാണ് | 2 AAA batteries (main unit), 2 AAA batteries (each sensor) |
| ആദ്യ തീയതി ലഭ്യമാണ് | സെപ്റ്റംബർ 11, 2020 |
| നിർമ്മാതാവ് | ഗെയിൻ എക്സ്പ്രസ് ഹോൾഡിംഗ്സ് ലിമിറ്റഡ്. |
| പവർ ഉറവിടം | ബാറ്ററി പവർ |
| പ്രത്യേക ഫീച്ചർ | Indoor main unit can be placed on the table with a stand |
| മെറ്റീരിയൽ | അക്രിലോണിട്രൈൽ ബ്യൂട്ടാഡീൻ സ്റ്റൈറൈൻ (എബിഎസ്) |
| ഇൻഡോർ താപനില ശ്രേണി | 0-50°C (32-122°F) |
| Do ട്ട്ഡോർ താപനില ശ്രേണി | -40-70 ° C (-40-158 ° F) |
| ഇൻഡോർ/ഔട്ട്ഡോർ ഈർപ്പം പരിധി | 20-95% RH |

Image 6: Display indicating the temperature and humidity measurement ranges for the main unit and outdoor sensors.

Image 7: The main unit with its dimensions (110mm x 110mm x 20mm) indicated.
9. വാറൻ്റിയും പിന്തുണയും
Specific warranty details and direct support contact information are not provided within the available product data. Please refer to the product packaging or the manufacturer's official website for warranty claims and customer support inquiries.


