ആമുഖം
വാങ്ങിയതിന് നന്ദി.asing the Overmax Multipic 4.1 Full HD 1080p LED Projector. This manual provides essential information for the safe and efficient use of your projector. Please read it thoroughly before operation and retain it for future reference.
സുരക്ഷാ വിവരങ്ങൾ
സുരക്ഷിതമായ പ്രവർത്തനം ഉറപ്പാക്കുന്നതിനും കേടുപാടുകൾ തടയുന്നതിനും, ദയവായി ഇനിപ്പറയുന്ന മുൻകരുതലുകൾ പാലിക്കുക:
- വെന്റിലേഷൻ ദ്വാരങ്ങൾ തടയരുത്. പ്രൊജക്ടറിന് ചുറ്റും മതിയായ വായുസഞ്ചാരം ഉറപ്പാക്കുക.
- l ചെയ്യുമ്പോൾ പ്രൊജക്ടർ ലെൻസിലേക്ക് നേരിട്ട് കണ്ണുകൾ പതിക്കുന്നത് ഒഴിവാക്കുക.amp ഓണാണ്.
- പ്രൊജക്ടർ അസ്ഥിരമായ പ്രതലങ്ങളിൽ സ്ഥാപിക്കരുത്.
- പ്രൊജക്ടർ വെള്ളത്തിൽ നിന്നോ മറ്റ് ദ്രാവകങ്ങളിൽ നിന്നോ അകറ്റി നിർത്തുക.
- പ്രൊജക്ടറിനൊപ്പം നൽകിയിരിക്കുന്ന പവർ അഡാപ്റ്റർ മാത്രം ഉപയോഗിക്കുക.
- പ്രൊജക്ടർ സ്വയം തുറക്കാനോ നന്നാക്കാനോ ശ്രമിക്കരുത്. എല്ലാ സേവനങ്ങളും യോഗ്യതയുള്ള ഉദ്യോഗസ്ഥർക്ക് റഫർ ചെയ്യുക.
- ഇടിമിന്നൽ ഉണ്ടാകുമ്പോഴോ ദീർഘനേരം ഉപയോഗിക്കാതിരിക്കുമ്പോഴോ പ്രൊജക്ടർ പ്ലഗ് ഊരിവയ്ക്കുക.
പാക്കേജ് ഉള്ളടക്കം
നിങ്ങളുടെ പാക്കേജിൽ എല്ലാ ഇനങ്ങളും ഉണ്ടെന്ന് ഉറപ്പാക്കുക:
- Overmax Multipic 4.1 Projector
- റിമോട്ട് കൺട്രോൾ
- പവർ കേബിൾ
- HDMI കേബിൾ
- ഫ്യൂസ് കേബിൾ
- ഉപയോക്തൃ മാനുവൽ (ഈ പ്രമാണം)
ഉൽപ്പന്നം കഴിഞ്ഞുview
Familiarize yourself with the projector's components and controls.
ഫ്രണ്ട് View

ചിത്രം: മുൻഭാഗം view of the Overmax Multipic 4.1 projector. The main projection lens is visible on the right side, with ventilation grilles and an infrared receiver on the left.
മികച്ച പാനൽ നിയന്ത്രണങ്ങൾ
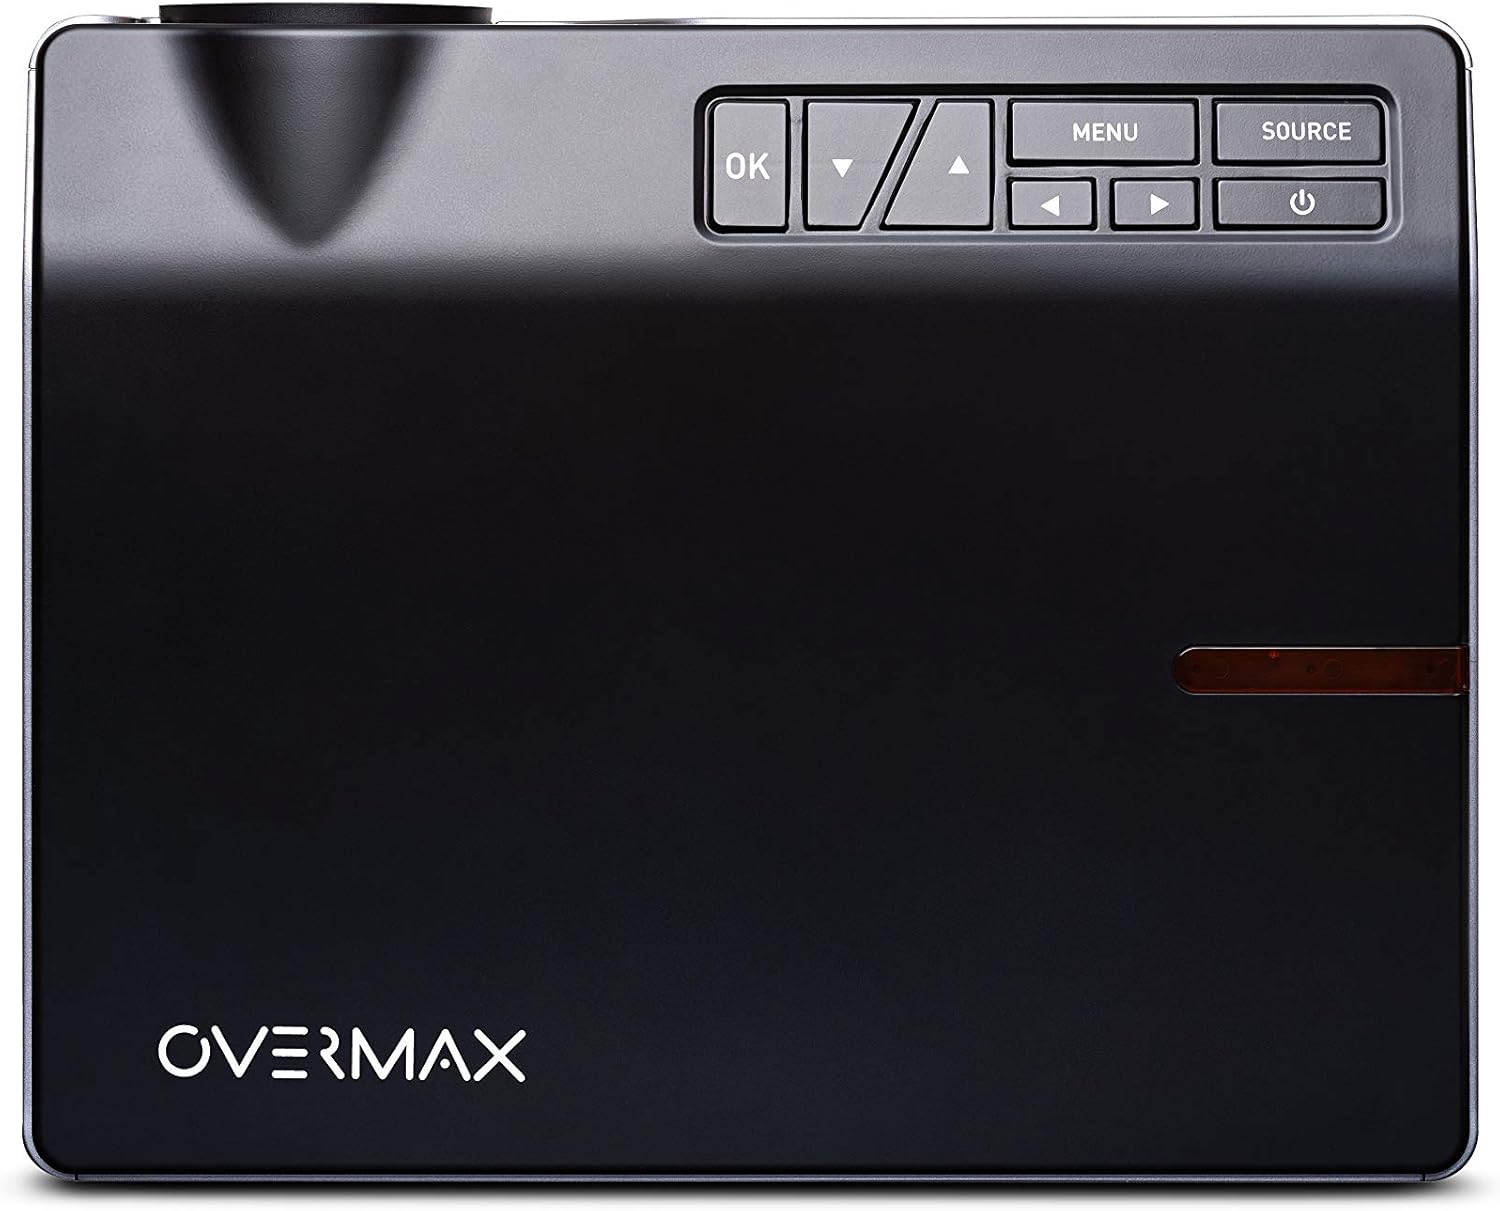
ചിത്രം: മുകളിൽ view of the Overmax Multipic 4.1 projector. The control panel is located on the top right, featuring buttons for Power, Source, Menu, OK, and directional navigation.
- പവർ ബട്ടൺ: പ്രൊജക്ടർ ഓണാക്കുകയോ ഓഫാക്കുകയോ ചെയ്യുന്നു.
- ഉറവിട ബട്ടൺ: Selects input source (HDMI1, HDMI2, USB, VGA, AV).
- മെനു ബട്ടൺ: പ്രൊജക്ടറിന്റെ ക്രമീകരണ മെനു ആക്സസ് ചെയ്യുന്നു.
- ശരി ബട്ടൺ: മെനുവിലെ തിരഞ്ഞെടുപ്പുകൾ സ്ഥിരീകരിക്കുന്നു.
- ദിശാസൂചന അമ്പടയാളങ്ങൾ: മെനു ഓപ്ഷനുകളിലൂടെ നാവിഗേറ്റ് ചെയ്യുകയും ക്രമീകരണങ്ങൾ ക്രമീകരിക്കുകയും ചെയ്യുന്നു.
റിയർ പാനൽ പോർട്ടുകൾ

ചിത്രം: പിൻഭാഗം view of the Overmax Multipic 4.1 projector. Ports include VGA, USB, HDMI1, HDMI2, and AV input, along with the power input and main power switch.
- VGA പോർട്ട്: VGA ഔട്ട്പുട്ട് ഉള്ള കമ്പ്യൂട്ടറുകളിലേക്ക് ബന്ധിപ്പിക്കുന്നു.
- യുഎസ്ബി പോർട്ടുകൾ (x2): Connects USB storage devices for media playback.
- HDMI പോർട്ടുകൾ (x2): Connects to devices like laptops, game consoles, or streaming sticks.
- എവി പോർട്ട്: Connects to older devices using a composite video and stereo audio cable.
- പവർ ഇൻപുട്ട്: വൈദ്യുതി കേബിൾ ബന്ധിപ്പിക്കുന്നു.
- പ്രധാന പവർ സ്വിച്ച്: യൂണിറ്റിലേക്കുള്ള പ്രധാന വൈദ്യുതി വിതരണം നിയന്ത്രിക്കുന്നു.
ഫോക്കസും കീസ്റ്റോൺ അഡ്ജസ്റ്റ്മെന്റും

ചിത്രം: വശം view of the Overmax Multipic 4.1 projector, showing the focus ring (larger) and keystone correction ring (smaller) located near the lens.
- ഫോക്കസ് റിംഗ്: Rotate to sharpen the projected image.
- കീസ്റ്റോൺ കറക്ഷൻ റിംഗ്: Adjusts the image shape to correct trapezoidal distortion if the projector is not perfectly perpendicular to the screen.
സജ്ജമാക്കുക
1. പ്ലേസ്മെന്റ്
Position the projector on a stable, flat surface or mount it to a ceiling or tripod. Ensure the projector is within a suitable distance from the projection surface to achieve the desired screen size (up to 200 inches diagonal).
- For ceiling mounting, use the four screw holes on the bottom of the projector.
- യൂണിറ്റിന് ചുറ്റും ശരിയായ വായുസഞ്ചാരം ഉറപ്പാക്കുക.
2. പവർ കണക്ഷൻ
- പ്രൊജക്ടറിന്റെ പവർ ഇൻപുട്ട് പോർട്ടിലേക്ക് പവർ കേബിൾ ബന്ധിപ്പിക്കുക.
- പവർ കേബിളിൻ്റെ മറ്റേ അറ്റം പവർ ഔട്ട്ലെറ്റിലേക്ക് പ്ലഗ് ചെയ്യുക.
- Flip the main power switch on the rear panel to the "ON" position.
3. ഇൻപുട്ട് ഉപകരണങ്ങൾ ബന്ധിപ്പിക്കുന്നു
Connect your desired source device (e.g., laptop, game console, USB drive) to the appropriate port on the projector.
- എച്ച്ഡിഎംഐ: Use an HDMI cable to connect to HDMI1 or HDMI2 ports.
- USB: Insert a USB flash drive into one of the USB ports for direct media playback.
- വി.ജി.എ: Use a VGA cable to connect to a computer's VGA output.
- ഓഫ്: Use a composite AV cable to connect to devices with AV output.
4. ഫോക്കസും കീസ്റ്റോൺ ക്രമീകരണവും
- പ്രൊജക്ടർ ഓണാക്കി ഒരു ചിത്രം പ്രദർശിപ്പിക്കുക.
- തിരിക്കുക ഫോക്കസ് റിംഗ് (larger ring near the lens) until the image appears sharp and clear.
- ചിത്രം ട്രപസോയിഡൽ ആയി (മുകളിലോ താഴെയോ വീതി കൂടുതലായി) കാണപ്പെടുന്നുണ്ടെങ്കിൽ, തിരിക്കുക. കീസ്റ്റോൺ കറക്ഷൻ റിംഗ് (smaller ring near the lens) to square the image.
പ്രവർത്തന നിർദ്ദേശങ്ങൾ
പവർ ചെയ്യുന്നത് ഓൺ/ഓഫ്
- പവർ ഓണാക്കാൻ: Press the Power button on the projector or remote control. The indicator light will turn on.
- പവർ ഓഫ് ചെയ്യാൻ: Press the Power button again. The projector will initiate a shutdown sequence. Do not unplug the projector until the fan stops running.
ഇൻപുട്ട് ഉറവിടം തിരഞ്ഞെടുക്കുന്നു
പവർ ഓൺ ചെയ്ത ശേഷം, അമർത്തുക ഉറവിടം button on the projector or remote control to cycle through available input sources (HDMI1, HDMI2, USB, VGA, AV). Select the source corresponding to your connected device.
മെനു നാവിഗേഷൻ
അമർത്തുക മെനു button to access settings such as picture mode, aspect ratio, sound settings, and system preferences. Use the directional arrows to navigate and the OK തിരഞ്ഞെടുക്കലുകൾ സ്ഥിരീകരിക്കുന്നതിനുള്ള ബട്ടൺ.
Wi-Fi കണക്റ്റിവിറ്റി
The Multipic 4.1 supports Wi-Fi connectivity for screen mirroring from compatible smartphones, tablets, and computers.
- Navigate to the Wi-Fi settings in the projector's menu.
- Select your Wi-Fi network and enter the password if required.
- Once connected, follow the on-screen instructions to initiate screen mirroring from your device.
ഓഡിയോ ഔട്ട്പുട്ട്
The projector features two built-in stereo speakers. Volume can be adjusted via the remote control or the projector's menu.
മെയിൻ്റനൻസ്
ലെൻസ് വൃത്തിയാക്കൽ
Use a soft, lint-free cloth specifically designed for optical lenses. Do not use abrasive cleaners or excessive force, as this can scratch the lens.
എയർ വെന്റുകൾ വൃത്തിയാക്കുന്നു
Regularly check and clean the air vents to prevent dust buildup, which can affect cooling and projector performance. Use a soft brush or compressed air to gently remove dust.
Lamp ജീവിതം
എൽഇഡി എൽamp in your projector has an estimated lifespan of up to 50,000 hours. No lamp replacement is typically required during the product's lifetime under normal usage conditions.
ട്രബിൾഷൂട്ടിംഗ്
| പ്രശ്നം | സാധ്യമായ കാരണം | പരിഹാരം |
|---|---|---|
| ചിത്രമൊന്നും പ്രദർശിപ്പിച്ചിട്ടില്ല |
|
|
| ചിത്രം മങ്ങിയതാണ് |
|
|
| ചിത്രം ട്രപസോയിഡൽ ആണ് |
|
|
| ശബ്ദമില്ല |
|
|
| Wi-Fi കണക്ഷൻ പ്രശ്നങ്ങൾ |
|
|
സ്പെസിഫിക്കേഷനുകൾ
| ഫീച്ചർ | വിശദാംശങ്ങൾ |
|---|---|
| മോഡൽ നമ്പർ | OV-MULTIPIC 4.1 |
| ബ്രാൻഡ് | ഓവർമാക്സ് |
| ഡിസ്പ്ലേ റെസല്യൂഷൻ | 1920 x 1080 (Full HD 1080p Native) |
| തെളിച്ചം | 4000 ല്യൂമെൻസ് |
| കോൺട്രാസ്റ്റ് റേഷ്യോ | 4000:1 |
| വീക്ഷണാനുപാതം | 16:9 ഒപ്പം 4:3 |
| Lamp ടൈപ്പ് ചെയ്യുക | എൽഇഡി |
| Lamp ജീവിതം | 50,000 മണിക്കൂർ വരെ |
| കണക്റ്റിവിറ്റി ടെക്നോളജി | HDMI (x2), USB (x2), VGA, AV, Wi-Fi |
| ബിൽറ്റ്-ഇൻ സ്പീക്കറുകൾ | 2 സ്റ്റീരിയോ സ്പീക്കറുകൾ |
| വൈദ്യുതി ഉപഭോഗം | 170 വാട്ട്സ് |
| നിയന്ത്രണ തരം | Remote Control, On-device buttons |
| മൗണ്ടിംഗ് തരം | Ceiling Mount, Portable |
| അനുയോജ്യമായ ഉപകരണങ്ങൾ | Laptop, Tablet, Game Consoles, USB drives |
വാറൻ്റിയും പിന്തുണയും
For warranty information, please refer to the warranty card included with your product or contact your retailer. Overmax provides support for its products. For technical assistance or further inquiries, please visit the official Overmax webസൈറ്റ് അല്ലെങ്കിൽ അവരുടെ ഉപഭോക്തൃ സേവന വിഭാഗവുമായി ബന്ധപ്പെടുക.
കുറിപ്പ്: നിർദ്ദിഷ്ട വാറന്റി നിബന്ധനകളും പിന്തുണാ കോൺടാക്റ്റ് വിശദാംശങ്ങളും പ്രദേശത്തിനനുസരിച്ച് വ്യത്യാസപ്പെടാം.
ഔദ്യോഗിക ഉൽപ്പന്ന വീഡിയോകൾ
ഈ മോഡലിന് വിൽപ്പനക്കാരനിൽ നിന്നുള്ള ഔദ്യോഗിക ഉൽപ്പന്ന വീഡിയോകളൊന്നും ഇപ്പോൾ ലഭ്യമല്ല.


