1. ആമുഖം
This manual provides detailed instructions for the installation, configuration, and operation of your ASRock Z590M Phantom Gaming 4 motherboard. Please read this manual thoroughly before attempting to install or use the product to ensure proper functionality and to prevent damage.
സുരക്ഷാ വിവരങ്ങൾ
- Always disconnect the power cord from the wall outlet before touching any components inside the computer case.
- ഘടകങ്ങൾ കൈകാര്യം ചെയ്യുമ്പോൾ ഇലക്ട്രോസ്റ്റാറ്റിക് ഡിസ്ചാർജ് (ഇഎസ്ഡി) കേടുപാടുകൾ തടയാൻ ആന്റി-സ്റ്റാറ്റിക് റിസ്റ്റ് സ്ട്രാപ്പ് ധരിക്കുക.
- കമ്പ്യൂട്ടർ കെയ്സിനുള്ളിൽ അമിതമായി ചൂടാകുന്നത് തടയാൻ ശരിയായ വായുസഞ്ചാരം ഉറപ്പാക്കുക.
- മദർബോർഡ് ഈർപ്പം, കടുത്ത താപനില എന്നിവയിൽ നിന്ന് അകറ്റി നിർത്തുക.
2. ഉൽപ്പന്നം കഴിഞ്ഞുview
The ASRock Z590M Phantom Gaming 4 is a Micro ATX motherboard designed for 10th and 11th Generation Intel Core processors, utilizing the LGA1200 socket and Intel Z590 chipset. It supports DDR4 memory, features USB 3.2 Gen2, Hyper M.2 (PCIe Gen4x4), and ASRock's Super Alloy design for enhanced durability and performance.
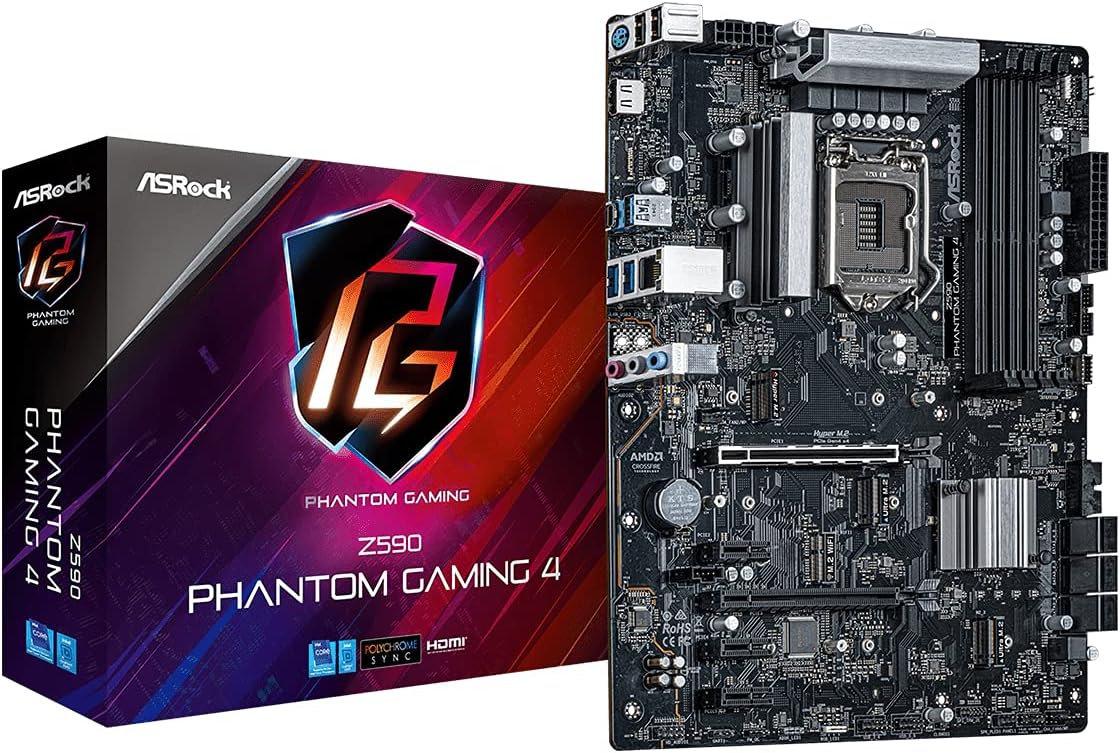
ചിത്രം 2.1: The ASRock Z590M Phantom Gaming 4 motherboard alongside its retail packaging. This image provides a general view ഉൽപ്പന്നത്തിന്റെയും അതിന്റെ ബ്രാൻഡിംഗിന്റെയും.
പ്രധാന സവിശേഷതകൾ
- Supports 10th and 11th Gen Intel Core Processors (LGA1200)
- Intel Z590 Chipset
- Dual Channel DDR4 Memory Technology (up to 4800MHz)
- ASRock USB 3.2 Gen2 Type-A Port (10 Gb/s)
- ASRock Hyper M.2 (PCIe Gen4x4) for high-speed storage
- ASRock Super Alloy design with Premium 50A Power Chokes and Sapphire Black PCB
- ASRock Steel Slot for enhanced PCIe slot durability
- ASRock POST Status Checker (PSC) for diagnostic assistance
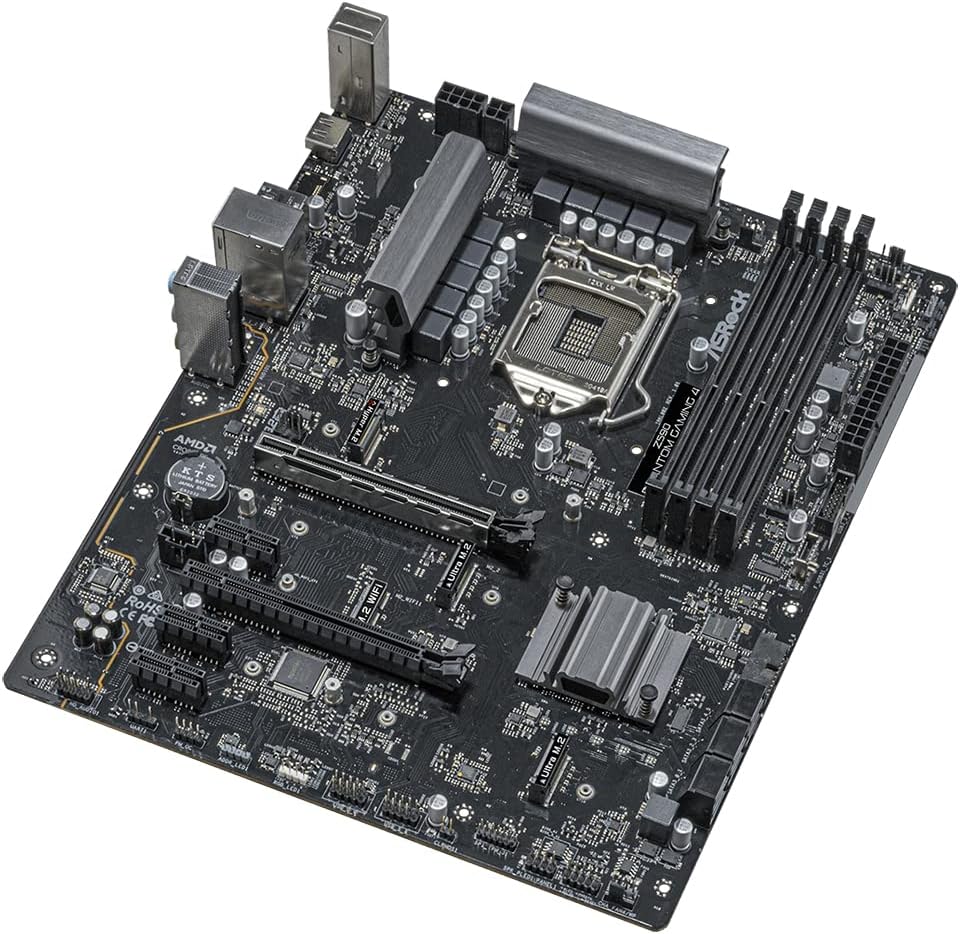
ചിത്രം 2.2: An angled perspective of the ASRock Z590M Phantom Gaming 4 motherboard, highlighting the CPU socket, RAM slots, and various expansion slots.
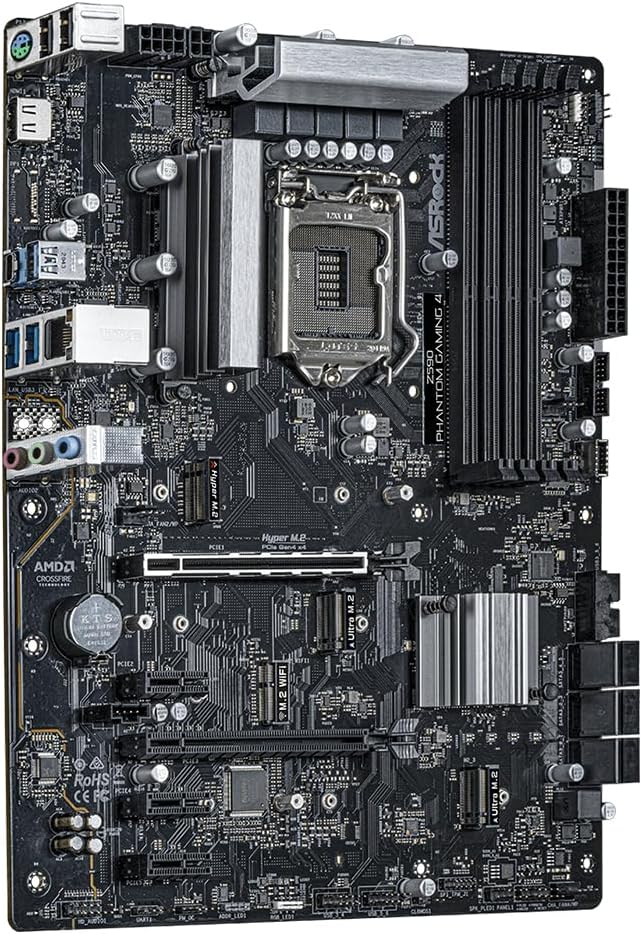
ചിത്രം 2.3: മുകളിൽ നിന്ന് താഴേക്ക് view of the ASRock Z590M Phantom Gaming 4 motherboard, showing the layout of components including the chipset heatsink, M.2 slots, and PCIe slots.
3. സജ്ജീകരണവും ഇൻസ്റ്റാളേഷനും
നിങ്ങളുടെ മദർബോർഡും അതിന്റെ ഘടകങ്ങളും ഇൻസ്റ്റാൾ ചെയ്യുന്നതിന് ഈ ഘട്ടങ്ങൾ ശ്രദ്ധാപൂർവ്വം പാലിക്കുക.
3.1 സിപിയു ഇൻസ്റ്റാൾ ചെയ്യുന്നു
- സിപിയു സോക്കറ്റ് ലിവർ തുറന്ന് ലോഡ് പ്ലേറ്റ് ഉയർത്തുക.
- സിപിയു സോക്കറ്റുമായി ശ്രദ്ധാപൂർവ്വം വിന്യസിക്കുക, സിപിയുവിലെ സുവർണ്ണ ത്രികോണം സോക്കറ്റിലെ ത്രികോണവുമായി പൊരുത്തപ്പെടുന്നുണ്ടെന്ന് ഉറപ്പാക്കുക.
- നിർബന്ധിച്ച് അമർത്താതെ സിപിയു സോക്കറ്റിൽ സൌമ്യമായി വയ്ക്കുക.
- ലോഡ് പ്ലേറ്റ് അടച്ച് ലിവർ ഉറപ്പിക്കുന്നത് വരെ അമർത്തുക.
3.2 മെമ്മറി (റാം) ഇൻസ്റ്റാൾ ചെയ്യുന്നു
- DIMM സ്ലോട്ടുകളുടെ രണ്ടറ്റത്തും ക്ലിപ്പുകൾ തുറക്കുക.
- DDR4 മെമ്മറി മൊഡ്യൂളിലെ നോച്ച്, DIMM സ്ലോട്ടിലെ നോച്ചുമായി വിന്യസിക്കുക.
- Insert the memory module firmly into the slot until the clips snap into place. For dual-channel operation, refer to the motherboard manual for recommended slot configurations.
3.3 സ്റ്റോറേജ് ഡിവൈസുകൾ ഇൻസ്റ്റാൾ ചെയ്യൽ
- M.2 SSD: Locate the M.2 slots. Insert the M.2 SSD into the slot at a 30-degree angle, then gently push it down and secure it with the provided screw.
- SATA ഡ്രൈവുകൾ: Connect SATA data cables from your SSD/HDD to the SATA ports on the motherboard. Connect power cables from your power supply to the drives.
3.4 എക്സ്പാൻഷൻ കാർഡുകൾ ഇൻസ്റ്റാൾ ചെയ്യൽ
Insert graphics cards or other PCIe expansion cards into the appropriate PCIe slots. Ensure they are seated firmly and secured with a screw to the case.
3.5 വൈദ്യുതി വിതരണം ബന്ധിപ്പിക്കുന്നു
- Connect the 24-pin ATX power connector to the main power socket on the motherboard.
- Connect the 8-pin (or 4+4-pin) ATX 12V power connector to the CPU power socket.
- Connect power to any graphics cards or other components as required.
3.6 Connecting Front Panel and Rear I/O
- Connect the front panel headers (power switch, reset switch, HDD LED, power LED) to the corresponding pins on the motherboard. Refer to the motherboard diagram for correct pin assignments.
- Connect USB, audio, and other front panel connectors.
- Ensure the I/O shield is installed in your case before mounting the motherboard.

ചിത്രം 3.1: The rear I/O panel of the ASRock Z590M Phantom Gaming 4 motherboard, displaying various ports including USB, Ethernet, and audio jacks.
4. പ്രവർത്തന നിർദ്ദേശങ്ങൾ
After successful installation, you can power on your system and configure the BIOS/UEFI.
4.1 ആദ്യ ബൂട്ടും BIOS/UEFI സജ്ജീകരണവും
- നിങ്ങളുടെ കമ്പ്യൂട്ടറിൽ പവർ ചെയ്യുക.
- അമർത്തുക DEL or F2 ബയോസ്/യുഇഎഫ്ഐ സജ്ജീകരണ യൂട്ടിലിറ്റിയിൽ പ്രവേശിക്കുന്നതിന് സ്റ്റാർട്ടപ്പ് സമയത്ത് കീ അമർത്തുക.
- Configure essential settings such as boot order, date/time, and enable XMP for memory if desired.
- Save changes and exit. The system will restart.
4.2 ഓപ്പറേറ്റിംഗ് സിസ്റ്റം ഇൻസ്റ്റലേഷൻ
Insert your operating system installation media (USB drive or DVD) and follow the on-screen prompts to install your preferred operating system.
4.3 ഡ്രൈവർ ഇൻസ്റ്റലേഷൻ
After installing the operating system, install the necessary drivers from the ASRock support website or the provided driver CD (if applicable). Key drivers include chipset, audio, LAN, and graphics drivers.
5. പരിപാലനം
നിങ്ങളുടെ മദർബോർഡിന്റെ ദീർഘായുസ്സും മികച്ച പ്രകടനവും ഉറപ്പാക്കാൻ പതിവ് അറ്റകുറ്റപ്പണികൾ സഹായിക്കുന്നു.
5.1 വൃത്തിയാക്കൽ
- Periodically clean dust from inside your computer case using compressed air.
- Ensure fans (CPU, case, GPU) are free from obstructions.
- വൃത്തിയാക്കുന്നതിന് മുമ്പ് എല്ലായ്പ്പോഴും വൈദ്യുതി വിച്ഛേദിക്കുക.
5.2 ബയോസ്/യുഇഎഫ്ഐ അപ്ഡേറ്റുകൾ
ASRock പരിശോധിക്കുക website for the latest BIOS/UEFI updates. Updates can improve stability, compatibility, and performance. Follow the instructions provided by ASRock carefully when performing a BIOS update.
6. പ്രശ്നപരിഹാരം
നിങ്ങൾ നേരിട്ടേക്കാവുന്ന പൊതുവായ പ്രശ്നങ്ങളെ ഈ വിഭാഗം അഭിസംബോധന ചെയ്യുന്നു.
6.1 പവർ ഇല്ല / ബൂട്ട് ഇല്ല
- എല്ലാ പവർ കണക്ഷനുകളും പരിശോധിക്കുക (24-പിൻ ATX, 8-പിൻ CPU, GPU).
- വൈദ്യുതി വിതരണം സ്വിച്ച് ഓണാണെന്ന് ഉറപ്പാക്കുക.
- Verify the front panel power switch connection to the motherboard.
- സാധ്യമെങ്കിൽ മറ്റൊരു പവർ സപ്ലൈ ഉപയോഗിച്ച് പരീക്ഷിക്കുക.
6.2 ഡിസ്പ്ലേ ഇല്ല
- Ensure the monitor is connected to the graphics card (or integrated graphics if no discrete GPU).
- ഗ്രാഫിക്സ് കാർഡും റാം മൊഡ്യൂളുകളും വീണ്ടും ഇൻസ്റ്റാൾ ചെയ്യുക.
- Check the POST Status Checker (PSC) LEDs on the motherboard for diagnostic codes.
6.3 സിസ്റ്റം അസ്ഥിരത / ക്രാഷുകൾ
- സിപിയു, ജിപിയു താപനില പരിശോധിക്കുക. ആവശ്യത്തിന് തണുപ്പിക്കൽ ഉറപ്പാക്കുക.
- റാം പിശകുകൾ പരിശോധിക്കാൻ മെമ്മറി ഡയഗ്നോസ്റ്റിക് ഉപകരണങ്ങൾ പ്രവർത്തിപ്പിക്കുക.
- എല്ലാ ഡ്രൈവർമാരും കാലികമാണെന്ന് ഉറപ്പാക്കുക.
- ബയോസ് ഡിഫോൾട്ട് സെറ്റിംഗുകളിലേക്ക് പുനഃസജ്ജമാക്കുക.
7 സ്പെസിഫിക്കേഷനുകൾ
| ഫീച്ചർ | സ്പെസിഫിക്കേഷൻ |
|---|---|
| ബ്രാൻഡ് | ASRock |
| മോഡലിൻ്റെ പേര് | Z590M PHANTOM GAMING 4 |
| സിപിയു സോക്കറ്റ് | LGA 1200 |
| അനുയോജ്യമായ പ്രോസസ്സറുകൾ | 10-ാം തലമുറ ഇന്റൽ കോർ, 11-ാം തലമുറ ഇന്റൽ കോർ |
| ചിപ്സെറ്റ് തരം | ഇൻ്റൽ Z590 |
| റാം മെമ്മറി ടെക്നോളജി | DDR4 SDRAM |
| മെമ്മറി സ്പീഡ് | 4800 MHz (OC) വരെ |
| മെമ്മറി സ്റ്റോറേജ് കപ്പാസിറ്റി | 12 GB (Note: This value from source data may refer to a specific configuration, actual max capacity depends on DIMM slots and module size) |
| USB 2.0 പോർട്ടുകളുടെ എണ്ണം | 2 (പിൻഭാഗം I/O) |
| ഉൽപ്പന്ന അളവുകൾ | 11 x 10.5 x 2.5 ഇഞ്ച് |
| ഇനത്തിൻ്റെ ഭാരം | 2.2 പൗണ്ട് |
| പ്ലാറ്റ്ഫോം | വിൻഡോസ് |
| ബാറ്ററികൾ ആവശ്യമാണ് | 1 Lithium Ion (for CMOS) |
8. വാറൻ്റിയും പിന്തുണയും
വിശദമായ വാറന്റി വിവരങ്ങൾക്ക്, ദയവായി നിങ്ങളുടെ ഉൽപ്പന്നത്തിനൊപ്പം ഉൾപ്പെടുത്തിയിരിക്കുന്ന വാറന്റി കാർഡ് പരിശോധിക്കുക അല്ലെങ്കിൽ ഔദ്യോഗിക ASRock സന്ദർശിക്കുക. website. ASRock provides technical support for its products.
8.1 സാങ്കേതിക പിന്തുണ
If you encounter issues that cannot be resolved using this manual or the troubleshooting steps, please contact ASRock technical support through their official webസൈറ്റ്. പിന്തുണയുമായി ബന്ധപ്പെടുമ്പോൾ നിങ്ങളുടെ ഉൽപ്പന്ന മോഡലും സീരിയൽ നമ്പറും തയ്യാറായി വയ്ക്കുക.
ASRock ഔദ്യോഗികം Webസൈറ്റ്: www.asrock.com


