1. ഉൽപ്പന്നം കഴിഞ്ഞുview
This manual provides instructions for the installation, operation, and maintenance of your AUTOWIKI Tail Light Assemblies. These tail lights are designed as direct replacements for the original equipment on 1998-2004 Nissan Frontier trucks, ensuring a precise fit and reliable performance.
The assemblies meet SAE and DOT standards, ensuring compliance with safety regulations. They feature a durable construction with a multi-protection polycarbonate lens for better light transmission and UV resistance, and are designed to be waterproof for enhanced longevity.

ചിത്രം 1.1: കഴിഞ്ഞുview of the AUTOWIKI Tail Light Assemblies.
2. ഉൽപ്പന്ന സവിശേഷതകൾ
- Direct Fitment: Specifically designed for 1998-2004 Nissan Frontier models.
- മെച്ചപ്പെടുത്തിയ ദൃശ്യപരത: Engineered to provide improved visual effects, especially during nighttime driving.
- എളുപ്പമുള്ള ഇൻസ്റ്റാളേഷൻ: Includes fixed accessories for straightforward installation.
- സുരക്ഷാ മാനദണ്ഡങ്ങൾ: Complies with SAE and DOT safety and quality standards.
- നീണ്ടുനിൽക്കുന്ന നിർമ്മാണം: Features a multi-protection polycarbonate lens for light transmission and UV resistance, and high-grade ABS plastic housing.
- കാലാവസ്ഥ പ്രതിരോധം: Waterproof design with one-way vents to dissipate moisture, ensuring shock-proof and heat-proof performance against weather damage.
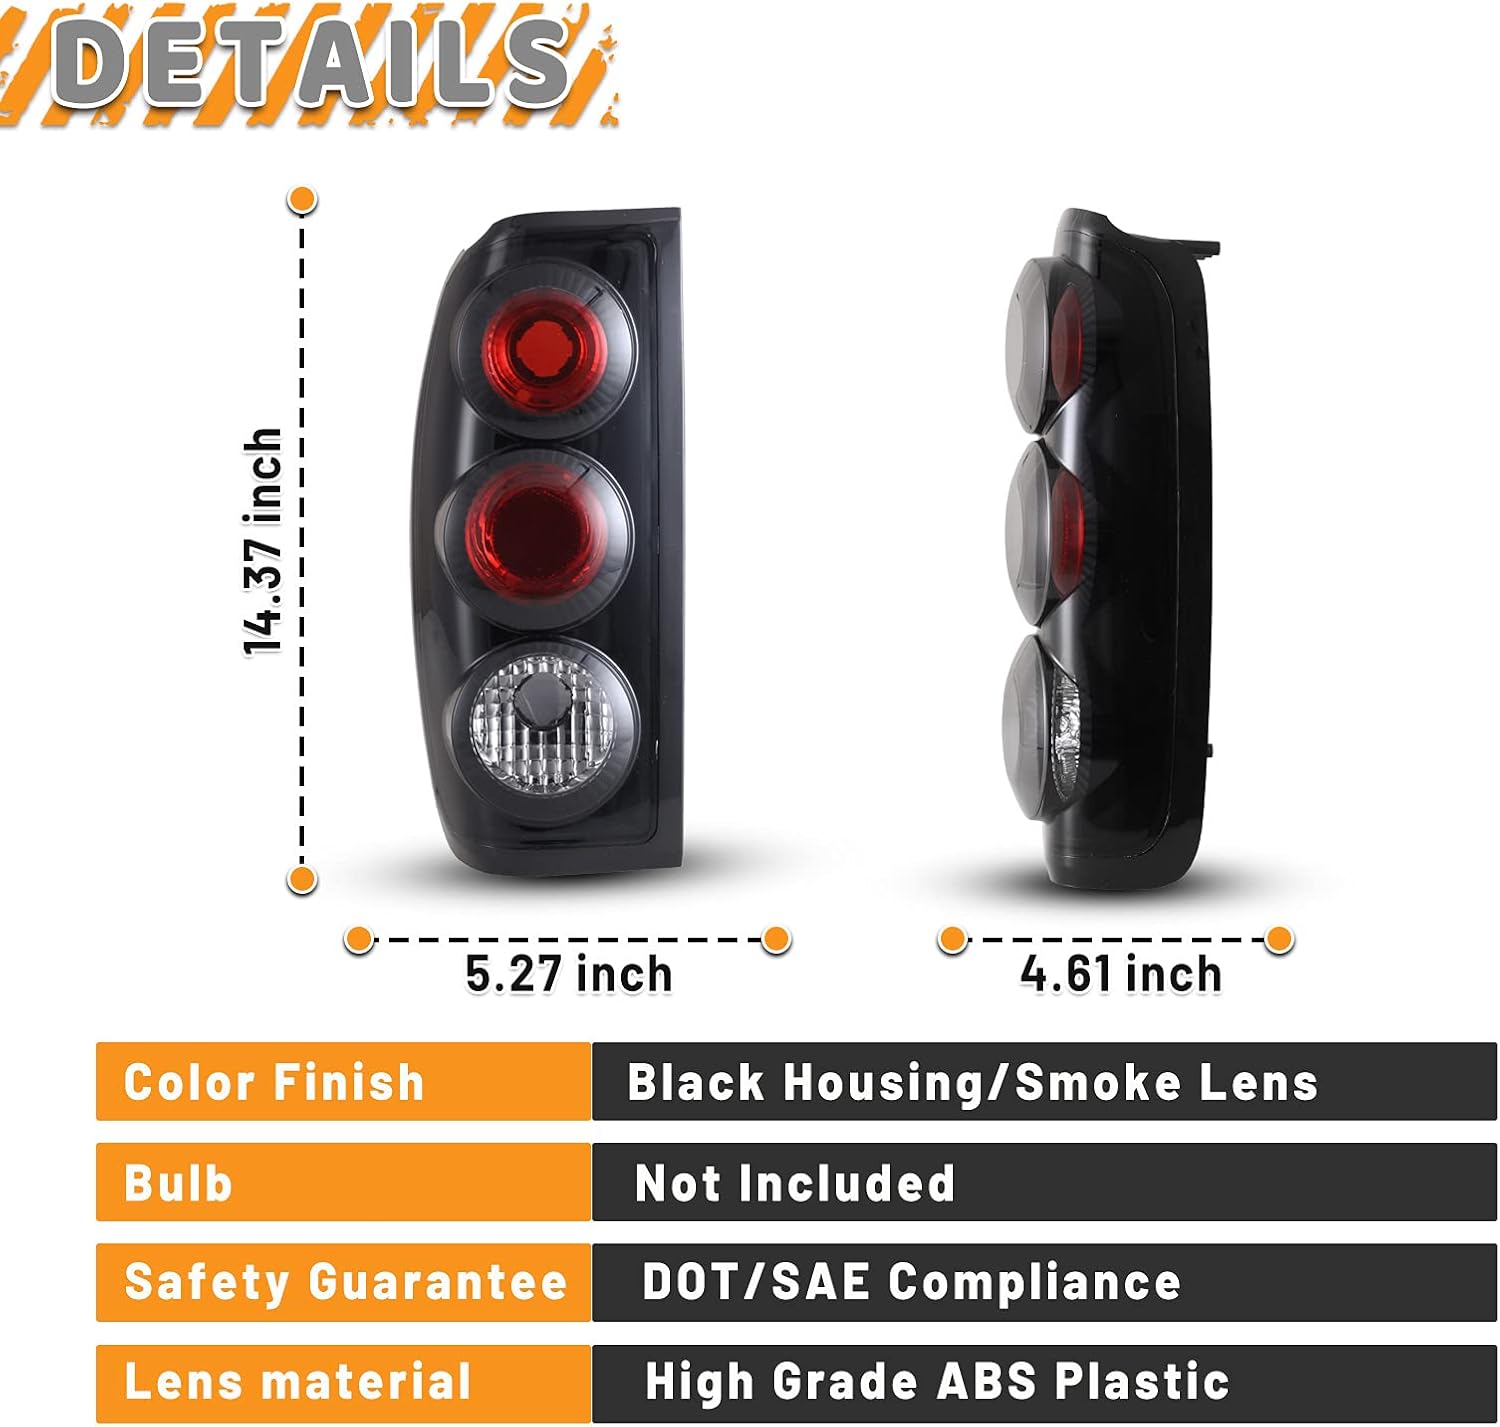
Image 2.1: Detailed dimensions and material specifications of the tail light assembly.
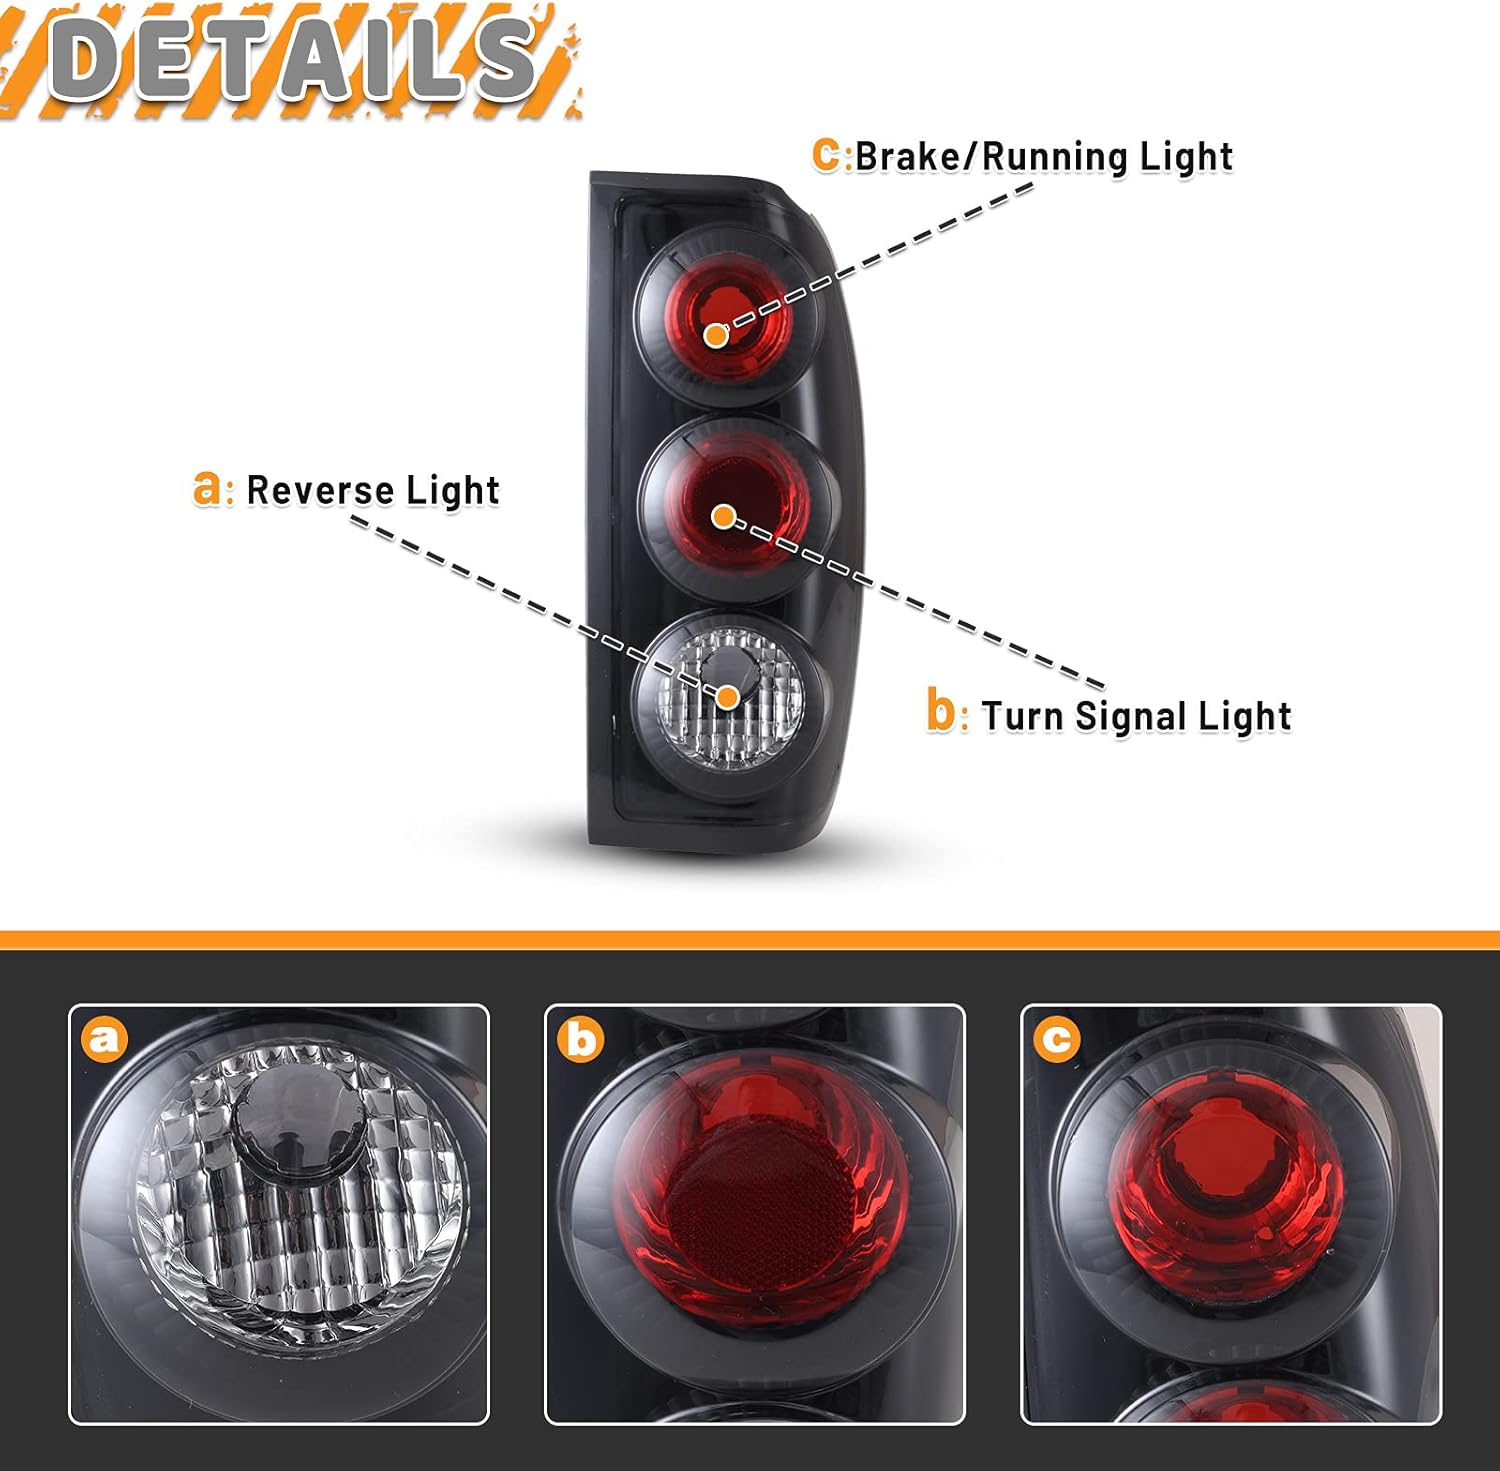
Image 2.2: Illustration of the individual light functions: Reverse Light, Turn Signal Light, and Brake/Running Light.

ചിത്രം 2.3: ക്ലോസ്-അപ്പ് view of the sealing design, highlighting the waterproof and dustproof features of the lens.
Video 2.1: A short demonstration of the tail lights in operation, showcasing their illumination patterns.
3 സ്പെസിഫിക്കേഷനുകൾ
| ബ്രാൻഡ് | ഓട്ടോവിക്കി |
| മോഡൽ നമ്പർ | CB20-0043-05S0 |
| OEM Part Number (Left) | 265553S525; 265557B425; 265558Z325 |
| OEM Part Number (Right) | 265503S525; 265507B425; 265508Z325 |
| വാഹന സേവന തരം | Truck (Nissan Frontier 1998-2004) |
| പ്രകാശ സ്രോതസ്സ് തരം | എൽഇഡി |
| ലെൻസ് മെറ്റീരിയൽ | Polymethylacrylate |
| ലെൻസ് നിറം | ക്ലിയർ |
| പ്രത്യേക ഫീച്ചർ | വാട്ടർപ്രൂഫ് |
| ഇനത്തിൻ്റെ ഭാരം | 4.05 പൗണ്ട് |
| പാക്കേജ് അളവുകൾ | 16.69 x 12.56 x 8.03 ഇഞ്ച് |
4. ഇൻസ്റ്റലേഷൻ നിർദ്ദേശങ്ങൾ
Replacing your tail light assemblies is a straightforward process. It is recommended to consult your vehicle's service manual for specific details regarding tail light removal and installation for your Nissan Frontier model year.
ആവശ്യമായ ഉപകരണങ്ങൾ:
- Screwdriver set (Phillips and/or flathead, depending on vehicle)
- Socket wrench set (if applicable)
- Trim removal tool (optional, for plastic clips)
പൊതുവായ ഘട്ടങ്ങൾ:
- സുരക്ഷ ആദ്യം: Ensure the vehicle is turned off and the parking brake is engaged. Disconnect the negative terminal of the battery to prevent electrical shorts.
- Access Mounting Screws: Open the tailgate or access panel to locate the mounting screws or bolts holding the tail light assembly in place. These are typically found on the inside edge of the light housing.
- പഴയ അസംബ്ലി നീക്കം ചെയ്യുക: Carefully remove all visible screws or bolts. Gently pull the tail light assembly straight back from the vehicle. It may be held by alignment pins or clips, so a firm but gentle pull may be necessary.
- വയറിംഗ് വിച്ഛേദിക്കുക: Once the assembly is loose, disconnect the electrical connectors from the bulb sockets. Twist the bulb sockets counter-clockwise to remove them from the old housing.
- Transfer Bulbs (if applicable): If your new assembly does not include bulbs, transfer the existing functional bulbs from the old sockets to the new ones by twisting them into place.
- Connect New Assembly: Connect the electrical connectors to the new tail light assembly. Ensure all connections are secure.
- പുതിയ അസംബ്ലിയുടെ സ്ഥാനം: Align the new tail light assembly with the mounting holes and alignment pins on the vehicle body. Push it firmly into place.
- Secure New Assembly: Reinstall the mounting screws or bolts that were removed in step 2. Tighten them securely, but do not overtighten to avoid cracking the plastic.
- ടെസ്റ്റ് പ്രവർത്തനം: Reconnect the vehicle battery. Test all tail light functions: running lights, brake lights, turn signals, and reverse lights, to ensure they are working correctly before driving.

ചിത്രം 4.1: പിൻഭാഗം view of the tail light assembly, indicating key installation points and bulb socket locations.
Video 4.1: A detailed video demonstrating the installation process for tail lights on a Nissan Frontier.
Video 4.2: An instructional video showing the replacement of rear tail lights for a 2000-2004 Nissan Frontier.
Video 4.3: A compatibility and feature overview video for AUTOSAVER88 taillights for Frontier 1998 models.
5. പ്രവർത്തന നിർദ്ദേശങ്ങൾ
The AUTOWIKI Tail Light Assemblies operate in conjunction with your vehicle's existing electrical system. No special operating procedures are required beyond the standard use of your vehicle's lighting controls.
- റണ്ണിംഗ് ലൈറ്റുകൾ: Activate automatically when your vehicle's headlights or parking lights are turned on.
- ബ്രേക്ക് ലൈറ്റുകൾ: Illuminate when the brake pedal is pressed, signaling deceleration or stopping.
- ടേൺ സിഗ്നലുകൾ: Flash when the turn signal lever is engaged, indicating a turn or lane change.
- റിവേഴ്സ് ലൈറ്റുകൾ: Illuminate when the vehicle is shifted into reverse gear, providing visibility and signaling backing maneuvers.
Always ensure all lights are functioning correctly before driving, especially at night or in adverse weather conditions.
6. പരിപാലനം
Proper maintenance ensures the longevity and optimal performance of your tail light assemblies.
- പതിവ് വൃത്തിയാക്കൽ: Clean the outer lens regularly with a soft cloth and mild automotive soap to remove dirt, dust, and road grime. Avoid abrasive cleaners or harsh chemicals that could damage the lens material.
- കേടുപാടുകൾക്കായി പരിശോധിക്കുക: Periodically inspect the tail light assemblies for any signs of cracks, chips, or moisture accumulation inside the housing. While designed to be waterproof, extreme conditions or impacts can compromise seals.
- Check Bulb Functionality: Regularly check that all bulbs (brake, running, turn signal, reverse) are working. Replace any non-functional bulbs promptly. Refer to your vehicle's service manual for correct bulb types and replacement procedures.
- വയറിംഗ് പരിശോധന: Occasionally check the wiring and connectors for corrosion or damage. Ensure all connections are secure.
7. പ്രശ്നപരിഹാരം
If you encounter issues with your tail light assemblies, consider the following common troubleshooting steps:
- പ്രകാശിക്കാത്ത വെളിച്ചം:
- Check the bulb: The most common cause is a burnt-out bulb. Replace it with the correct type.
- Check the fuse: A blown fuse can affect one or more lights. Consult your vehicle's fuse box diagram and replace any blown fuses.
- Check wiring connections: Ensure all electrical connectors are securely attached and free from corrosion.
- ലെൻസിനുള്ളിലെ ഈർപ്പം:
- Minor condensation can occur due to temperature changes and usually dissipates.
- If significant water accumulation or persistent moisture is present, inspect the seals around the housing. Ensure the one-way vents are not blocked. If the issue persists, the seal may be compromised.
- ഇടവിട്ടുള്ള പ്രവർത്തനം:
- Often caused by loose or corroded electrical connections. Disconnect, clean, and re-secure all connectors.
- A faulty bulb socket can also cause intermittent operation.
If these steps do not resolve the issue, it is recommended to consult a qualified automotive technician.
8. വാറൻ്റിയും പിന്തുണയും
For information regarding product warranty, returns, or technical support, please refer to the documentation included with your purchase or contact AUTOWIKI customer service directly. Keep your proof of purchase for any warranty claims.


