ആമുഖം
This instruction manual provides detailed guidance for the safe and effective installation of your Picture Hang Solutions Mirror Hanging Kit. This kit is designed for securely mounting mirrors and heavy frames, offering robust support and adjustable leveling features.
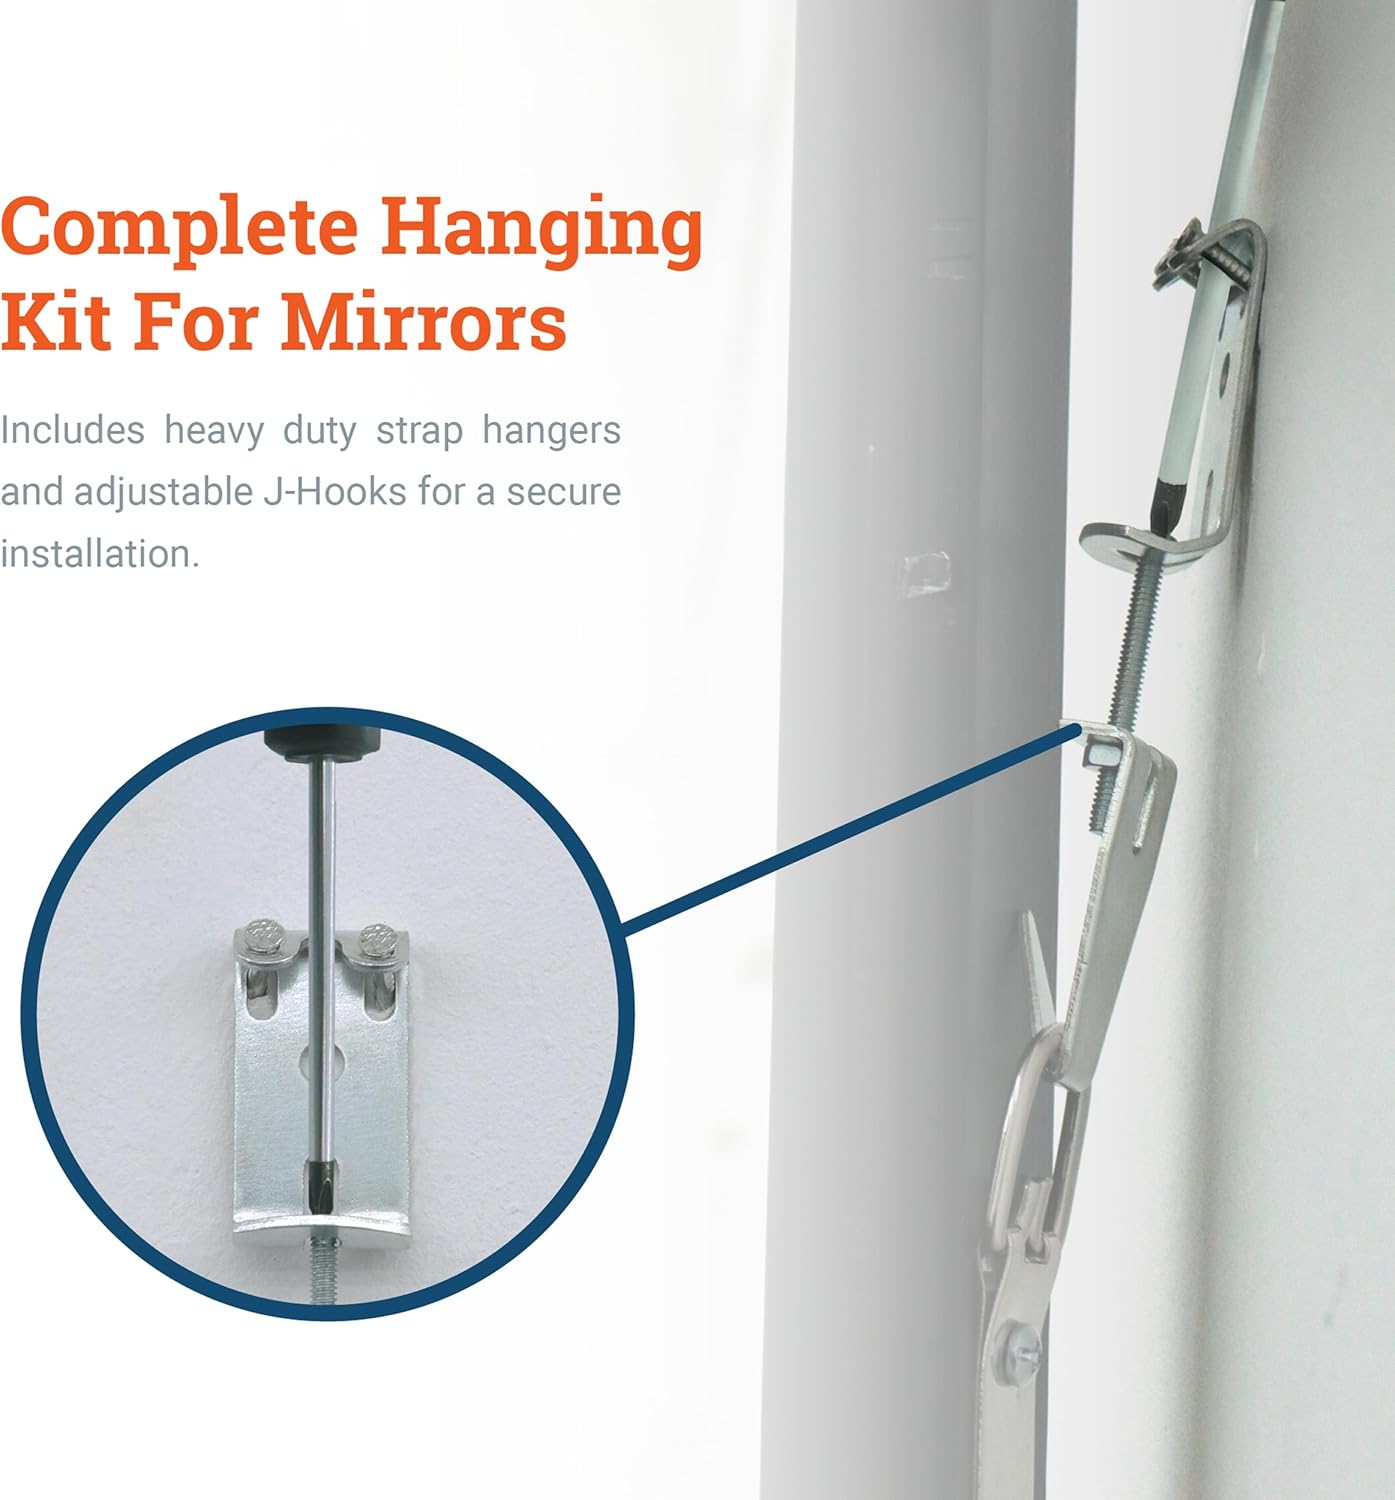
- Complete Hanging Solution: Includes large strap hangers and adjustable leveling hardware for various mirror types.
- ഉയർന്ന ഭാരം ശേഷി: Supports up to 100 pounds when using a pair of large strap hangers with a pair of adjustable J-Hooks, suitable for drywall or wood applications.
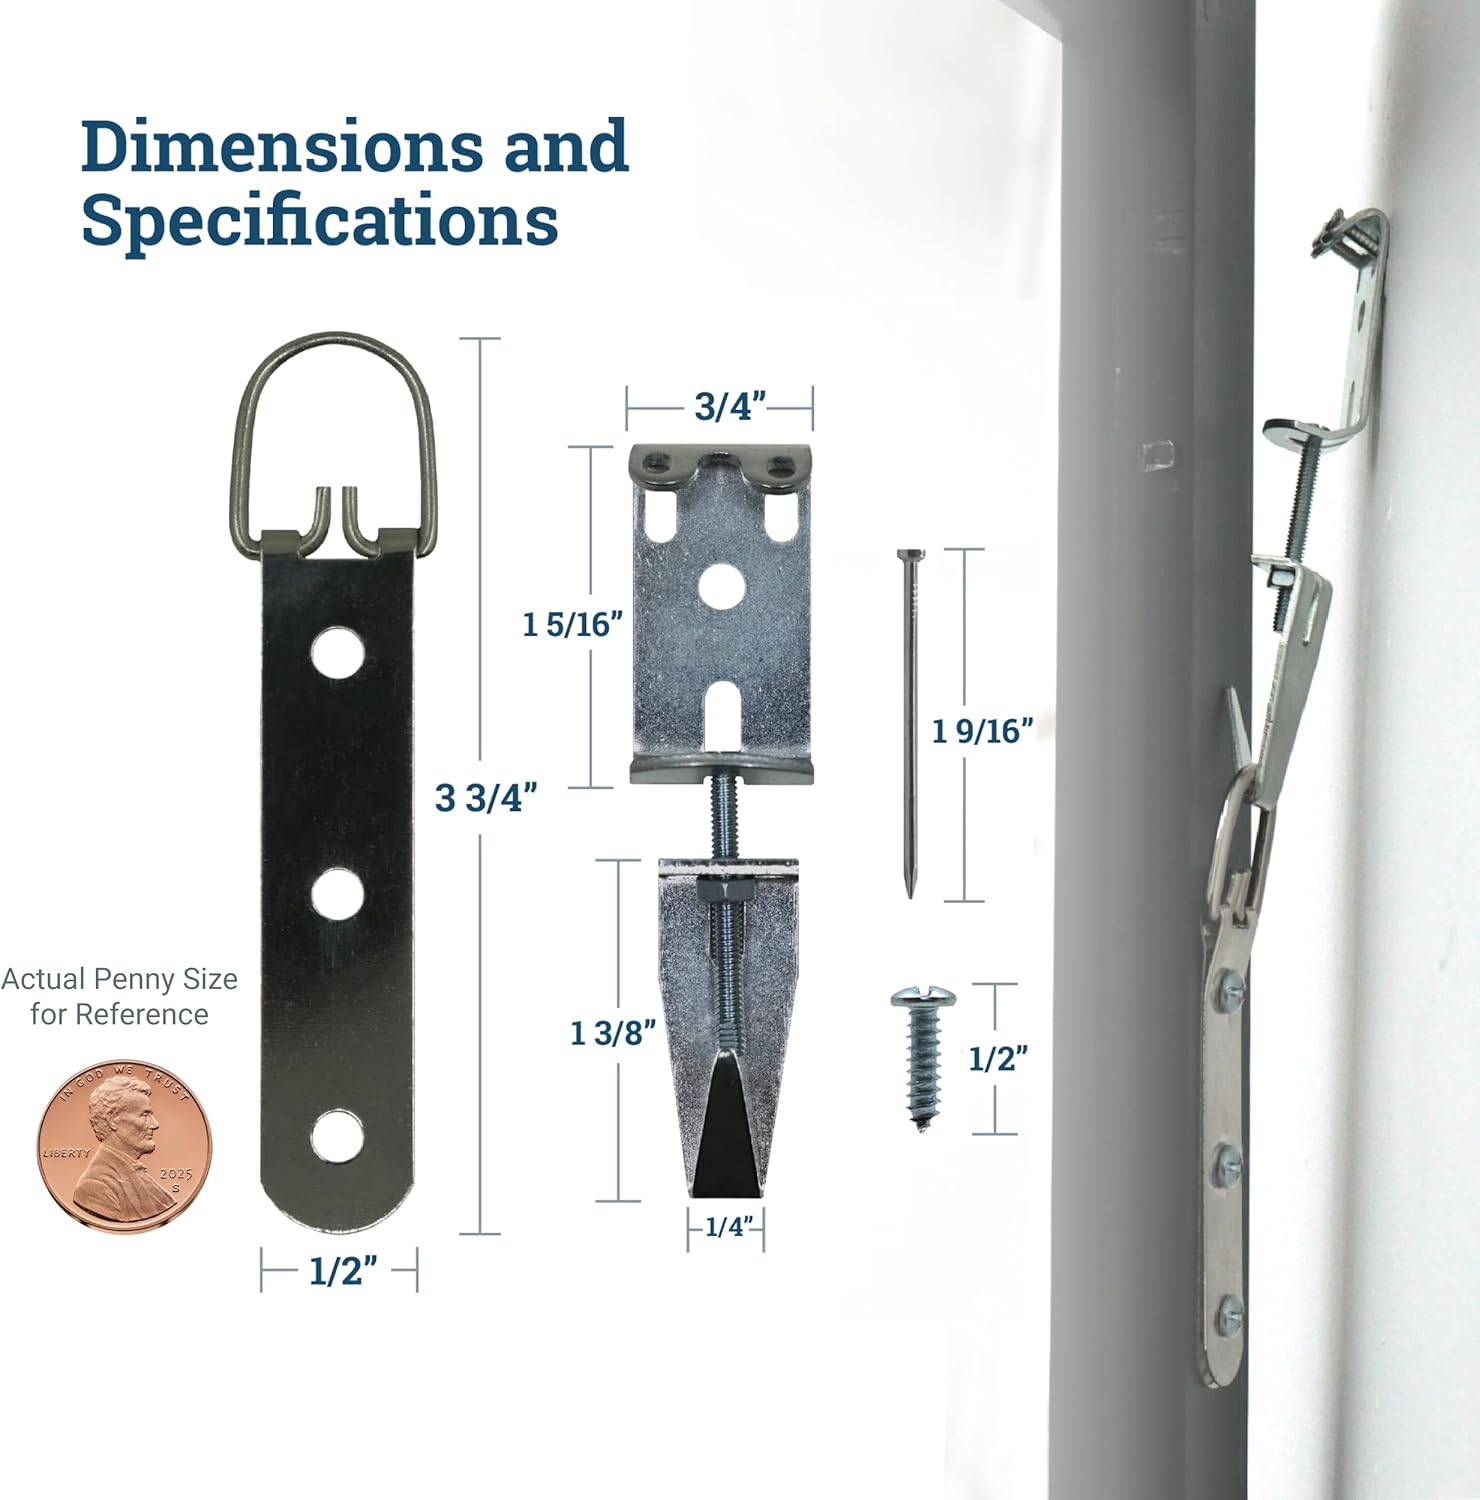
- Adjustable for Precision: Adjustable J-Hooks provide 3/4" adjustment capacity, simplifying leveling during installation.
- നീണ്ടുനിൽക്കുന്ന നിർമ്മാണം: Hangers are designed for heavy-duty applications, ensuring secure and reliable mounting.
പാക്കേജ് ഉള്ളടക്കം
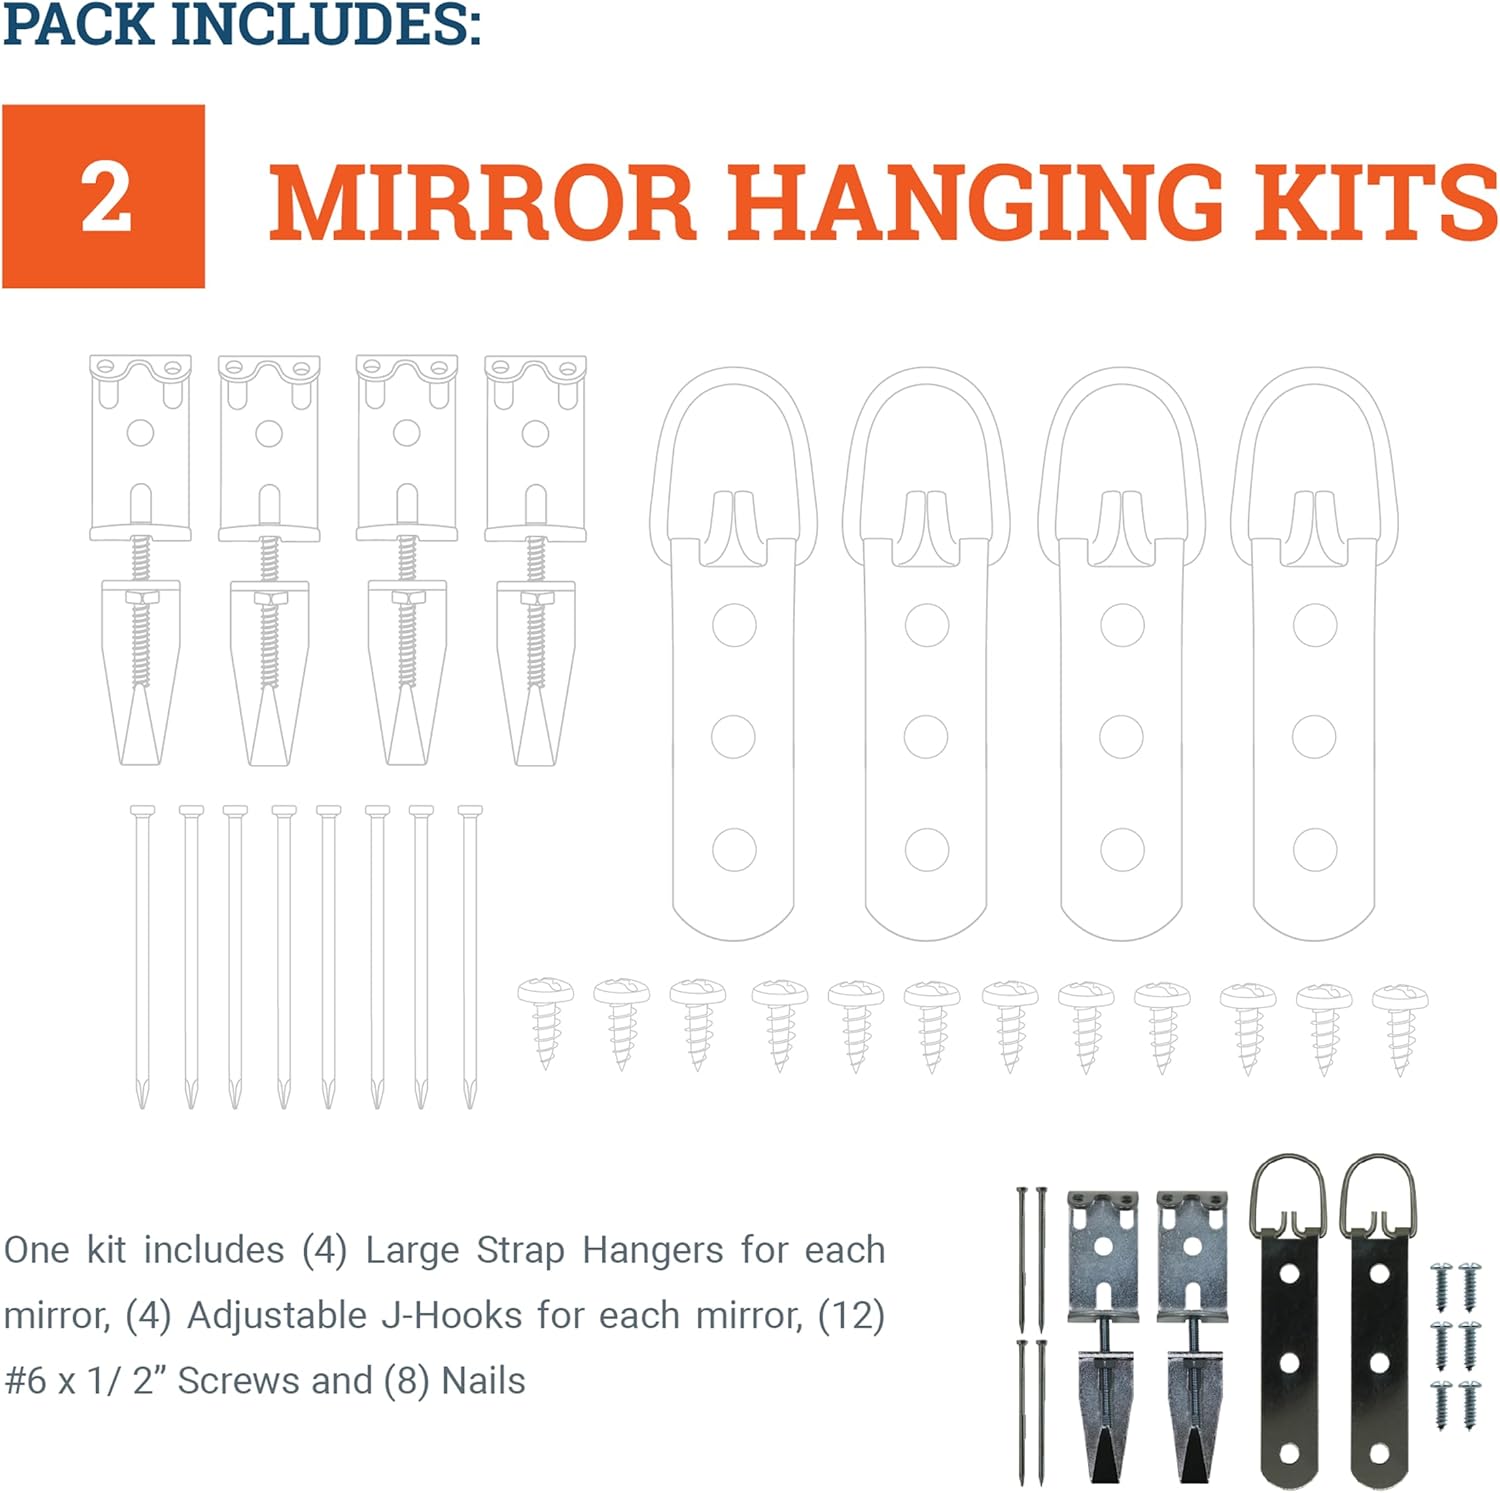
Verify that all components are present before beginning installation. Each kit includes:
- (4) Large Strap Hangers
- (4) Adjustable J-Hooks
- (12) #6 x 1/2” Screws
- (8) Nails
സജ്ജീകരണവും ഇൻസ്റ്റാളേഷനും
Before installation, ensure your wall type is suitable. This kit is best suited for drywall or wood panel walls. Select a hanger with a weight capacity of at least 1-3 times the weight of the item you are hanging. This kit supports up to 100 lbs.
Step 1: Attach Strap Hangers to Mirror
Position the large strap hangers on the back of the mirror frame. Secure them using the provided #6 x 1/2” screws. Ensure they are firmly attached and spaced appropriately for the mirror's size and weight distribution.

Step 2: Install Adjustable J-Hooks on Wall
Mark the desired location for your mirror on the wall. Install the adjustable J-Hooks onto the wall using the provided nails. For drywall, ensure the nails penetrate securely. For wood, pre-drilling a small pilot hole may be beneficial. Make sure to align the J-Hooks horizontally so they will properly engage with the strap hangers on the mirror.
Step 3: Hang and Adjust Mirror
Carefully lift the mirror and engage the strap hangers with the J-Hooks on the wall. Once hung, use the adjustment mechanism on the J-Hooks to fine-tune the mirror's level. The J-Hooks offer 3/4" of adjustment capacity, allowing for precise leveling without needing perfect initial wall installation.
Operation and Usage Tips
Once installed, the mirror hanging kit provides a stable and secure mount. Periodically check the stability of the mirror and the tightness of the screws, especially after any significant vibrations or impacts to the wall.
- ഭാരം വിതരണം: For very wide mirrors, consider using more than two sets of hangers to distribute the weight evenly.
- വാൾ ആങ്കറുകൾ: For maximum security, especially with heavier items or in less robust drywall, consider using appropriate wall anchors in conjunction with the provided nails for the J-Hooks.
- Avoid Picture Wire: Do not use picture hanging wire with this system for heavy mirrors, as it can concentrate stress and lead to failure.
മെയിൻ്റനൻസ്
The Picture Hang Solutions Mirror Hanging Kit requires minimal maintenance. Regularly inspect the hangers and wall mounts for any signs of wear, corrosion, or loosening. Tighten screws as necessary. Keep the components clean and dry to prevent rust.
ട്രബിൾഷൂട്ടിംഗ്
- Mirror is not level: Use the 3/4" adjustment capacity of the J-Hooks to fine-tune the level. Turn the screw on the J-Hook to raise or lower that side of the mirror.
- Mirror feels unstable: Ensure all screws are tightly secured to both the mirror frame and the wall. Verify that the J-Hooks are properly engaged with the strap hangers. If hanging on drywall, consider using stronger wall anchors if the weight is near the maximum capacity or if the drywall feels weak.
- Difficulty attaching J-Hooks to wall: For wood, ensure a pilot hole is drilled. For drywall, ensure the nails are driven straight and fully into the wall.
സ്പെസിഫിക്കേഷനുകൾ
| ഫീച്ചർ | വിശദാംശങ്ങൾ |
|---|---|
| മോഡൽ നമ്പർ | B09BQ7GVRZ |
| ബ്രാൻഡ് | പിക്ചർ ഹാംഗ് സോല്യൂഷൻസ് |
| ഭാരം ശേഷി | 100 പൗണ്ട് വരെ |
| മെറ്റീരിയൽ | അലോയ് സ്റ്റീൽ |
| ഫാസ്റ്റനർ തരം | ഹുക്ക് |
| ഉപരിതല ശുപാർശ | Drywall, Wood |
| Adjustable J-Hook Capacity | 3/4 ഇഞ്ച് |
| ഇനത്തിന്റെ ഭാരം (കിറ്റ്) | 5.3 ഔൺസ് (0.15 കിലോഗ്രാം) |
| നിറം | വെള്ളി |

വാറൻ്റിയും പിന്തുണയും
For any questions regarding installation, missing parts, or product performance, please contact Picture Hang Solutions customer support. While specific warranty details are not provided in this manual, standard consumer rights apply. Please retain your purchase receipt for any warranty claims.
കൂടുതൽ സഹായത്തിന്, സന്ദർശിക്കുക Picture Hang Solutions Store on Amazon.


