
ആമുഖം
The Brigade Select 7" Digital LCD Monitor, model VBV-770M, is a robust and versatile display unit designed for vehicle camera systems. It features multiple camera inputs, auto-triggers, and various display options to enhance vehicle safety and operational efficiency. This manual provides essential information for the proper installation, operation, and maintenance of your monitor.
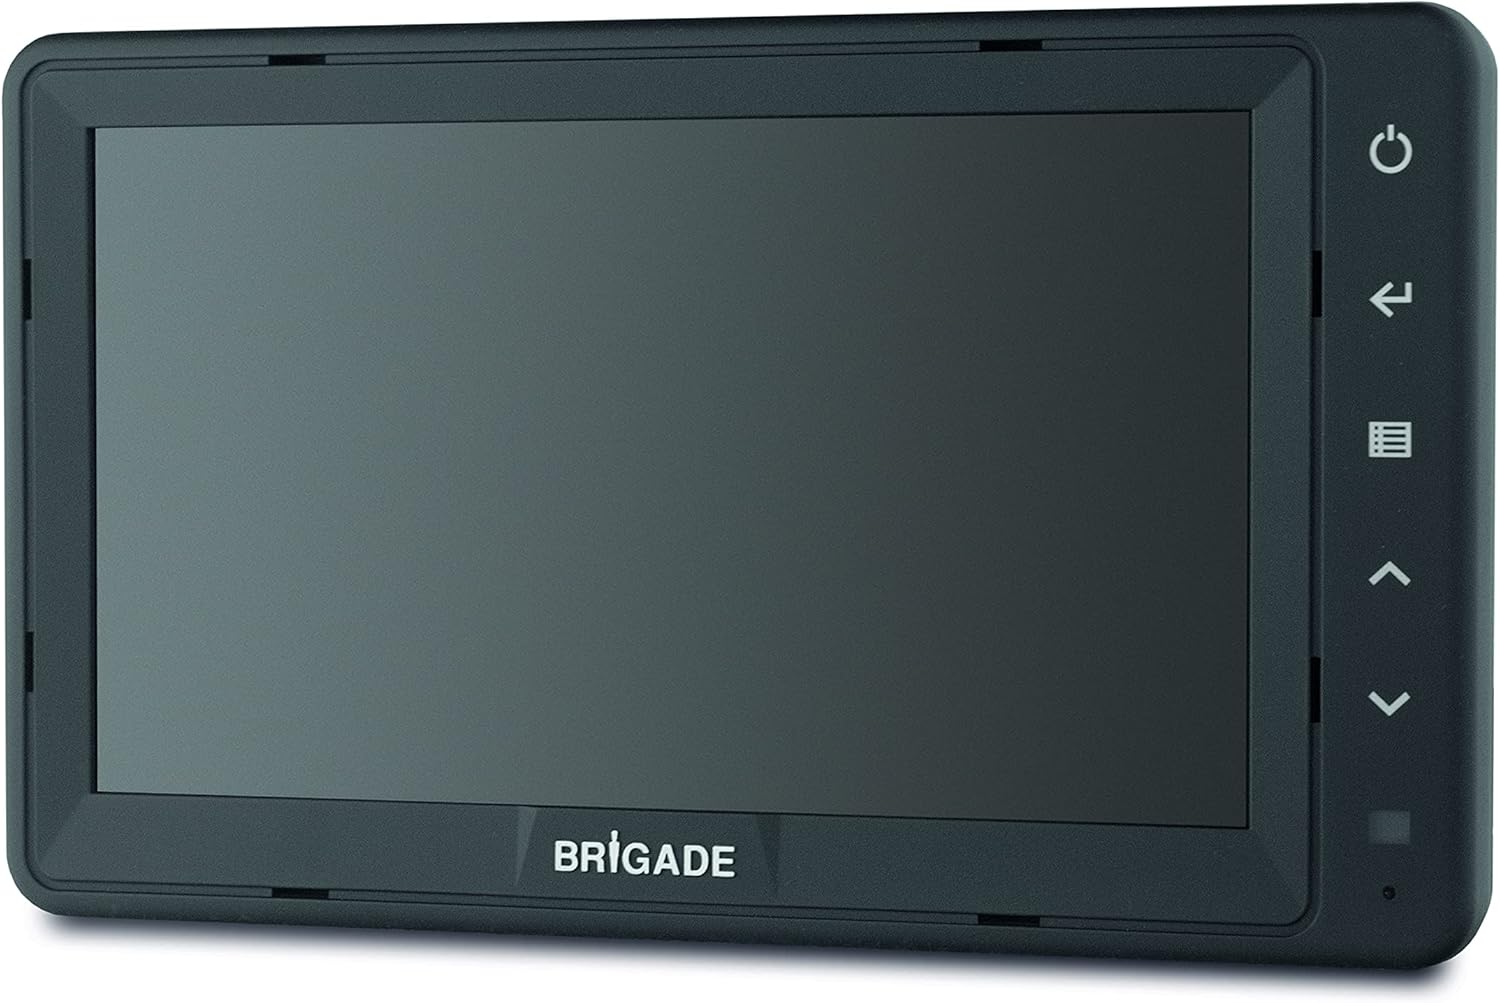
Figure 1: Brigade Select 7" Digital LCD Monitor (VBV-770M)
ബോക്സിൽ എന്താണുള്ളത്
എല്ലാ ഇനങ്ങളും ഉണ്ടെന്ന് ഉറപ്പാക്കാൻ പാക്കേജിന്റെ ഉള്ളടക്കങ്ങൾ പരിശോധിക്കുക:
- 1 x Monitor (VBV-770M)
- 1 x Cable Adapter
- 1 x Sunshield
- 1 x Installation Guide (this manual)
- 1 x ബ്രാക്കറ്റ്
പ്രധാന സവിശേഷതകൾ
- ഡിസ്പ്ലേ: 7" Digital LCD
- ഇൻപുട്ടുകൾ: 3 Camera inputs
- ട്രിഗറുകൾ: 3 Auto-triggers for automatic camera switching
- ഡിസ്പ്ലേ മോഡുകൾ: Mirror / Normal switching from menu
- സുരക്ഷാ സവിശേഷതകൾ: On-screen distance markers
- സുരക്ഷ: 'Button lock' anti-tampഎർ സവിശേഷത
- ഓഡിയോ: സംയോജിത ഓഡിയോ പിന്തുണ
- ദൃശ്യപരത: Sun shield included, Auto-dimmer for varying light conditions
- ഉപയോക്തൃ ഇൻ്റർഫേസ്: Multi-lingual menus
- അനുയോജ്യത: Auto-switching PAL / NTSC video formats
- പാലിക്കൽ: DVS compliant, Vehicle camera monitor, CE marked, E-Marked: UNECE R10 compliant, HALT tested, Camera monitor system R46 approved (VBV-770M only)
സജ്ജീകരണവും ഇൻസ്റ്റാളേഷനും
This section provides general guidelines for installing the Brigade VBV-770M monitor. For detailed wiring diagrams and specific vehicle integration, please refer to the separate installation guide provided or consult a qualified technician.
മോണിറ്റർ മൌണ്ട് ചെയ്യുന്നു
- ഒരു ലൊക്കേഷൻ തിരഞ്ഞെടുക്കുക: Select a stable, flat surface in the vehicle's cabin that provides a clear view for the driver without obstructing vision or airbags.
- ബ്രാക്കറ്റ് സുരക്ഷിതമാക്കുക: Use appropriate fasteners to securely attach the provided mounting bracket to the chosen surface. Ensure it is firmly fixed to withstand vehicle vibrations.
- മോണിറ്റർ ഘടിപ്പിക്കുക: Slide or clip the monitor onto the bracket. Adjust the angle for optimal viewing.
- Install Sunshield: Attach the sunshield to the monitor to reduce glare and improve screen visibility in bright conditions.
Power and Camera Connections
- പവർ കണക്ഷൻ: Connect the monitor's power cable to a 12-24V DC power source in the vehicle. Ensure proper polarity. The monitor consumes approximately 18 Watts (1.5 Ampഎസ്).
- ക്യാമറ ഇൻപുട്ടുകൾ: Connect up to three cameras to the designated camera input ports on the monitor.
- Trigger Wires: Connect the auto-trigger wires from the monitor to the appropriate vehicle signals (e.g., reverse gear, left turn signal, right turn signal) to enable automatic camera switching.
- കേബിൾ മാനേജുമെന്റ്: Route all cables safely, away from moving parts, heat sources, and sharp edges. Secure them with cable ties or clips.
പ്രവർത്തന നിർദ്ദേശങ്ങൾ
അടിസ്ഥാന പ്രവർത്തനം
- പവർ ഓൺ/ഓഫ്: Press the power button (usually indicated by a circle with a vertical line) on the monitor to turn it on or off.
- ഇൻപുട്ട് തിരഞ്ഞെടുക്കൽ: Use the input selection button (often an arrow or 'M' for menu/mode) to cycle through the connected camera inputs.
- Auto-Trigger: When correctly wired, the monitor will automatically switch to the corresponding camera view when a trigger signal is received (e.g., engaging reverse gear).
മെനു നാവിഗേഷൻ
The monitor features multi-lingual menus for adjusting settings. Use the navigation buttons (up/down arrows, enter/select) to browse and select options.
- ആക്സസ് മെനു: Press the menu button (often an icon with lines or 'M').
- നാവിഗേറ്റ്: Use the up/down arrow buttons to scroll through menu options.
- തിരഞ്ഞെടുക്കുക/സ്ഥിരീകരിക്കുക: Press the enter or select button to confirm a choice or enter a sub-menu.
- മെനുവിൽ നിന്ന് പുറത്തുകടക്കുക: Press the menu button again or a dedicated 'back' button to exit the menu.
ക്രമീകരിക്കാവുന്ന ക്രമീകരണങ്ങൾ
- തെളിച്ചം/തീവ്രത: Adjust screen brightness and contrast for optimal viewing in different lighting conditions. The auto-dimmer feature will also assist.
- കണ്ണാടി/സാധാരണ ചിത്രം: For each camera input, you can set the image to be mirrored (typical for rear-view cameras) or normal.
- Distance Markers: Enable or disable on-screen distance markers and adjust their position or calibration if supported.
- ഭാഷ: മെനു ഇന്റർഫേസിനായി നിങ്ങൾക്ക് ഇഷ്ടപ്പെട്ട ഭാഷ തിരഞ്ഞെടുക്കുക.
- ബട്ടൺ ലോക്ക്: Activate the 'Button lock' feature to prevent unauthorized tampക്രമീകരണങ്ങൾ ഉപയോഗിച്ച് എറിംഗ്.
മെയിൻ്റനൻസ്
- വൃത്തിയാക്കൽ: Use a soft, dry, lint-free cloth to clean the monitor screen and casing. കഠിനമായ അടയാളങ്ങൾക്ക്, ചെറുതായി dampen the cloth with water. Do not use abrasive cleaners, solvents, or alcohol-based solutions, as these can damage the screen or finish.
- കേബിൾ പരിശോധന: Periodically check all cables and connections for signs of wear, fraying, or corrosion. Ensure they remain securely connected.
- പരിസ്ഥിതി വ്യവസ്ഥകൾ: While designed for robust use, avoid exposing the monitor to extreme temperatures outside its operating range (-30 to +70°C) or direct prolonged sunlight when not in use.
ട്രബിൾഷൂട്ടിംഗ്
| പ്രശ്നം | സാധ്യമായ കാരണം | പരിഹാരം |
|---|---|---|
| മോണിറ്റർ പവർ ഓണാക്കുന്നില്ല. | No power supply; Loose power connection; Blown fuse. | Check power source (12-24V); Ensure power cable is securely connected; Check vehicle's fuse box for a blown fuse. |
| ചിത്രമൊന്നും പ്രദർശിപ്പിച്ചിട്ടില്ല. | Camera not connected; Incorrect input selected; Faulty camera or cable. | Verify camera connections; Cycle through inputs using the input button; Test with a known working camera/cable. |
| ചിത്രം വികലമായിരിക്കുന്നു അല്ലെങ്കിൽ മിന്നിമറയുന്നു. | Poor connection; Electrical interference; Incorrect video format. | Check all cable connections; Ensure proper grounding; Verify camera output format (PAL/NTSC) matches monitor's auto-switching capability. |
| Auto-trigger not working. | Trigger wire not connected; Incorrect trigger signal. | Ensure trigger wires are correctly connected to the vehicle's signals; Verify the vehicle signal is active. |
If the problem persists after attempting these solutions, please contact Brigade customer support.
സ്പെസിഫിക്കേഷനുകൾ
| ഫീച്ചർ | വിശദാംശങ്ങൾ |
|---|---|
| മോഡൽ | VBV-770M (4288) |
| സ്ക്രീൻ വലിപ്പം | 7 ഇഞ്ച് |
| ഡിസ്പ്ലേ തരം | ഡിജിറ്റൽ എൽസിഡി |
| പവർ ഇൻപുട്ട് | 12-24 വി ഡിസി |
| വൈദ്യുതി ഉപഭോഗം | 18 വാട്ട്സ് |
| നിലവിലുള്ളത് | 1.5 Amps |
| ക്യാമറ ഇൻപുട്ടുകൾ | 3 |
| Auto-Triggers | 3 |
| വീഡിയോ ഫോർമാറ്റ് | Auto-switching PAL / NTSC |
| പ്രവർത്തന താപനില | -30 മുതൽ +70 ഡിഗ്രി സെൽഷ്യസ് വരെ |
| മെക്കാനിക്കൽ വൈബ്രേഷൻ | 4G |
| മെക്കാനിക്കൽ ഷോക്ക് | 100G |
| പാലിക്കൽ | CE marked, E-Marked: UNECE R10 compliant, HALT tested, Camera monitor system R46 approved (VBV-770M only), DVS compliant |
| നിയന്ത്രണ രീതി | Touch (buttons on monitor) |
| ഉൾപ്പെടുത്തിയ ഘടകങ്ങൾ | Monitor, Cable Adapter, Sunshield, Installation Guide, Bracket |
വാറൻ്റി വിവരങ്ങൾ
The Brigade Select 7" Digital LCD Monitor VBV-770M comes with a 3 വർഷത്തെ വാറൻ്റി from the date of purchase. This warranty covers defects in materials and workmanship under normal use. It does not cover damage caused by improper installation, accident, misuse, abuse, neglect, unauthorized modification, or natural disasters.
Please retain your proof of purchase for warranty claims. For full terms and conditions, refer to the warranty card included with your product or contact Brigade customer support.
പിന്തുണ
For technical assistance, troubleshooting beyond this manual, or warranty claims, please contact Brigade Electronics directly.
Brigade Electronics Contact:
- Webസൈറ്റ്: brigade-electronics.com
- ഫോൺ: Please refer to the official Brigade webപ്രാദേശിക കോൺടാക്റ്റ് നമ്പറുകൾക്കായുള്ള സൈറ്റ്.
When contacting support, please have your product model (VBV-770M) and serial number (if applicable) ready.


