1. ആമുഖം
This manual provides detailed instructions for the safe and effective use of your Femivo 4K 48MP WiFi Vlogging Camera Camcorder. Please read this manual thoroughly before operating the device and retain it for future reference.

ചിത്രം 1.1: Femivo 4K 48MP WiFi Vlogging Camera Camcorder with accessories.
2. പാക്കേജ് ഉള്ളടക്കം
താഴെ ലിസ്റ്റ് ചെയ്തിരിക്കുന്ന എല്ലാ ഇനങ്ങളും നിങ്ങളുടെ പാക്കേജിൽ ഉൾപ്പെടുത്തിയിട്ടുണ്ടെന്ന് ഉറപ്പാക്കുക. ഏതെങ്കിലും ഇനങ്ങൾ നഷ്ടപ്പെട്ടിട്ടുണ്ടെങ്കിലോ കേടായിട്ടുണ്ടെങ്കിലോ, ദയവായി ഉപഭോക്തൃ പിന്തുണയുമായി ബന്ധപ്പെടുക.

ചിത്രം 2.1: കഴിഞ്ഞുview of included accessories and camera.
- Femivo 4K 48MP WiFi Vlogging Camera Camcorder
- ബാഹ്യ മൈക്രോഫോൺ
- ഹാൻഡ്ഹെൽഡ് സ്റ്റെബിലൈസർ
- ലെൻസ് ഹുഡ്
- റിമോട്ട് കൺട്രോൾ
- ബാറ്ററി ചാർജർ
- 2 x റീചാർജ് ചെയ്യാവുന്ന ബാറ്ററികൾ
- USB കേബിൾ
- HDMI കേബിൾ
- Charging Adapter & Cable
- ഉപയോക്തൃ മാനുവൽ
- ചുമക്കുന്ന ബാഗ്
3. ഉൽപ്പന്നം കഴിഞ്ഞുview
നിങ്ങളുടെ കാംകോർഡറിന്റെ പ്രധാന ഘടകങ്ങളും നിയന്ത്രണങ്ങളും സ്വയം പരിചയപ്പെടുത്തുക.
3.1 പ്രധാന സവിശേഷതകൾ
- 4K UHD വീഡിയോ റെക്കോർഡിംഗ്: Capture high-resolution video at 4K.
- 48MP ഫോട്ടോ മിഴിവ്: Take detailed still images.
- 16X ഡിജിറ്റൽ സൂം: Magnify subjects for closer shots.
- 3.0 ഇഞ്ച് ഐപിഎസ് ടച്ച് സ്ക്രീൻ: Navigate menus and preview content with ease.
- ഐആർ നൈറ്റ് വിഷൻ: Record in low-light conditions.
- വൈഫൈ പ്രവർത്തനം: Connect to a smartphone for remote control and file കൈമാറ്റം.
- Webക്യാമറ പ്രവർത്തനം: Use the camcorder as a webതത്സമയ സ്ട്രീമിംഗിനോ വീഡിയോ കോളുകൾക്കോ വേണ്ടിയുള്ള കാം.
- HDMI ഔട്ട്പുട്ട്: Connect to a TV or monitor for playback.
- ബാഹ്യ മൈക്രോഫോൺ പിന്തുണ: Enhance audio quality with the included microphone.
- ഹാൻഡ്ഹെൽഡ് സ്റ്റെബിലൈസർ: Reduce camera shake for smoother footage.

ചിത്രം 3.1: Key features and recording modes.
4. സജ്ജീകരണം
4.1 ബാറ്ററി ചാർജ് ചെയ്യുകയും ഇൻസ്റ്റാൾ ചെയ്യുകയും ചെയ്യുന്നു
- Insert the battery into the provided battery charger.
- Connect the charger to a power source using the charging adapter and cable. The indicator light will show charging status.
- Once fully charged, open the battery compartment on the camcorder.
- Insert the charged battery, ensuring correct orientation, until it clicks into place.
- ബാറ്ററി കമ്പാർട്ട്മെൻ്റ് കവർ സുരക്ഷിതമായി അടയ്ക്കുക.
4.2 ഒരു മെമ്മറി കാർഡ് ഇടുന്നു
The camcorder supports SD cards. A Class 10 or higher SD card (up to 128GB) is recommended for optimal performance, especially for 4K recording.
- Locate the memory card slot on the camcorder.
- Insert the SD card with the metal contacts facing the correct direction (refer to the diagram inside the slot if available) until it clicks into place.
- നീക്കം ചെയ്യാൻ, കാർഡ് പുറത്തേക്ക് വരുന്നത് വരെ സൌമ്യമായി അകത്തേക്ക് തള്ളുക.
4.3 ആക്സസറികൾ അറ്റാച്ചുചെയ്യുന്നു
4.3.1 External Microphone
The external microphone enhances audio capture quality.
- Slide the microphone's hot shoe mount into the hot shoe on top of the camcorder.
- Secure it by tightening the locking mechanism.
- Connect the microphone's 3.5mm audio jack to the microphone input port on the camcorder.

ചിത്രം 4.1: External Stereo Microphone details.
4.3.2 ഹാൻഡ്ഹെൽഡ് സ്റ്റെബിലൈസർ
Attach the handheld stabilizer for improved grip and reduced camera shake.
- Unfold the handheld stabilizer.
- Align the camcorder's tripod screw hole with the screw on the stabilizer.
- Rotate the camcorder clockwise to secure it onto the stabilizer.
4.3.3 ലെൻസ് ഹുഡ്
Attach the lens hood to reduce glare and protect the lens.
- Remove the lens cap from the camcorder.
- Align the lens hood with the front of the camcorder lens.
- Gently twist or push the lens hood until it is securely attached.
5. പ്രവർത്തന നിർദ്ദേശങ്ങൾ
5.1 പവർ ഓൺ/ഓഫ്
- പവർ ഓണാക്കാൻ: Open the LCD screen. The camcorder will automatically power on.
- പവർ ഓഫ് ചെയ്യാൻ: Close the LCD screen. The camcorder will automatically power off. Alternatively, press and hold the Power button.
5.2 അടിസ്ഥാന റെക്കോർഡിംഗ് (വീഡിയോ/ഫോട്ടോ)
- Ensure the camcorder is powered on and a memory card is inserted.
- For Video Recording: അമർത്തുക മോഡ് button to select video mode. Press the രേഖപ്പെടുത്തുക button to start recording. Press it again to stop.
- For Photo Capture: അമർത്തുക മോഡ് button to select photo mode. Press the ഫോട്ടോ ഒരു ചിത്രമെടുക്കാനുള്ള ബട്ടൺ.
5.3 സൂം പ്രവർത്തനം
Use the zoom controls located on the top of the camcorder to adjust the 16X digital zoom.
- തള്ളുക ടി (ടെലിഫോട്ടോ) സൂം ഇൻ ചെയ്യാനുള്ള ബട്ടൺ.
- തള്ളുക W (Wide-angle) സൂം ഔട്ട് ചെയ്യാനുള്ള ബട്ടൺ.

ചിത്രം 5.1: 16X Digital Zoom in action.
5.4 IR നൈറ്റ് വിഷൻ മോഡ്
Activate IR Night Vision for recording in dark environments.
- In video or photo mode, access the menu settings.
- Navigate to the IR Night Vision option and enable it. The screen will display in black and white.
ചിത്രം 5.2: IR Night Vision capability.
5.5 വൈഫൈ കണക്ഷൻ
Connect your camcorder to a smartphone via WiFi for remote control, live preview, ഒപ്പം file transfer using the 'RoadCam' app.
- Download and install the 'RoadCam' app on your smartphone.
- On the camcorder, go to the menu and enable WiFi. The camcorder will display its WiFi network name (SSID) and password.
- On your smartphone, go to WiFi settings and connect to the camcorder's network using the provided password.
- Open the 'RoadCam' app to control the camcorder remotely.

ചിത്രം 5.3: WiFi Wireless Transmission with a smartphone.
5.6 Webക്യാം ഫംഗ്ഷൻ
Use the camcorder as a high-quality webവീഡിയോ കോളുകൾക്കോ ലൈവ് സ്ട്രീമിംഗിനോ ഉള്ള ക്യാമറ.
- യുഎസ്ബി കേബിൾ ഉപയോഗിച്ച് നിങ്ങളുടെ കമ്പ്യൂട്ടറിലേക്ക് കാംകോർഡർ ബന്ധിപ്പിക്കുക.
- On the camcorder's screen, select 'PC Camera' or 'Webcam' mode.
- നിങ്ങളുടെ കമ്പ്യൂട്ടർ കാംകോർഡറിനെ ഒരു ആയി തിരിച്ചറിയണം webcam. നിങ്ങളുടെ വീഡിയോ കോൺഫറൻസിംഗിലോ സ്ട്രീമിംഗ് സോഫ്റ്റ്വെയറിലോ അത് തിരഞ്ഞെടുക്കുക.
5.7 HDMI ഔട്ട്പുട്ട്
Connect the camcorder to a TV or monitor to view നിങ്ങളുടെ റെക്കോർഡിംഗുകൾ ഒരു വലിയ സ്ക്രീനിൽ.
- Connect one end of the HDMI cable to the camcorder's HDMI output port.
- Connect the other end to an HDMI input port on your TV or monitor.
- Select the corresponding HDMI input on your TV/monitor.
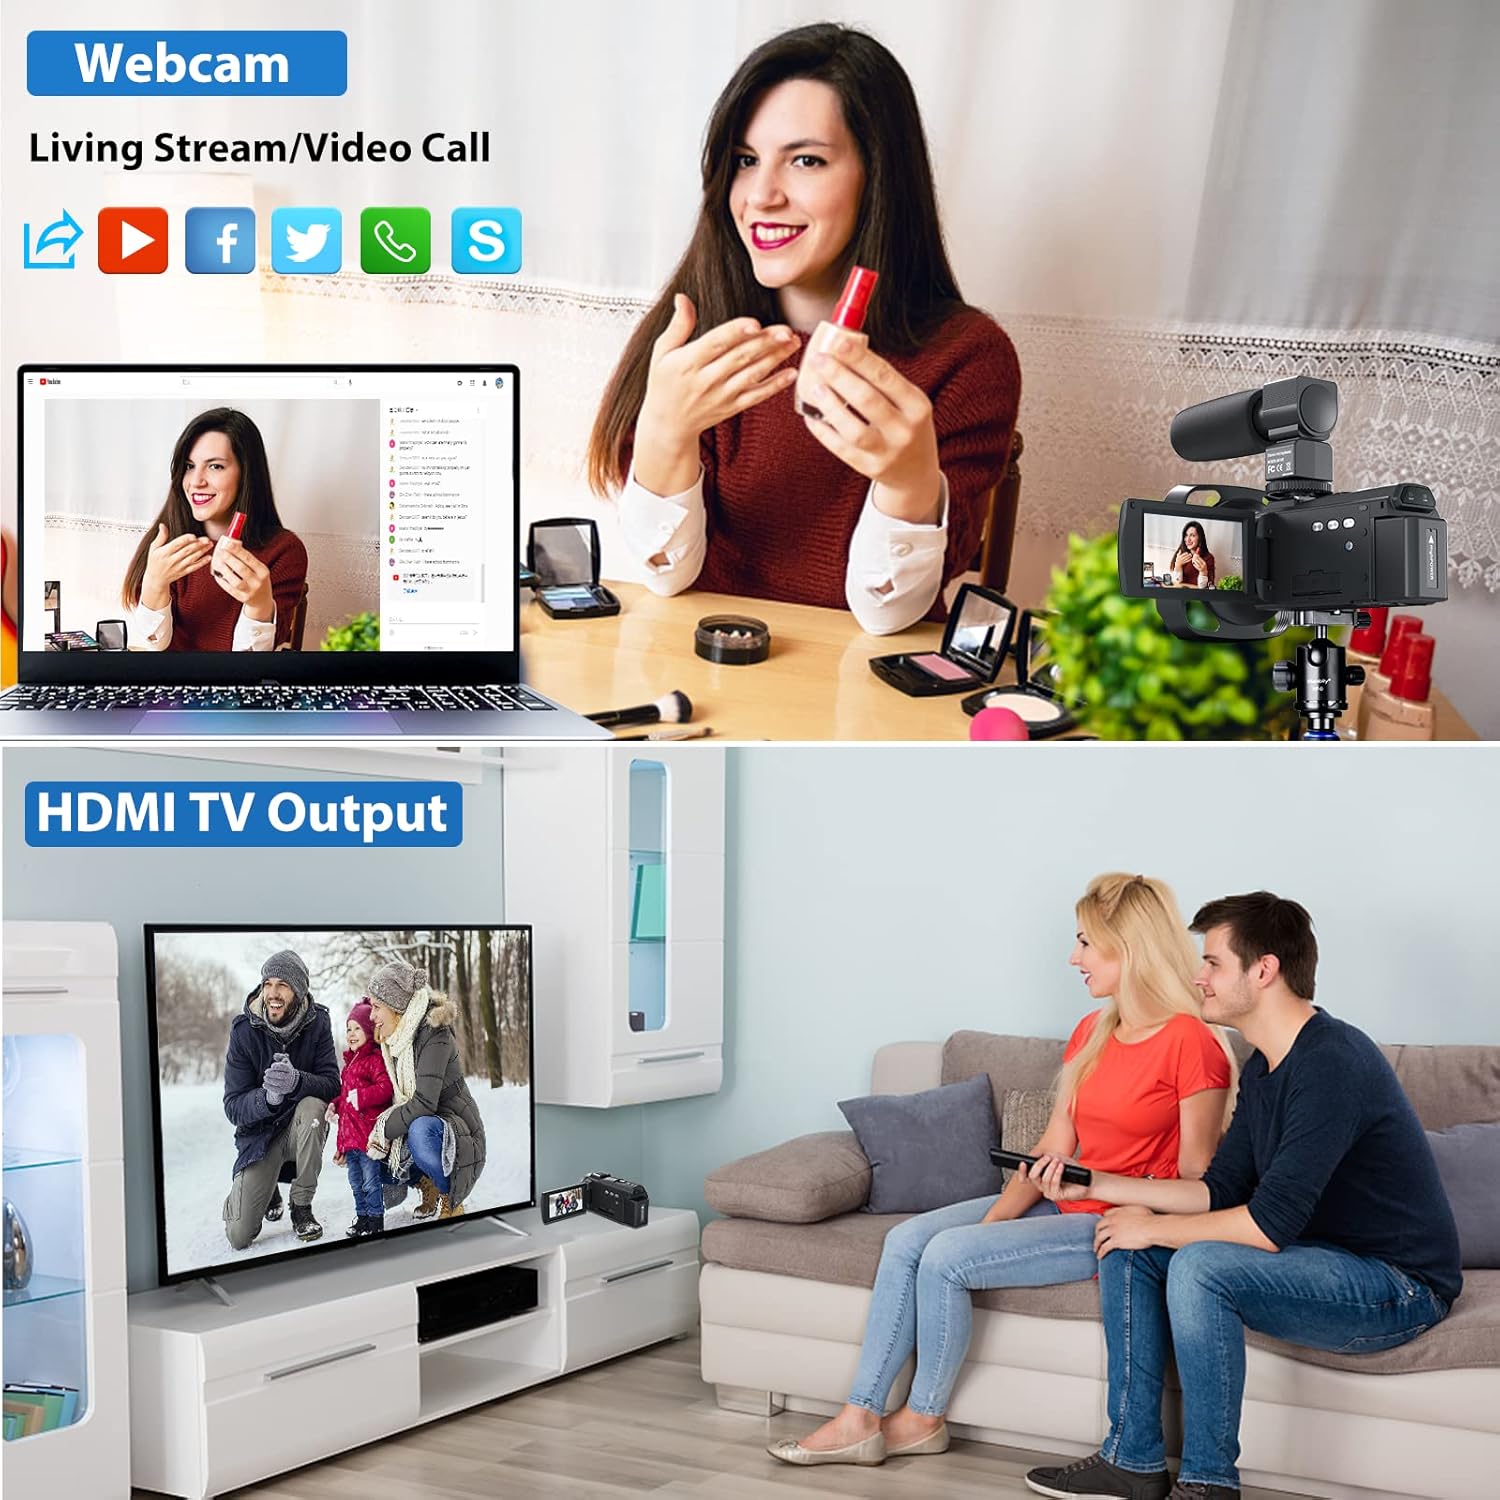
ചിത്രം 5.4: Webcam and HDMI output functionality.
5.8 വിദൂര നിയന്ത്രണം
ഉൾപ്പെടുത്തിയിരിക്കുന്ന റിമോട്ട് കൺട്രോൾ ദൂരെ നിന്ന് സൗകര്യപ്രദമായ പ്രവർത്തനം അനുവദിക്കുന്നു.
- റിമോട്ട് കൺട്രോൾ നേരിട്ട് കാംകോർഡറിന്റെ ഐആർ റിസീവറിൽ ചൂണ്ടിക്കാണിക്കുക.
- Use the buttons on the remote to start/stop recording, take photos, zoom, and navigate menus.
5.9 Special Recording Features
The camcorder offers several advanced recording modes:
- ലൂപ്പ് റെക്കോർഡ്: തുടർച്ചയായി രേഖപ്പെടുത്തുന്നു, ഏറ്റവും പഴയത് തിരുത്തിയെഴുതുന്നു fileമെമ്മറി കാർഡ് നിറയുമ്പോൾ s.
- മുഖം കണ്ടെത്തൽ: Automatically detects and focuses on faces in the frame.
- സമയക്കുറവ്: Captures a series of images over time and stitches them into a video.
- സ്ലോ മോഷൻ: സ്ലോ-മോഷൻ പ്ലേബാക്കിനായി ഉയർന്ന ഫ്രെയിം റേറ്റിൽ വീഡിയോ റെക്കോർഡുചെയ്യുന്നു.
- പ്രവർത്തനം താൽക്കാലികമായി നിർത്തുക: Allows pausing and resuming video recording within a single file.
- ചലനം കണ്ടെത്തൽ: Starts recording automatically when motion is detected in the frame.
- ആന്റി-ഷേക്ക്: Digital image stabilization to reduce blur from camera movement.
- Selfie Shooting: Utilize the rotatable screen for easy self-recording.
6. പരിപാലനം
- ലെൻസ് വൃത്തിയാക്കൽ: Use a soft, lint-free cloth specifically designed for camera lenses. Avoid using harsh chemicals.
- ശരീരം വൃത്തിയാക്കൽ: Wipe the camcorder body with a soft, dry cloth.
- സംഭരണം: When not in use, store the camcorder in its carrying bag in a cool, dry place away from direct sunlight and extreme temperatures. Remove the battery if storing for extended periods.
- ബാറ്ററി കെയർ: Fully charge batteries before first use. Do not expose batteries to high temperatures or disassemble them.
7. പ്രശ്നപരിഹാരം
If you encounter issues with your camcorder, refer to the following common problems and solutions:
| പ്രശ്നം | സാധ്യമായ കാരണം | പരിഹാരം |
|---|---|---|
| കാംകോർഡർ പവർ ഓൺ ചെയ്യുന്നില്ല. | ബാറ്ററി തീർന്നു അല്ലെങ്കിൽ തെറ്റായി ചേർത്തിരിക്കുന്നു. | Ensure battery is charged and inserted correctly. |
| വീഡിയോ റെക്കോർഡ് ചെയ്യാൻ/ഫോട്ടോ എടുക്കാൻ കഴിയില്ല. | മെമ്മറി കാർഡ് നിറഞ്ഞിരിക്കുന്നു, ചേർത്തിട്ടില്ല, അല്ലെങ്കിൽ കേടായിരിക്കുന്നു. | Check memory card. Format if necessary (this will erase all data). Replace if faulty. |
| മോശം വീഡിയോ/ഫോട്ടോ നിലവാരം. | Lens is dirty, insufficient lighting, incorrect settings. | Clean the lens. Ensure adequate lighting. Adjust resolution and exposure settings. |
| വൈഫൈ കണക്ഷൻ പ്രശ്നങ്ങൾ. | Incorrect password, app not installed, distance too far. | Verify password. Ensure 'RoadCam' app is installed. Stay within range (approx. 65ft). |
| ഓഡിയോ റെക്കോർഡ് ചെയ്തിട്ടില്ല. | Microphone not connected, microphone settings incorrect. | Ensure external microphone is securely connected and enabled in settings. |
8 സ്പെസിഫിക്കേഷനുകൾ
| ഫീച്ചർ | സ്പെസിഫിക്കേഷൻ |
|---|---|
| ബ്രാൻഡ് | ഫെമിവോ |
| ഫോട്ടോ സെൻസർ ടെക്നോളജി | CMOS |
| വീഡിയോ ക്യാപ്ചർ റെസല്യൂഷൻ | 1080p, 4K, 720p |
| പരമാവധി അപ്പേർച്ചർ | f/2.0 |
| ഫ്ലാഷ് മെമ്മറി തരം | SD (up to 128GB, Class 10 recommended) |
| വീഡിയോ ക്യാപ്ചർ ഫോർമാറ്റ് | MP4 |
| സ്ക്രീൻ വലിപ്പം | 3 Inches (IPS Touch Screen) |
| കണക്റ്റിവിറ്റി ടെക്നോളജി | HDMI, USB, WiFi |
| പ്രത്യേക സവിശേഷതകൾ | Infrared (IR Night Vision), Low Light, Time Lapse, Loop Record, Face Detection, Slow Motion, Pause Function, Motion Detection, Anti-Shake |
| കാംകോർഡർ തരം | വീഡിയോ ക്യാമറ |
| ഇനത്തിൻ്റെ ഭാരം | 2.08 പൗണ്ട് |
| പാക്കേജ് അളവുകൾ | 7.28 x 6.02 x 4.33 ഇഞ്ച് |
9. വാറൻ്റിയും പിന്തുണയും
For warranty information and technical support, please refer to the documentation included with your purchase or contact Femivo customer service directly. Keep your proof of purchase for warranty claims.


