1. ആമുഖം
This manual provides detailed instructions for the installation, operation, and maintenance of your LAMAX T4 Car Camera. Please read this manual thoroughly before using the device to ensure proper function and safety. The LAMAX T4 is a Full HD dashcam designed to record your journeys, featuring a magnetic mount, super capacitor power, and a 140-degree wide-angle lens.
2. പാക്കേജ് ഉള്ളടക്കം
താഴെ കൊടുത്തിരിക്കുന്ന എല്ലാ ഇനങ്ങളും നിങ്ങളുടെ പാക്കേജിൽ ഉണ്ടെന്ന് ഉറപ്പാക്കുക:
- LAMAX T4 Dashcam
- മാഗ്നെറ്റിക് ഹോൾഡർ
- Car Adapter with additional USB port
- 3M Replacement Adhesive
- Mini USB PC Cable
- Optional Magnetic 3M Holder with GPS (accessory)

Figure 2.1: Contents of the LAMAX T4 Car Camera package. Includes the dashcam, magnetic mount, car charger, USB cable, and adhesive pads.
3. ഉൽപ്പന്നം കഴിഞ്ഞുview
The LAMAX T4 Car Camera is equipped with several features to enhance your driving experience and provide reliable recording. Key features include Full HD video resolution, a 140-degree wide-angle lens, Wide Dynamic Range (WDR) for improved image quality in varying light conditions, a G-sensor for incident detection, and a super capacitor for enhanced durability.
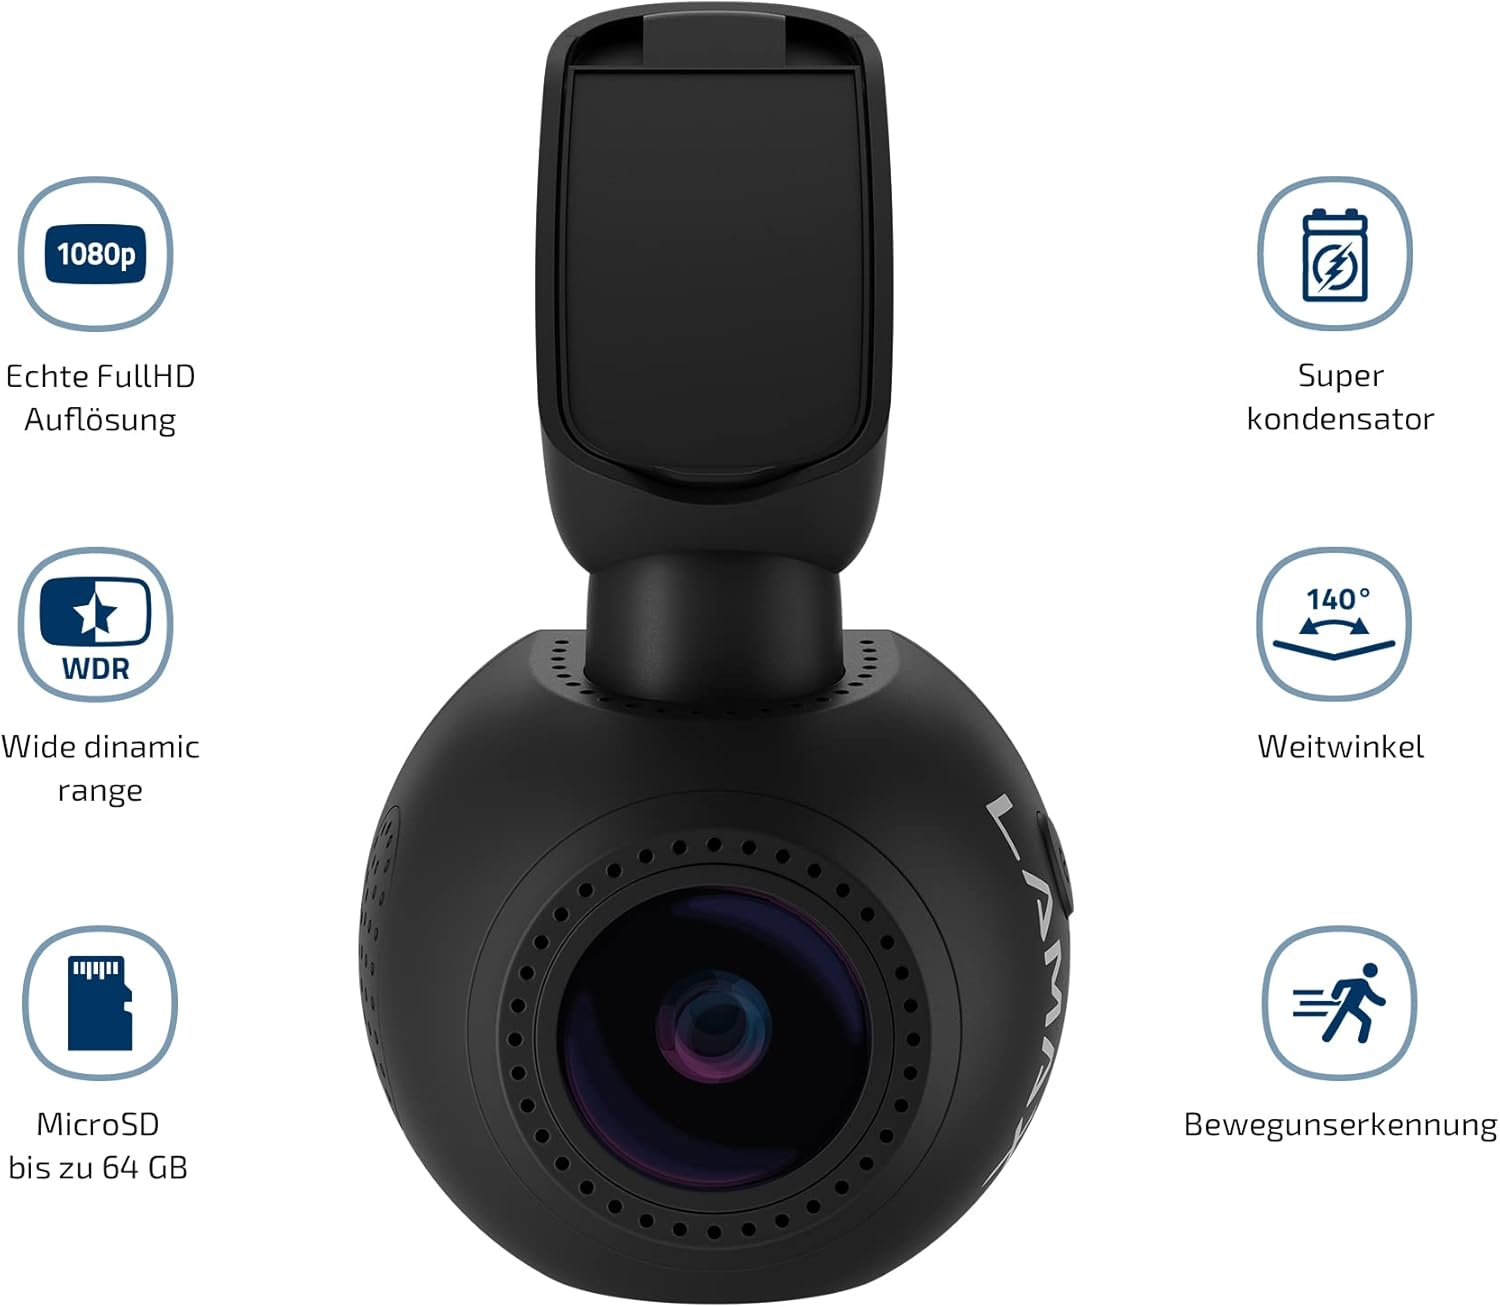
ചിത്രം 3.1: ഓവർview of LAMAX T4 Car Camera features, highlighting 1080p Full HD, Super Capacitor, 140-degree wide angle, WDR, MicroSD support up to 64GB, and Motion Detection.
3.1 ഘടകം തിരിച്ചറിയൽ
Familiarize yourself with the various parts of your LAMAX T4 dashcam:
- ക്യാമറ ലെൻസ്: Records video.
- 1.5 Inch Display: വേണ്ടി viewലൈവ് ഫൂtage, പ്ലേബാക്ക്, മെനു നാവിഗേഷൻ.
- Magnetic Mount Connector: For attaching the camera to the magnetic holder.
- മൈക്രോ എസ്ഡി കാർഡ് സ്ലോട്ട്: നിങ്ങളുടെ മെമ്മറി കാർഡ് ഇവിടെ ഇടുക.
- മൈക്രോഫോൺ: ഓഡിയോ റെക്കോർഡ് ചെയ്യുന്നു.
- LED സൂചകം: Shows device status (e.g., recording, charging).
- നിയന്ത്രണ ബട്ടണുകൾ: മെനു നാവിഗേഷനും ഫംഗ്ഷൻ തിരഞ്ഞെടുപ്പിനും.
- മിനി USB പോർട്ട്: For power supply and data transfer.

Figure 3.2: Detailed diagram identifying the components of the LAMAX T4 Car Camera, including the magnetic mount, power input, MicroSD slot, microphone, LED indicator, and control buttons.
4. സജ്ജീകരണം
4.1 ക്യാമറ മൗണ്ടിംഗ്
- Clean the area on your windshield where you intend to mount the camera. Ensure it does not obstruct your view.
- Attach the magnetic holder to the windshield using the provided 3M adhesive pad. Press firmly for at least 30 seconds to ensure a secure bond.
- Slide the LAMAX T4 dashcam onto the magnetic holder. The magnetic connection will secure the camera. An additional lock mechanism on the mount provides extra stability.
- വ്യക്തമായ ദൃശ്യങ്ങൾ ഉറപ്പാക്കാൻ ക്യാമറ ആംഗിൾ ക്രമീകരിക്കുക. view മുന്നോട്ടുള്ള പാതയുടെ.

Figure 4.1: LAMAX T4 Car Camera mounted on the windshield, showing the driver's perspective of the road.

ചിത്രം 4.2: ക്ലോസപ്പ് view of the LAMAX T4 Car Camera securely mounted on the car windshield.
4.2 പവർ കണക്ഷൻ
- Connect the Mini USB cable to the camera's Mini USB port.
- Plug the other end of the cable into the provided car adapter.
- Insert the car adapter into your vehicle's 12V cigarette lighter socket.
- The camera will automatically power on and begin recording when the vehicle's ignition is turned on. The car adapter also includes an additional USB port for charging other devices.
4.3 ഒരു മൈക്രോ എസ്ഡി കാർഡ് ചേർക്കൽ
The LAMAX T4 supports MicroSD cards up to 64GB. A high-speed card (Class 10 or higher) is recommended for optimal performance.
- With the camera powered off, locate the MicroSD card slot on the side of the device.
- ക്യാമറയുടെ പിൻഭാഗത്തേക്ക് അഭിമുഖമായി സ്വർണ്ണ കോൺടാക്റ്റുകൾ വരുന്ന വിധത്തിൽ, അത് ശരിയായ സ്ഥാനത്ത് ക്ലിക്കായി വരുന്ന വരെ മൈക്രോ എസ്ഡി കാർഡ് ഇടുക.
- To remove, gently push the card in until it clicks, then release, and it will eject.
4.4 Optional GPS Module
If you have the optional GPS module, attach it to the magnetic mount before attaching the camera. The GPS module records vehicle position and speed, which can be displayed in the video footage.
5. പ്രവർത്തന നിർദ്ദേശങ്ങൾ
5.1 പവർ ഓൺ/ഓഫ്
- സ്വയമേവ: The camera powers on and off automatically with the vehicle's ignition.
- മാനുവൽ: Press and hold the power button to manually turn the camera on or off.
5.2 വീഡിയോ റെക്കോർഡിംഗ്
The LAMAX T4 records in Full HD (1080p) at 30 frames per second. It utilizes loop recording, meaning when the memory card is full, the oldest unprotected fileകൾ പുതിയ റെക്കോർഡിംഗുകളാൽ തിരുത്തിയെഴുതപ്പെടുന്നു.
- റെക്കോർഡിംഗ് ആരംഭിക്കുക: Recording typically starts automatically when the camera powers on. A flashing LED indicator confirms recording is active.
- റെക്കോർഡിംഗ് നിർത്തുക: Press the 'OK' button to stop recording. Press again to resume.
- സംരക്ഷിക്കുന്നു Files: During recording, press the 'M' button to manually protect the current recording from being overwritten. Files protected by the G-sensor are also locked.
5.3 G-Sensor Function
The integrated G-sensor detects sudden impacts or rapid acceleration/deceleration. When triggered, it automatically locks the current video segment, preventing it from being overwritten during loop recording. The sensitivity of the G-sensor can be adjusted in the camera settings.
5.4 വൈഡ് ഡൈനാമിക് റേഞ്ച് (WDR)
WDR technology improves video quality in challenging lighting conditions, such as strong backlighting or rapid changes from dark to bright environments. This ensures clearer details in both bright and dark areas of the image.
5.5 ഡിസ്പ്ലേ, മെനു നാവിഗേഷൻ
The 1.5-inch display allows you to view തത്സമയംtage, play back recorded videos, and access camera settings. Use the control buttons (Up, Down, OK, M) to navigate through the menu options.

Figure 5.1: The LAMAX T4 Car Camera display showing a live view of the road during operation.
5.6 തീയതിയും സമയ ക്രമീകരണങ്ങളും
It is important to set the correct date and time for accurate video timestamps. Access these settings through the camera's menu. Due to the super capacitor, the camera relies on continuous power to maintain date and time settings over extended periods without power. If the camera is left unpowered for several days, the date and time may need to be reset.
6. പരിപാലനം
6.1 ക്യാമറ വൃത്തിയാക്കൽ
- ക്യാമറ ബോഡി വൃത്തിയാക്കാൻ മൃദുവായതും ഉണങ്ങിയതുമായ തുണി ഉപയോഗിക്കുക.
- ലെൻസിന്, പോറലുകൾ ഒഴിവാക്കാൻ ഒരു പ്രത്യേക ലെൻസ് ക്ലീനിംഗ് തുണിയും ലായനിയും ഉപയോഗിക്കുക.
- ഉരച്ചിലുകളുള്ള ക്ലീനറുകളോ ലായകങ്ങളോ ഉപയോഗിക്കരുത്.
6.2 മൈക്രോ എസ്ഡി കാർഡ് മാനേജ്മെന്റ്
- Regularly format your MicroSD card (e.g., once a month) using the camera's menu option to maintain optimal performance and prevent data corruption.
- Replace the MicroSD card if you experience frequent recording errors or data loss.
7. പ്രശ്നപരിഹാരം
If you encounter issues with your LAMAX T4, refer to the following common problems and solutions:
- ക്യാമറ പവർ ഓൺ ചെയ്യുന്നില്ല:
Ensure the car adapter is securely plugged into the 12V socket and the Mini USB cable is firmly connected to the camera. Check if the vehicle's 12V socket is receiving power. - Camera does not record:
Verify that a MicroSD card is inserted correctly and is not full. Format the MicroSD card if necessary. Ensure the camera is receiving continuous power. - Date and time settings are not saved:
The LAMAX T4 uses a super capacitor, which requires continuous power to maintain date and time settings over long periods. If the camera is disconnected from power for more than a few days, the date and time may reset. Reconnect to power and reset the date/time in the settings. - Video quality is poor or license plates are unreadable:
Ensure the camera lens is clean and free from obstructions. Check that the camera is recording in Full HD (1080p) resolution in the settings. While the camera records in Full HD, license plate readability can be affected by distance, speed, and lighting conditions. - Magnetic mount is not stable:
Ensure the windshield surface is clean and dry before applying the 3M adhesive. Press the adhesive firmly for the recommended time. If the adhesive wears out, use a replacement 3M adhesive pad. - ക്യാമറ മരവിക്കുന്നു അല്ലെങ്കിൽ തകരാറുകൾ:
Try resetting the camera by pressing the reset button (if available) or disconnecting and reconnecting the power. If the issue persists, try using a different MicroSD card.
8 സ്പെസിഫിക്കേഷനുകൾ
Technical specifications for the LAMAX T4 Car Camera:
| മോഡൽ നമ്പർ | LMXT4 |
| വീഡിയോ ക്യാപ്ചർ റെസല്യൂഷൻ | 1080p (പൂർണ്ണ HD) |
| സെക്കൻഡിൽ ഫ്രെയിമുകൾ | 30fps |
| Viewing ആംഗിൾ | 140° (horizontal max.) |
| ഡിസ്പ്ലേ വലിപ്പം | 1.5 ഇഞ്ച് |
| പവർ ഉറവിടം | Super Capacitor, 12V Car Adapter |
| സംഭരണം | 64GB വരെയുള്ള മൈക്രോഎസ്ഡി കാർഡ് (ക്ലാസ് 10 ശുപാർശ ചെയ്യുന്നു) |
| പ്രത്യേക സവിശേഷതകൾ | WDR, G-Sensor, Loop Recording, Magnetic Mount, Optional GPS |
| കണക്റ്റിവിറ്റി | ഓക്സിലറി, യുഎസ്ബി |
| മൗണ്ടിംഗ് തരം | കാന്തിക മൌണ്ട് |
| ഉൽപ്പന്ന അളവുകൾ | 6 x 16 x 11 സെ.മീ |
| ഇനത്തിൻ്റെ ഭാരം | 340 ഗ്രാം |
9. വാറൻ്റി വിവരങ്ങൾ
LAMAX products are covered by a manufacturer's warranty. The specific terms and duration of the warranty may vary by region and retailer. Please retain your proof of purchase for any warranty claims. For detailed warranty information, refer to the documentation provided with your purchase or visit the official LAMAX webസൈറ്റ്.
10. ഉപഭോക്തൃ പിന്തുണ
If you require further assistance or have questions not covered in this manual, please contact LAMAX customer support. You can typically find contact information on the official LAMAX website or through your product retailer. When contacting support, please have your product model (LMXT4) and proof of purchase available.


