1. ആമുഖം
This manual provides detailed instructions for the installation, configuration, and operation of your Hikvision DS-7104HGHI-K1 4-Channel Digital Video Recorder (DVR). Please read this manual thoroughly before using the product to ensure correct and safe operation. Keep this manual for future reference.
2. ഉൽപ്പന്നം കഴിഞ്ഞുview ഫീച്ചറുകളും
The Hikvision DS-7104HGHI-K1 is a 4-channel 1080p Lite DVR designed for reliable surveillance recording. It supports various camera types and features advanced video compression technology.

ചിത്രം 2.1: മുകളിൽ view of the Hikvision DS-7104HGHI-K1 DVR, showing its compact design and branding.
പ്രധാന സവിശേഷതകൾ:
- 4-Channel Video Input: Supports up to 4 analog cameras.
- 1080p Lite Recording: Provides high-definition recording at 1080p Lite resolution.
- H.265+ Compression: Advanced video compression technology for efficient storage and reduced bandwidth usage.
- Multi-format Input: Compatible with HDTVI, AHD, CVI, CVBS, and up to 5 IP camera inputs (up to 2MP).
- HDMI/VGA ഔട്ട്പുട്ട്: For local monitoring.
- വിദൂര ആക്സസ്: റിമോട്ട് പിന്തുണയ്ക്കുന്നു viewing via Hik-Connect app.

ചിത്രം 2.2: മുന്നിലും പിന്നിലും views of the Hikvision DVR, highlighting various ports and connectivity options, along with icons representing H.265 Pro, Mobile access, 5-in-1 compatibility, and IP/Analog XVR capabilities.
H.265+ Compression Benefits:
H.265+ compression significantly reduces the required storage space and bandwidth compared to older compression standards like H.264, without compromising video quality.

ചിത്രം 2.3: A bar graph illustrating the reduction in 24-hour recording file size (GB) when using H.265+ compression compared to H.264 and H.265, showing up to an 83% gap in storage requirements.
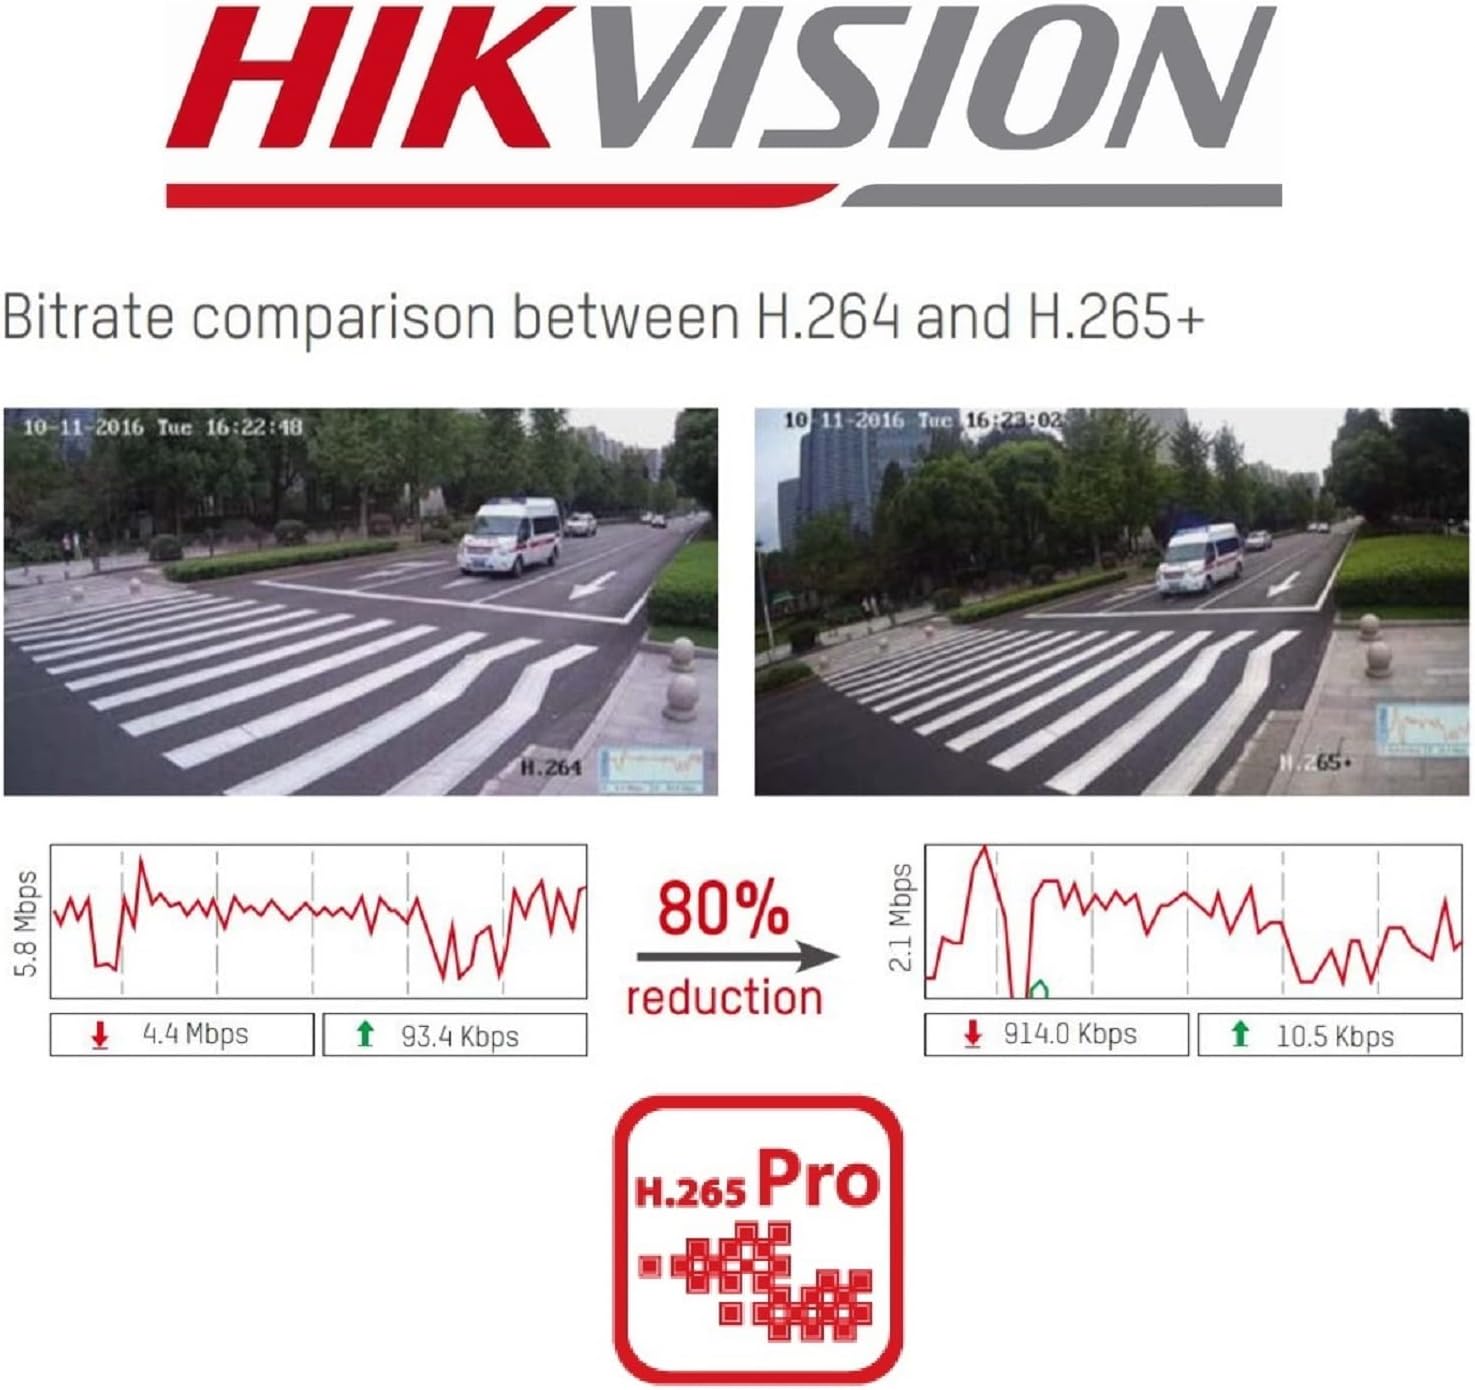
ചിത്രം 2.4: A visual comparison of bitrate usage between H.264 and H.265+ compression, demonstrating an 80% reduction in bitrate with H.265+ while maintaining similar video quality in sample surveillance footage.
3. പാക്കേജ് ഉള്ളടക്കം
നിങ്ങളുടെ പാക്കേജിൽ എല്ലാ ഇനങ്ങളും ഉണ്ടെന്ന് ഉറപ്പാക്കുക:
- Hikvision DS-7104HGHI-K1 DVR Unit
- പവർ അഡാപ്റ്റർ
- യുഎസ്ബി മൗസ്
- SATA Cables (for HDD connection)
- ദ്രുത ആരംഭ ഗൈഡ്
- Note: Hard drive is not included and must be purchased separately.
4 സുരക്ഷാ വിവരങ്ങൾ
- Ensure the power supply matches the DVR's requirements.
- DVR വെള്ളത്തിലോ ഈർപ്പത്തിലോ പെടരുത്.
- നേരിട്ടുള്ള സൂര്യപ്രകാശത്തിലോ താപ സ്രോതസ്സുകൾക്ക് സമീപമോ DVR വയ്ക്കുന്നത് ഒഴിവാക്കുക.
- അമിതമായി ചൂടാക്കുന്നത് തടയാൻ ശരിയായ വായുസഞ്ചാരം ഉറപ്പാക്കുക.
- നിർമ്മാതാവ് വ്യക്തമാക്കിയ ആക്സസറികൾ മാത്രം ഉപയോഗിക്കുക.
5. സജ്ജീകരണം
5.1 ഹാർഡ്വെയർ ഇൻസ്റ്റലേഷൻ
- Hard Drive Installation (HDD not included):
- DVR-ന്റെ മുകളിലെ കവർ അഴിച്ചുമാറ്റി നീക്കം ചെയ്യുക.
- Connect the SATA power and data cables from the DVR to the hard drive.
- Secure the hard drive inside the DVR using the provided screws.
- മുകളിലെ കവർ മാറ്റി സ്ക്രൂകൾ ഉപയോഗിച്ച് ഉറപ്പിക്കുക.
- ക്യാമറകൾ ബന്ധിപ്പിക്കുക: Connect your analog cameras to the BNC video input ports on the rear panel of the DVR.
- മോണിറ്റർ ബന്ധിപ്പിക്കുക: HDMI അല്ലെങ്കിൽ VGA ഔട്ട്പുട്ട് പോർട്ടിലേക്ക് ഒരു മോണിറ്റർ ബന്ധിപ്പിക്കുക.
- നെറ്റ്വർക്ക് ബന്ധിപ്പിക്കുക: Connect an Ethernet cable from the DVR's LAN port to your router or network switch.
- യുഎസ്ബി മൗസ് ബന്ധിപ്പിക്കുക: DVR-ലെ ഒരു USB പോർട്ടിലേക്ക് USB മൗസ് പ്ലഗ് ചെയ്യുക.
- പവർ ഓൺ: Connect the power adapter to the DVR and then to a power outlet. The DVR will power on automatically.
5.2 പ്രാരംഭ കോൺഫിഗറേഷൻ
- First-Time Startup: Upon first boot, the DVR will guide you through a setup wizard.
- പാസ്വേഡ് സജ്ജമാക്കുക: Create a strong password for the admin user. This is crucial for security.
- നെറ്റ്വർക്ക് ക്രമീകരണങ്ങൾ: Configure network settings (DHCP is usually sufficient for most home networks).
- HDD ഇനിഷ്യലൈസേഷൻ: The DVR will prompt you to initialize the newly installed hard drive. This step is necessary for recording.
- തീയതിയും സമയവും: ശരിയായ തീയതിയും സമയവും സജ്ജമാക്കുക.
6. ഓപ്പറേഷൻ
6.1 തത്സമയം View
പ്രാരംഭ സജ്ജീകരണത്തിനുശേഷം, DVR തത്സമയം പ്രദർശിപ്പിക്കും view from connected cameras on the monitor. You can switch between single-camera view മൾട്ടി-ക്യാമറ ഗ്രിഡും view using the on-screen controls or mouse.
6.2 റെക്കോർഡിംഗ്
The DVR is typically configured to record continuously by default once the HDD is initialized. You can customize recording schedules, motion detection recording, and alarm recording settings through the DVR's menu:
- പോകുക Menu > Record > Schedule to adjust recording times.
- പോകുക Menu > Alarm > Motion Detection to configure motion-triggered recording.
6.3 പ്ലേബാക്ക്
ലേക്ക് view രേഖപ്പെടുത്തി footage:
- പോകുക Menu > Playback.
- Select the camera(s) and the date/time range you wish to review.
- foo-യിലൂടെ നാവിഗേറ്റ് ചെയ്യാൻ പ്ലേബാക്ക് നിയന്ത്രണങ്ങൾ (പ്ലേ ചെയ്യുക, താൽക്കാലികമായി നിർത്തുക, വേഗത്തിൽ മുന്നോട്ട് പോകുക, റിവൈൻഡ് ചെയ്യുക) ഉപയോഗിക്കുക.tage.
6.4 Remote Access (Hik-Connect)
The Hik-Connect app allows you to view തത്സമയംtage, play back recordings, and receive alerts on your smartphone or tablet from anywhere with an internet connection.

ചിത്രം 6.1: The Hik-Connect application icon alongside a smartphone displaying a multi-camera live view, illustrating the remote monitoring capabilities of the DVR system.
- Download the Hik-Connect app from your device's app store.
- Create a Hik-Connect account.
- DVR-ലെ QR കോഡ് സ്കാൻ ചെയ്തുകൊണ്ടോ അതിന്റെ സീരിയൽ നമ്പർ നേരിട്ട് നൽകിയോ നിങ്ങളുടെ DVR ആപ്പിലേക്ക് ചേർക്കുക.
- Ensure your DVR is connected to the internet and Hik-Connect service is enabled in the DVR's network settings.
7. പരിപാലനം
- പതിവ് വൃത്തിയാക്കൽ: Keep the DVR free from dust. Use a soft, dry cloth for cleaning.
- ഫേംവെയർ അപ്ഡേറ്റുകൾ: ഇടയ്ക്കിടെ ഹൈക്വിഷൻ ഉദ്യോഗസ്ഥനെ പരിശോധിക്കുക webഒപ്റ്റിമൽ പ്രകടനവും സുരക്ഷയും ഉറപ്പാക്കാൻ ഫേംവെയർ അപ്ഡേറ്റുകൾക്കായുള്ള സൈറ്റ്.
- ഡാറ്റ ബാക്കപ്പ്: Regularly back up important recordings to an external storage device.
- പാസ്വേഡ് സുരക്ഷ: Change your DVR password periodically to enhance security.
8. പ്രശ്നപരിഹാരം
- വീഡിയോ ഔട്ട്പുട്ട് ഇല്ല:
- Check HDMI/VGA cable connections.
- Ensure the monitor is powered on and set to the correct input.
- റെക്കോർഡിംഗ് ഇല്ല:
- Verify that a hard drive is installed and initialized.
- Check recording schedules and ensure they are active.
- Ensure cameras are properly connected and functioning.
- Cannot Access Remotely:
- Ensure the DVR is connected to the internet.
- Check network settings and Hik-Connect status on the DVR.
- Verify your Hik-Connect account and device binding in the app.
- DVR Unresponsive:
- Restart the DVR by disconnecting and reconnecting the power.
- If issues persist, consider a factory reset (note: this will erase configurations).
9 സ്പെസിഫിക്കേഷനുകൾ
| ഫീച്ചർ | വിശദാംശങ്ങൾ |
|---|---|
| മോഡൽ നമ്പർ | DS-7104HGHI-K1 |
| വീഡിയോ ഇൻപുട്ട് | 4-channel BNC (HDTVI/AHD/CVI/CVBS) + up to 5 IP channels (up to 2MP) |
| വീഡിയോ കംപ്രഷൻ | H.265 Pro+/H.265+/H.265/H.264+/H.264 |
| എൻകോഡിംഗ് റെസല്യൂഷൻ | 1080p Lite @ 25/30 fps |
| വീഡിയോ ഔട്ട്പുട്ട് | 1 HDMI, 1 VGA (simultaneous output) |
| ഓഡിയോ ഇൻപുട്ട് | 1-ചാനൽ RCA |
| ഓഡിയോ ഔട്ട്പുട്ട് | 1-ചാനൽ RCA |
| ഹാർഡ് ഡിസ്ക് പിന്തുണ | 1 SATA interface, up to 4 TB capacity |
| നെറ്റ്വർക്ക് ഇന്റർഫേസ് | 1 RJ45 10M/100M self-adaptive Ethernet interface |
| യുഎസ്ബി ഇൻ്റർഫേസ് | 2 USB 2.0 ഇൻ്റർഫേസുകൾ |
| അളവുകൾ (L x W x H) | 20 x 20 x 4.5 സെ.മീ |
| ഭാരം | 1.01 കിലോഗ്രാം (എച്ച്ഡിഡി ഇല്ലാതെ) |
10. വാറൻ്റിയും പിന്തുണയും
വാറന്റി വിവരങ്ങൾക്കും സാങ്കേതിക പിന്തുണയ്ക്കും, ദയവായി ഔദ്യോഗിക Hikvision കാണുക. website or contact your authorized Hikvision dealer. Keep your purchase receipt as proof of purchase.


