1. ആമുഖം
This manual provides comprehensive instructions for the installation, operation, maintenance, and troubleshooting of the ORTUR Laser Module LU2-4-SF. This module is designed for use with desktop engraving machines such as Ortur Laser Master 2 Pro, OLM2 S2, and OLM2 Pro S2.
The LU2-4-SF module features an upgraded high-performance fixed-focus laser head with a 24V 2A power supply, offering high stability, efficiency, and excellent laser beam quality. It has a luminous power of 5500mW and a 30mm focal length, optimized for precise engraving and cutting.

Figure 1: ORTUR Laser Module LU2-4-SF. This image shows the red-colored laser module with its specifications label, indicating product name, model, wavelength, focal length, input voltage, and maximum luminous power.
For more detailed information, visit the official product page: ortur.tech/LU2-4
2 പ്രധാന സവിശേഷതകൾ
- Brilliant Performance: Upgraded high-performance fixed focus laser head, 24V 2A power supply featuring high stability, high efficiency, low noise, and excellent laser beam quality. 5500MW Luminous power, 30MM focal length is good for precise engraving and cutting.
- High Speed & More Stable: Adopting compression laser technology, the laser focal spot is approximately 0.12*0.15 MM. This laser head is compatible with other 24V laser cutters, offering expanded creative possibilities.
- സുരക്ഷാ സംരക്ഷണ രൂപകൽപ്പന: The laser module shield filters out 97% of UV rays, allowing engraving without protective glasses and preventing accidental contact with the laser spot. The aluminum housing and heat sink ensure rapid heat dissipation for long continuous operation.
- വിശാലമായ അനുയോജ്യത: Ideal for engraving wood, bamboo, cardboard, leather, circuit boards, glass, aluminum oxide, and non-reflective lacquered metal. Cuttable materials include plywood board, pine board, non-woven fabric, and acrylic.
3. സജ്ജീകരണവും ഇൻസ്റ്റാളേഷനും
Before installation, ensure your engraving machine is powered off and disconnected from the power source. Refer to your engraving machine's specific manual for detailed instructions on module replacement or installation.
- അൺപാക്ക് ചെയ്യുന്നു: Carefully remove the LU2-4-SF laser module from its packaging. Inspect for any visible damage.
- മൗണ്ടിംഗ്: Attach the laser module to the designated mounting bracket on your engraving machine. Ensure it is securely fastened to prevent movement during operation.
- ഇലക്ട്രിക്കൽ കണക്ഷൻ: Connect the 24V power cable from your engraving machine to the laser module. Ensure the connection is firm and correct polarity is observed.
- ഡാറ്റ കണക്ഷൻ: Connect any necessary data or control cables from the laser module to your engraving machine's control board.
- ഫോക്കസ് അഡ്ജസ്റ്റ്മെന്റ്: The LU2-4-SF features a fixed focus. Ensure the module is positioned at the correct working distance (focal length 30mm) from the material surface for optimal performance.
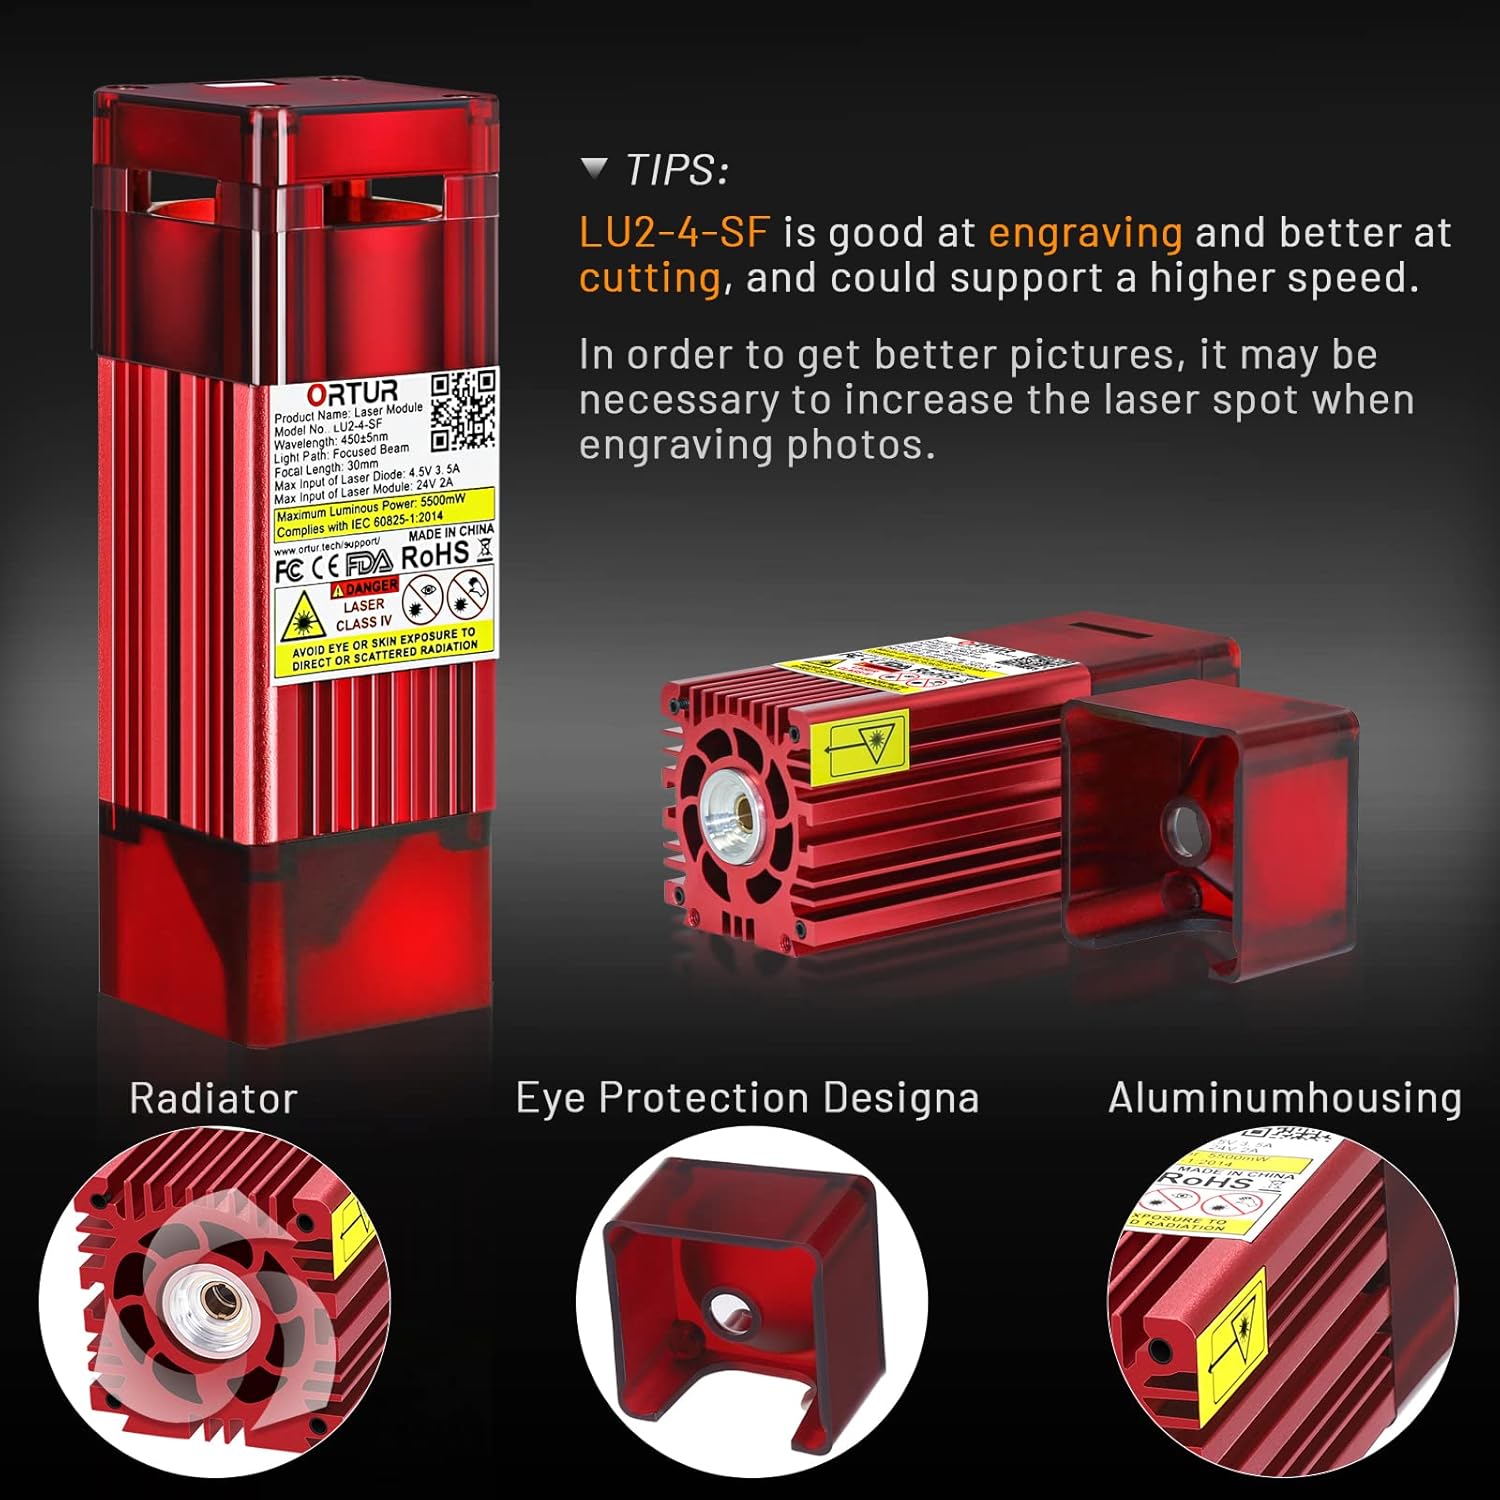
Figure 2: Key components of the ORTUR LU2-4-SF laser module. This image highlights the radiator for heat dissipation, the eye protection design of the shield, and the aluminum housing, all contributing to safe and efficient operation.
4. പ്രവർത്തന നിർദ്ദേശങ്ങൾ
Always wear appropriate laser safety glasses when operating the laser module, even with the built-in shield. Ensure the work area is well-ventilated.
- സോഫ്റ്റ്വെയർ സജ്ജീകരണം: Use compatible laser engraving software (e.g., LightBurn, LaserGRBL) to prepare your design. Configure the software settings according to the material and desired effect.
- മെറ്റീരിയൽ പ്ലേസ്മെൻ്റ്: Place the material to be engraved or cut on the machine's workbed, ensuring it is flat and secure.
- Focal Length Verification: Verify the distance between the laser module and the material surface is approximately 30mm for optimal focus.
- Power and Speed Settings: Adjust laser power and engraving/cutting speed in your software. Start with lower power settings and gradually increase as needed.
- For engraving, the LU2-4-SF is highly effective.
- For cutting, it supports higher speeds and is well-suited for materials like plywood, pine board, non-woven fabric, and acrylic.
- പ്രവർത്തനം ആരംഭിക്കുക: Initiate the engraving or cutting process through your software. Monitor the operation closely.

Figure 3: Comparison of the OLM2-SF's compressed laser focal spot (0.12x0.15mm) versus a typical laser, demonstrating its precision. The image also shows examples of engraving results on wood, highlighting the clean cuts and engravings achievable with the OLM2-SF.

Figure 4: A visual guide to widely applicable materials for the ORTUR LU2-4-SF laser module, including plywood, kraft paper, leather, plastic, film-coated glass, cardboard, non-woven fabric, solid wood, veneer, and bamboo.
5. പരിപാലനം
Regular maintenance ensures optimal performance and extends the lifespan of your laser module.
- ലെൻസ് ക്ലീനിംഗ്: Periodically inspect the laser lens for dust or debris. Use a soft, lint-free cloth and a small amount of lens cleaning solution (specifically designed for optical lenses) to gently clean the lens. Avoid abrasive materials.
- Heat Sink Inspection: Ensure the heat sink fins are free from dust and obstructions to allow for efficient heat dissipation. Use compressed air to clear any buildup.
- കേബിൾ കണക്ഷനുകൾ: Check all electrical and data cable connections regularly to ensure they are secure and free from wear or damage.
- സംഭരണം: When not in use, store the laser module in a clean, dry environment, away from direct sunlight and extreme temperatures.
6. പ്രശ്നപരിഹാരം
| പ്രശ്നം | സാധ്യമായ കാരണം | പരിഹാരം |
|---|---|---|
| ലേസർ ജ്വലിക്കുന്നില്ല അല്ലെങ്കിൽ ദുർബലമായ ഔട്ട്പുട്ട് |
|
|
| മോശം കൊത്തുപണി/മുറിക്കൽ നിലവാരം |
|
|
| സോഫ്റ്റ്വെയർ മൊഡ്യൂൾ തിരിച്ചറിഞ്ഞില്ല. |
|
|
7 സ്പെസിഫിക്കേഷനുകൾ

Figure 5: Detailed product dimensions and key specifications of the ORTUR LU2-4-SF laser module, including optical power, voltage, current, wavelength, focal spot size, and overall product size.
| സ്പെസിഫിക്കേഷൻ | മൂല്യം |
|---|---|
| ഉൽപ്പന്നത്തിൻ്റെ പേര് | ലേസർ മൊഡ്യൂൾ |
| മോഡൽ നമ്പർ. | LU2-4-SF |
| ഒപ്റ്റിക്കൽ പവർ | 4,500-5,500mW (5.5W Luminous Power) |
| തരംഗദൈർഘ്യം | 450±5nm (445±10NM) |
| വാല്യംtage | 4.2-5.0V (Input of Laser Diode) / 24V (Input of Laser Module) |
| ഇലക്ട്രിക് കറൻ്റ് | 3.4-3.6A (Input of Laser Diode) / 2A (Input of Laser Module) |
| ഫോക്കൽ ലെങ്ത് | 30 മി.മീ |
| ഫോക്കൽ സ്പോട്ട് | About 0.12*0.15 MM |
| Light Path | ഫോക്കസ്ഡ് ബീം |
| ഉൽപ്പന്ന വലുപ്പം | 40*41*122എംഎം |
| മെറ്റീരിയൽ | അലുമിനിയം |
| നിറം | ചുവപ്പ് |
| ഇനത്തിൻ്റെ ഭാരം | 299 ഗ്രാം |
8. വാറൻ്റിയും പിന്തുണയും
The ORTUR Laser Module LU2-4-SF comes with a 2 വർഷത്തെ വാറൻ്റി കാലയളവ്. Customer service is available for the lifetime of the product.
If you have any questions regarding instructions, operation, or require further assistance, please contact the ORTUR customer service team directly. They are available to provide professional support.
For more information and support resources, you may visit the official Ortur store on Amazon: Ortur Amazon Store.


