1. ആമുഖം
Thank you for choosing the TeleAdapt LCD Display Alarm Clock. This device is designed to provide accurate timekeeping, reliable alarm functions, and convenient charging for your mobile devices. Its compact design and intuitive features make it an ideal addition to any bedside table, office, or living space. This manual will guide you through the setup, operation, and maintenance of your new alarm clock.
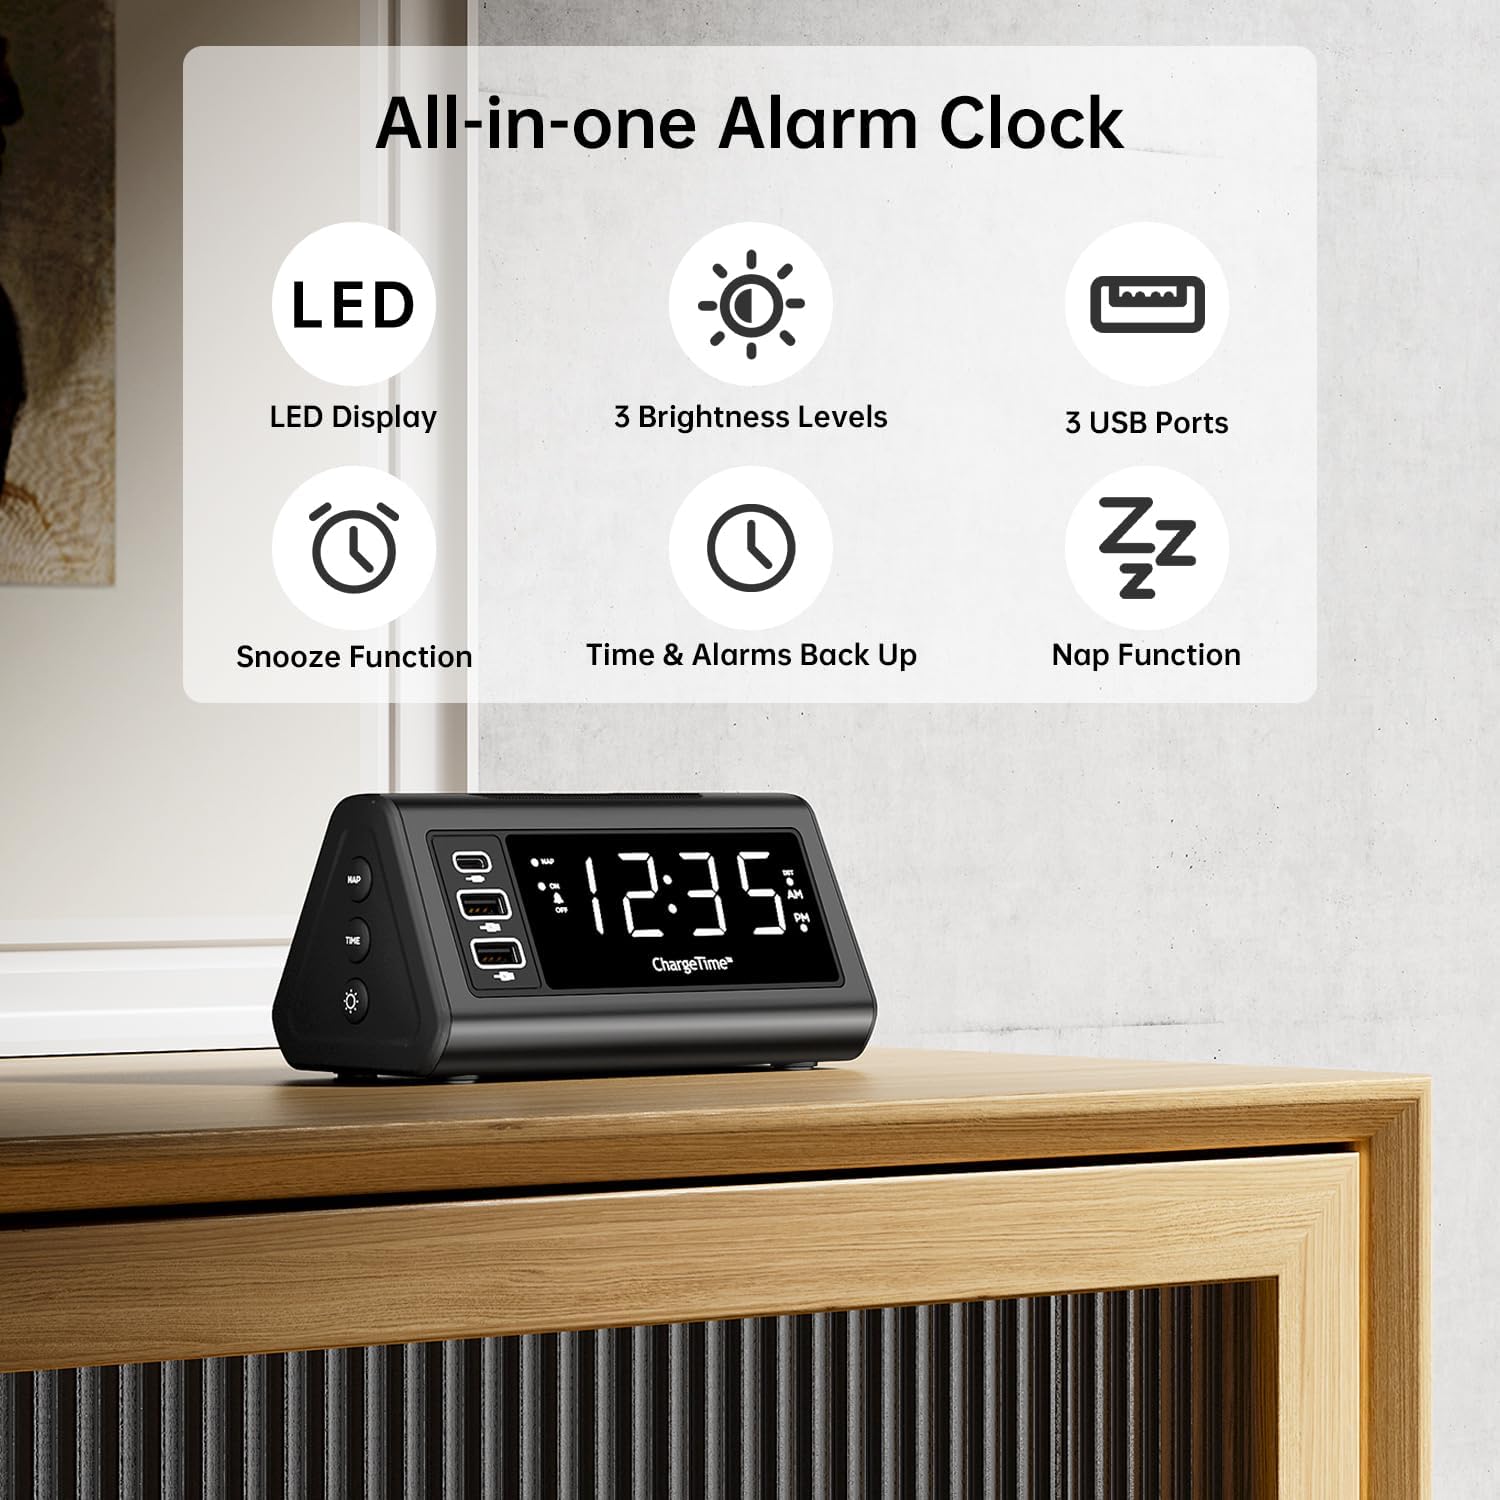
ചിത്രം 1: ഓവർview of TeleAdapt Alarm Clock features.
2 പ്രധാനപ്പെട്ട സുരക്ഷാ വിവരങ്ങൾ
Please read all safety instructions carefully before using this product. Failure to follow these instructions may result in electric shock, fire, or damage to the device.
- ഉപകരണം വെള്ളത്തിലോ അമിതമായ ഈർപ്പത്തിലോ തുറന്നുകാട്ടരുത്.
- Do not disassemble, repair, or modify the device. Refer all servicing to qualified personnel.
- Use only the provided AC power adapter. Using an incompatible adapter may damage the device.
- Ensure proper ventilation around the device. Do not cover ventilation openings.
- നേരിട്ടുള്ള സൂര്യപ്രകാശം, താപ സ്രോതസ്സുകൾ, തുറന്ന തീജ്വാലകൾ എന്നിവയിൽ നിന്ന് ഉപകരണം അകറ്റി നിർത്തുക.
- പ്രാദേശിക നിയന്ത്രണങ്ങൾ അനുസരിച്ച് ബാറ്ററികൾ ശരിയായി വിനിയോഗിക്കുക.
3. പാക്കേജ് ഉള്ളടക്കം
പാക്കേജിൽ എല്ലാ ഇനങ്ങളും ഉണ്ടെന്ന് ഉറപ്പാക്കുക:
- TeleAdapt LCD Display Alarm Clock
- AC Power Adapter with interchangeable plugs
- 2 x AAA Batteries (for backup)
- നിർദ്ദേശ മാനുവൽ (ഈ പ്രമാണം)
4. ഉൽപ്പന്നം കഴിഞ്ഞുview
Familiarize yourself with the various parts and controls of your alarm clock:
Front Display and USB Ports:
- വലിയ LED ഡിസ്പ്ലേ: Shows current time, AM/PM indicator, and DST status.
- USB-C പോർട്ട് (1x): For fast charging compatible devices (5V/3A output).
- USB-A പോർട്ടുകൾ (2x): For charging various devices (5V/2.4A each output).
- NAP Indicator: Lights up when Nap function is active.
- അലാറം ഇൻഡിക്കേറ്റർ: Lights up when alarm is set.
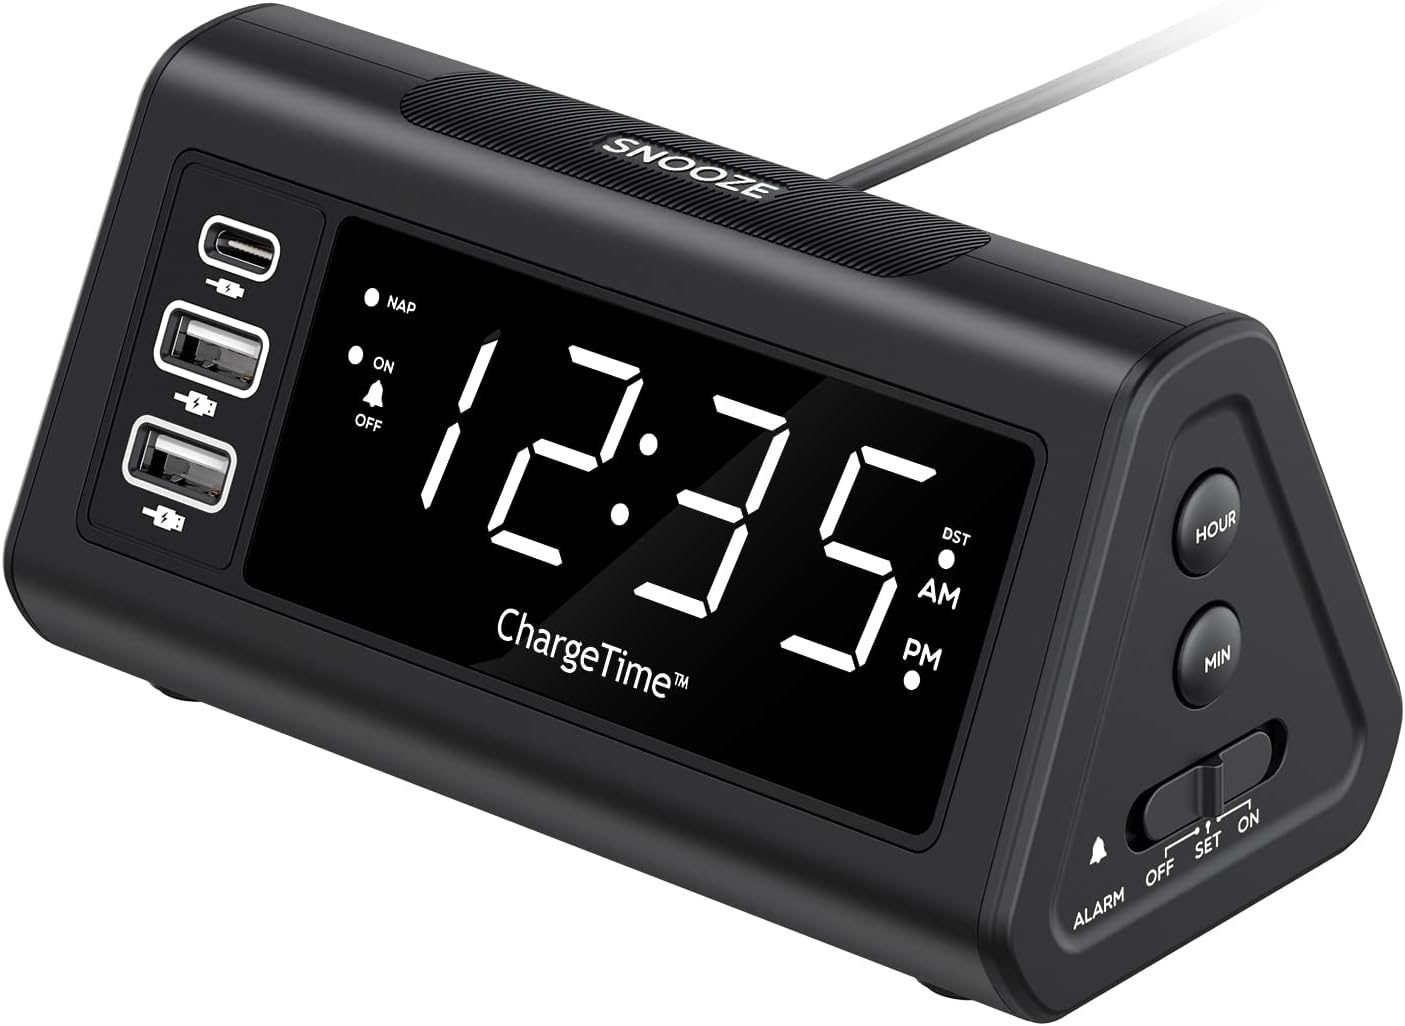
ചിത്രം 2: മുൻഭാഗം view with display and USB ports.
Side Controls:
- NAP Button: Activates and adjusts the nap timer.
- ഓൺ-ഓഫ് ബട്ടൺ: Toggles the alarm on or off.
- ടൈം ബട്ടൺ: Used in conjunction with SNOOZE to set time.
- ഡിമ്മർ ബട്ടൺ: Adjusts display brightness (Off, Low, High).

Figure 3: Side controls for various functions.
മുകളിലും പിന്നിലും:
- സ്നൂസ് ബട്ടൺ: Large button on top for snooze and dimmer adjustment.
- ALARM Switch (OFF/SET/ON): Slider switch to control alarm setting and activation.
- മണിക്കൂർ ബട്ടൺ: Adjusts hour during time/alarm setting.
- MIN ബട്ടൺ: Adjusts minute during time/alarm setting.
- ബാറ്ററി കമ്പാർട്ട്മെൻ്റ്: Holds 2 x AAA batteries for backup power.
- DC 12V/5A Input: AC അഡാപ്റ്ററിനുള്ള പവർ ഇൻപുട്ട്.
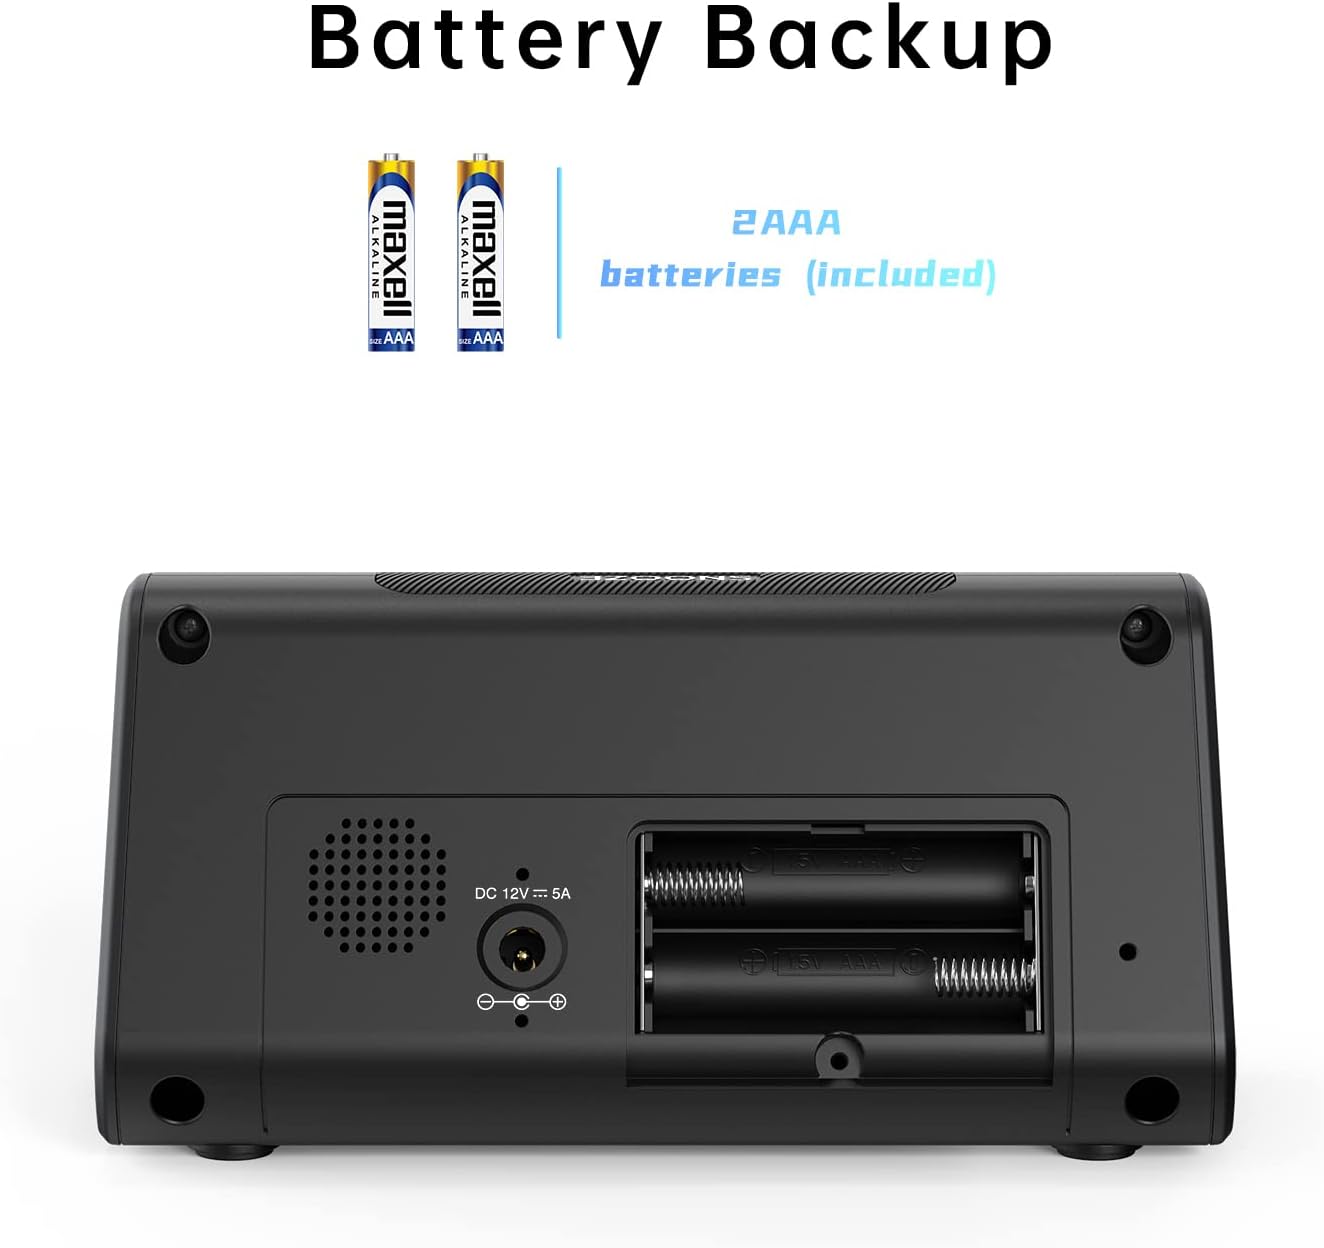
ചിത്രം 4: പിന്നിലേക്ക് view with battery compartment and power input.
5. സജ്ജീകരണം
5.1. പവർ കണക്ഷൻ
- Insert the 2 x AAA batteries into the battery compartment on the back of the alarm clock. Ensure correct polarity. These batteries provide backup power to retain time and alarm settings during a power outage.
- Connect the provided AC power adapter to the DC 12V/5A input port on the back of the alarm clock.
- Plug the AC power adapter into a standard wall outlet. The display will light up.

Figure 5: Connecting the AC power adapter.
5.2. നിലവിലെ സമയം ക്രമീകരിക്കുന്നു.
- അമർത്തിപ്പിടിക്കുക സമയം ബട്ടൺ ഒപ്പം സ്നൂസ് ചെയ്യുക button simultaneously for 3 seconds. The display will begin to flash, indicating time setting mode.
- ഉപയോഗിക്കുക മണിക്കൂർ ഒപ്പം MIN buttons on the side to adjust the year, month, and date in sequence. Press the സമയം button to confirm each setting and move to the next.
- After setting the date, adjust the current hour and minute using the മണിക്കൂർ ഒപ്പം MIN ബട്ടണുകൾ.
- അമർത്തുക സമയം സമയം സ്ഥിരീകരിക്കാൻ വീണ്ടും ബട്ടൺ അമർത്തുക.
- You can enable or disable the Auto DST (Daylight Saving Time) feature in this menu. Use the മണിക്കൂർ or MIN buttons to select ON or OFF, then press സമയം to confirm. (Note: Auto DST is only available in US time zones).

Figure 6: Setting the time on the alarm clock.
6. പ്രവർത്തന നിർദ്ദേശങ്ങൾ
6.1. അലാറം സജ്ജമാക്കുന്നു
- സ്ലൈഡ് ചെയ്യുക അലാറം switch on the side to the സെറ്റ് position. The time display will flash.
- ഉപയോഗിക്കുക മണിക്കൂർ ഒപ്പം MIN buttons to set your desired wake-up time.
- സ്ലൈഡ് ചെയ്യുക അലാറം എന്നതിലേക്ക് മാറുക ON position to activate the alarm. The alarm indicator light will illuminate on the display.
6.2. സ്നൂസ് ഫംഗ്ഷൻ
അലാറം മുഴങ്ങുമ്പോൾ, വലിയ ബട്ടൺ അമർത്തുക സ്നൂസ് ചെയ്യുക button on top to temporarily silence the alarm. The alarm will sound again after the set snooze duration.
To set the snooze duration (5, 10, or 15 minutes):
- അമർത്തിപ്പിടിക്കുക സ്നൂസ് ചെയ്യുക button for 3 seconds. The current snooze time will flash on the display.
- ആവർത്തിച്ച് അമർത്തുക സ്നൂസ് ചെയ്യുക button to cycle through 5, 10, or 15 minutes.
- അമർത്തുക സ്നൂസ് ചെയ്യുക നിങ്ങളുടെ തിരഞ്ഞെടുപ്പ് സ്ഥിരീകരിക്കാൻ വീണ്ടും ബട്ടൺ.

Figure 7: Using the Snooze function.
6.3. Nap Function
The Nap function allows you to set a short-term alarm for a nap without affecting your main alarm setting.
- അമർത്തുക എൻഎപി button on the side of the clock. The display will show a nap duration (e.g., 90, 75, 60, 45, 30, 15 minutes) or OFF.
- അമർത്തുന്നത് തുടരുക എൻഎപി button to cycle through the desired nap times or select OFF to disable. The “NAP” indicator will light when active.
- To stop the nap alarm when it sounds, press either the സ്നൂസ് ചെയ്യുക or എൻഎപി ബട്ടൺ.

Figure 8: Utilizing the Nap function.
6.4. ഡിസ്പ്ലേ തെളിച്ചം ക്രമീകരിക്കൽ
The alarm clock features three levels of display brightness: Off, Low, and High.
- ആവർത്തിച്ച് അമർത്തുക സ്നൂസ് / ഡിമ്മർ button on the top of the clock to cycle through the brightness levels.

Figure 9: Display brightness options.
6.5. ചാർജിംഗ് ഉപകരണങ്ങൾ
The alarm clock includes three USB charging ports for your convenience:
- 1 x USB-C Port: Provides 5V/3A output for fast charging compatible devices.
- 2 x USB-A പോർട്ടുകൾ: Provide 5V/2.4A output each for charging various smartphones, tablets, and other USB-powered devices.
Simply connect your device's charging cable to the appropriate USB port on the alarm clock. No additional charging station is required.
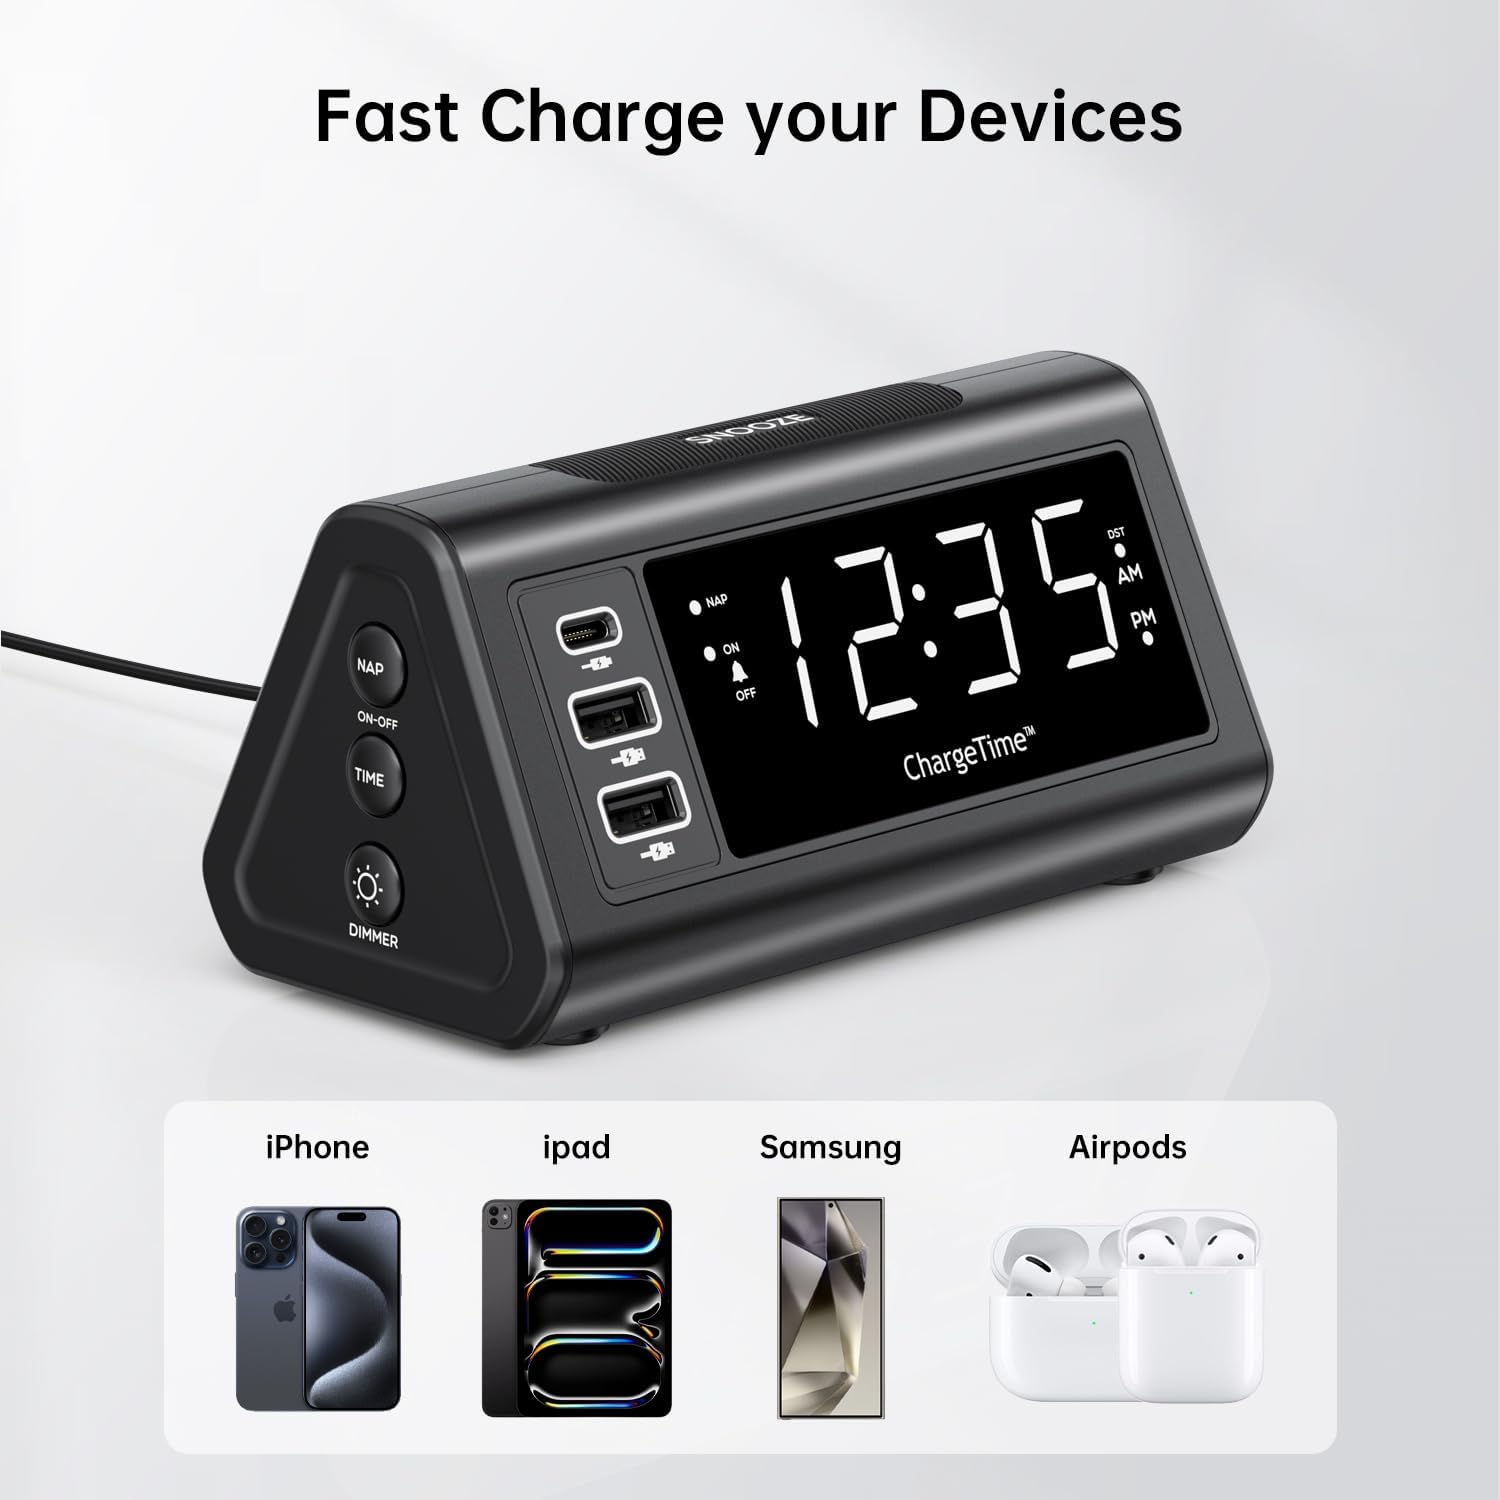
Figure 10: Charging devices via USB ports.
7. പരിപാലനം
7.1. വൃത്തിയാക്കൽ
To clean the alarm clock, gently wipe the surface with a soft, dry cloth. Do not use abrasive cleaners, waxes, or solvents as they may damage the finish. Ensure the device is unplugged from the power outlet before cleaning.
7.2. ബാറ്ററി മാറ്റിസ്ഥാപിക്കൽ
The 2 x AAA batteries are for backup only and do not power the main functions. Replace them periodically (e.g., once a year) to ensure settings are retained during power outages. To replace, open the battery compartment on the back, remove old batteries, and insert new ones with correct polarity.
8. പ്രശ്നപരിഹാരം
| പ്രശ്നം | സാധ്യമായ കാരണം | പരിഹാരം |
|---|---|---|
| ഡിസ്പ്ലേ ശൂന്യമാണ് അല്ലെങ്കിൽ പ്രകാശിക്കുന്നില്ല. | No power, power adapter not connected, or display brightness set to OFF. | Ensure AC adapter is securely plugged into the clock and wall outlet. Press the SNOOZE/DIMMER button repeatedly to adjust brightness. |
| അലാറം മുഴങ്ങുന്നില്ല. | Alarm is not set, alarm switch is OFF, or volume is too low (if applicable). | Verify alarm time is set correctly. Slide the ALARM switch to the ON position. |
| Time settings are lost after power outage. | ബാക്കപ്പ് ബാറ്ററികൾ തീർന്നിരിക്കുന്നു അല്ലെങ്കിൽ ഇൻസ്റ്റാൾ ചെയ്തിട്ടില്ല. | Ensure 2 x AAA batteries are installed correctly and are not depleted. Replace if necessary. |
| Cannot set time/alarm. | Incorrect button combination or sequence. | Refer to Section 5.2 for time setting (TIME + SNOOZE for 3 seconds) and Section 6.1 for alarm setting (ALARM switch to SET). |
| Devices not charging via USB ports. | Device not compatible, cable faulty, or clock not powered. | Ensure the alarm clock is powered by the AC adapter. Try a different USB cable or device to confirm functionality. |
9 സ്പെസിഫിക്കേഷനുകൾ
- ബ്രാൻഡ്: TeleAdapt
- മോഡൽ: ChargeTime USB-C (TA-7835)
- നിറം: കറുപ്പ്
- ഡിസ്പ്ലേ തരം: ഡിജിറ്റൽ LED
- ഊർജ്ജ സ്രോതസ്സ്: Corded Electric (AC mains), Battery Powered (backup)
- USB-C ഔട്ട്പുട്ട്: 5V/3A
- USB-A putട്ട്പുട്ട്: 5V/2.4A (each port)
- ബാറ്ററി ബാക്കപ്പ്: 2 x AAA ബാറ്ററികൾ (ഉൾപ്പെട്ടിരിക്കുന്നു)
- അളവുകൾ: ഏകദേശം 7.48 x 5.35 x 3.43 ഇഞ്ച്
- ഇനത്തിൻ്റെ ഭാരം: ഏകദേശം 1.54 പൗണ്ട്
- പ്രത്യേക സവിശേഷതകൾ: 3-level display brightness, Snooze function (5/10/15 min), Nap timer (15-90 min), Auto-DST (US time zones only)
10. വാറൻ്റിയും പിന്തുണയും
For warranty information or technical support, please contact TeleAdapt customer service. Details can typically be found on the manufacturer's official webനിങ്ങളുടെ സൈറ്റിലോ വാങ്ങൽ കേന്ദ്രം വഴിയോ. വാറന്റി ക്ലെയിമുകൾക്കായി നിങ്ങളുടെ വാങ്ങിയതിന്റെ തെളിവ് സൂക്ഷിക്കുക.
നിർമ്മാതാവ്: TeleAdapt
Webസൈറ്റ്: www.teleadapt.com (ദയവായി ശ്രദ്ധിക്കുക: ഇതൊരു പ്ലെയ്സ്ഹോൾഡറാണ് URL. ശരിയായ പിന്തുണാ കോൺടാക്റ്റ് വിവരങ്ങൾക്ക് നിങ്ങളുടെ ഉൽപ്പന്ന പാക്കേജിംഗ് അല്ലെങ്കിൽ ഔദ്യോഗിക ഡോക്യുമെന്റേഷൻ പരിശോധിക്കുക.)


