ആമുഖം
The AdaLov CPE362 Gigabit Wireless Bridge is designed to extend network connections over long distances, providing reliable and high-speed wireless transmission for various applications. This manual provides comprehensive instructions for setting up, operating, and maintaining your CPE362 wireless bridge system.
ഉൽപ്പന്ന സവിശേഷതകൾ
- Gigabit LAN Port & Long-Range Coverage: Features a 1000Mbps LAN port and a 14dBi high-gain antenna, extending internet connections up to 5KM. Ideal for connecting buildings, CCTV cameras, and more.
- പ്ലഗ് ആൻഡ് പ്ലേ: Simplify your network with automatic pairing for point-to-point (PtP) and point-to-multipoint (PtMP) connections. CPE362 easily extends networks, supports video surveillance, and enables efficient internet sharing with minimal setup effort.
- Durable Outdoor Performance: Designed for outdoor use, IP65 rated for water and dust resistance. Its 14dBi directional antenna ensures reliable performance in harsh weather, making it perfect for extending networks to remote areas like barns or shops.
- High-Speed 5.8GHz Connectivity: Operating at 5.8GHz, the CPE362 delivers wireless speeds up to 866Mbps, ensuring smooth video and voice transmission with low latency. Providing stable and fast internet connections, even in busy environments.
- Cost-Effective Network Solution: The CPE362 offers a budget-friendly alternative to cable installation or leased lines. With 48V POE support, it simplifies deployment by combining power and data transmission over a single Ethernet cable.
ബോക്സിൽ എന്താണുള്ളത്
The AdaLov CPE362 package includes the following components:
- 2 x Wireless Bridges
- 2 x ബ്രാക്കറ്റ് മൗണ്ടുകൾ
- 2 x 48V POE Adapters
- 2 x Small Metal Cable Tie + 4 x Big Metal Cable Tie
- 1 x ഉപയോക്തൃ മാനുവൽ

സജ്ജീകരണവും ഇൻസ്റ്റാളേഷനും
1. Understanding PTP and PTMP Configurations
The CPE362 supports both Point-to-Point (PTP) and Point-to-Multipoint (PTMP) network extensions. In a PTP setup, two bridges create a direct wireless link. In a PTMP setup, one master bridge connects to multiple slave bridges.

2. ഫിസിക്കൽ ഇൻസ്റ്റലേഷൻ
The CPE362 wireless bridges are designed for outdoor use and can be mounted on poles or walls using the included bracket mounts. Ensure a clear line of sight between the master and slave bridges for optimal performance.


The devices are weatherproof, designed to withstand sun, wind, sand, thunderstorms, and freezing temperatures.

3. Connecting the Bridges
The CPE362 bridges are designed for plug-and-play operation with automatic pairing. Each bridge has a switch to designate it as a Master (AP) or Slave (STA).

For initial setup, connect the Master bridge to your network source (e.g., router, NVR) via the POE adapter and LAN port. Connect the Slave bridge to the device you wish to provide network access to (e.g., security camera, computer) also via its POE adapter and LAN port. The bridges will automatically pair.
Operating the Wireless Bridge
Network Extension Applications
The CPE362 is versatile and can be used in various scenarios to extend your network:
- Security Camera Systems: Extend network connectivity to remote IP cameras without running long Ethernet cables.
- Home/Office Network Extension: Provide internet access to outbuildings, garages, or distant parts of a property.
- സ്റ്റാർലിങ്ക് ഇൻ്റഗ്രേഷൻ: Seamlessly integrate with Starlink systems to extend satellite internet connectivity.

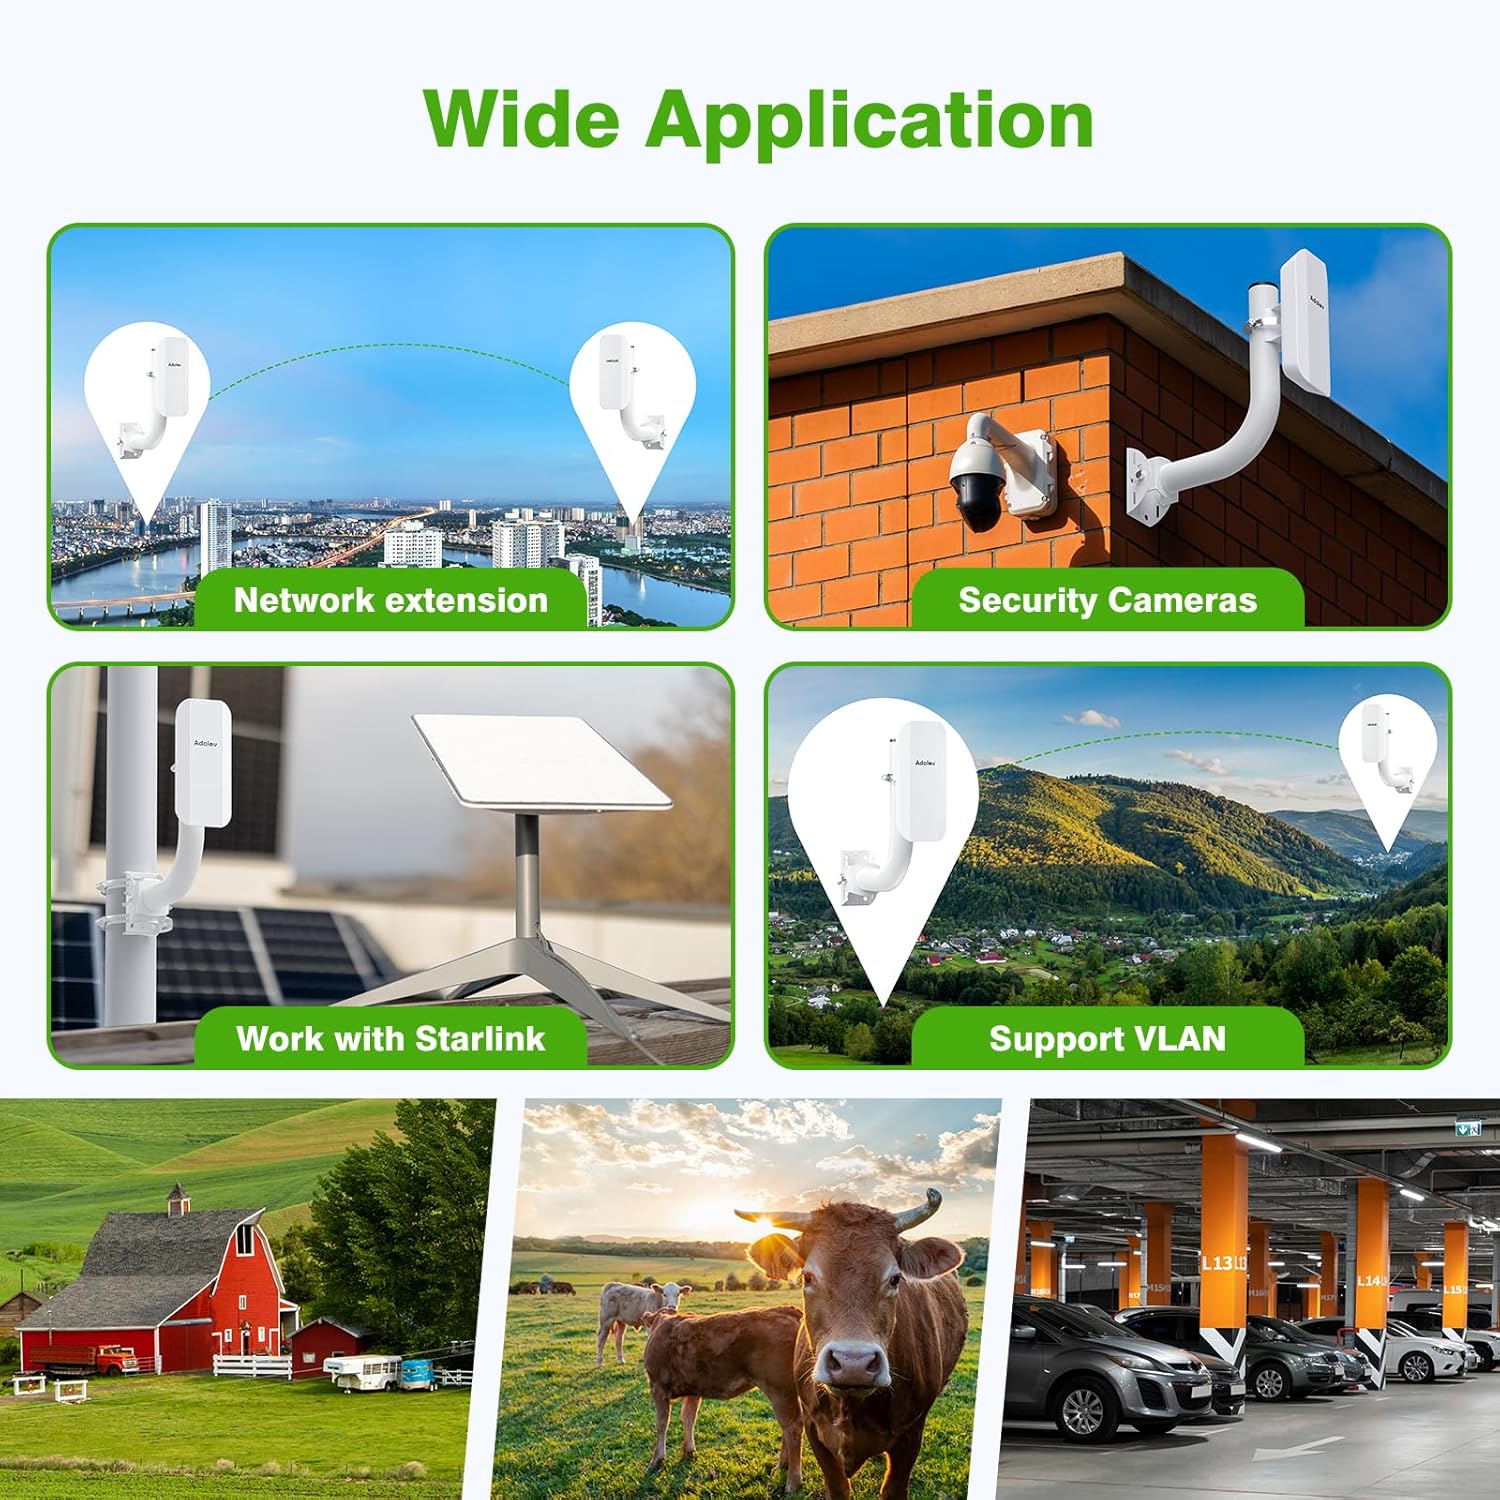
VLAN പിന്തുണ
The CPE362 supports VLAN (Virtual Local Area Network) functionality, allowing for network segmentation and improved security or traffic management. This advanced feature enables you to create separate logical networks over the same physical infrastructure.

കണക്ഷൻ ഡയഗ്രമുകൾ


മെയിൻ്റനൻസ്
The AdaLov CPE362 is built for durability and minimal maintenance, especially in outdoor environments. Its IP65 rating ensures protection against dust and water ingress. Regular visual inspections are recommended to ensure the physical integrity of the units and mounting brackets, especially after severe weather conditions.
Keep the lenses and surfaces clean from dirt, dust, or debris to maintain optimal signal transmission. Use a soft, damp cloth for cleaning. Do not use harsh chemicals or abrasive materials.
ട്രബിൾഷൂട്ടിംഗ്
- No Connection/Poor Signal:
- Ensure clear line of sight between master and slave bridges. Obstructions like trees or buildings can significantly degrade signal.
- Verify that both bridges are powered on and the indicator lights are functioning correctly.
- Check all Ethernet cable connections. Ensure they are securely plugged into the correct ports (LAN/POE).
- Confirm that the Master/Slave switch on each unit is set correctly (one Master, one or more Slaves).
- If manually configuring IP addresses, ensure they are within the same subnet and do not conflict with other devices on your network. The default IP and login info are typically found on the back of each bridge.
- വേഗത കുറഞ്ഞ വേഗത:
- Check for potential interference from other 5.8GHz devices.
- Ensure the bridges are aligned properly. Minor adjustments can significantly improve performance.
- Reduce the distance between bridges if possible, or ensure no new obstructions have appeared.
- ഉപകരണം കണ്ടെത്തിയില്ല:
- Verify the network cable connecting the device to the bridge is working.
- Check the device's own network settings (e.g., DHCP enabled or static IP configured correctly).
സ്പെസിഫിക്കേഷനുകൾ
| ഫീച്ചർ | വിശദാംശങ്ങൾ |
|---|---|
| ഉൽപ്പന്ന അളവുകൾ | 7.87 x 7.87 x 2.76 ഇഞ്ച് |
| ഇനത്തിൻ്റെ ഭാരം | 4.4 പൗണ്ട് |
| മോഡൽ നമ്പർ | CPE362 വയർലെസ്സ് പാലം |
| ബ്രാൻഡ് | അഡലോവ് |
| പ്രത്യേക ഫീച്ചർ | Access Point Mode, Guest Mode, Internet Security, Support VLAN, Weatherproof |
| ഫ്രീക്വൻസി ബാൻഡ് ക്ലാസ് | സിംഗിൾ-ബാൻഡ് |
| വയർലെസ് കമ്മ്യൂണിക്കേഷൻ സ്റ്റാൻഡേർഡ് | 802.11ac |
| അനുയോജ്യമായ ഉപകരണങ്ങൾ | POE Switch, Personal Computer, Router, Security Camera |
| ആവൃത്തി | 5.8 GHz |
| ശുപാർശ ചെയ്യുന്ന ഉപയോഗങ്ങൾ | Outdoor Network Extension, Home |
| കണക്റ്റിവിറ്റി ടെക്നോളജി | Ethernet, Wi-Fi, 48V PoE |
വാറൻ്റിയും പിന്തുണയും
For detailed warranty information and technical support, please refer to the official AdaLov website or contact their customer service directly. The user manual included in the product package also contains specific warranty terms and contact details.


