1. ആമുഖം
This manual provides detailed instructions for the installation, operation, maintenance, and troubleshooting of the Briidea HTRC-01 DC 12-48V 35A Waterproof Motor Speed Controller. This device is designed to provide precise speed control for various DC brush motors, including those found in trolling boat motors, blowers, fans, and electric weeders.

Image 1.1: Briidea HTRC-01 controller in a marine application.
The controller is shown mounted on a boat, demonstrating its application for trolling motors.

ചിത്രം 1.2: ഉദാamples of compatible brush motor applications.
This image illustrates the versatility of the controller for various brush motor-driven devices such as electric weeders, trolling motors, automotive fans, and leaf blowers.
2 സുരക്ഷാ വിവരങ്ങൾ
- വൈദ്യുതി വിതരണം: വൈദ്യുതി വിതരണം വോളിയം ഉറപ്പാക്കുകtage is within the specified range of DC 12-48V. Exceeding this range can damage the unit.
- ധ്രുവത: Always connect the positive and negative terminals of the power supply correctly. Reversing polarity will cause immediate damage to the controller.
- നിലവിലെ റേറ്റിംഗ്: Do not exceed the continuous current rating of 35A or the peak current of 60A. Overloading can lead to overheating and failure.
- വയറിംഗ്: Use appropriate wire gauges (up to 6AWG) for connections to prevent overheating and ensure stable operation.
- പരിസ്ഥിതി: While the unit is IP65 waterproof, avoid submerging it or exposing it to extreme conditions beyond its rating.
- ഇൻസ്റ്റലേഷൻ: Ensure the controller is securely mounted and all connections are tight to prevent accidental disconnections or short circuits.
- പരിപാലനം: ഏതെങ്കിലും അറ്റകുറ്റപ്പണികൾ അല്ലെങ്കിൽ പരിശോധന നടത്തുന്നതിന് മുമ്പ് വൈദ്യുതി വിച്ഛേദിക്കുക.
3. ഉൽപ്പന്നം കഴിഞ്ഞുview
The Briidea HTRC-01 is a robust DC motor speed controller featuring a waterproof design and intuitive controls. It allows for variable speed adjustment and includes a forward-brake-reverse switch.

ചിത്രം 3.1: മുൻഭാഗം view of the Briidea HTRC-01 controller.
This image displays the main components on the top panel: the LED output display, the speed adjustment potentiometer, and the forward-brake-reverse switch.

Image 3.2: Internal components and labeled features.
ഒരു പൊട്ടിത്തെറിച്ചു view showing the internal wiring, the 12 high-performance MOS tubes, the control switch, the 0-100% speed control knob, and the LED output display.
4 സ്പെസിഫിക്കേഷനുകൾ
| ഫീച്ചർ | സ്പെസിഫിക്കേഷൻ |
|---|---|
| മോഡൽ | HTRC-01 |
| ഇൻപുട്ട് വോളിയംtage | ഡിസി ക്സനുമ്ക്സ-ക്സനുമ്ക്സവ് |
| തുടർച്ചയായ കറൻ്റ് | 35എ |
| പീക്ക് കറൻ്റ് | 60എ |
| വേഗത നിയന്ത്രണ പരിധി | 0-100% (Variable) |
| വാട്ടർപ്രൂഫ് റേറ്റിംഗ് | IP65 |
| പ്രദർശിപ്പിക്കുക | LED (0-100% rotation value) |
| അളവുകൾ (L x W x H) | 6.4 x 6.4 x 3.5 ഇഞ്ച് (16.26 x 16.26 x 8.89 സെ.മീ) |
| ഭാരം | 2.29 പൗണ്ട് (1.04 കി.ഗ്രാം) |
| മെറ്റീരിയൽ | Metal (internal components) |
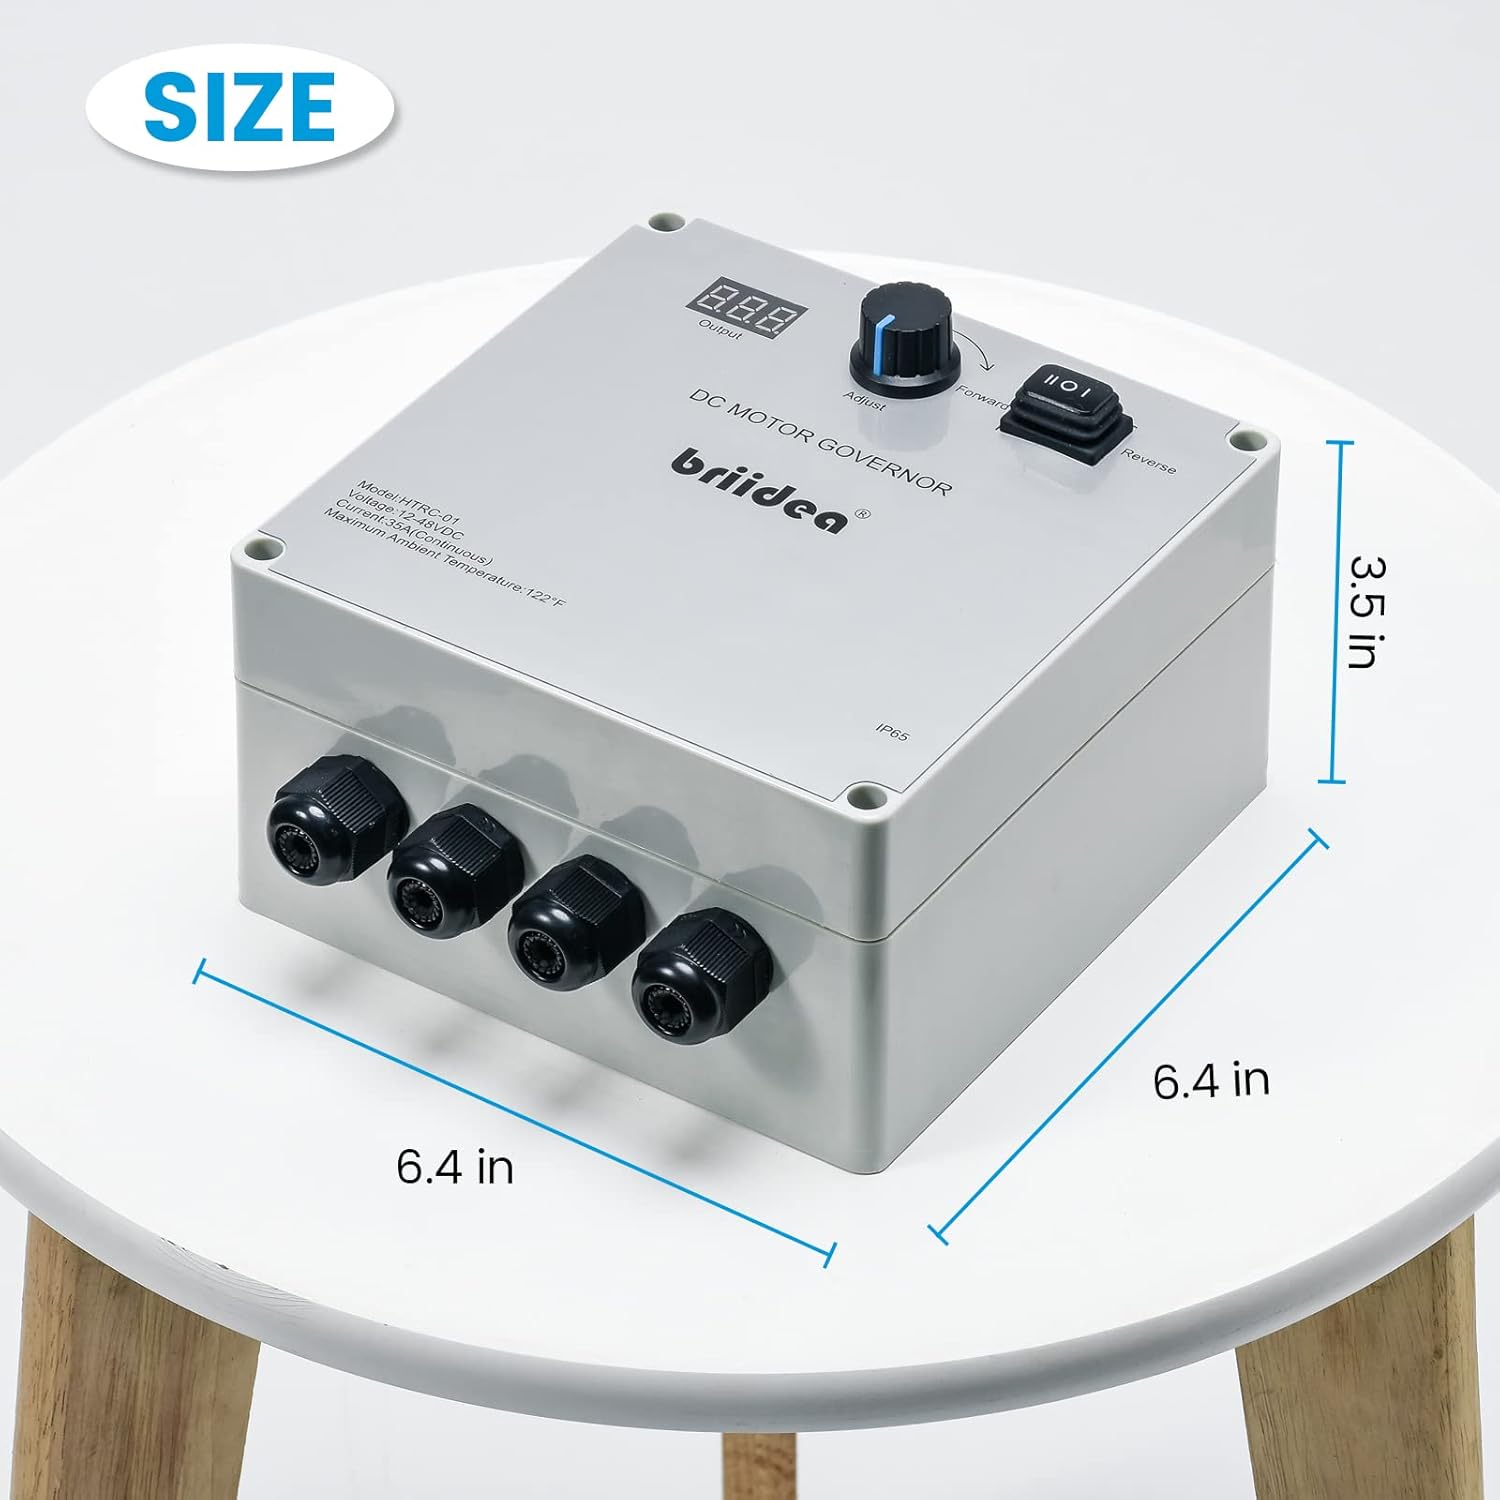
ചിത്രം 4.1: ഉൽപ്പന്ന അളവുകൾ.
This diagram provides the physical measurements of the controller for installation planning.
5. സജ്ജീകരണവും ഇൻസ്റ്റാളേഷനും
Follow these steps for proper installation of your Briidea HTRC-01 motor speed controller.
- മൗണ്ടിംഗ്: Select a suitable, stable surface for mounting the controller. Ensure it is accessible for operation and protected from direct impact.
- വയറിംഗ് തയ്യാറാക്കൽ: Ensure the power source is disconnected before making any electrical connections. Prepare your power supply wires and motor wires. The controller supports up to 6AWG wire access directly, eliminating the need for separate terminals.
- പവർ ബന്ധിപ്പിക്കുക: Connect the positive (+) terminal of your DC power supply to the 'POWER +' input on the controller. Connect the negative (-) terminal of your DC power supply to the 'POWER -' input. Warning: Reversing polarity will damage the unit.
- Connect Motor: Connect the motor wires to the 'MOTOR' terminals on the controller. The motor terminals are not polarity-sensitive for basic operation, but reversing them will reverse the motor's direction if the switch is in the 'Forward' position.
- സുരക്ഷിത കണക്ഷനുകൾ: Ensure all wire connections are tight and secure within the waterproof cable glands.
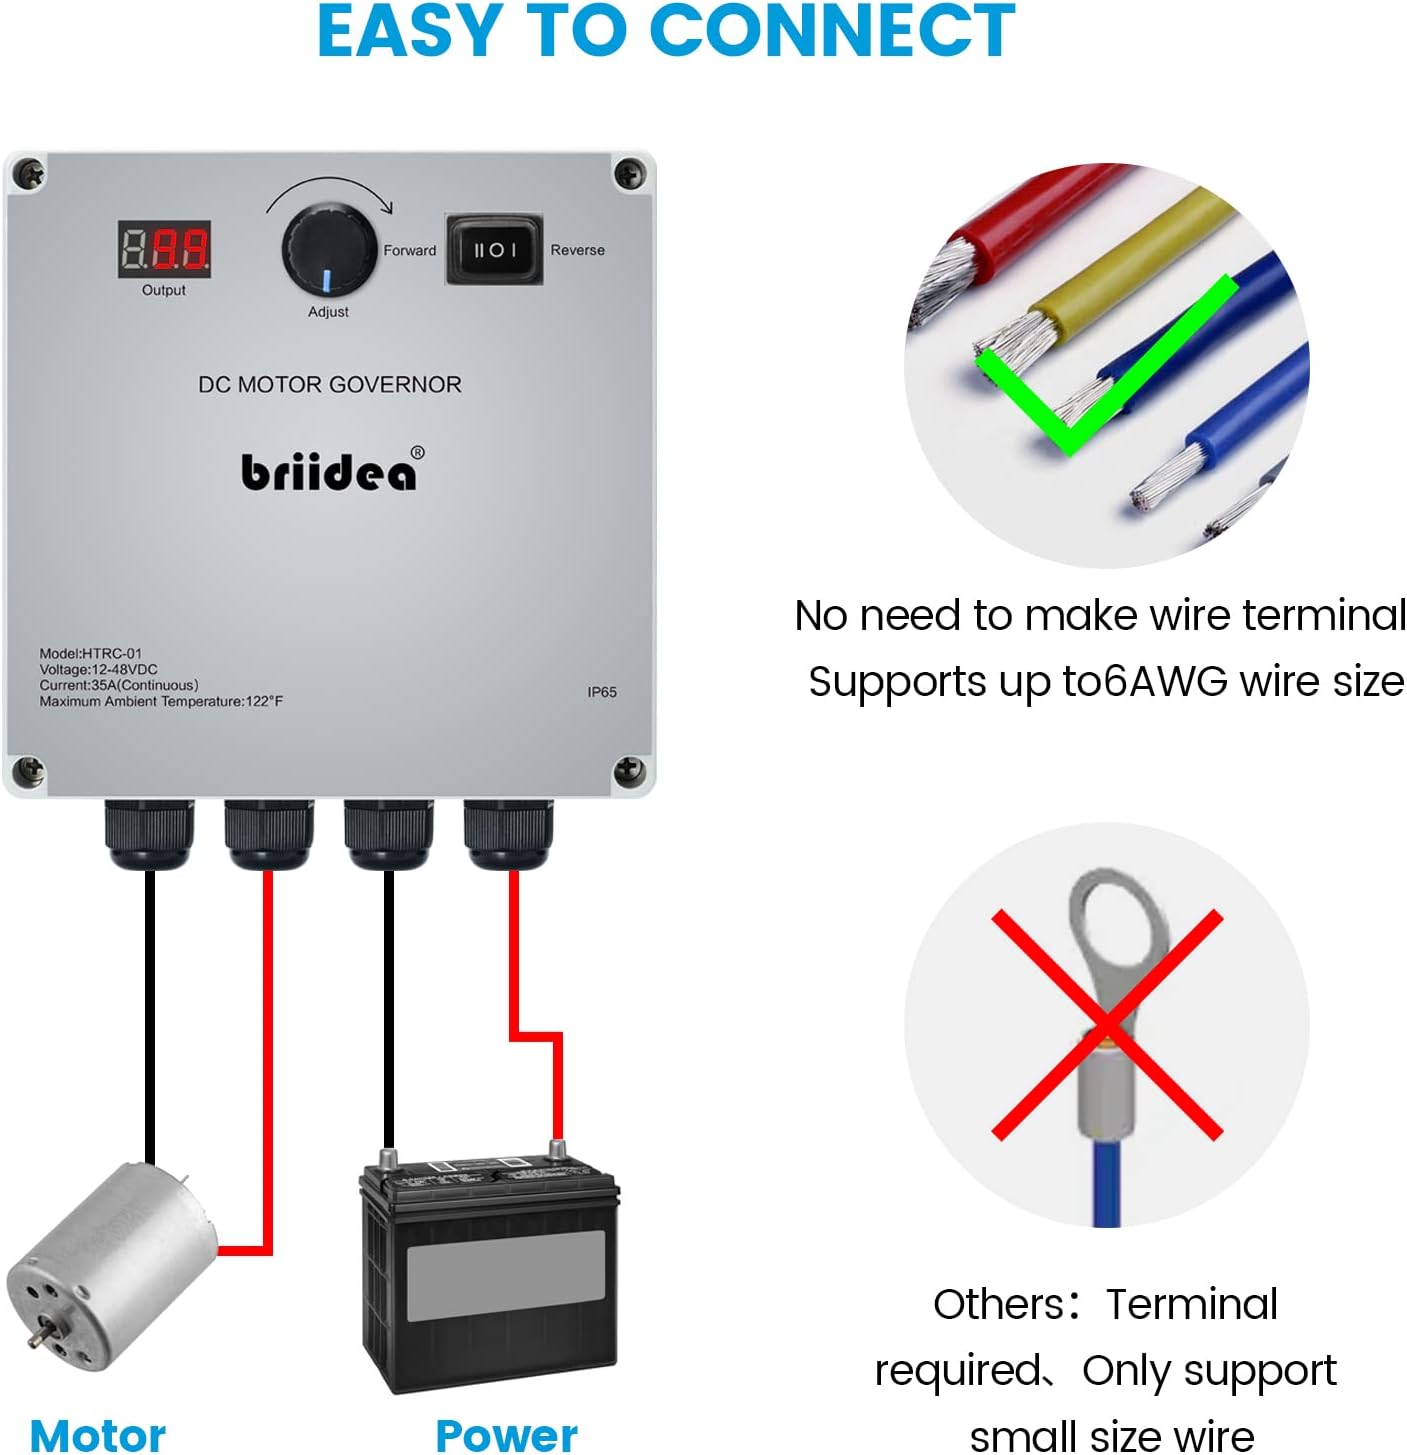
Image 5.1: Wiring diagram.
This diagram illustrates the direct connection method for the motor and power supply, highlighting that no additional wire terminals are required and supporting up to 6AWG wire size.
6. പ്രവർത്തന നിർദ്ദേശങ്ങൾ
Once installed, operate the controller as follows:
- പവർ ഓൺ: Connect the power supply to the controller. The LED display will illuminate.
- ദിശ തിരഞ്ഞെടുക്കുക: ഉപയോഗിക്കുക Forward-Brake-Reverse Switch to select the desired motor direction.
- ഫോർവേഡ്: Motor rotates in the forward direction.
- Brake (Center Position): Motor stops and applies a brake.
- വിപരീതം: മോട്ടോർ വിപരീത ദിശയിൽ കറങ്ങുന്നു.
- വേഗത ക്രമീകരിക്കുക: തിരിക്കുക Adjust Potentiometer Knob clockwise to increase motor speed from 0% to 100%. Rotate counter-clockwise to decrease speed. The LED display will show the current speed percentage.
- Output ട്ട്പുട്ട് നിരീക്ഷിക്കുക: The LED display provides a real-time numerical value of the motor's output speed, ranging from 0 to 100.
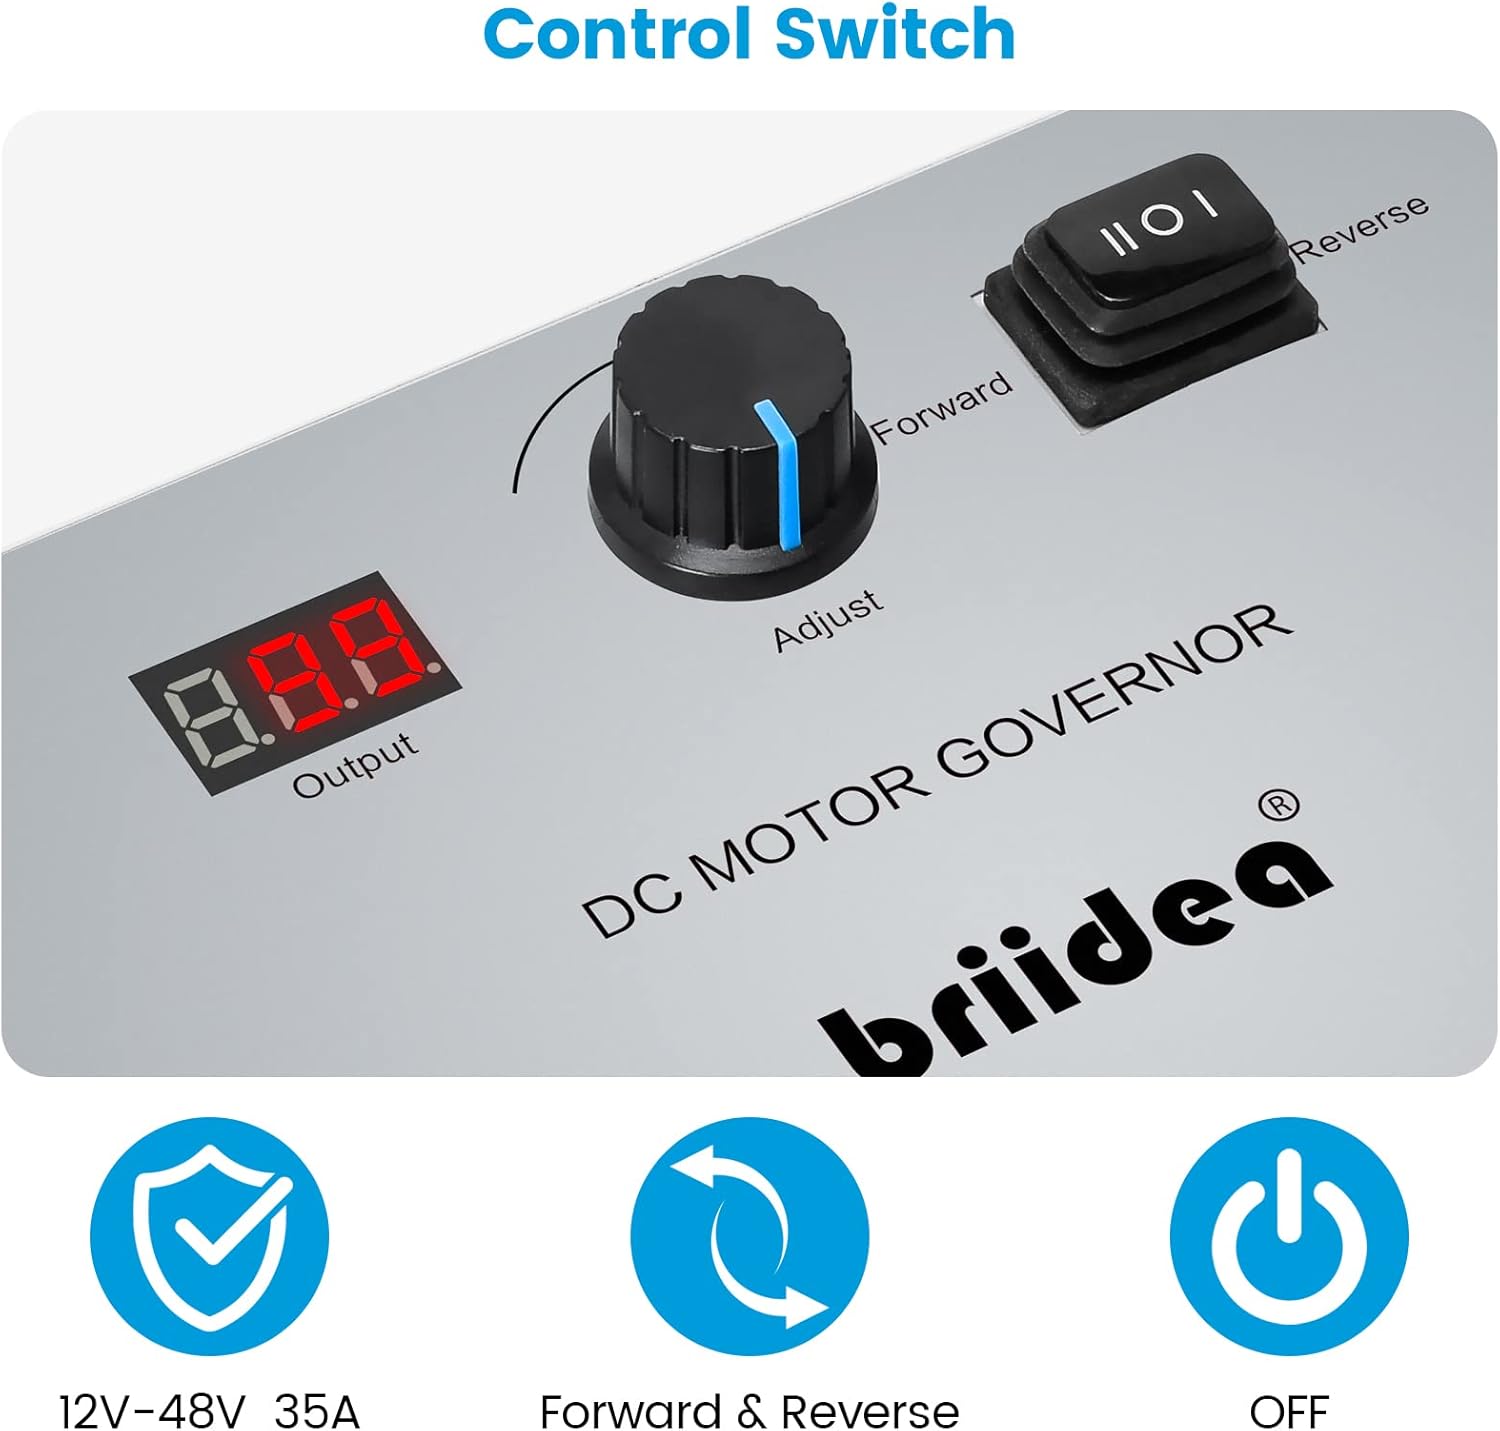
Image 6.1: Control panel details.
This image highlights the LED display, the speed adjustment knob, and the three-position switch for forward, brake (off), and reverse functions.
7. പരിപാലനം
Regular maintenance ensures the longevity and optimal performance of your controller.
- വൃത്തിയാക്കൽ: കൺട്രോളറിന്റെ പുറംഭാഗം ഇടയ്ക്കിടെ പരസ്യം ഉപയോഗിച്ച് വൃത്തിയാക്കുക.amp തുണി. കഠിനമായ രാസവസ്തുക്കളോ ഉരച്ചിലുകളോ ഉപയോഗിക്കുന്നത് ഒഴിവാക്കുക.
- കണക്ഷൻ പരിശോധന: Regularly inspect all wiring connections to ensure they remain tight and free from corrosion. Loose connections can lead to intermittent operation or damage.
- വാട്ടർപ്രൂഫ് ഇന്റഗ്രിറ്റി: Although IP65 rated, inspect the cable glands and housing for any signs of damage or wear that could compromise its waterproof seal, especially after exposure to water.
- പരിസ്ഥിതി സംരക്ഷണം: Store the controller in a dry, cool place when not in use for extended periods.

Image 7.1: Waterproof capability.
The image shows the controller being exposed to water, illustrating its IP65 waterproof design, which protects against water jets from any direction.
8. പ്രശ്നപരിഹാരം
If you encounter issues with your Briidea HTRC-01 controller, refer to the following common problems and solutions:
| പ്രശ്നം | സാധ്യമായ കാരണം | പരിഹാരം |
|---|---|---|
| Controller does not power on / LED display is off. | No power supply, incorrect wiring, blown fuse (if applicable). | Check power connections and ensure correct polarity. Verify power source is active. Inspect for any external fuses. |
| Motor does not respond to speed adjustment. | Motor not connected, faulty motor, switch in 'Brake' position, internal controller issue. | Check motor connections. Ensure the switch is in 'Forward' or 'Reverse'. Test motor directly if possible. |
| Motor runs at full speed regardless of knob position. | Potentiometer fault, internal circuit damage. | Contact customer support. This indicates a potential internal component failure. |
| Motor direction is incorrect. | Forward-Brake-Reverse switch setting, motor wiring. | Adjust the Forward-Brake-Reverse switch. If still incorrect, reverse the motor's wire connections to the controller. |
| Controller overheats. | Overload, insufficient ventilation, short circuit. | Ensure motor current does not exceed 35A continuous. Provide adequate airflow around the unit. Check for short circuits in wiring. |
9. വാറൻ്റി വിവരങ്ങൾ
Briidea products are manufactured to high-quality standards. For specific warranty terms and conditions, please refer to the documentation included with your purchase or visit the official Briidea website. Typically, a limited warranty covers manufacturing defects for a specified period from the date of purchase.
10. പിന്തുണ
For technical assistance, product inquiries, or warranty claims, please contact Briidea customer support through their official website or the retailer where the product was purchased. Please have your model number (HTRC-01) and purchase information ready when contacting support.
You can visit the Briidea store for more information: Briidea Store on Amazon


