1. ആമുഖം
The LocknCharge Carrier 40 Cart is designed for efficient charging, secure storage, and safe transportation of up to 40 mobile devices. This cart comes prewired with 45-watt USB-C cables, simplifying device deployment and management. Its robust construction and thoughtful design, including LocknCharge Baskets and a soft-closing lid, make it an ideal solution for educational and professional environments.
2 സുരക്ഷാ വിവരങ്ങൾ
Please read and understand all safety instructions before operating the Carrier 40 Cart. Failure to follow these instructions may result in injury or damage to the product.
- Ensure the cart is placed on a level, stable surface.
- Do not overload the cart beyond its specified capacity.
- Keep all ventilation openings clear to prevent overheating.
- Only connect the cart to a grounded power outlet.
- Do not attempt to service the cart yourself. Refer all servicing to qualified personnel.
- Keep children away from the cart during operation and movement.
- Always engage the wheel brakes when the cart is stationary.
3. സജ്ജീകരണം
3.1 അൺപാക്കിംഗും പരിശോധനയും
Carefully remove the Carrier 40 Cart from its packaging. Inspect the cart for any signs of damage that may have occurred during shipping. Report any damage to your supplier immediately.
3.2 കാസ്റ്റർ ഇൻസ്റ്റലേഷൻ
The cart typically ships with casters unattached. Attach the four heavy-duty casters to the base of the cart using the provided hardware. Ensure all bolts are securely tightened. Two of the casters are usually locking casters and should be installed on the same side for easier access.

ചിത്രം 3.2.1: The LocknCharge Carrier 40 Cart shown with devices in baskets and the lid partially open, illustrating its general appearance and functionality. This image provides an overview of the cart's design and how devices are stored.
3.3 പവർ കണക്ഷൻ
Locate the main power inlet on the side or rear of the cart. Connect the provided power cord to the cart and then to a grounded electrical outlet. Ensure the power switch is in the OFF position before connecting to power.
3.4 Cable Management and Device Placement
The Carrier 40 Cart comes prewired with 45-watt USB-C cables. These cables are neatly routed and secured within the cart's cable management system. The cart includes LocknCharge Baskets designed to hold devices. Each basket can typically hold 5-6 devices, allowing for organized storage and quick deployment.

ചിത്രം 3.4.1: എ വിശദമായി view of USB-C cables connected to multiple devices stored within the cart. This image highlights the prewired cable setup and how devices are connected for charging.

ചിത്രം 3.4.2: A close-up showing the organized routing of USB-C cables within the cart, demonstrating the integrated cable management solution.

ചിത്രം 3.4.3: മറ്റൊന്ന് view of devices being charged inside the cart, emphasizing the ease of connecting and storing multiple devices simultaneously.
To place devices: Open the cart lid. Remove the LocknCharge Baskets. Place devices into the baskets, ensuring they fit securely. Connect the prewired USB-C cables to each device. Return the baskets with devices to their designated slots within the cart.
4. പ്രവർത്തന നിർദ്ദേശങ്ങൾ
4.1 ചാർജിംഗ് ഉപകരണങ്ങൾ
After devices are placed and connected, turn on the main power switch on the cart. The cart's charging system will automatically begin charging the connected devices. Charging status indicators (if present) will illuminate to show the charging progress.
4.2 Securing the Cart
The Carrier 40 Cart includes a high-quality combination padlock for securing the cart's contents. After all devices are stored and the lid is closed, use the padlock to secure the lid. Ensure the lid is fully closed and the padlock is correctly engaged to prevent unauthorized access.

ചിത്രം 4.2.1: ഒരു ക്ലോസപ്പ് view of the combination padlock attached to the cart, demonstrating the security feature for stored devices.
4.3 Transporting the Cart
To move the cart, ensure the lid is securely locked and all devices are properly seated in their baskets. Release the brakes on the locking casters. Use the integrated handles to push or pull the cart to its desired location. Always engage the caster brakes once the cart is stationary.

ചിത്രം 4.3.1: The LocknCharge Carrier 40 Cart with its side shelves extended, illustrating its potential as a mobile workstation or presentation cart. This view also shows the casters for mobility.

ചിത്രം 4.3.2: The cart with its lid open, revealing the internal structure and device baskets, ready for devices to be inserted or removed.
4.4 Using the Work Surface
The soft-closing top lid of the Carrier 40 Cart can double as a work surface when closed. Ensure no heavy objects are placed on the lid that could exceed its weight capacity or obstruct its opening mechanism.
5. പരിപാലനം
5.1 വൃത്തിയാക്കൽ
Clean the exterior surfaces of the cart with a soft, damp cloth. Avoid using abrasive cleaners or solvents that could damage the finish. Ensure the cart is unplugged from the power source before cleaning.
5.2 Cable Inspection
Periodically inspect all USB-C cables for signs of wear, fraying, or damage. Replace any damaged cables immediately to ensure safe and efficient charging. Only use LocknCharge approved replacement cables.
5.3 Caster Inspection
Regularly check the casters for smooth operation and ensure the brakes are functioning correctly. Clean any debris from the wheels to maintain mobility.
6. പ്രശ്നപരിഹാരം
6.1 ഉപകരണങ്ങൾ ചാർജ് ചെയ്യുന്നില്ല
- പവർ കണക്ഷൻ പരിശോധിക്കുക: Ensure the cart is securely plugged into a live, grounded power outlet and the main power switch is ON.
- കേബിൾ കണക്ഷനുകൾ പരിശോധിക്കുക: Confirm that each USB-C cable is firmly connected to both the cart's internal port and the device.
- കേബിളുകൾ പരിശോധിക്കുക: Check for any visible damage to the USB-C cables. Replace if necessary.
- ഉപകരണ അനുയോജ്യത: Ensure the devices are compatible with USB-C charging and the 45-watt output.
6.2 Cart Difficult to Move
- Release Brakes: Ensure all caster brakes are disengaged.
- കാസ്റ്ററുകൾ പരിശോധിക്കുക: Inspect casters for debris (e.g., hair, lint) that might be obstructing movement. Clean if necessary.
- ഉപരിതല തരം: The cart is designed for smooth, hard surfaces. Movement on carpet or uneven terrain may be more difficult.
6.3 Lid Not Securing Properly
- തടസ്സങ്ങൾ മായ്ക്കുക: Ensure no devices or cables are preventing the lid from closing completely.
- Padlock Alignment: Verify the combination padlock is correctly aligned and engaged with the locking mechanism.
7 സ്പെസിഫിക്കേഷനുകൾ
| ഫീച്ചർ | വിശദാംശങ്ങൾ |
|---|---|
| ഉൽപ്പന്ന അളവുകൾ | 33.6 x 26.3 x 36.6 ഇഞ്ച് (L x W x H) |
| ഇനത്തിൻ്റെ ഭാരം | 222 പൗണ്ട് |
| ഉപകരണ ശേഷി | 40 ഉപകരണങ്ങൾ വരെ |
| ചാർജിംഗ് തരം | USB-C, 45-watt per port (prewired) |
| സുരക്ഷ | Combination padlock included |
| മൊബിലിറ്റി | Heavy-duty casters (2 locking) |
| അധിക സവിശേഷതകൾ | Soft-closing top lid, LocknCharge Baskets, Integrated cable management |

ചിത്രം 7.1: The LocknCharge Carrier 40 Cart with its lid closed, showcasing its sleek and compact design when not in use or during transport.
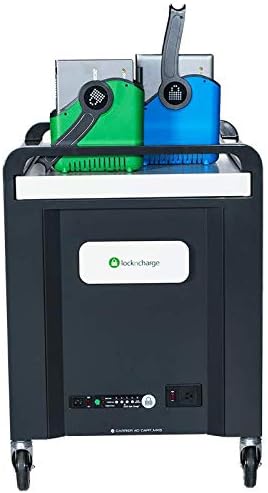
ചിത്രം 7.2: ഒരു മുൻവശം view of the cart, detailing the power management panel, charging indicators, and the main power inlet.
ചിത്രം 7.3: The LocknCharge Carrier 40 Cart with its side shelves extended, illustrating its potential as a mobile workstation or presentation cart. This view also shows the casters for mobility.
ചിത്രം 7.4: The cart with its lid open, revealing the internal structure and device baskets, ready for devices to be inserted or removed.
ചിത്രം 7.5: The LocknCharge Carrier 40 Cart shown with devices in baskets and the lid partially open, illustrating its general appearance and functionality. This image provides an overview of the cart's design and how devices are stored.
ചിത്രം 7.6: എ വിശദമായി view of USB-C cables connected to multiple devices stored within the cart. This image highlights the prewired cable setup and how devices are connected for charging.
ചിത്രം 7.7: A close-up showing the organized routing of USB-C cables within the cart, demonstrating the integrated cable management solution.
ചിത്രം 7.8: മറ്റൊന്ന് view of devices being charged inside the cart, emphasizing the ease of connecting and storing multiple devices simultaneously.
ചിത്രം 7.9: ഒരു ക്ലോസപ്പ് view of the combination padlock attached to the cart, demonstrating the security feature for stored devices.
8. വാറൻ്റിയും പിന്തുണയും
8.1 ഉൽപ്പന്ന വാറന്റി
LocknCharge products typically come with a manufacturer's warranty covering defects in materials and workmanship. Please refer to the warranty card included with your product or visit the official LocknCharge website for specific warranty terms and conditions applicable to the Carrier 40 Cart.
8.2 ഉപഭോക്തൃ പിന്തുണ
For technical assistance, troubleshooting, or replacement parts, please contact LocknCharge customer support. You can find contact information on the LocknCharge official website or through your authorized reseller.
LocknCharge Official Webസൈറ്റ്: www.lockncharge.com


