ആമുഖം
ഷാർപ്പ് ബിഗ് ബാംഗ് അലാറം ക്ലോക്ക് തിരഞ്ഞെടുത്തതിന് നന്ദി. നിങ്ങളുടെ പുതിയ അലാറം ക്ലോക്ക് സജ്ജീകരിക്കാനും പ്രവർത്തിപ്പിക്കാനും പരിപാലിക്കാനും നിങ്ങളെ സഹായിക്കുന്നതിനുള്ള വിശദമായ നിർദ്ദേശങ്ങൾ ഈ മാനുവലിൽ നൽകിയിരിക്കുന്നു. ഉപയോഗിക്കുന്നതിന് മുമ്പ് ദയവായി ഈ മാനുവൽ നന്നായി വായിച്ച് ഭാവിയിലെ റഫറൻസിനായി സൂക്ഷിക്കുക.
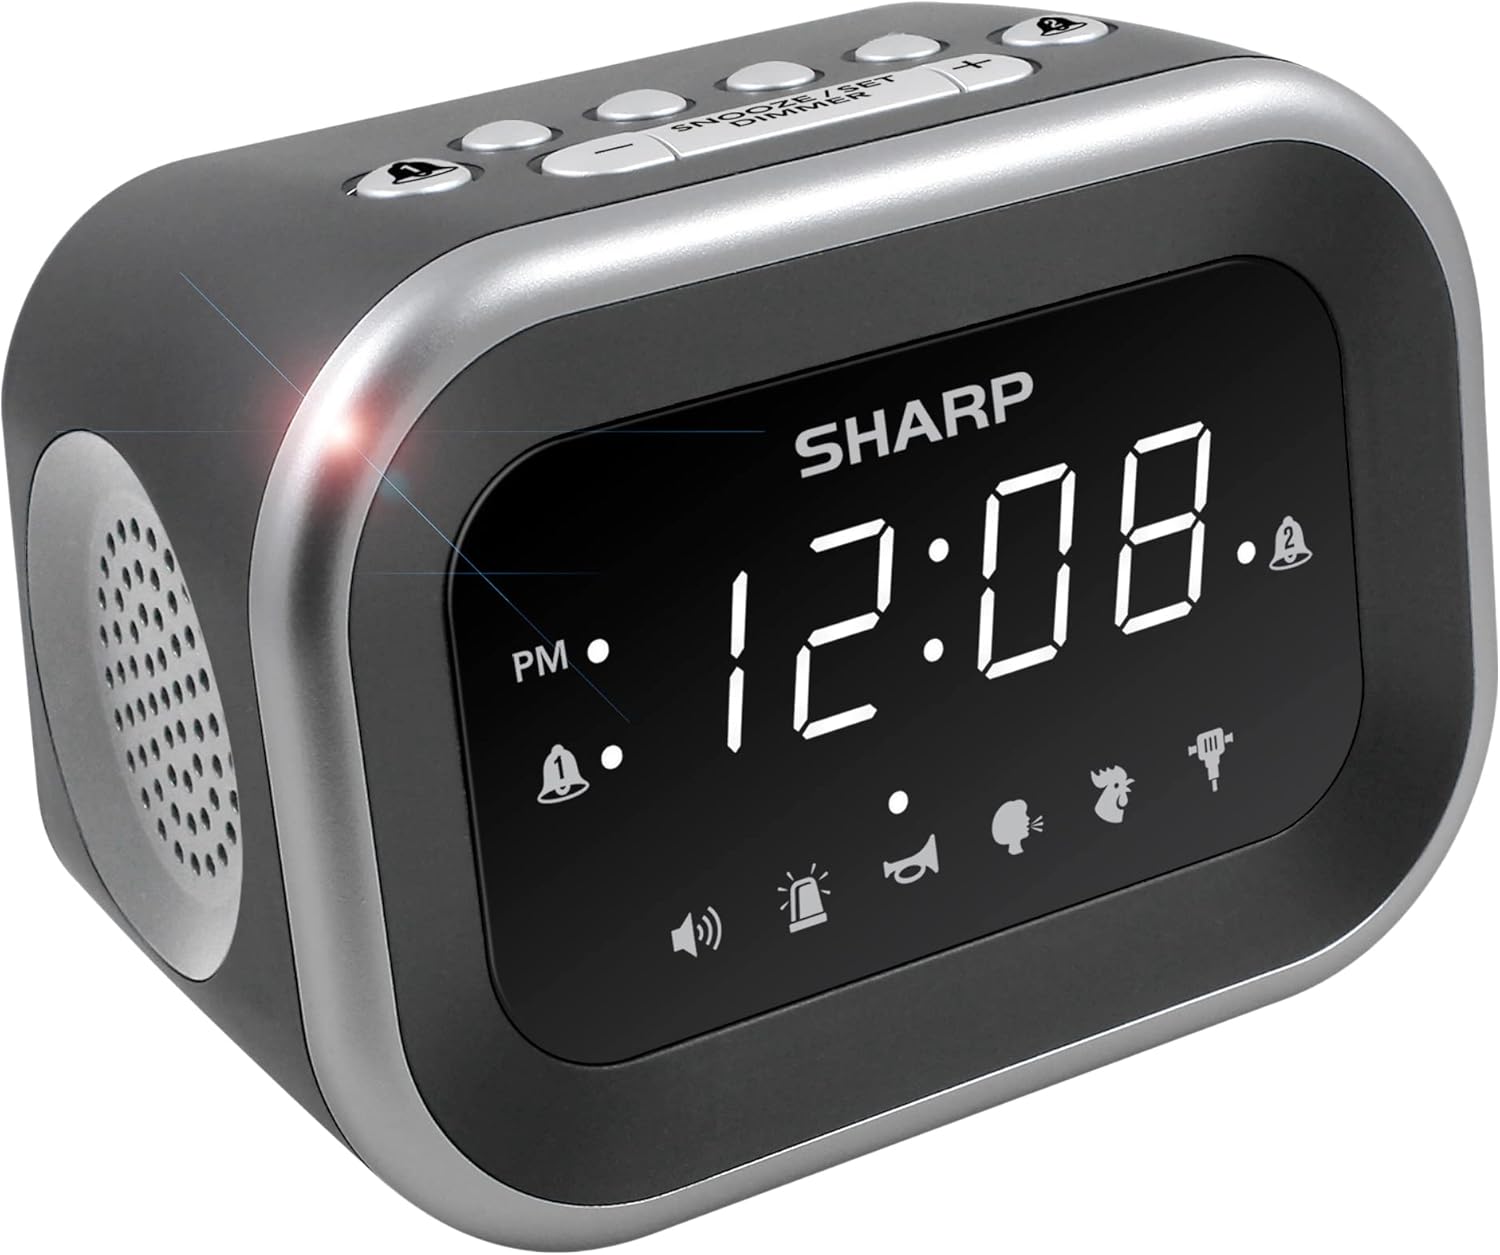
ചിത്രം: മുൻഭാഗം view ഡിജിറ്റൽ ഡിസ്പ്ലേയും സ്പീക്കർ ഗ്രില്ലും കാണിക്കുന്ന ഷാർപ്പ് ബിഗ് ബാംഗ് അലാറം ക്ലോക്കിന്റെ.
സുരക്ഷാ വിവരങ്ങൾ
- യൂണിറ്റിനെ തീവ്രമായ താപനില, നേരിട്ടുള്ള സൂര്യപ്രകാശം അല്ലെങ്കിൽ ഉയർന്ന ഈർപ്പം എന്നിവയ്ക്ക് വിധേയമാക്കരുത്.
- യൂണിറ്റ് വെള്ളത്തിൽ നിന്നോ മറ്റ് ദ്രാവകങ്ങളിൽ നിന്നോ അകറ്റി നിർത്തുക.
- നിർദ്ദിഷ്ട പവർ അഡാപ്റ്റർ മാത്രം ഉപയോഗിക്കുക.
- യൂണിറ്റ് ഡിസ്അസംബ്ലിംഗ് ചെയ്യാനോ പരിഷ്ക്കരിക്കാനോ ശ്രമിക്കരുത്.
- കുട്ടികൾക്ക് ലഭ്യമാകാതെ സൂക്ഷിക്കുക.
പാക്കേജ് ഉള്ളടക്കം
- ഷാർപ്പ് ബിഗ് ബാങ് അലാറം ക്ലോക്ക്
- എസി പവർ അഡാപ്റ്റർ
- ഉപയോക്തൃ മാനുവൽ (ഈ പ്രമാണം)
ഉൽപ്പന്നം കഴിഞ്ഞുview
നിങ്ങളുടെ അലാറം ക്ലോക്കിന്റെ വിവിധ ഘടകങ്ങളും നിയന്ത്രണങ്ങളും ഉപയോഗിച്ച് സ്വയം പരിചയപ്പെടുക.
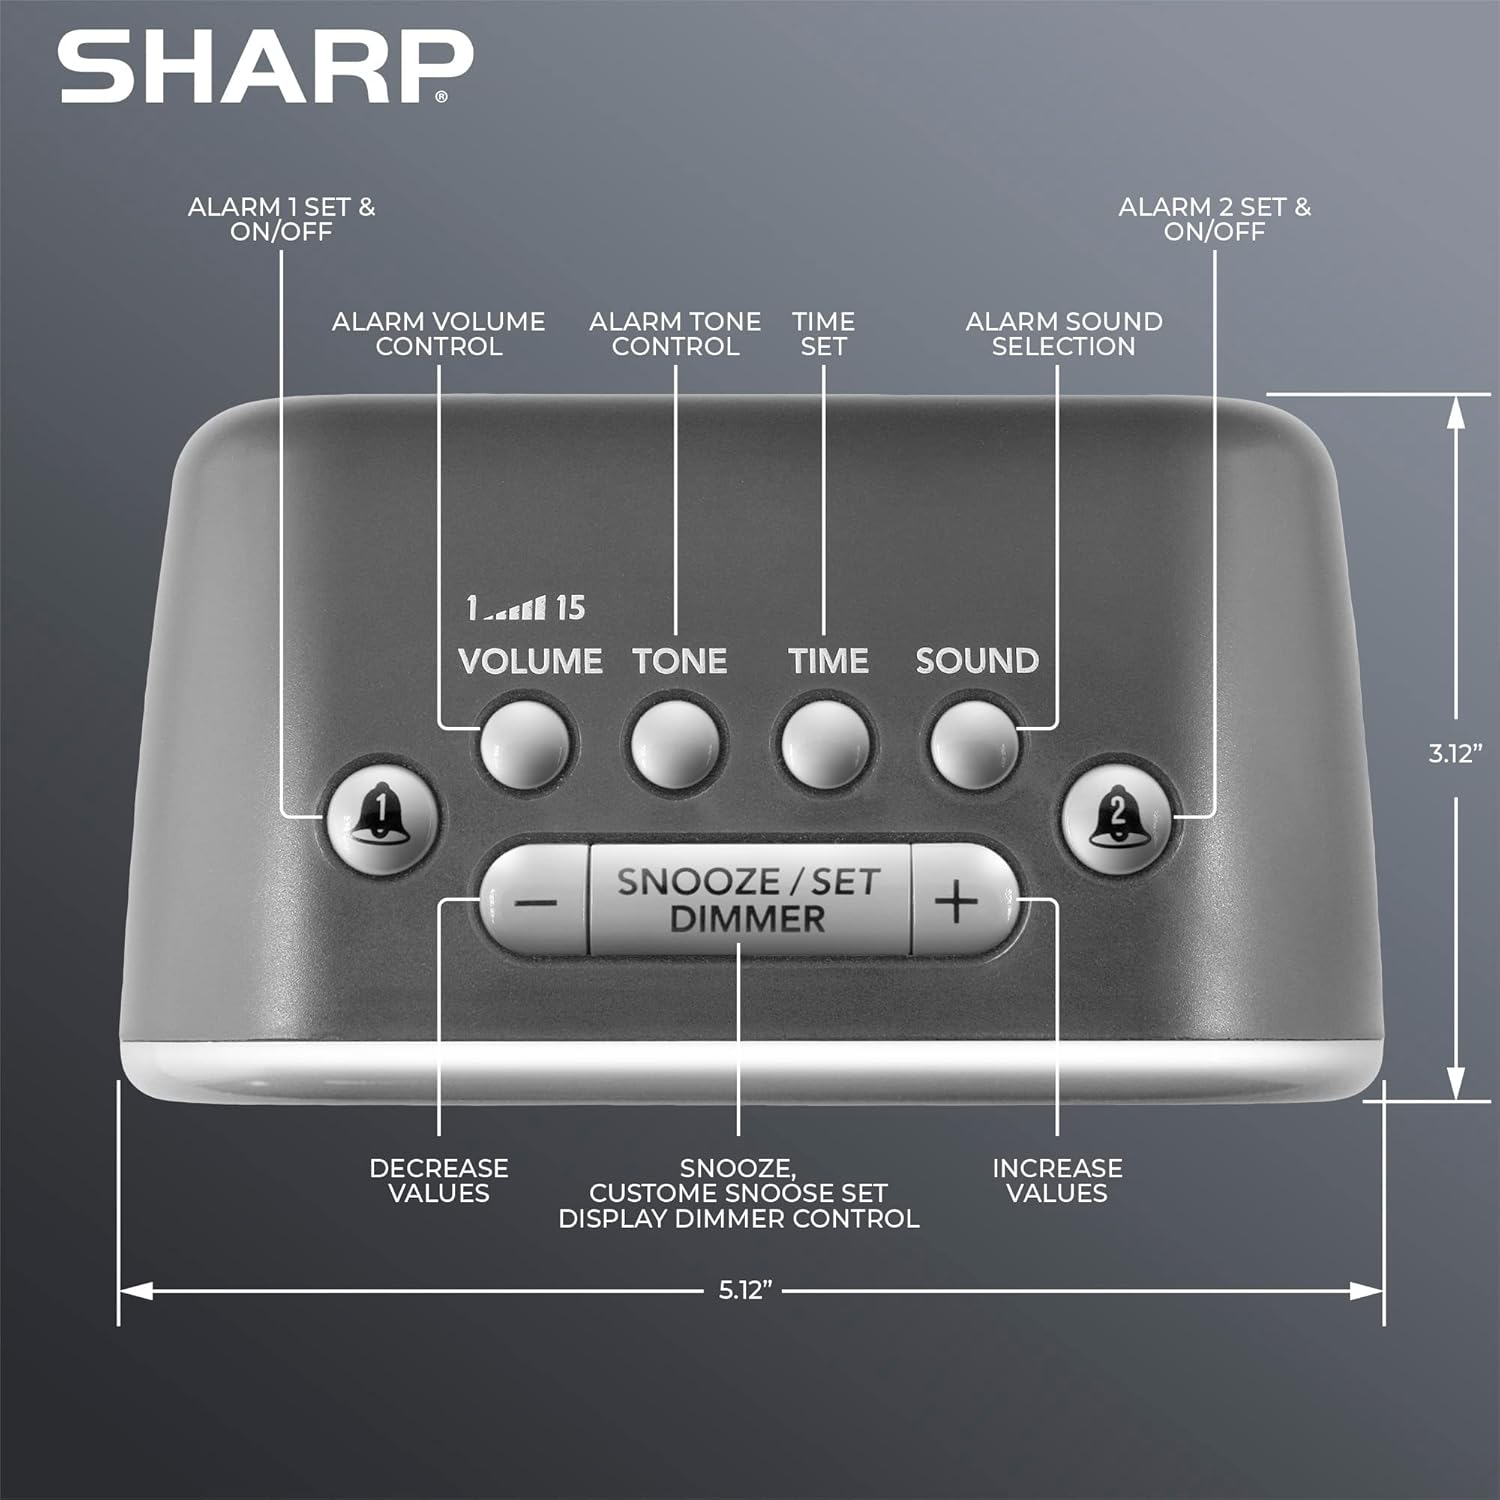
ചിത്രം: മുകളിൽ view അലാറം ക്ലോക്കിന്റെ, അലാറം 1, അലാറം 2, വോളിയം, ടോൺ, സമയം, ശബ്ദം, സ്നൂസ്/സെറ്റ്/ഡിമ്മർ, +/- നിയന്ത്രണങ്ങൾ എന്നിവയ്ക്കുള്ള ബട്ടണുകൾ ഹൈലൈറ്റ് ചെയ്യുന്നു.
- ഡിസ്പ്ലേ: സമയവും ക്രമീകരണങ്ങളും അറിയുന്നതിനായി വലിയ വെളുത്ത LED ഡിസ്പ്ലേ.
- അലാറം 1 & 2 ബട്ടണുകൾ: വ്യക്തിഗത അലാറങ്ങൾ സജീവമാക്കുക/നിർജ്ജീവമാക്കുക, സജ്ജമാക്കുക.
- വോളിയം ബട്ടൺ: അലാറം വോളിയം ക്രമീകരിക്കുന്നു (ലെവലുകൾ 1-15).
- ടോൺ ബട്ടൺ: അലാറം ടോൺ ക്രമീകരിക്കുന്നു.
- സമയ ബട്ടൺ: നിലവിലെ സമയം സജ്ജമാക്കാൻ ഉപയോഗിക്കുന്നു.
- ശബ്ദ ബട്ടൺ: ആറ് അലാറം ശബ്ദങ്ങളിൽ ഒന്ന് തിരഞ്ഞെടുക്കുന്നു.
- സ്നൂസ്/സെറ്റ്/ഡിമ്മർ ബട്ടൺ: സ്നൂസ് സജീവമാക്കുന്നു, ക്രമീകരണങ്ങൾ സ്ഥിരീകരിക്കുന്നു, ഡിസ്പ്ലേ തെളിച്ചം ക്രമീകരിക്കുന്നു.
- +/- ബട്ടണുകൾ: സമയം, ശബ്ദം, ടോൺ, സ്നൂസ് ദൈർഘ്യം എന്നിവയ്ക്കായി മൂല്യങ്ങൾ ക്രമീകരിക്കുക.
സജ്ജമാക്കുക
1. പവർ കണക്ഷൻ
- അലാറം ക്ലോക്കിന്റെ പിൻഭാഗത്തുള്ള DC IN ജാക്കിലേക്ക് AC പവർ അഡാപ്റ്റർ പ്ലഗ് ചെയ്യുക.
- അഡാപ്റ്ററിന്റെ മറ്റേ അറ്റം ഒരു സ്റ്റാൻഡേർഡ് 110V/120V ഗാർഹിക വാൾ ഔട്ട്ലെറ്റിലേക്ക് പ്ലഗ് ചെയ്യുക.
- പവർ കണക്റ്റ് ചെയ്തിട്ടുണ്ടെന്ന് സൂചിപ്പിക്കുന്ന തരത്തിൽ ഡിസ്പ്ലേ പ്രകാശിക്കും.
2. ബാറ്ററി ബാക്കപ്പ് ഇൻസ്റ്റലേഷൻ
ബാറ്ററി ബാക്കപ്പിനായി അലാറം ക്ലോക്കിന് 2 x AAA ബാറ്ററികൾ (ഉൾപ്പെടുത്തിയിട്ടില്ല) ആവശ്യമാണ്. വൈദ്യുതി തടസ്സപ്പെടുമ്പോൾ ഈ സവിശേഷത നിങ്ങളുടെ സമയവും അലാറം ക്രമീകരണങ്ങളും സംഭരിക്കുന്നു. ബാറ്ററി ബാക്കപ്പ് മോഡിൽ ഡിസ്പ്ലേ പ്രകാശിക്കില്ല.
- യൂണിറ്റിന്റെ അടിയിലുള്ള ബാറ്ററി കമ്പാർട്ട്മെന്റ് കവർ തുറക്കുക.
- ശരിയായ പോളാരിറ്റി (+ ഉം - ഉം) നിരീക്ഷിച്ചുകൊണ്ട് 2 പുതിയ AAA ബാറ്ററികൾ ഇടുക.
- ബാറ്ററി കമ്പാർട്ട്മെൻ്റ് കവർ സുരക്ഷിതമായി അടയ്ക്കുക.

ചിത്രം: ഉപയോഗത്തിന് തയ്യാറായി, ഒരു നൈറ്റ്സ്റ്റാൻഡിൽ സ്ഥാപിച്ചിരിക്കുന്ന അലാറം ക്ലോക്ക്.
പ്രവർത്തന നിർദ്ദേശങ്ങൾ
1. നിലവിലെ സമയം ക്രമീകരിക്കുന്നു.
- അമർത്തിപ്പിടിക്കുക സമയം മണിക്കൂർ അക്കങ്ങൾ മിന്നുന്നത് വരെ ബട്ടൺ അമർത്തുക.
- ഉപയോഗിക്കുക + or - മണിക്കൂർ ക്രമീകരിക്കാൻ ബട്ടണുകൾ. PM ഇൻഡിക്കേറ്ററിൽ ശ്രദ്ധിക്കുക.
- അമർത്തുക സമയം മണിക്കൂർ സ്ഥിരീകരിക്കാൻ വീണ്ടും ബട്ടൺ അമർത്തുക, മിനിറ്റുകളുടെ അക്കങ്ങൾ മിന്നിമറയും.
- ഉപയോഗിക്കുക + or - മിനിറ്റ് ക്രമീകരിക്കാൻ ബട്ടണുകൾ.
- അമർത്തുക സമയം സമയം ലാഭിക്കാൻ ഒരിക്കൽ കൂടി ബട്ടൺ അമർത്തുക.
2. അലാറങ്ങൾ സജ്ജീകരിക്കൽ (അലാറം 1 ഉം അലാറം 2 ഉം)
ഈ ക്ലോക്കിൽ രണ്ട് സ്വതന്ത്ര അലാറങ്ങളുണ്ട്.
- അമർത്തിപ്പിടിക്കുക അലാറം 1 or അലാറം 2 അലാറം മണിക്കൂർ അക്കങ്ങൾ മിന്നുന്നത് വരെ ബട്ടൺ അമർത്തുക.
- ഉപയോഗിക്കുക + or - അലാറം സമയം ക്രമീകരിക്കുന്നതിനുള്ള ബട്ടണുകൾ. PM സൂചകം നിരീക്ഷിക്കുക.
- ബന്ധപ്പെട്ടത് അമർത്തുക അലാറം മണിക്കൂർ സ്ഥിരീകരിക്കാൻ വീണ്ടും ബട്ടൺ അമർത്തുക, മിനിറ്റുകളുടെ അക്കങ്ങൾ മിന്നിമറയും.
- ഉപയോഗിക്കുക + or - അലാറം മിനിറ്റ് ക്രമീകരിക്കാനുള്ള ബട്ടണുകൾ.
- അമർത്തുക അലാറം അലാറം സമയം ലാഭിക്കാൻ ഒരിക്കൽ കൂടി ബട്ടൺ അമർത്തുക. സജ്ജീകരിച്ച അലാറത്തിന്റെ അലാറം ഇൻഡിക്കേറ്റർ (ബെൽ ഐക്കൺ) ഡിസ്പ്ലേയിൽ ദൃശ്യമാകും.
- ഒരു അലാറം സജീവമാക്കാനോ നിർജ്ജീവമാക്കാനോ, അലാറം 1 or അലാറം 2 ബട്ടൺ ചുരുക്കത്തിൽ അമർത്തുക. അലാറം സജീവമാണോ എന്ന് ബെൽ ഐക്കൺ സൂചിപ്പിക്കുന്നു.
3. അലാറം ശബ്ദങ്ങൾ തിരഞ്ഞെടുക്കൽ
ക്ലോക്ക് ആറ് വ്യത്യസ്ത അലാറം ശബ്ദങ്ങൾ പുറപ്പെടുവിക്കുന്നു: റൂസ്റ്റർ, ബ്യൂഗിൾ, നാഗിംഗ് മോം, ജാക്ക്ഹാമർ, സൈറൺ, ബീപ്പ്.

ചിത്രം: ലഭ്യമായ ആറ് അലാറം ശബ്ദങ്ങളുടെ ദൃശ്യ പ്രാതിനിധ്യം.
- ഒരു അലാറം സെറ്റ് ഉപയോഗിച്ച്, അമർത്തുക ശബ്ദം ബട്ടൺ. നിലവിലെ ശബ്ദ ഐക്കൺ മിന്നിമറയും.
- ഉപയോഗിക്കുക + or - ലഭ്യമായ ശബ്ദങ്ങളിലൂടെ സൈക്കിൾ ചെയ്യാൻ ബട്ടണുകൾ.
- അമർത്തുക ശബ്ദം നിങ്ങളുടെ തിരഞ്ഞെടുപ്പ് സ്ഥിരീകരിക്കാൻ വീണ്ടും ബട്ടൺ.
4. അലാറം വോളിയവും ടോണും ക്രമീകരിക്കുന്നു
നിങ്ങൾ തിരഞ്ഞെടുത്ത അലാറം ശബ്ദത്തിന്റെ വോളിയവും (115dB വരെ) ടോണും ഇഷ്ടാനുസൃതമാക്കാം.

ചിത്രം: സാധാരണ ശബ്ദങ്ങളുമായി താരതമ്യപ്പെടുത്തുമ്പോൾ അലാറം ക്ലോക്കിന്റെ ഉച്ചത വ്യക്തമാക്കുന്ന ഡെസിബെൽ റഫറൻസ് സ്കെയിൽ.
- അമർത്തുക വോളിയം ബട്ടൺ. നിലവിലെ വോളിയം ലെവൽ (1-15) മിന്നിമറയും.
- ഉപയോഗിക്കുക + or - വോളിയം ക്രമീകരിക്കാനുള്ള ബട്ടണുകൾ.
- അമർത്തുക വോളിയം സ്ഥിരീകരിക്കാൻ വീണ്ടും ബട്ടൺ.
- അമർത്തുക ടോൺ ബട്ടൺ. നിലവിലെ ടോൺ ക്രമീകരണം മിന്നിമറയും.
- ഉപയോഗിക്കുക + or - ടോൺ ക്രമീകരിക്കാൻ ബട്ടണുകൾ.
- അമർത്തുക ടോൺ സ്ഥിരീകരിക്കാൻ വീണ്ടും ബട്ടൺ.
5. സ്നൂസ് ഫംഗ്ഷൻ
അലാറം മുഴങ്ങുമ്പോൾ, വലിയ ബട്ടൺ അമർത്തുക സ്നൂസ്/സെറ്റ്/ഡിമ്മർ അലാറം താൽക്കാലികമായി നിശബ്ദമാക്കാൻ ക്ലോക്കിന് മുകളിലുള്ള ബട്ടൺ. ഡിഫോൾട്ട് സ്നൂസ് സമയം 9 മിനിറ്റാണ്.
സ്നൂസ് ദൈർഘ്യം ഇഷ്ടാനുസൃതമാക്കൽ:
- അലാറം മുഴങ്ങുമ്പോൾ, അമർത്തിപ്പിടിക്കുക സ്നൂസ്/സെറ്റ്/ഡിമ്മർ സ്നൂസ് സമയം മിന്നുന്നത് വരെ ബട്ടൺ അമർത്തുക.
- ഉപയോഗിക്കുക + or - നിങ്ങൾക്ക് ആവശ്യമുള്ള സ്നൂസ് ദൈർഘ്യം (1-59 മിനിറ്റ്) സജ്ജമാക്കാൻ ബട്ടണുകൾ.
- അമർത്തുക സ്നൂസ്/സെറ്റ്/ഡിമ്മർ ഇഷ്ടാനുസൃത സ്നൂസ് സമയം ലാഭിക്കാൻ വീണ്ടും ബട്ടൺ അമർത്തുക.
6. ഡിസ്പ്ലേ ഡിമ്മർ കൺട്രോൾ
ഡിസ്പ്ലേയ്ക്ക് 3 ബ്രൈറ്റ്നെസ് ലെവലുകൾ ഉണ്ട് (ഓഫ്, ലോ, ഹൈ).
- ചുരുക്കത്തിൽ അമർത്തുക സ്നൂസ്/സെറ്റ്/ഡിമ്മർ തെളിച്ച നിലകളിലൂടെ സൈക്കിൾ ചെയ്യാൻ ബട്ടൺ (അലാറം മുഴങ്ങാത്തപ്പോൾ): ഉയർന്നത് > താഴ്ന്നത് > ഓഫ്.

ചിത്രം: കഴിഞ്ഞുview ഡിസ്പ്ലേ, വോളിയം, ശബ്ദങ്ങൾ, നിയന്ത്രണങ്ങൾ എന്നിവയുൾപ്പെടെയുള്ള പ്രധാന സവിശേഷതകളുടെ.
മെയിൻ്റനൻസ്
വൃത്തിയാക്കൽ
- വൃത്തിയാക്കുന്നതിന് മുമ്പ് പവർ ഔട്ട്ലെറ്റിൽ നിന്ന് അലാറം ക്ലോക്ക് ഊരിമാറ്റുക.
- മൃദുവായതും ഉണങ്ങിയതുമായ തുണി ഉപയോഗിച്ച് പുറംഭാഗങ്ങൾ തുടയ്ക്കുക.
- അബ്രാസീവ് ക്ലീനറുകൾ, മെഴുക്, ലായകങ്ങൾ എന്നിവ ഉപയോഗിക്കരുത്.
ബാറ്ററി മാറ്റിസ്ഥാപിക്കൽ
- വൈദ്യുതി വിതരണത്തിനിടയിൽ ക്ലോക്കിന് സമയമോ അലാറം ക്രമീകരണങ്ങളോ നഷ്ടപ്പെട്ടാൽtage, AAA ബാക്കപ്പ് ബാറ്ററികൾ മാറ്റിസ്ഥാപിക്കേണ്ടി വന്നേക്കാം.
- ബാറ്ററികൾ മാറ്റിസ്ഥാപിക്കുന്നതിന് സജ്ജീകരണ വിഭാഗത്തിലെ ബാറ്ററി ഇൻസ്റ്റാളേഷൻ ഘട്ടങ്ങൾ പാലിക്കുക.
ട്രബിൾഷൂട്ടിംഗ്
| പ്രശ്നം | സാധ്യമായ കാരണം | പരിഹാരം |
|---|---|---|
| അലാറം മുഴങ്ങുന്നില്ല അല്ലെങ്കിൽ വളരെ നിശബ്ദമാണ്. | അലാറം സജീവമാക്കിയിട്ടില്ല; ശബ്ദം വളരെ കുറവാണ്; തെറ്റായ ശബ്ദം തിരഞ്ഞെടുത്തു. | അലാറം ബെൽ ഐക്കൺ പ്രദർശിപ്പിച്ചിട്ടുണ്ടെന്ന് ഉറപ്പാക്കുക. VOLUME ബട്ടൺ ഉപയോഗിച്ച് വോളിയം ക്രമീകരിക്കുക. തിരഞ്ഞെടുത്ത അലാറം ശബ്ദം പരിശോധിക്കുക. |
| പവർ ഔട്ട് ചെയ്യുമ്പോൾ ഡിസ്പ്ലേ ഓഫാണ്tage. | ബാറ്ററി ബാക്കപ്പ് ക്രമീകരണങ്ങൾ മാത്രമേ നിലനിർത്തുന്നുള്ളൂ, ഡിസ്പ്ലേ പവർ നിലനിർത്തുന്നില്ല. | ഇത് സാധാരണ പ്രവർത്തനമാണ്. പവർ പുനഃസ്ഥാപിക്കുമ്പോൾ ഡിസ്പ്ലേ വീണ്ടും പ്രകാശിക്കും. ക്രമീകരണങ്ങൾ നിലനിർത്താൻ ബാക്കപ്പ് ബാറ്ററികൾ ഫ്രഷ് ആണെന്ന് ഉറപ്പാക്കുക. |
| സമയം അല്ലെങ്കിൽ അലാറം ക്രമീകരണങ്ങൾ നഷ്ടപ്പെട്ടു. | വൈദ്യുതി തടസ്സം കൂടാതെ/അല്ലെങ്കിൽ ബാക്കപ്പ് ബാറ്ററികൾ നശിച്ചു. | 2 x AAA ബാക്കപ്പ് ബാറ്ററികൾ മാറ്റിസ്ഥാപിക്കുക. സമയവും അലാറം ക്രമീകരണങ്ങളും പുനഃസജ്ജമാക്കുക. |
| ബട്ടണുകൾ പ്രതികരിക്കുന്നില്ല. | താൽക്കാലിക സോഫ്റ്റ്വെയർ തകരാർ. | പവർ ഔട്ട്ലെറ്റിൽ നിന്ന് യൂണിറ്റ് കുറച്ച് മിനിറ്റ് അൺപ്ലഗ് ചെയ്യുക, തുടർന്ന് അത് വീണ്ടും പ്ലഗ് ഇൻ ചെയ്യുക. |
സ്പെസിഫിക്കേഷനുകൾ
- ബ്രാൻഡ്: മൂർച്ചയുള്ള
- മോഡൽ: B0BDPQNVMR
- ഊർജ്ജ സ്രോതസ്സ്: കോർഡഡ് ഇലക്ട്രിക് (110V/120V അനുയോജ്യം)
- ബാറ്ററി ബാക്കപ്പ്: 2 x AAA ബാറ്ററികൾ (ഉൾപ്പെടുത്തിയിട്ടില്ല)
- അലാറം വോളിയം: 115dB വരെ
- അലാറം ശബ്ദങ്ങൾ: 6 (റൂസ്റ്റർ, ബ്യൂഗിൾ, നാഗിംഗ് മോം, ജാക്ക്ഹാമർ, സൈറൺ, ബീപ്പ്)
- ഡിസ്പ്ലേ: 3-ലെവൽ ഡിമ്മറുള്ള വെളുത്ത LED (ഉയർന്ന, താഴ്ന്ന, ഓഫ്)
- അളവുകൾ (ഏകദേശം): 5.12" (വീതി) x 3.12" (ഉയരം) x 3.55" (ആഴം)
- ഭാരം: 12.5 ഔൺസ്
- മെറ്റീരിയൽ: അക്രിലോണിട്രൈൽ ബ്യൂട്ടാഡീൻ സ്റ്റൈറൈൻ (എബിഎസ്)
- UPC: 049353008608
വാറൻ്റിയും പിന്തുണയും
വാറന്റി വിവരങ്ങൾക്കും ഉപഭോക്തൃ പിന്തുണയ്ക്കും, വാങ്ങുന്ന സമയത്ത് നൽകിയിട്ടുള്ള ഡോക്യുമെന്റേഷൻ പരിശോധിക്കുക അല്ലെങ്കിൽ ഷാർപ്പ് കസ്റ്റമർ സർവീസുമായി നേരിട്ട് ബന്ധപ്പെടുക. കൂടുതൽ വിവരങ്ങൾക്ക് നിങ്ങൾക്ക് ഔദ്യോഗിക ഷാർപ്പ് സ്റ്റോർ സന്ദർശിക്കാനും കഴിയും:


