1. ആമുഖം
This manual provides detailed instructions for the installation, operation, and maintenance of your SV3C Dual-Lens 4MP Outdoor Security Camera. Please read this manual thoroughly before use to ensure proper functionality and safety. This camera features advanced technology including 4MP high-resolution video, dual-band 2.4G/5G WiFi connectivity, Pan-Tilt-Zoom (PTZ) capabilities, AI human detection with auto-tracking, multiple night vision modes, two-way audio, and IP66 weatherproofing.
2. ഉൽപ്പന്ന സവിശേഷതകൾ
- 4MP High Resolution & Three Night Vision Modes: The camera offers 4-megapixel high-definition video, providing clear and detailed images. It features four infrared lights for night vision up to 25 meters and supports three night vision modes (Infrared, Color, Smart) for clear color recording even in dark environments.
- PTZ Rotation Function: Control the camera's horizontal rotation from 0° to 180° and vertical rotation from 0° to 90° via the app, allowing for comprehensive monitoring of your surroundings.
- AI Human Detection & Auto-Tracking: Equipped with human detection and auto-tracking functions. When a human shape is detected in the monitoring area, an alarm is triggered, and the camera automatically tracks the movement, continuing to record. Motion detection sensitivity, range, and time can be adjusted via the app. The dual-lens system (8mm and 2.8mm lenses) automatically switches to zoom in on detected human movement for clearer identification.
- Recording Functions & 128GB Micro SD Card Support: Supports 24-hour recording and scheduled recording. Recordings are saved to a Micro SD card (up to 128GB, not included). When the storage is full, older footage is automatically overwritten. New image compression technology saves 1/3 to 1/4 of storage space, allowing for longer recording times.
- Alarm Linkage: When an alarm is triggered, notifications are sent to your email and app. Photos and motion detection recordings are saved to FTP and the Micro SD card.
- Two-Way Audio & IP66 Waterproof: Built-in high-quality speaker and microphone enable two-way communication. You can check your home's status, warn intruders, or communicate directly with family members. With IP66 waterproof and dustproof rating, it operates reliably in temperatures from -10℃ to +55℃, withstanding harsh weather conditions like typhoons, heavy rain, and snow. Suitable for outdoor installation at entrances, gardens, parking lots, and shops.
- Family Sharing & Connectivity: This network camera supports both wired and wireless connections. It features an AP mode, allowing use even without WiFi. Live viewing, recording playback, and settings can be managed via the smartphone app. Multiple 4MP cameras can be connected simultaneously, and the family sharing function allows real-time viewing by multiple users. Remote monitoring is possible when away from home, enabling you to watch over elderly family members or children's safety.
- ഡ്യുവൽ-ബാൻഡ് വൈഫൈ: Compatible with both 2.4Ghz and 5Ghz WiFi networks.
3. പാക്കേജ് ഉള്ളടക്കം
പാക്കേജിൽ സാധാരണയായി ഇനിപ്പറയുന്ന ഇനങ്ങൾ ഉൾപ്പെടുന്നു:
- SV3C Dual-Lens 4MP Outdoor Security Camera
- Power Adapter (3m)
- ലാൻ കേബിൾ
- വാട്ടർപ്രൂഫ് കണക്റ്റർ
- Mounting Sticker/Template
- ആൻ്റിന
- മൌണ്ടിംഗ് ബ്രാക്കറ്റ്
- സ്ക്രൂകളും വാൾ പ്ലഗുകളും
- ഹെക്സ് വഞ്ചി
- ദ്രുത ആരംഭ ഗൈഡ്
- ഉപയോക്തൃ മാനുവൽ (ജാപ്പനീസ്)

Image: Package contents of the SV3C camera.
4. സജ്ജീകരണ ഗൈഡ്
4.1 ഫിസിക്കൽ ഇൻസ്റ്റലേഷൻ
Follow these steps to physically install your camera:
- ഒരു ലൊക്കേഷൻ തിരഞ്ഞെടുക്കുക: ആവശ്യമുള്ളത് നൽകുന്ന ഒരു ഔട്ട്ഡോർ സ്ഥലം തിരഞ്ഞെടുക്കുക viewing angle and is within range of your WiFi network or can be connected via LAN cable. Avoid direct sunlight, reflections from glass, and areas with extreme light/dark contrast.
- Attach Mounting Sticker: Place the mounting sticker on the wall at your desired installation point.
- തുളകൾ: Use a drill to create appropriate pilot holes according to the marks on the sticker.
- വാൾ പ്ലഗുകൾ തിരുകുക: Gently tap the wall plugs into the drilled holes using a hammer.
- സുരക്ഷിത ബ്രാക്കറ്റ്: Align the mounting bracket with the holes and secure it to the wall using screws. Ensure the angled side of the bracket faces downwards.
- ക്യാമറ ഘടിപ്പിക്കുക: Mount the camera onto the secured bracket and tighten the remaining screws to fix it in place.
- ആന്റിനകൾ ഇൻസ്റ്റാൾ ചെയ്യുക: Screw the 5DB antennas onto the camera's antenna ports.
Video: Demonstrates how to insert a Micro SD card and install the camera.
4.2 മൈക്രോ എസ്ഡി കാർഡ് ചേർക്കൽ
മൈക്രോ എസ്ഡി കാർഡ് ചേർക്കാൻ:
- ക്യാമറ ഓഫ് ചെയ്യുക.
- Locate the Micro SD card slot, usually under a protective cover on the camera body.
- Carefully insert the Micro SD card into the slot until it clicks into place.
- Replace the protective cover to ensure waterproofing.
4.3 നെറ്റ്വർക്ക് കണക്ഷൻ
The camera supports both WiFi and wired LAN connections.
- വൈഫൈ കണക്ഷൻ: Ensure your camera is within range of your 2.4Ghz or 5Ghz WiFi router.
- LAN Cable Connection: Connect a LAN cable from your router to the camera's LAN port.

Image: WiFi and LAN cable connection options.
4.4 App Setup (CamHiPro)
Download the CamHiPro app from your smartphone's app store (iOS/Android).
- ആപ്പ് സമാരംഭിക്കുക: Open the CamHiPro app.
- ക്യാമറ ചേർക്കുക: ഒരു പുതിയ ഉപകരണം ചേർക്കാൻ '+' ഐക്കൺ ടാപ്പ് ചെയ്യുക.
- Select IP Camera: Choose 'IP Camera' from the device type options.
- ഇതിനായി തിരയുക ക്യാമറ: The app will search for cameras within your LAN. Select your camera from the list.
- Configure Wireless: Enter your WiFi network details (SSID and password) if connecting wirelessly.
- Set Device Name: Assign a name to your camera (e.g., 'Front Door', 'Garden').
- സജ്ജീകരണം പൂർത്തിയാക്കുക: Follow any remaining on-screen prompts to complete the setup.
Video: Initial camera setup using Bluetooth.
Video: Demonstrates adding a camera via the CamHiPro app.
5. പ്രവർത്തന നിർദ്ദേശങ്ങൾ
5.1 PTZ നിയന്ത്രണം
Use the directional controls within the CamHiPro app to pan (horizontal) and tilt (vertical) the camera to adjust its viewing ആംഗിൾ.
Video: Demonstrates PTZ (Pan-Tilt-Zoom) functionality.

Image: PTZ (Pan-Tilt-Zoom) functionality with auto-tracking.
5.2 നൈറ്റ് വിഷൻ മോഡുകൾ
ക്യാമറ മൂന്ന് രാത്രി കാഴ്ച മോഡുകൾ വാഗ്ദാനം ചെയ്യുന്നു:
- ഇൻഫ്രാറെഡ് മോഡ്: Black and white video using infrared lights.
- വർണ്ണ മോഡ്: Full-color video using built-in spotlights.
- സ്മാർട്ട് മോഡ്: Automatically switches from infrared to color night vision when human motion is detected.

Image: Different night vision modes (Black & White, Color, Smart).
Video: Demonstrates color and monochrome night vision.
5.3 ടു-വേ ഓഡിയോ
Use the microphone and speaker icons in the app to engage in two-way conversations with people near the camera.

Image: Two-way audio communication.
Video: Demonstrates two-way audio functionality.
5.4 റെക്കോർഡിംഗും പ്ലേബാക്കും
റെക്കോർഡ് ചെയ്ത foo ആക്സസ് ചെയ്യുകtage via the CamHiPro app. You can view 24-hour recordings, scheduled recordings, or event-triggered recordings saved on the Micro SD card.

Image: SD card recording and playback via the app.
വീഡിയോ: കഴിഞ്ഞുview of app features including recording and playback.
5.5 മോഷൻ ഡിറ്റക്ഷനും അലേർട്ടുകളും
Configure motion detection zones and sensitivity in the app. When motion is detected, the camera will trigger alarms, send notifications, and begin auto-tracking.
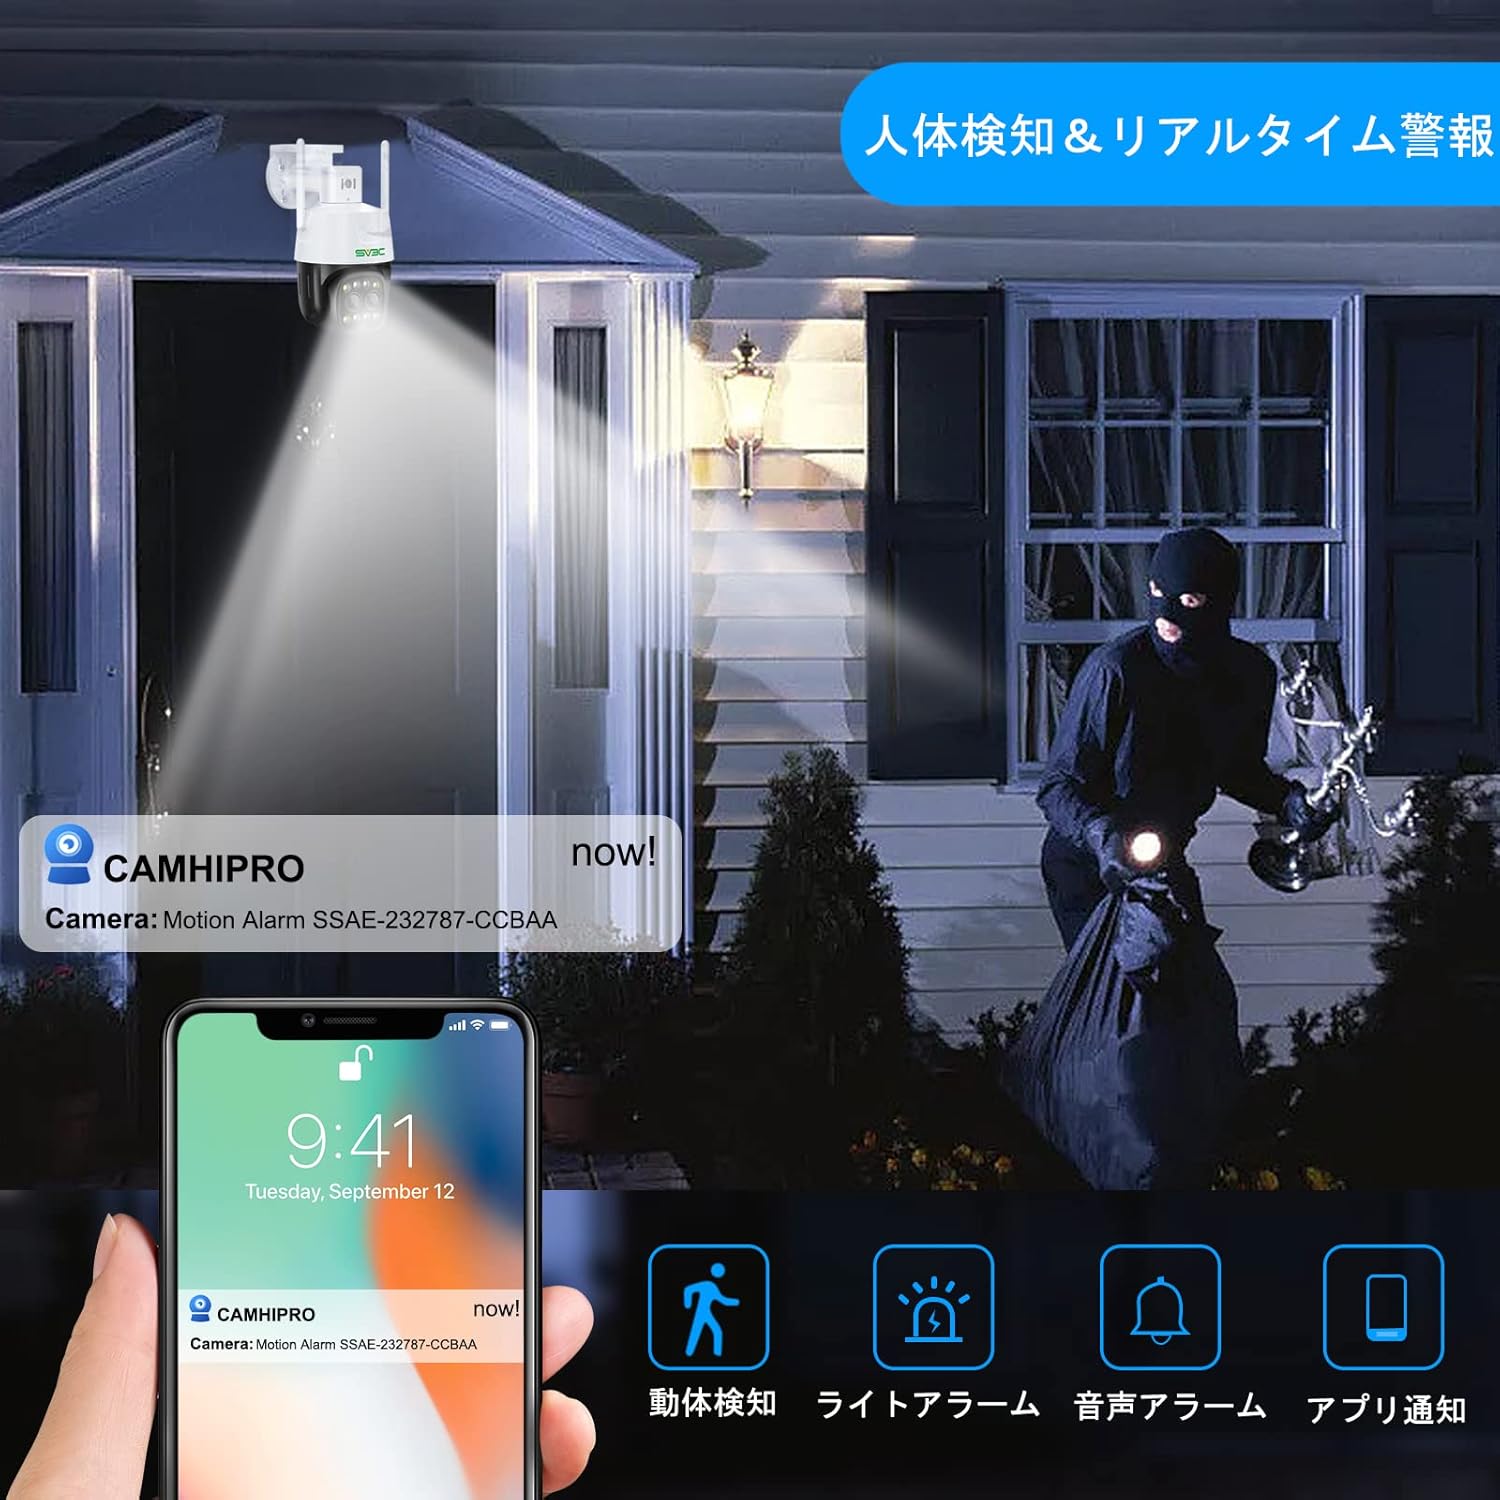
Image: AI human detection and real-time alerts.
Video: Demonstrates the auto-tracking feature.
Video: Demonstrates human detection and auto-tracking.
6. പരിപാലനം
- പതിവ് വൃത്തിയാക്കൽ: വ്യക്തമായ ഇമേജ് ഗുണനിലവാരം ഉറപ്പാക്കാൻ ക്യാമറ ലെൻസ് ഇടയ്ക്കിടെ മൃദുവായതും ഉണങ്ങിയതുമായ തുണി ഉപയോഗിച്ച് വൃത്തിയാക്കുക.
- ഫേംവെയർ അപ്ഡേറ്റുകൾ: Check the CamHiPro app regularly for firmware updates to ensure optimal performance and security.
- കേബിൾ പരിശോധന: Inspect all cables and connections for any signs of wear or damage, especially for outdoor installations.
7. പ്രശ്നപരിഹാരം
- ശക്തിയില്ല: Ensure the power adapter is correctly connected and the power outlet is functional.
- നെറ്റ്വർക്ക് കണക്ഷൻ ഇല്ല: Verify your WiFi password is correct. Ensure the camera is within WiFi range or the LAN cable is securely connected. Try restarting your router and camera.
- മോശം ചിത്രത്തിന്റെ ഗുണനിലവാരം: Clean the camera lens. Check your network speed. Ensure the camera is not facing direct sunlight or extreme light sources.
- മോഷൻ ഡിറ്റക്ഷൻ പ്രവർത്തിക്കുന്നില്ല: Check motion detection settings in the app (sensitivity, detection zones). Ensure the auto-tracking feature is enabled if desired.
- ഓഡിയോ ഇല്ല: Check microphone and speaker settings in the app. Ensure volume is not muted.
- SD കാർഡ് റെക്കോർഡ് ചെയ്യുന്നില്ല: Ensure the Micro SD card is correctly inserted and formatted. Check if the card is full or damaged.
8 സ്പെസിഫിക്കേഷനുകൾ
| ഫീച്ചർ | സ്പെസിഫിക്കേഷൻ |
|---|---|
| വീഡിയോ ക്യാപ്ചർ റെസല്യൂഷൻ | 1440p (4MP) |
| കണക്റ്റിവിറ്റി പ്രോട്ടോക്കോൾ | Wi-Fi (2.4Ghz/5Ghz) |
| അനുയോജ്യമായ ഉപകരണങ്ങൾ | സ്മാർട്ട്ഫോണുകൾ (iOS/Android) |
| ഉപയോഗ പരിസ്ഥിതി | ഔട്ട്ഡോർ |
| പ്രത്യേക സവിശേഷതകൾ | PTZ Technology, Night Vision (Infrared, Color, Smart), AI Human Detection, Auto-Tracking, Two-Way Audio, IP66 Waterproof |
| മൗണ്ടിംഗ് തരം | Screw mount (ceiling/wall) |
| സൂം അനുപാതം | 4x ഡിജിറ്റൽ സൂം |
| ഉൽപ്പന്ന ഭാരം | 780 ഗ്രാം |
| പാക്കേജ് അളവുകൾ | 22.7 x 21.1 x 14.1 സെ.മീ |
9. വാറൻ്റിയും പിന്തുണയും
SV3C surveillance cameras come with a 12-month quality guarantee from the date of purchase. If you have any issues or questions about the product, please feel free to contact the seller via email. Please note that a Micro SD card is not included with the product.


