1 പ്രധാനപ്പെട്ട സുരക്ഷാ വിവരങ്ങൾ
ഈ മോണിറ്റർ ഉപയോഗിക്കുന്നതിന് മുമ്പ് ദയവായി എല്ലാ നിർദ്ദേശങ്ങളും ശ്രദ്ധാപൂർവ്വം വായിക്കുക. ഭാവിയിലെ റഫറൻസിനായി ഈ മാനുവൽ സൂക്ഷിക്കുക.
- ശക്തി: Use only the power adapter supplied with the monitor. Ensure the power outlet is properly grounded.
- വെൻ്റിലേഷൻ: വായുസഞ്ചാര ദ്വാരങ്ങൾ തടയരുത്. ശരിയായ വായുസഞ്ചാരത്തിനായി മോണിറ്ററിന് ചുറ്റും മതിയായ ഇടം നൽകുക.
- ഈർപ്പം: Do not expose the monitor to rain, moisture, or excessive humidity. Do not place objects filled with liquids on the monitor.
- ചൂട്: Keep the monitor away from heat sources such as radiators, heat registers, stoves, or other heat-producing appliances.
- വൃത്തിയാക്കൽ: Unplug the monitor from the power outlet before cleaning. Use a soft, dry cloth. Do not use liquid or aerosol cleaners.
- സേവനം: ഈ ഉൽപ്പന്നം സ്വയം സേവിക്കാൻ ശ്രമിക്കരുത്. യോഗ്യതയുള്ള സേവന ഉദ്യോഗസ്ഥർക്ക് എല്ലാ സേവനങ്ങളും റഫർ ചെയ്യുക.
2. പാക്കേജ് ഉള്ളടക്കം
നിങ്ങളുടെ പാക്കേജിൽ എല്ലാ ഇനങ്ങളും ഉണ്ടെന്ന് ഉറപ്പാക്കുക. ഏതെങ്കിലും ഇനങ്ങൾ നഷ്ടപ്പെട്ടിട്ടുണ്ടെങ്കിലോ കേടായിട്ടുണ്ടെങ്കിലോ, ദയവായി ഉപഭോക്തൃ പിന്തുണയുമായി ബന്ധപ്പെടുക.
- KOORUI 24-inch PC Monitor (Model P01)
- മോണിറ്റർ സ്റ്റാൻഡ് (ബേസും കഴുത്തും)
- പവർ അഡാപ്റ്റർ
- HDMI കേബിൾ
- ഉപയോക്തൃ മാനുവൽ

Image: KOORUI 24-inch PC Monitor P01 and its included accessories, including the monitor, stand, power adapter, HDMI cable, and user manual.
3. സജ്ജീകരണ നിർദ്ദേശങ്ങൾ
3.1 മോണിറ്റർ സ്റ്റാൻഡ് കൂട്ടിച്ചേർക്കൽ
- മോണിറ്ററിന്റെയും സ്റ്റാൻഡിന്റെയും ഘടകങ്ങൾ പാക്കേജിംഗിൽ നിന്ന് ശ്രദ്ധാപൂർവ്വം നീക്കം ചെയ്യുക.
- സ്റ്റാൻഡ് നെക്ക് മോണിറ്റർ പാനലിൽ ഘടിപ്പിക്കുക. അത് സുരക്ഷിതമായി സ്ഥലത്ത് ക്ലിക്കു ചെയ്യുന്നുണ്ടെന്ന് ഉറപ്പാക്കുക അല്ലെങ്കിൽ സ്ക്രൂകൾ നൽകിയിട്ടുണ്ടെങ്കിൽ അത് ഉപയോഗിച്ച് ഉറപ്പിച്ചിട്ടുണ്ടെന്ന് ഉറപ്പാക്കുക.
- സ്റ്റാൻഡ് ബേസ് സ്റ്റാൻഡ് നെക്കിൽ ഘടിപ്പിക്കുക. അത് ഉറപ്പിക്കാൻ ബേസിന്റെ അടിയിലുള്ള തമ്പ് സ്ക്രൂ മുറുക്കുക.

Image: The KOORUI 24-inch PC Monitor P01 fully assembled with its stand, ready for connection.
3.2 മോണിറ്റർ ബന്ധിപ്പിക്കുന്നു
The monitor supports HDMI and VGA connections.
- പവർ കണക്ഷൻ: Connect the power adapter to the monitor's DC input port, then plug the other end into a power outlet.
- വീഡിയോ കണക്ഷൻ:
- For HDMI: Connect one end of the HDMI cable to the HDMI port on your computer and the other end to the HDMI port on the monitor.
- For VGA: Connect one end of the VGA cable to the VGA port on your computer and the other end to the VGA port on the monitor.
- ഓഡിയോ (ഓപ്ഷണൽ): If your computer supports audio output via HDMI, the monitor's built-in speakers will play audio.

ചിത്രം: ഒരു ക്ലോസ്-അപ്പ് view of the monitor's rear panel, highlighting the HDMI, VGA, and DC power input ports for easy identification during connection.

Image: The KOORUI 24-inch PC Monitor P01 connected to a laptop, demonstrating a typical setup for extended display use.
4. പ്രവർത്തന നിർദ്ദേശങ്ങൾ
4.1 പവർ ഓൺ/ഓഫ്
മോണിറ്റർ ഓൺ അല്ലെങ്കിൽ ഓഫ് ചെയ്യുന്നതിന് താഴെ വലതുവശത്തുള്ള പവർ ബട്ടൺ അമർത്തുക. മോണിറ്റർ ഓൺ ആകുമ്പോൾ പവർ ഇൻഡിക്കേറ്റർ ലൈറ്റ് പ്രകാശിക്കും.
4.2 ഓൺ-സ്ക്രീൻ ഡിസ്പ്ലേ (OSD) മെനു
Use the control buttons on the bottom right of the monitor to navigate the OSD menu. These buttons typically include Menu, Up, Down, Select, and Exit.
- മെനു: OSD മെനു തുറക്കുന്നു.
- മുകളിലേക്ക്/താഴേക്ക്: മെനു ഓപ്ഷനുകളിലൂടെ നാവിഗേറ്റ് ചെയ്യുന്നു.
- തിരഞ്ഞെടുക്കുക: ഒരു തിരഞ്ഞെടുപ്പ് സ്ഥിരീകരിക്കുന്നു അല്ലെങ്കിൽ ഒരു ഉപമെനുവിൽ പ്രവേശിക്കുന്നു.
- പുറത്ത്: നിലവിലെ മെനുവിൽ നിന്നോ OSD-യിൽ നിന്നോ പുറത്തുകടക്കുന്നു.
4.3 ഡിസ്പ്ലേ സെറ്റിംഗ്സ് ക്രമീകരിക്കൽ
Within the OSD menu, you can adjust various settings:
- തെളിച്ചം/തീവ്രത: ഡിസ്പ്ലേയുടെ മൊത്തത്തിലുള്ള പ്രകാശവും കോൺട്രാസ്റ്റ് അനുപാതവും ക്രമീകരിക്കുക.
- വർണ്ണ ക്രമീകരണങ്ങൾ: വർണ്ണ താപനില, നിറം, സാച്ചുറേഷൻ എന്നിവ പരിഷ്കരിക്കുക.
- ഇൻപുട്ട് ഉറവിടം: Manually select between HDMI and VGA input.
- ലോ ബ്ലൂ ലൈറ്റ് മോഡ്: Activates a filter to reduce blue light emissions, minimizing eye strain during prolonged use.
- Adaptive FreeSync: Enables dynamic refresh rate adjustment for smoother visuals, especially in gaming.
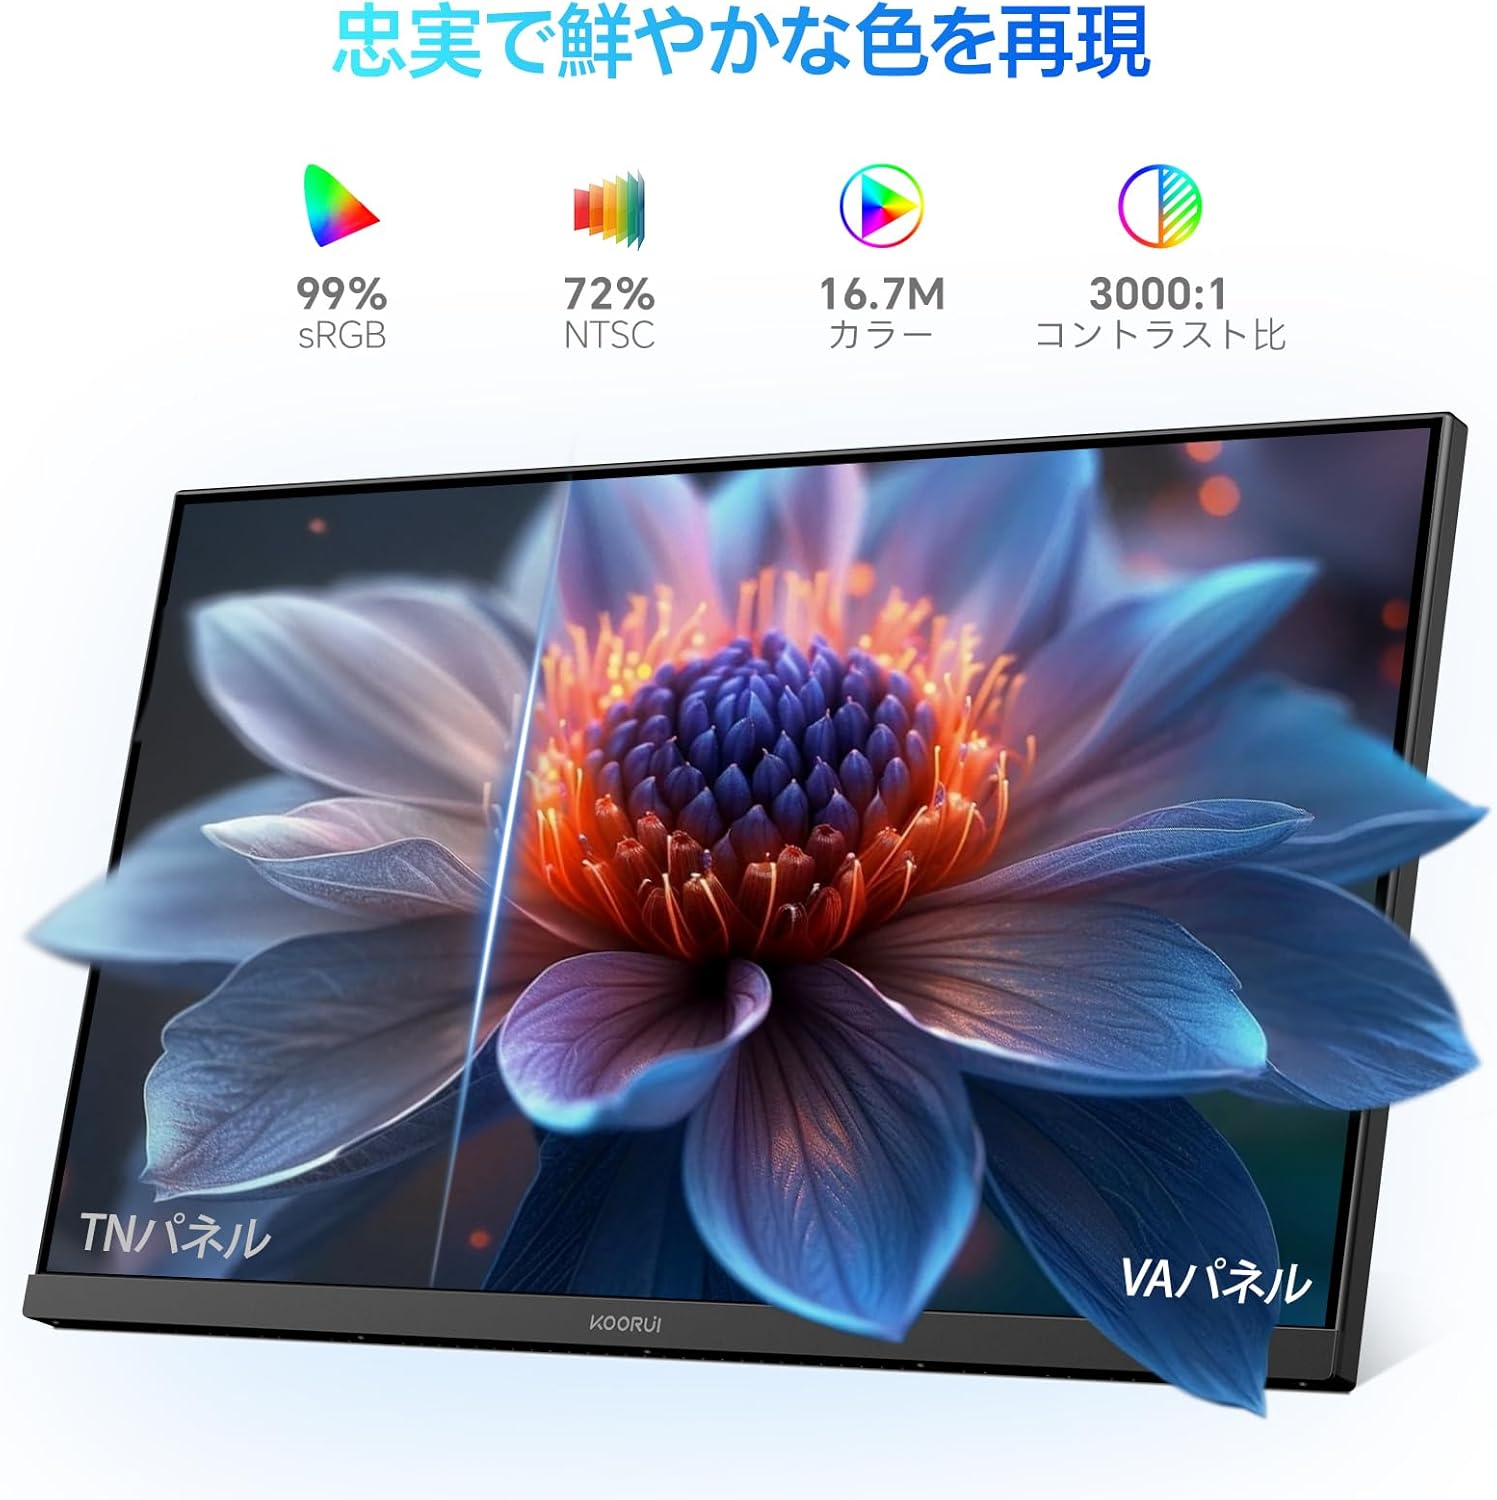
Image: A user working at a desk with the KOORUI 24-inch PC Monitor P01, illustrating the visual comfort provided by the Low Blue Light mode.

Image: A visual comparison demonstrating the benefits of Flicker-free and Low Blue Light technologies in reducing eye strain compared to a conventional display.
4.4 ശാരീരിക ക്രമീകരണങ്ങൾ
The monitor allows for tilt adjustment to optimize your viewing ആംഗിൾ.
- ടിൽറ്റ്: Gently tilt the monitor panel forward (up to 5 degrees) or backward (up to 15 degrees) to find your preferred viewസ്ഥാനം.

ചിത്രം: ഒരു സൈഡ് പ്രോfile of the monitor illustrating its adjustable tilt feature, allowing users to angle the screen for optimal comfort.
5. പരിപാലനം
5.1 മോണിറ്റർ വൃത്തിയാക്കുന്നു
നിങ്ങളുടെ മോണിറ്ററിന്റെ ദീർഘായുസ്സും ഒപ്റ്റിമൽ പ്രകടനവും ഉറപ്പാക്കാൻ, ഈ ക്ലീനിംഗ് മാർഗ്ഗനിർദ്ദേശങ്ങൾ പാലിക്കുക:
- വൃത്തിയാക്കുന്നതിന് മുമ്പ് എല്ലായ്പ്പോഴും പവർ ഔട്ട്ലെറ്റിൽ നിന്ന് മോണിറ്റർ അഴിക്കുക.
- മൃദുവായ, ലിൻ്റ് രഹിത തുണി ഉപയോഗിക്കുകampened with water to clean the screen. Avoid applying excessive pressure.
- മോണിറ്ററിന് വേണ്ടി സിasing, മൃദുവായതും ഉണങ്ങിയതുമായ ഒരു തുണി ഉപയോഗിക്കുക.
- Do not use alcohol, ammonia-based cleaners, or abrasive cleaning agents, as these can damage the screen or casing.
5.2 പൊതു പരിചരണം
- മോണിറ്ററിലോ അതിന്റെ കേബിളുകളിലോ ഭാരമുള്ള വസ്തുക്കൾ വയ്ക്കുന്നത് ഒഴിവാക്കുക.
- Do not expose the monitor to direct sunlight or extreme temperatures.
- മോണിറ്റർ കൂടുതൽ നേരം ഉപയോഗിക്കുന്നില്ലെങ്കിൽ, പവർ ഔട്ട്ലെറ്റിൽ നിന്ന് അത് ഊരിവെക്കുക.
6. പ്രശ്നപരിഹാരം
നിങ്ങളുടെ മോണിറ്ററിൽ പ്രശ്നങ്ങൾ നേരിടുകയാണെങ്കിൽ, ഇനിപ്പറയുന്ന പൊതുവായ പ്രശ്നങ്ങളും പരിഹാരങ്ങളും പരിശോധിക്കുക:
| പ്രശ്നം | സാധ്യമായ കാരണം | പരിഹാരം |
|---|---|---|
| സ്ക്രീനിൽ ചിത്രമൊന്നുമില്ല | മോണിറ്റർ ഓൺ ചെയ്തിട്ടില്ല; വീഡിയോ കേബിൾ അയഞ്ഞിരിക്കുന്നു അല്ലെങ്കിൽ വിച്ഛേദിക്കപ്പെട്ടിരിക്കുന്നു; തെറ്റായ ഇൻപുട്ട് ഉറവിടം തിരഞ്ഞെടുത്തിരിക്കുന്നു. | Ensure power cable is connected and monitor is on; Check video cable connections; Select correct input source via OSD menu. |
| ചിത്രം മങ്ങിയതോ വളച്ചൊടിച്ചതോ ആണ് | തെറ്റായ റെസല്യൂഷൻ; വീഡിയോ കേബിൾ പ്രശ്നം. | Set display resolution to 1920x1080; Try a different video cable. |
| നിറങ്ങൾ തെറ്റാണ് | Color settings in OSD; Video cable issue. | Adjust color settings in OSD menu; Check video cable for damage. |
| മോണിറ്റർ ഫ്ലിക്കറുകൾ | പുതുക്കൽ നിരക്ക് പൊരുത്തപ്പെടുന്നില്ല; കേബിൾ പ്രശ്നം. | Ensure refresh rate is set to 100Hz (or compatible); Try a different video cable. |
| ശബ്ദമില്ല | Volume too low; Incorrect audio output selected on computer; HDMI cable not transmitting audio. | Increase monitor volume; Check computer's audio output settings; Ensure HDMI cable supports audio. |
ഈ പരിഹാരങ്ങൾ പരീക്ഷിച്ചതിനു ശേഷവും പ്രശ്നം നിലനിൽക്കുകയാണെങ്കിൽ, ദയവായി KOORUI ഉപഭോക്തൃ പിന്തുണയുമായി ബന്ധപ്പെടുക.
7 സ്പെസിഫിക്കേഷനുകൾ
Technical specifications for the KOORUI 24-inch PC Monitor P01:
| ഫീച്ചർ | സ്പെസിഫിക്കേഷൻ |
|---|---|
| ബ്രാൻഡ് | കൂറുയി |
| മോഡൽ നമ്പർ | P01 |
| സ്ക്രീൻ വലിപ്പം | 24 ഇഞ്ച് |
| റെസലൂഷൻ | FHD 1920 x 1080 Pixels |
| വീക്ഷണാനുപാതം | 16:9 |
| പാനൽ തരം | VA പാനൽ |
| പുതുക്കിയ നിരക്ക് | 100 Hz |
| പ്രതികരണ സമയം | 5 മില്ലിസെക്കൻഡ് |
| കോൺട്രാസ്റ്റ് റേഷ്യോ | 3000:1 |
| Viewing ആംഗിൾ | 178° (തിരശ്ചീനമായി/ലംബമായി) |
| ഉപരിതല വിവരണം | മാറ്റ് |
| പ്രത്യേക സവിശേഷതകൾ | Low Blue Light Filter, Tilt Adjustment, Frameless Design, Flicker-Free, Adaptive FreeSync |
| കണക്റ്റിവിറ്റി | എച്ച്ഡിഎംഐ, വിജിഎ |
| നിറം | കറുപ്പ് |

Image: Detailed diagram showing the dimensions and weight of the KOORUI 24-inch PC Monitor P01.
8. വാറൻ്റിയും പിന്തുണയും
8.1 വാറൻ്റി വിവരങ്ങൾ
This KOORUI monitor comes with a 3 വർഷത്തെ നിർമ്മാതാവിന്റെ വാറന്റി. സാധാരണ ഉപയോഗത്തിലുള്ള മെറ്റീരിയലുകളിലെയും നിർമ്മാണത്തിലെയും വൈകല്യങ്ങൾ ഈ വാറന്റി ഉൾക്കൊള്ളുന്നു. വാറന്റി ക്ലെയിമുകൾക്കായി നിങ്ങളുടെ വാങ്ങലിന്റെ തെളിവ് സൂക്ഷിക്കുക.
8.2 ഉപഭോക്തൃ പിന്തുണ
KOORUI is committed to providing premium service. If you encounter any damage, malfunctions, or missing accessories, please do not hesitate to contact us. We offer 24-hour assistance and a 12-month replacement service for eligible issues.
For support, please visit the official KOORUI webസൈറ്റ് അല്ലെങ്കിൽ നിങ്ങളുടെ റീട്ടെയിലറെ ബന്ധപ്പെടുക.


