1. ആമുഖം
Thank you for choosing the Abask J05 PRO Dash Cam. This device is designed to provide reliable video evidence of your journeys, offering both front and cabin recording in high resolution. Equipped with advanced features such as G-Sensor, Loop Recording, Parking Monitor, and WiFi connectivity, it ensures comprehensive coverage and ease of use. Please read this manual thoroughly before operation to ensure proper installation and optimal performance.
2 സുരക്ഷാ വിവരങ്ങൾ
- Do not operate the dash cam or access its settings while driving. Always pull over safely before making any adjustments.
- ഡ്രൈവറുടെ വാഹനത്തിന് തടസ്സമാകാത്ത ഒരു സ്ഥലത്താണ് ഡാഷ്കാം സ്ഥാപിച്ചിരിക്കുന്നതെന്ന് ഉറപ്പാക്കുക. view അല്ലെങ്കിൽ എയർബാഗ് വിന്യാസത്തിൽ ഇടപെടുക.
- Use only the original power adapter and cables provided to prevent damage to the device and vehicle.
- Avoid exposing the dash cam to extreme temperatures, direct sunlight for prolonged periods, or excessive moisture.
- ശക്തമായ കാന്തിക മണ്ഡലങ്ങളിൽ നിന്ന് ഉപകരണം അകറ്റി നിർത്തുക.
- Do not attempt to disassemble or repair the dash cam yourself. Contact customer support for assistance.
3. പാക്കേജ് ഉള്ളടക്കം
പാക്കേജിൽ ഇനിപ്പറയുന്ന ഇനങ്ങൾ ഉണ്ടോ എന്ന് പരിശോധിക്കുക:
- 1x Abask J05 Car Camera
- 1x 32 GB Micro SD Card
- 1x Cigarette Lighter Adapter (3.5 m)
- 1x USB Cable (0.5 m)
- 1x സക്ഷൻ കപ്പ് മൗണ്ട്
- 1x ക്രോബാർ
- 1x ഉപയോക്തൃ മാനുവൽ
- 4x കേബിൾ ടൈകൾ

4. ഉൽപ്പന്നം കഴിഞ്ഞുview
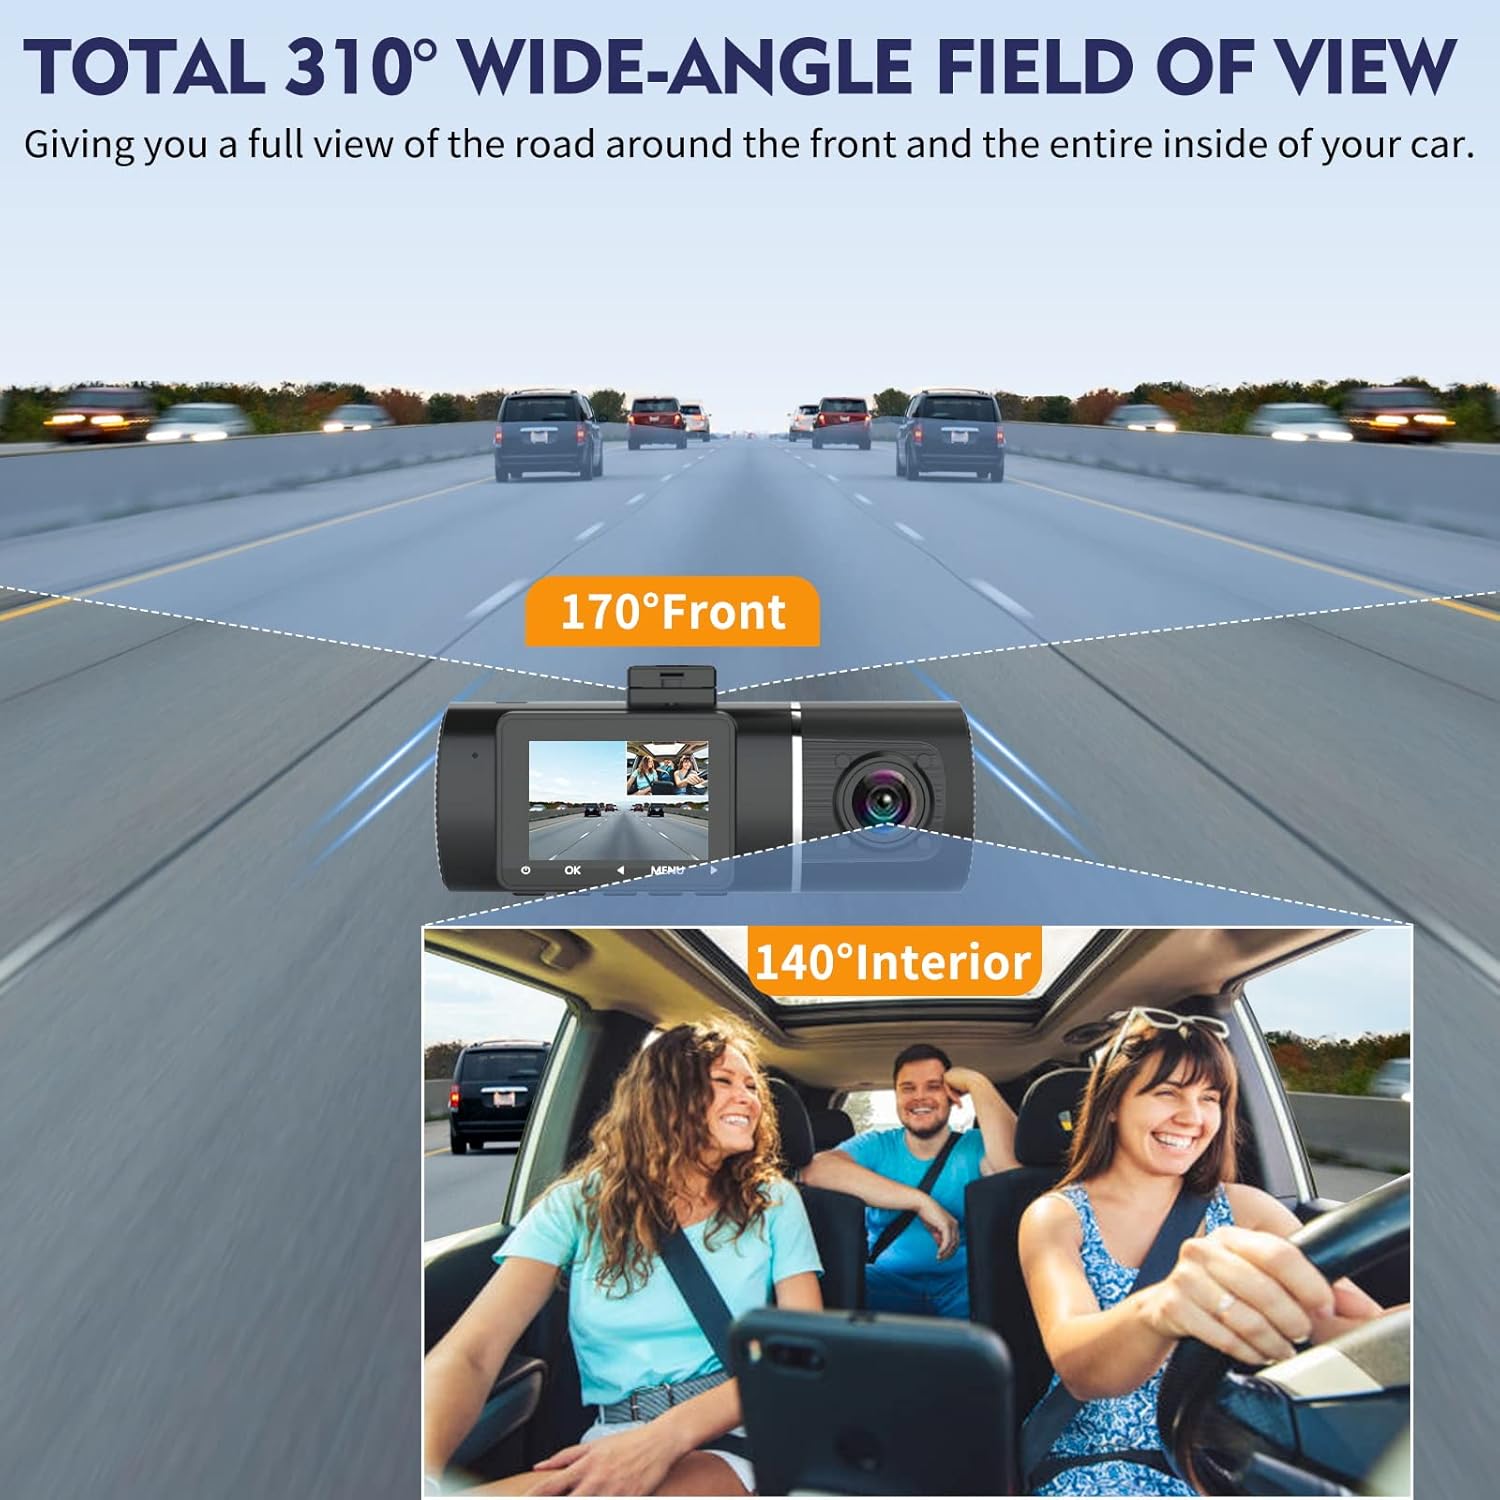
The Abask J05 PRO Dash Cam features a compact design with dual cameras for comprehensive recording. The front camera captures the road ahead, while the cabin camera monitors the vehicle's interior. A built-in display allows for live view and playback, and intuitive buttons provide easy navigation through settings and functions.
പ്രധാന ഘടകങ്ങൾ:
- മുൻ ക്യാമറ ലെൻസ്: Records the view outside the vehicle.
- Cabin Camera Lens: Records the interior of the vehicle.
- ഡിസ്പ്ലേ സ്ക്രീൻ: തത്സമയം കാണിക്കുന്നു view, playback, and menu options.
- മൈക്രോഫോൺ: Records audio inside the cabin.
- സ്പീക്കർ: For audio playback and alerts.
- പവർ ബട്ടൺ: To manually turn the device on/off.
- മെനു ബട്ടൺ: ക്രമീകരണങ്ങളും ഓപ്ഷനുകളും ആക്സസ് ചെയ്യുന്നു.
- ശരി ബട്ടൺ: Confirms selections and starts/stops recording.
- നാവിഗേഷൻ ബട്ടണുകൾ: For moving through menu options.
- മൈക്രോ എസ്ഡി കാർഡ് സ്ലോട്ട്: മെമ്മറി കാർഡ് ഇടുന്നതിന്.
- USB പോർട്ട്: For power supply and data transfer.
5. സജ്ജീകരണം
5.1. Installing the Dash Cam
- ഒരു ലൊക്കേഷൻ തിരഞ്ഞെടുക്കുക: Select a spot on your windshield, preferably behind the rearview mirror, that does not obstruct your driving view. Ensure the front camera has a clear view of the road and the cabin camera has a clear view ഉൾഭാഗത്തിന്റെ.
- വിൻഡ്ഷീൽഡ് വൃത്തിയാക്കുക: Thoroughly clean the chosen area on the windshield to ensure the suction cup adheres firmly.
- സക്ഷൻ കപ്പ് മൗണ്ട് അറ്റാച്ചുചെയ്യുക: സക്ഷൻ കപ്പ് വിൻഡ്ഷീൽഡിനെതിരെ ദൃഢമായി അമർത്തി ലിവർ ഫ്ലിപ്പുചെയ്ത് അത് ഉറപ്പിക്കുക.
- ഡാഷ് കാം മൌണ്ട് ചെയ്യുക: Slide the dash cam onto the mount until it clicks into place. Adjust the angle of both cameras to ensure optimal recording coverage.
- പവർ ബന്ധിപ്പിക്കുക: Plug the mini USB end of the power cable into the dash cam's USB port and the cigarette lighter adapter into your vehicle's 12V power outlet.
- കേബിൾ റൂട്ട് ചെയ്യുക: Carefully route the power cable along the edge of the windshield and dashboard to keep it tidy and out of the way, using the provided cable ties or crowbar if necessary.


5.2. Inserting and Formatting the SD Card
The dash cam requires a Micro SD card (Class 10 or higher, U3 recommended) for recording. A 32GB card is included, and the device supports up to 128GB.
- SD കാർഡ് ചേർക്കുക: With the dash cam powered off, gently insert the Micro SD card into the card slot until it clicks into place.
- SD കാർഡ് ഫോർമാറ്റ് ചെയ്യുക: It is highly recommended to format the SD card inside the dash cam before first use and periodically (e.g., once a month) to ensure stable recording and prevent data corruption.
- ഡാഷ് കാം ഓൺ ചെയ്യുക.
- അമർത്തുക മെനു ക്രമീകരണങ്ങൾ നൽകുന്നതിനുള്ള ബട്ടൺ.
- എന്നതിലേക്ക് നാവിഗേറ്റ് ചെയ്യുക ഫോർമാറ്റ് option and confirm.
- The dash cam will format the card, deleting all existing data.
6. ഡാഷ് കാം പ്രവർത്തിപ്പിക്കൽ
6.1. പവർ ഓൺ/ഓഫ്
The dash cam is designed to automatically power on and begin recording when your vehicle's ignition is turned on (and the power adapter receives power). It will automatically power off shortly after the ignition is turned off.
- മാനുവൽ പവർ ഓൺ: അമർത്തിപ്പിടിക്കുക ശക്തി കുറച്ച് നിമിഷങ്ങൾക്കുള്ള ബട്ടൺ.
- മാനുവൽ പവർ ഓഫ്: അമർത്തിപ്പിടിക്കുക ശക്തി കുറച്ച് നിമിഷങ്ങൾക്കുള്ള ബട്ടൺ.
6.2. റെക്കോർഡിംഗ് മോഡുകൾ
The Abask J05 PRO records simultaneously from both the front and cabin cameras.
- മുൻ ക്യാമറ: Records in 4K resolution (3840x2160P).
- ക്യാബിൻ ക്യാമറ: Records in 1080P resolution (1920x1080P).


6.3. Super Night Vision
The dash cam is equipped with advanced night vision technology, including an F1.8 aperture, 4 infrared (IR) lights for the cabin camera, and Wide Dynamic Range (WDR) for the front camera. This ensures clear and detailed recordings even in low-light conditions or complete darkness.

6.4. G-Sensor (Emergency Lock)
The built-in G-Sensor automatically detects sudden shakes or collisions. When an impact is detected, the current video footage is automatically locked and saved to a protected folder, preventing it from being overwritten by loop recording. This ensures critical evidence is preserved.
- The G-Sensor sensitivity can be adjusted in the settings menu (Low, Medium, High, Off).
6.5. ലൂപ്പ് റെക്കോർഡിംഗ്
Loop recording allows the dash cam to continuously record by overwriting the oldest unlocked video files when the Micro SD card reaches its storage limit. This ensures that recording never stops due to a full memory card.
- Video segments can typically be set to 1, 3, or 5 minutes in the settings.

6.6. Parking Monitor (Motion Activated)
When enabled, the parking monitor feature allows the dash cam to automatically turn on and record a short video if it detects a collision or motion around your parked vehicle. This provides surveillance even when you are away from your car.
- കുറിപ്പ്: This feature requires a hardwire kit (not included) to provide continuous power to the dash cam when the vehicle is off.
6.7. WiFi & App Control
The Abask J05 PRO features built-in WiFi, allowing you to connect your smartphone to the dash cam via a dedicated app. This enables you to view തത്സമയംtage, change settings, download recorded videos, and share them directly from your phone.
- ആപ്പിൻ്റെ പേര്: LuckyCam
- ഡൗൺലോഡ്: ഇതിനായി തിരയുക "LuckyCam" in your smartphone's app store or scan the QR codes below.
- കണക്ഷൻ ഘട്ടങ്ങൾ:
- Turn on the dash cam's WiFi in the settings menu.
- On your smartphone, go to WiFi settings and connect to the dash cam's WiFi network (usually named something like "Abask_XXXX"). The default password is typically "12345678" or found in the dash cam's WiFi settings.
- Open the LuckyCam app. You should now see the live view and be able to access controls and files.


Android App Link: ഗൂഗിൾ പ്ലേ സ്റ്റോർ
iOS App Link: App Store (via Tencent)
7. പരിപാലനം
- SD കാർഡ് ഫോർമാറ്റിംഗ്: Regularly format the Micro SD card (e.g., monthly) to prevent data corruption and ensure optimal recording performance. This can be done through the dash cam's settings menu.
- ലെൻസുകളും സ്ക്രീനുകളും വൃത്തിയാക്കൽ: Use a soft, lint-free cloth to gently wipe the camera lenses and the display screen. Do not use abrasive cleaners or solvents.
- ഫേംവെയർ അപ്ഡേറ്റുകൾ: Check the official Abask website periodically for any available firmware updates. Updates can improve performance and add new features.
8. പ്രശ്നപരിഹാരം
If you encounter issues with your Abask J05 PRO Dash Cam, please refer to the following common solutions:
| പ്രശ്നം | സാധ്യമായ കാരണം / പരിഹാരം |
|---|---|
| ഡാഷ് ക്യാം പവർ ഓൺ ചെയ്യുന്നില്ല. | Check if the power cable is securely connected to the dash cam and the vehicle's power outlet. Ensure the vehicle's ignition is on. Test the power outlet with another device. |
| Dash cam freezes or hangs. | Press and hold the power button to force a restart. If the issue persists, try formatting the SD card. Ensure the SD card is a high-quality Class 10 (U3 recommended) card. |
| Recording stops or shows errors. | Format the Micro SD card. Ensure the SD card is not full. Replace the SD card if it is old or damaged. Ensure the card meets the recommended specifications (Class 10, U3). |
| വീഡിയോ നിലവാരം മോശമാണ് അല്ലെങ്കിൽ മങ്ങിയതാണ്. | Clean the camera lenses with a soft cloth. Ensure the protective film (if any) has been removed from the lenses. Check if the windshield is clean. Adjust camera angles. |
| Parking monitor does not work. | Ensure the parking monitor feature is enabled in the settings. Verify that a hardwire kit is properly installed and providing continuous power to the dash cam. |
| വൈഫൈ കണക്ഷൻ പ്രശ്നങ്ങൾ. | Ensure WiFi is enabled on the dash cam. Restart both the dash cam and your smartphone. Re-enter the WiFi password. Ensure you are within close range of the dash cam. |
If the problem persists after trying these solutions, please contact Abask customer support for further assistance.
9 സ്പെസിഫിക്കേഷനുകൾ
| ഫീച്ചർ | വിശദാംശങ്ങൾ |
|---|---|
| ബ്രാൻഡ് | അബാസ്ക് |
| മോഡലിൻ്റെ പേര് | J05 PRO |
| ഉൽപ്പന്ന അളവുകൾ | 10 x 14 x 6 സെ.മീ |
| ഇനത്തിൻ്റെ ഭാരം | 370 ഗ്രാം |
| മുൻവശത്തെ വീഡിയോ റെസല്യൂഷൻ | 4K (2160p) |
| Cabin Video Resolution | 1080P |
| ഡിസ്പ്ലേ വലിപ്പം | 1.5 ഇഞ്ച് |
| ഫീൽഡ് View (മുന്നിൽ) | 170 ഡിഗ്രി |
| ഫീൽഡ് View (ചെറിയമുറി) | 140 ഡിഗ്രി |
| പ്രത്യേക സവിശേഷതകൾ | G Sensor, Loop Recording, Night Vision, Parking Monitor, WiFi |
| മെമ്മറി കാർഡ് തരം | Micro SD (Class 10, U3 recommended) |
| ഉൾപ്പെടുത്തിയ മെമ്മറി കാർഡ് വലുപ്പം | 32 ജിബി |
| Max Supported Memory Card | 128 ജിബി |
| പവർ ഉറവിടം | Lithium Ion Battery (included), Car Charger |
| മൗണ്ടിംഗ് തരം | വിൻഡ്ഷീൽഡ് മ .ണ്ട് |
| അനുയോജ്യമായ ഉപകരണങ്ങൾ | Cars, Trucks, Motorcycles, Smartphones, PCs |
10. വാറൻ്റിയും പിന്തുണയും
Abask products come with a standard warranty. For specific warranty terms and conditions, please refer to the warranty card included in your package or visit the official Abask website. If you have any questions, require technical assistance, or need to claim warranty service, please contact Abask customer support through the contact information provided on the official webസൈറ്റ് അല്ലെങ്കിൽ നിങ്ങളുടെ വാങ്ങൽ പ്ലാറ്റ്ഫോം.
ഉയർന്ന നിലവാരമുള്ള ഉൽപ്പന്നങ്ങളും മികച്ച ഉപഭോക്തൃ സേവനവും നൽകുന്നതിന് ഞങ്ങൾ പ്രതിജ്ഞാബദ്ധരാണ്.


