ആമുഖം
The GuineaLoft Cage Connector is designed to expand your guinea pig's living space by connecting two GuineaLoft cages. This connector creates a spacious bridge corridor, encouraging increased activity and interaction among your pets. It features an easy-to-use design for installation and removal, and includes a temporary closure mechanism for convenience.

Image: The GuineaLoft Cage Connector, a clear acrylic structure designed to link two guinea pig cages.
പാക്കേജ് ഉള്ളടക്കം
അസംബ്ലി ആരംഭിക്കുന്നതിന് മുമ്പ് എല്ലാ ഘടകങ്ങളും നിലവിലുണ്ടെന്ന് ദയവായി പരിശോധിക്കുക:
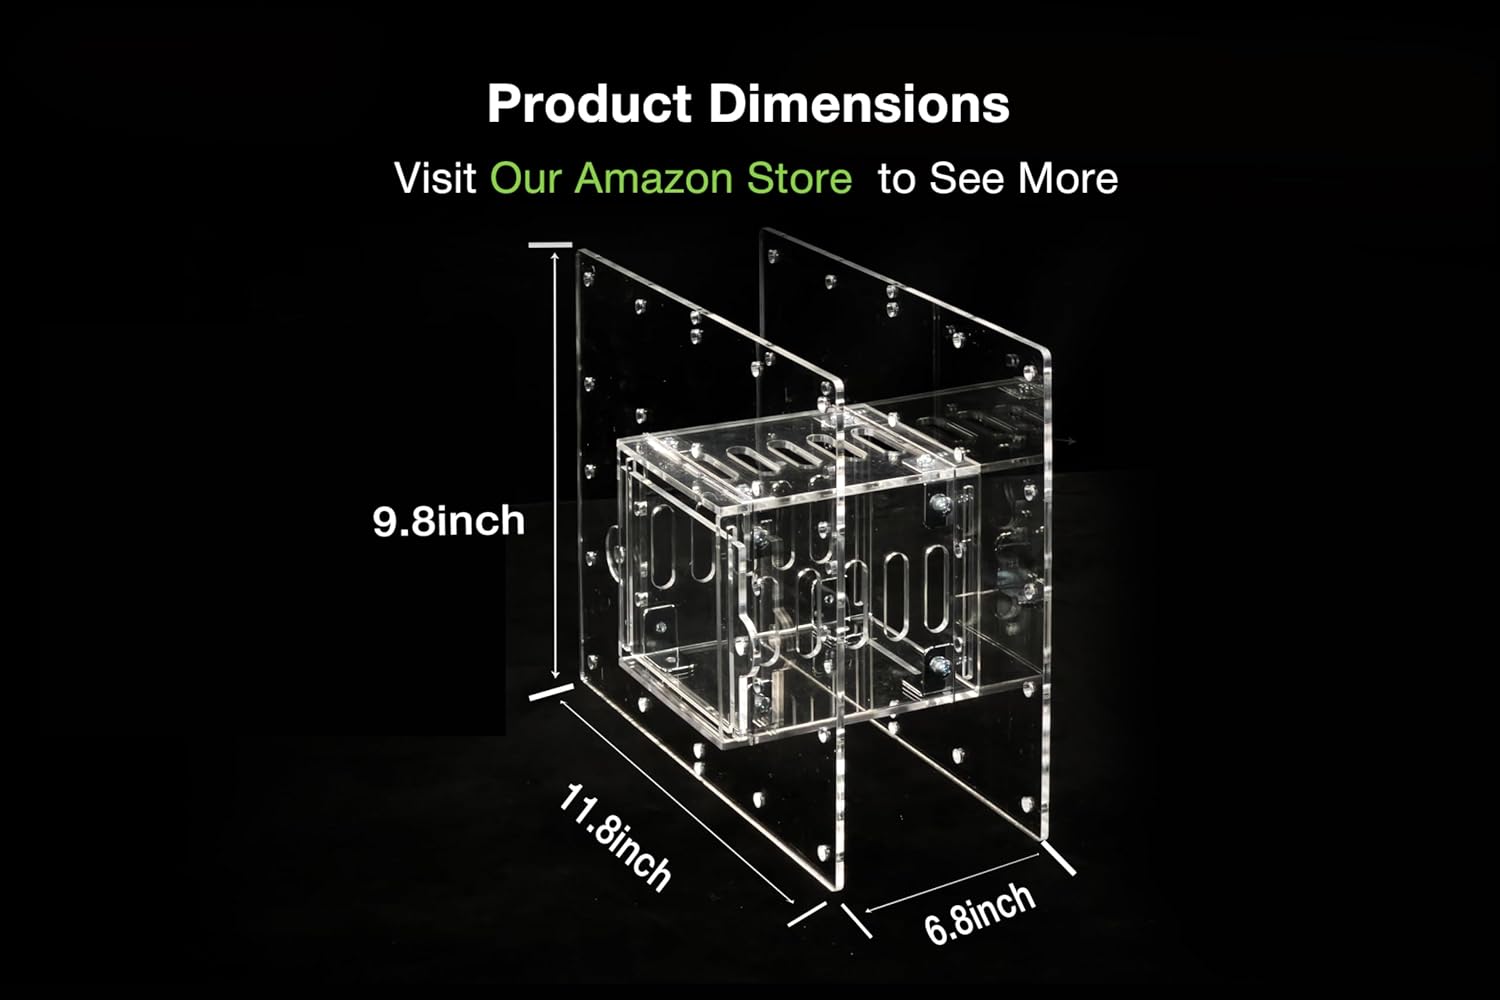
Image: A visual representation of the GuineaLoft Cage Connector components and their quantities.
- Wall Panels x 2
- സൈഡ് പാനലുകൾ x 2
- താഴെയുള്ള പാനൽ x 1
- ടോപ്പ് പാനൽ x 1
- ഡോർ പാനൽ x 1
- L2 ബ്രാക്കറ്റുകൾ x 8
- M5 6mm Screws x 16
സജ്ജീകരണവും അസംബ്ലിയും
- Prepare Cages: Identify the two GuineaLoft cage panels where the connector will be installed. These panels will be replaced by the connector panels.
- Assemble the Corridor Structure: Attach the L2 brackets to the Wall, Side, Bottom, and Top Panels using the M5 6mm screws. Ensure the brackets are positioned correctly to form the corridor structure. When securing the panels, keep the brackets in place and insert screws from the outside of the panel inwards for a secure fit.
- Insert Door Panel: Slide the Door Panel into the designated slots on the corridor structure. This allows for temporary closure of the corridor.

Image: The transparent slide door being placed into the connector, illustrating its function.
- Connect to Cages: Replace two existing regular cage panels with the two connector panels. Then, insert the assembled corridor between these two connector panels, ensuring a secure fit.
The connector allows for various cage configurations, including side-by-side, head-to-head, or L-shaped setups.

Image: The connector linking two GuineaLoft Model-P2 cages, demonstrating a possible setup.

Image: The connector linking two GuineaLoft Model-C cages, showcasing another configuration.

Image: The connector linking two GuineaLoft Model-E cages, illustrating a third setup option.
പ്രവർത്തന നിർദ്ദേശങ്ങൾ
- Encouraging Activity: The spacious bridge corridor allows guinea pigs to move freely between connected cages, promoting a significantly higher range of activities and interaction.

Image: Multiple guinea pigs using the connector to move between cages, highlighting increased activity.
- Temporary Closure: If separation is needed, such as during a timeout for fighting guinea pigs or for individual care, the included door panel can be used to temporarily close off the corridor.
മെയിൻ്റനൻസ്
- വൃത്തിയാക്കൽ: The connector is designed for easy removal and reinsertion, facilitating convenient cage cleaning. Disassemble the corridor from the main cages, clean all acrylic panels with a pet-safe cleaner, and reassemble once dry.
- പരിശോധന: Regularly inspect all panels, brackets, and screws for any signs of wear or damage. Ensure all connections remain secure to maintain the structural integrity of the connector.
ട്രബിൾഷൂട്ടിംഗ്
No specific troubleshooting steps are provided for this product. If you encounter any issues during assembly or use, please ensure all components are correctly installed according to the setup instructions. For further assistance, refer to the support information below.
സ്പെസിഫിക്കേഷനുകൾ
| മോഡൽ നമ്പർ | v1 |
| ഉൽപ്പന്ന അളവുകൾ | 30.48 x 17.78 x 25.4 സെ.മീ (12 x 7 x 10 ഇഞ്ച്) |
| ഭാരം | 997.9 ഗ്രാം (2.2 പൗണ്ട്) |
| മെറ്റീരിയൽ | അക്രിലിക് |
| നിർമ്മാതാവ് | ഗിനിലോഫ്റ്റ് |

Image: A diagram illustrating the length, width, and height of the connector.
വാറൻ്റിയും പിന്തുണയും
Specific warranty information for the GuineaLoft Cage Connector is not provided in the product details. For any inquiries regarding warranty, product support, or replacement parts, please contact GuineaLoft customer service directly through their official channels or the retailer where the product was purchased.
You can visit the GuineaLoft Store for more information: GuineaLoft Amazon Store


