ആമുഖം
This manual provides essential information for the safe and efficient operation of your Creality K1 MAX 3D Printer. Please read it thoroughly before using the device to ensure optimal performance and longevity.

Figure 1: The Creality K1 MAX 3D Printer, showcasing its enclosed design and large build volume.
1. സജ്ജീകരണം
1.1 അൺബോക്സിംഗും പ്രാരംഭ പ്ലേസ്മെന്റും
The Creality K1 MAX is designed for ease of use, arriving largely pre-assembled and calibrated. Upon unboxing, carefully remove all packaging materials. Place the printer on a stable, level surface in a well-ventilated area, away from direct sunlight and heat sources.

Figure 2: The Creality K1 MAX is assembled and calibrated before shipment, allowing for immediate printing upon arrival.
1.2 പവർ കണക്ഷൻ
Connect the power cable to the printer and then to a suitable power outlet. Ensure the power switch is in the OFF position before connecting. Once connected, you may switch the printer ON.
1.3 നെറ്റ്വർക്ക് കോൺഫിഗറേഷൻ
The K1 MAX supports both WiFi and RJ45 Ethernet connectivity. Access the network settings via the printer's display screen to connect to your local network. This enables remote monitoring and control through Creality Print software or Creality Cloud.
2. പ്രവർത്തന നിർദ്ദേശങ്ങൾ
2.1 ഹൈ-സ്പീഡ് പ്രിന്റിംഗ് ശേഷികൾ
The K1 MAX features an upgraded motion system, achieving acceleration up to 20000mm/s² and printing speeds of up to 600mm/s. This is facilitated by a CoreXY structure and a lightweight 190g printhead, minimizing motion inertia for agile and swift operation. Each X/Y/Z axis is driven by a high-precision stepper motor, with a steel transmission shaft connecting and syncing the two Y-axis belts for responsive and precise movement.

Figure 3: Illustration of the K1 MAX's high-speed capabilities, including CoreXY structure, 600mm/s max speed, and 20000mm/s² acceleration.
2.2 AI LiDAR and Camera System
The printer integrates a 1µm resolution AI LiDAR for precise first-layer scanning, ensuring optimal adhesion and print quality. An AI camera provides real-time monitoring, detects printing errors such as 'spaghetti' failures or foreign objects on the print bed, and issues alerts. It also supports time-lapse recording of your prints.

Figure 4: The AI LiDAR system actively scans the first layer to ensure accuracy and detect potential issues.
2.3 Extrusion System and Nozzle
The K1 MAX features an all-metal Sprite direct extruder with dual gears and a 1:3.5 gear ratio, delivering a powerful and uniform 80N extrusion force. This design is particularly effective for printing with flexible filaments like TPU. The hotend incorporates a new ceramic heater, encircling the entire hotend, which heats to 200°C in 40 seconds. Combined with a titanium alloy heatbreak and a hardened steel nozzle, it supports printing temperatures up to 300°C and a maximum flow rate of 32mm³/s.
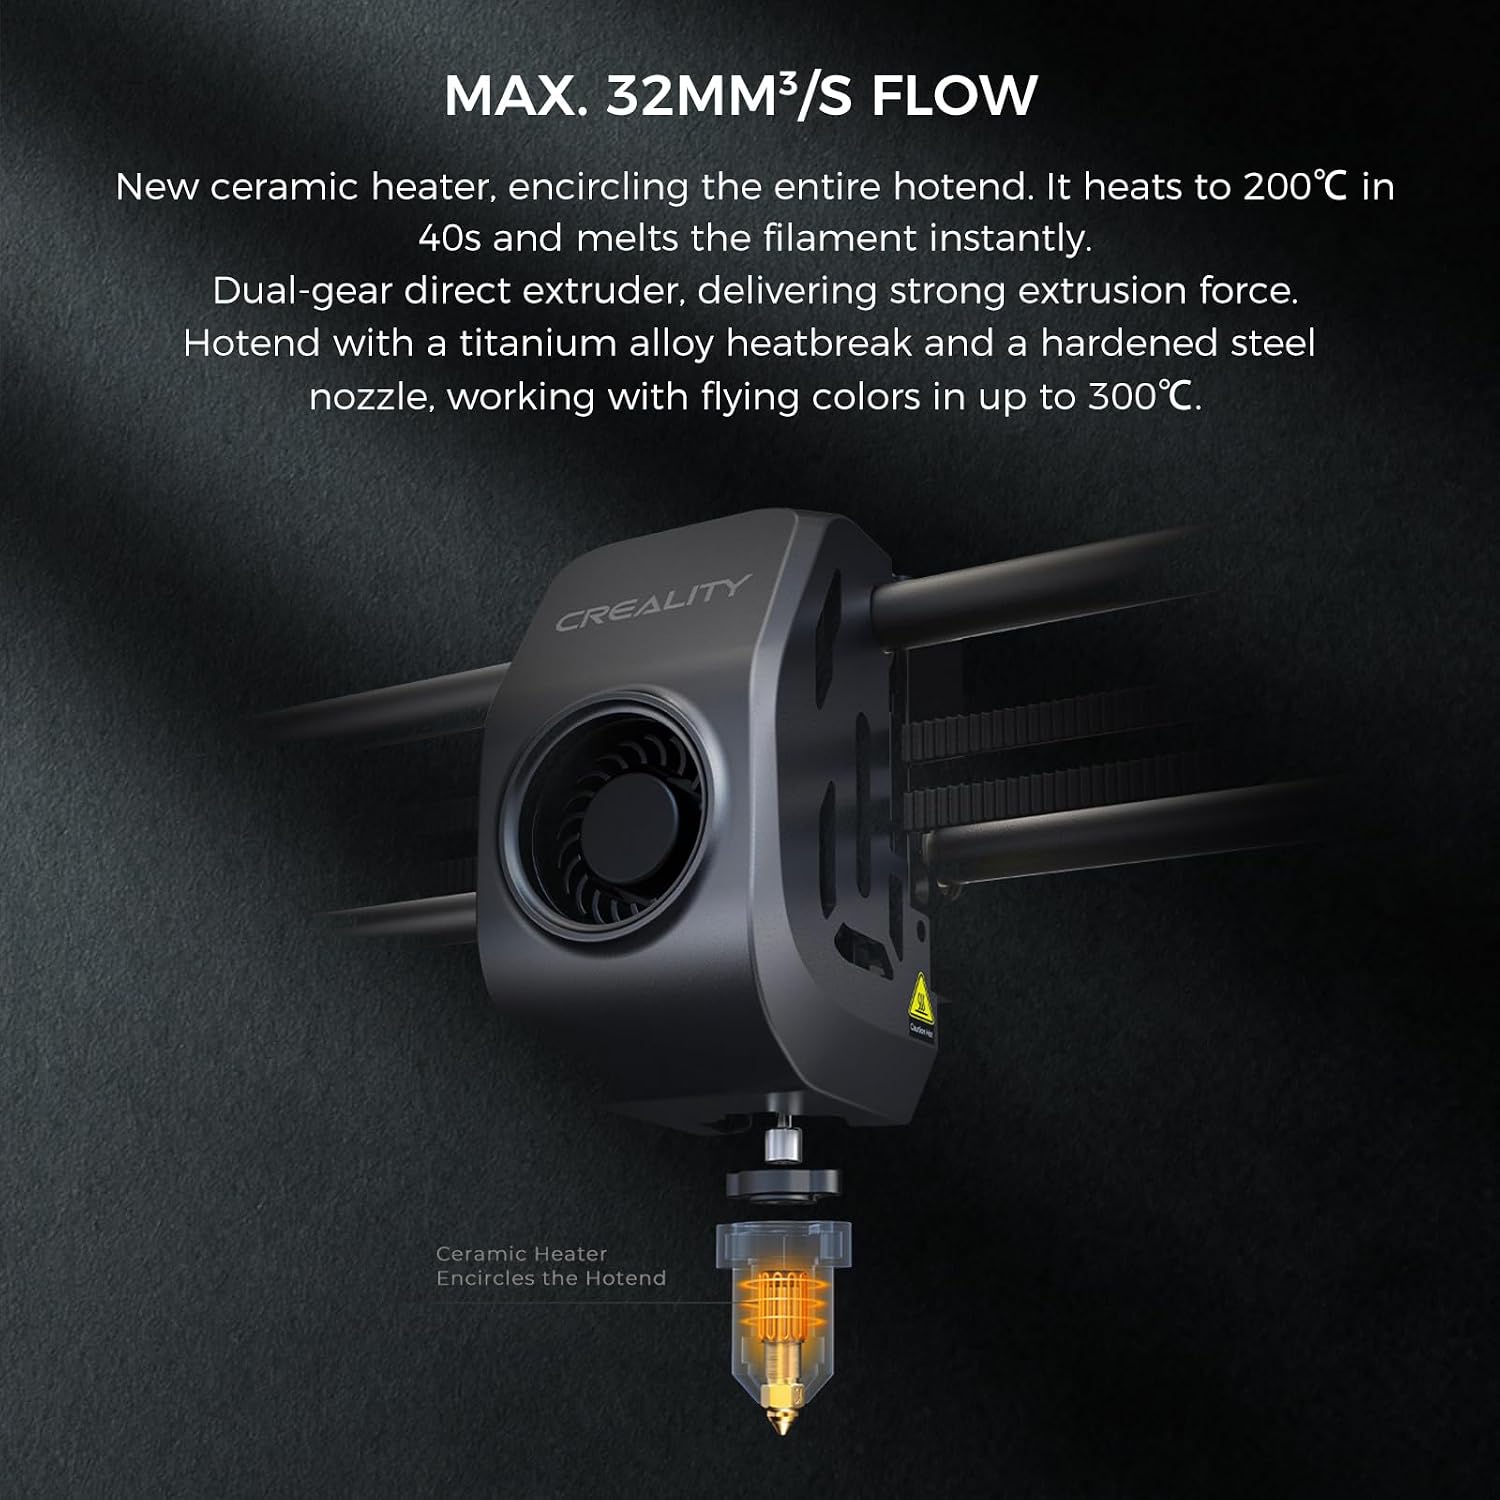
Figure 5: The K1 MAX hotend with its ceramic heater and direct extruder, capable of high-temperature and high-flow printing.
2.4 Build Plate and Heatbed
The printer is equipped with a flexible, sticky, and heat-resistant build plate, compatible with a wide range of filaments. Its finely textured surface ensures excellent first-layer adhesion and allows for easy removal of finished prints by bending the plate. The aluminum alloy heatbed heats uniformly and quickly, reaching 60°C in just 90 seconds.

Figure 6: The flexible build plate allows for easy removal of printed models.
2.5 കൂളിംഗ് സിസ്റ്റം
Effective cooling is achieved through dual fans. A large fan on the printhead, equipped with air ducts, directly cools the printed model. Additionally, an 18W auxiliary fan within the build chamber enhances the overall cooling effect, crucial for high-speed printing.

Figure 7: The dual fan system, including a printhead fan and an auxiliary chamber fan, provides efficient model cooling.
2.6 Creality OS and Software
The K1 MAX operates on the Creality OS, featuring a user-friendly interface. This smart system is powered by a snappy dual-core 1.2GHz CPU and includes 8GB of ROM for storing up to 400 model files, enabling quick writing and reading. It syncs data and commands with PC, phone, and cloud platforms, allowing for comprehensive control and monitoring. The latest self-developed slicer, Creality Print 4.3, offers rich presets and streamlines the slicing process into three simple stages, supporting high-speed printing with variable line width and arc path.

Figure 8: Real-time monitoring of print progress and status is available through a connected smartphone application.
3. പരിപാലനം
3.1 റെഗുലർ ക്ലീനിംഗ്
To maintain optimal performance, regularly clean the printer. This includes wiping down the build plate, removing any filament debris from the extruder and nozzle area, and cleaning the interior of the print chamber. Use a soft, dry cloth for external surfaces and ensure the printer is powered off before cleaning.
3.2 Nozzle Inspection
Periodically inspect the nozzle for wear or clogs. A worn nozzle can affect print quality. Refer to the specifications for compatible nozzle sizes and replacement procedures.
3.3 Build Plate Care
Clean the flexible build plate with isopropyl alcohol after each print to ensure consistent adhesion. Avoid using abrasive materials that could damage the surface.
3.4 എയർ ഫിൽട്ടർ മാറ്റിസ്ഥാപിക്കൽ
The K1 MAX includes built-in air filters. Consult the manufacturer's guidelines for recommended replacement intervals to ensure effective purification of compounds generated during printing.

Figure 9: The integrated air purifier helps maintain a cleaner printing environment.
4. പ്രശ്നപരിഹാരം
4.1 Print Quality Issues (Ringing/Ghosting)
If you observe ringing or ghosting on your prints, the K1 MAX's G-sensor in the printhead measures resonance frequencies during high-speed printing and automatically tunes the printer to mitigate these effects. Ensure this feature is active and properly calibrated.

Figure 10: Visual comparison demonstrating the reduction of ringing artifacts with the G-sensor enabled.
4.2 ആദ്യ പാളി അഡീഷൻ പ്രശ്നങ്ങൾ
Poor first layer adhesion can lead to print failures. The AI LiDAR system performs a first-layer scan to detect and alert you to any issues. Ensure the build plate is clean and free of debris. The hands-free auto-leveling system should also be checked for proper calibration.

ചിത്രം 11: ഒരു മുൻample of a failure detection alert, indicating a print quality problem such as 'spaghetti' formation.
4.3 Foreign Object Detection
The integrated AI camera can detect foreign objects or debris on the print bed that might interfere with printing. If an alert is triggered, pause the print and carefully remove the obstruction before resuming.

Figure 12: The AI camera detects foreign objects on the print platform, pausing the print to prevent damage or failure.
4.4 Power Loss Recovery
The K1 MAX is equipped with a power loss recovery feature. In the event of a power interruption, the printer is designed to resume printing from where it left off once power is restored, minimizing material waste and print time loss.
5 സ്പെസിഫിക്കേഷനുകൾ
The following table outlines the key technical specifications for the Creality K1 MAX 3D Printer:

Figure 13: Detailed product parameters for the Creality K1 MAX 3D Printer.
| ഫീച്ചർ | സ്പെസിഫിക്കേഷൻ |
|---|---|
| പ്രിൻ്റിംഗ് ടെക്നോളജി | FDM (ഫ്യൂസ്ഡ് ഡിപ്പോസിഷൻ മോഡലിംഗ്) |
| ബിൽഡ് വോളിയം | 300x300x300mm (11.81x11.81x11.81 inches) |
| ഉൽപ്പന്ന അളവുകൾ | 435x462x526mm (18.19 x 17.13 x 20.71 inches) |
| മൊത്തം ഭാരം | 18 കിലോ (35.2 പൗണ്ട്) |
| പ്രിൻ്റിംഗ് സ്പീഡ് | ≤600mm/s (Typical 300mm/s) |
| ത്വരണം | ≤20000mm/s² |
| പ്രിന്റിംഗ് കൃത്യത | 100 ± 0.1 മിമി |
| ഫിലമെൻ്റ് വ്യാസം | 1.75 മി.മീ |
| നോസൽ വ്യാസം | 0.4mm (compatible with 0.6/0.8mm) |
| നോസൽ താപനില | ≤300°C |
| ചൂടാക്കിയ കിടക്ക താപനില | ≤120°C |
| എക്സ്ട്രൂഡർ | Dual-gear direct drive extruder |
| ബിൽഡ് സർഫസ് | Flexible build plate |
| ലെവലിംഗ് മോഡ് | Dual hands-free auto leveling |
| പിന്തുണയ്ക്കുന്ന ഫിലമെന്റുകൾ | PLA, PETG, PET, TPU, PA, ABS, ASA, PC, PLA-CF, PA-CF, PET-CF |
| അച്ചടിക്കാവുന്നത് File ഫോർമാറ്റ് | ജി-കോഡ് |
| സ്ലൈസിംഗ് സോഫ്റ്റ്വെയർ | Creality Print; compatible with Cura, Simplify3D, PrusaSlicer |
| File കൈമാറ്റം | USB drive, Ethernet, WiFi |
| ഡിസ്പ്ലേ സ്ക്രീൻ | 4.3" color touch screen |
| AI ക്യാമറ | അതെ |
| AI ലിഡാർ | അതെ |
| പവർ ലോസ് റിക്കവറി | അതെ |
| ഫിലമെൻ്റ് റൺഔട്ട് സെൻസർ | അതെ |
| ലൈറ്റിംഗ് കിറ്റ് | അതെ |
| സ്ലീപ്പ് മോഡ് | അതെ |
| റേറ്റുചെയ്ത പവർ | 1000W |
| റേറ്റുചെയ്ത വോളിയംtage | 100-240V ~ 50/60Hz |
| UI ഭാഷകൾ | English, Spanish, German, French, Russian, Portuguese, Italian, Turkish, Japanese, Chinese |
6. വാറണ്ടിയും പിന്തുണയും
6.1 വാറൻ്റി വിവരങ്ങൾ
For detailed warranty terms and conditions, please refer to the official Creality webഉൽപ്പന്നത്തിന്റെ സൈറ്റിലോ വാറന്റി കാർഡിലോ ഉൾപ്പെടുത്തിയിട്ടുള്ള ഏതെങ്കിലും ഉൽപ്പന്നം. വാറന്റി കവറേജിൽ സാധാരണയായി വാങ്ങിയ തീയതി മുതൽ ഒരു നിശ്ചിത കാലയളവിലേക്കുള്ള നിർമ്മാണ വൈകല്യങ്ങൾ ഉൾപ്പെടുന്നു.
6.2 ഉപഭോക്തൃ പിന്തുണ
Should you encounter any issues or require technical assistance, please contact Creality customer support through their official channels. You can find contact information on the Creality website or within your product documentation. Online resources, including FAQs and troubleshooting guides, are also available.
Visit the official Creality Store for additional information and support: ക്രിയാത്മക സ്റ്റോർ


