1. ആമുഖം
Thank you for choosing the GenMachine Mini PC. This compact yet powerful computer is designed to deliver exceptional performance for a variety of tasks, including gaming, office productivity, and creative design. Equipped with an AMD Ryzen 7 3750H processor, ample memory, and fast storage, it offers a seamless computing experience. This manual provides essential information for setting up, operating, maintaining, and troubleshooting your new Mini PC.
2. ബോക്സിൽ എന്താണുള്ളത്?
അൺബോക്സ് ചെയ്യുമ്പോൾ എല്ലാ ഇനങ്ങളും നിലവിലുണ്ടെന്നും നല്ല നിലയിലാണെന്നും ദയവായി പരിശോധിക്കുക.
- 1 x GenMachine Mini PC
- 1 x HDMI കേബിൾ
- 1 x പവർ അഡാപ്റ്റർ
- 1 x ഉപയോക്തൃ മാനുവൽ (ഈ പ്രമാണം)
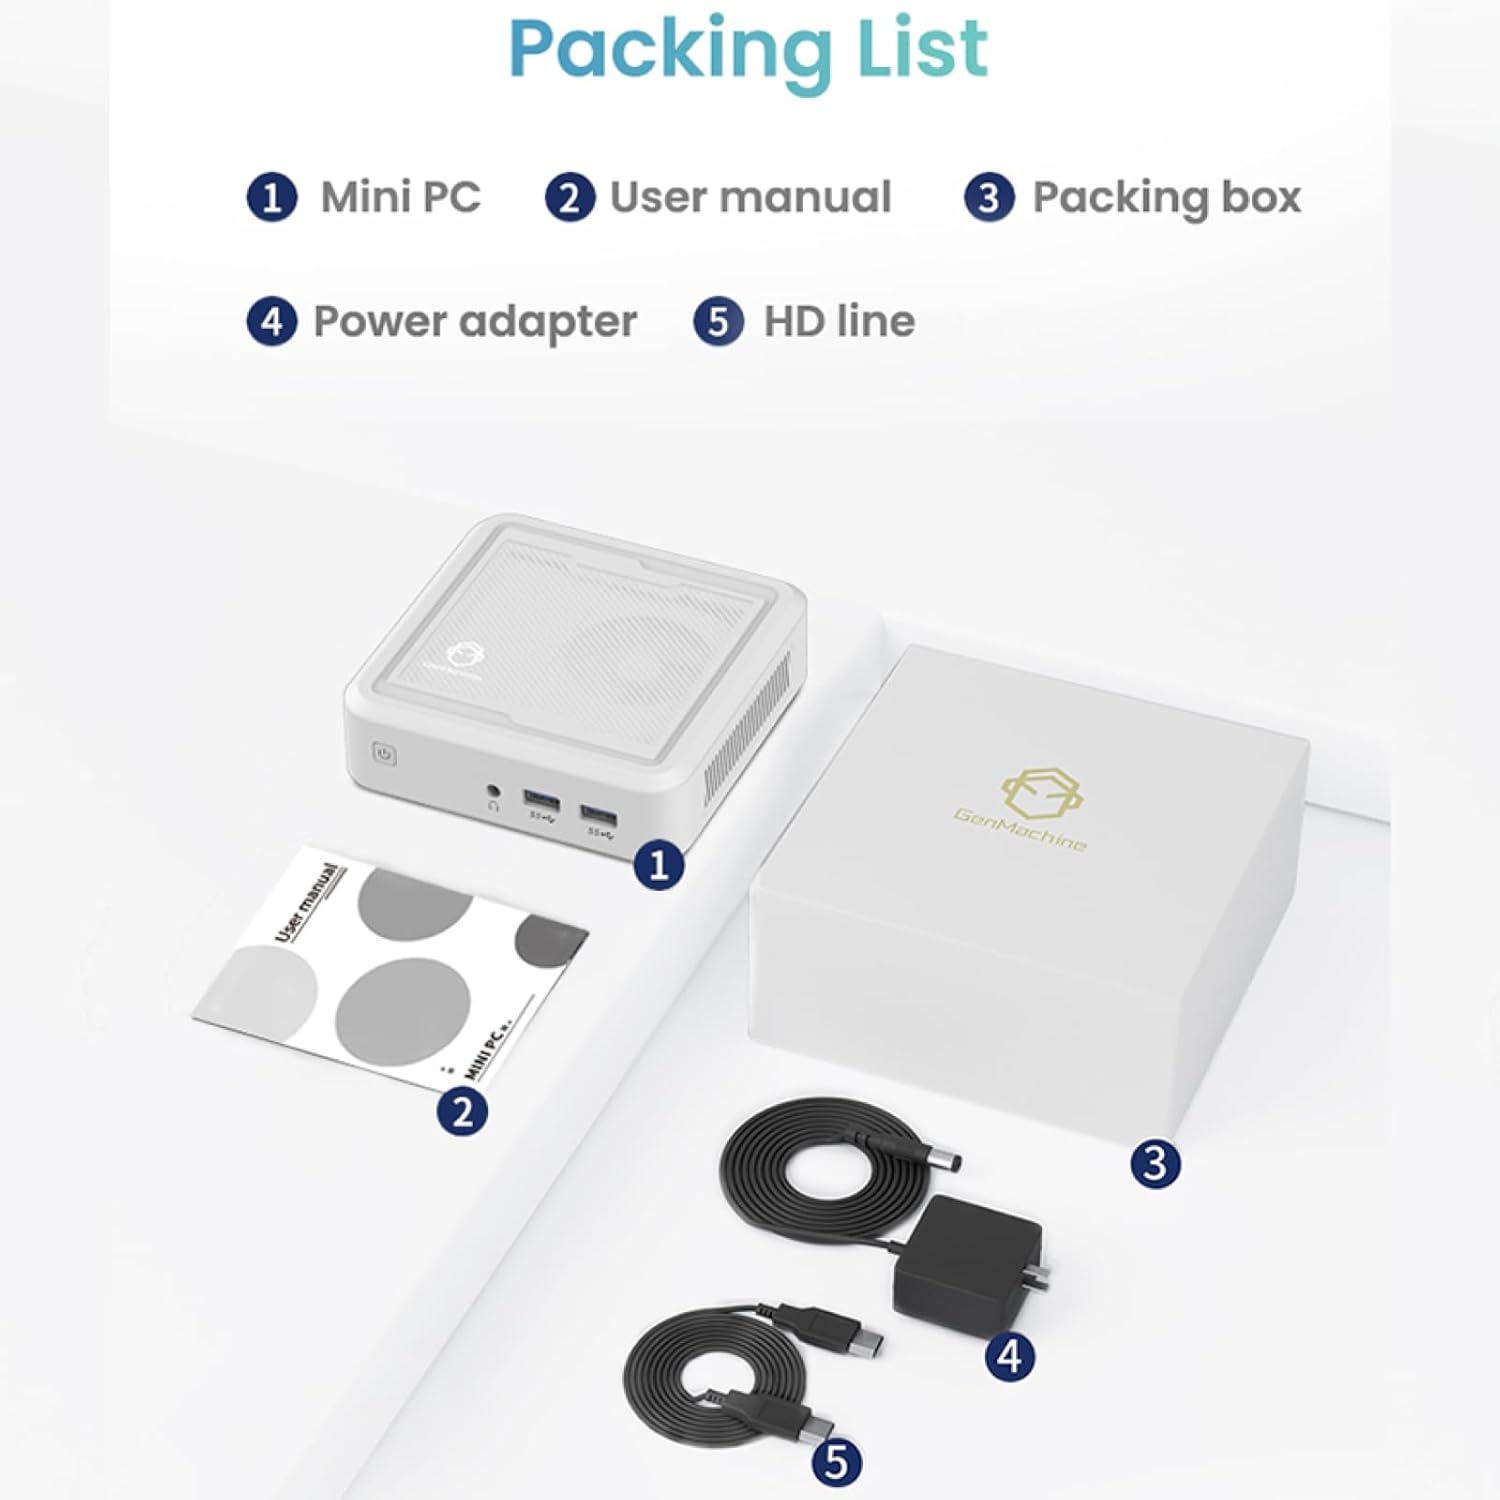
Figure 2.1: Packaging contents of the GenMachine Mini PC.
3. ഉൽപ്പന്ന സവിശേഷതകൾ
The GenMachine Mini PC is engineered with features to enhance your computing experience:
- ശക്തമായ പ്രകടനം: Equipped with an AMD Ryzen 7 3750H processor, delivering speeds up to 4.0GHz with 4 cores and 8 threads for demanding tasks.
- Ample Memory and Storage: Features 8GB of DDR4 RAM and a 256GB SSD with M.2 NVMe support for seamless multitasking and quick file പ്രവേശനം.
- ബഹുമുഖ കണക്റ്റിവിറ്റി: Advanced WiFi 6 and Bluetooth 5.2 capabilities ensure high-speed internet and smooth device pairing.
- കോംപാക്റ്റ് ഡിസൈൻ: A sleek, small form factor that fits easily into any workspace or gaming setup.
- ഒന്നിലധികം പ്രദർശന ഓപ്ഷനുകൾ: HDMI and DisplayPort outputs support dual 4K displays for expanded productivity and immersive visuals.

ചിത്രം 3.1: മുൻഭാഗം view of the GenMachine Mini PC.
3.1 Rich Interface for Easy Connection
The Mini PC offers a comprehensive set of ports to meet various connectivity needs:
- USB 3.0 x 4
- എച്ച്ഡിഎംഐ x 1
- DisplayPort (DP) x 1
- ലാൻ (ഇഥർനെറ്റ്) x 1
- 3.5mm Audio Jack x 1
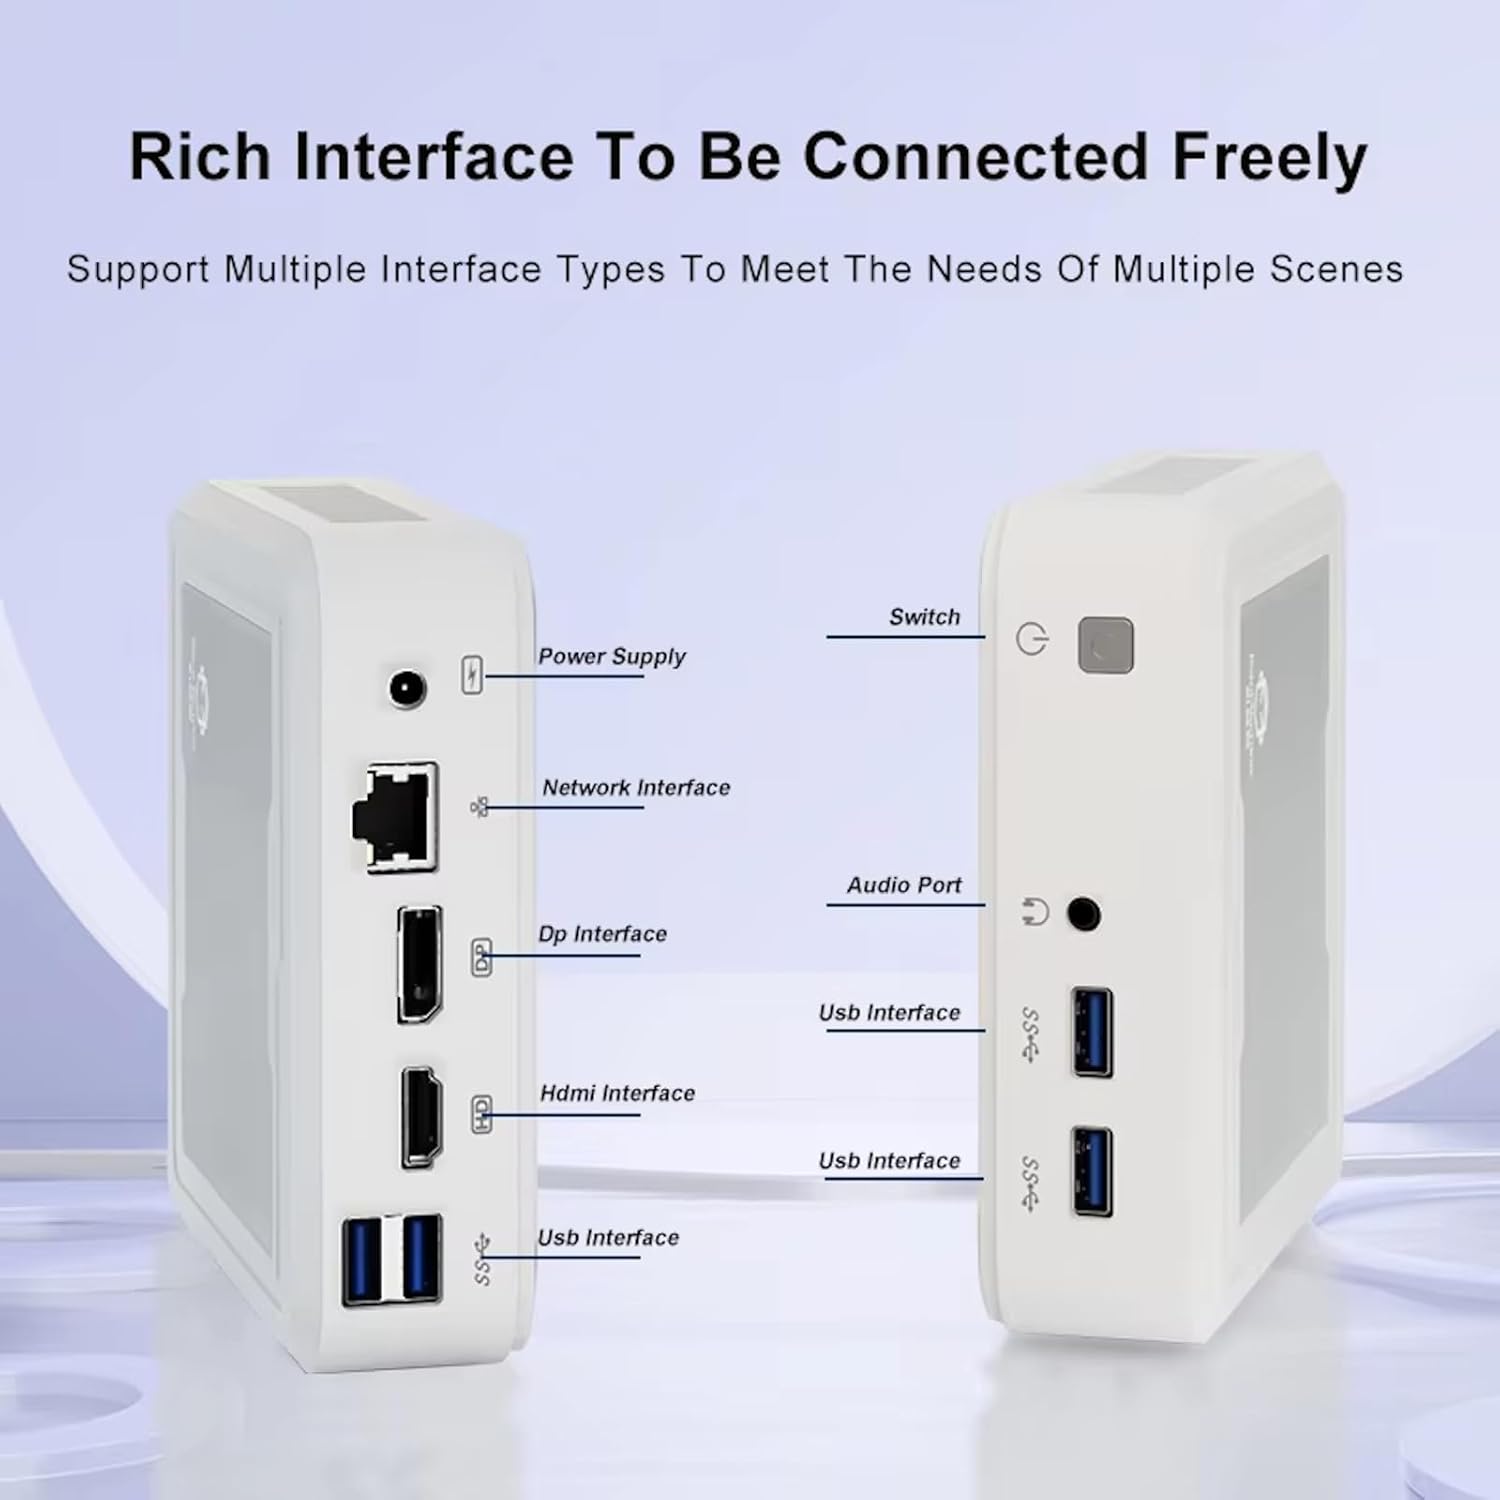
Figure 3.2: Available ports on the GenMachine Mini PC.
3.2 Dual Monitor Support
Enhance your productivity or gaming experience by connecting up to two 4K displays simultaneously using the HDMI and DisplayPort outputs.

Figure 3.3: Dual 4K display setup with the GenMachine Mini PC.
Video 3.1: Demonstration of the GenMachine Mini PC supporting two monitors simultaneously.
3.3 Energy Efficiency and Quiet Operation
Designed for low noise operation, the Mini PC maintains a quiet environment, making it suitable for various settings.

Figure 3.4: Noise level comparison of the GenMachine Mini PC.
3.4 Compact and Durable Design
The Mini PC features an ultra-durable, lightweight metal casing, making it space-saving and robust for any work environment.
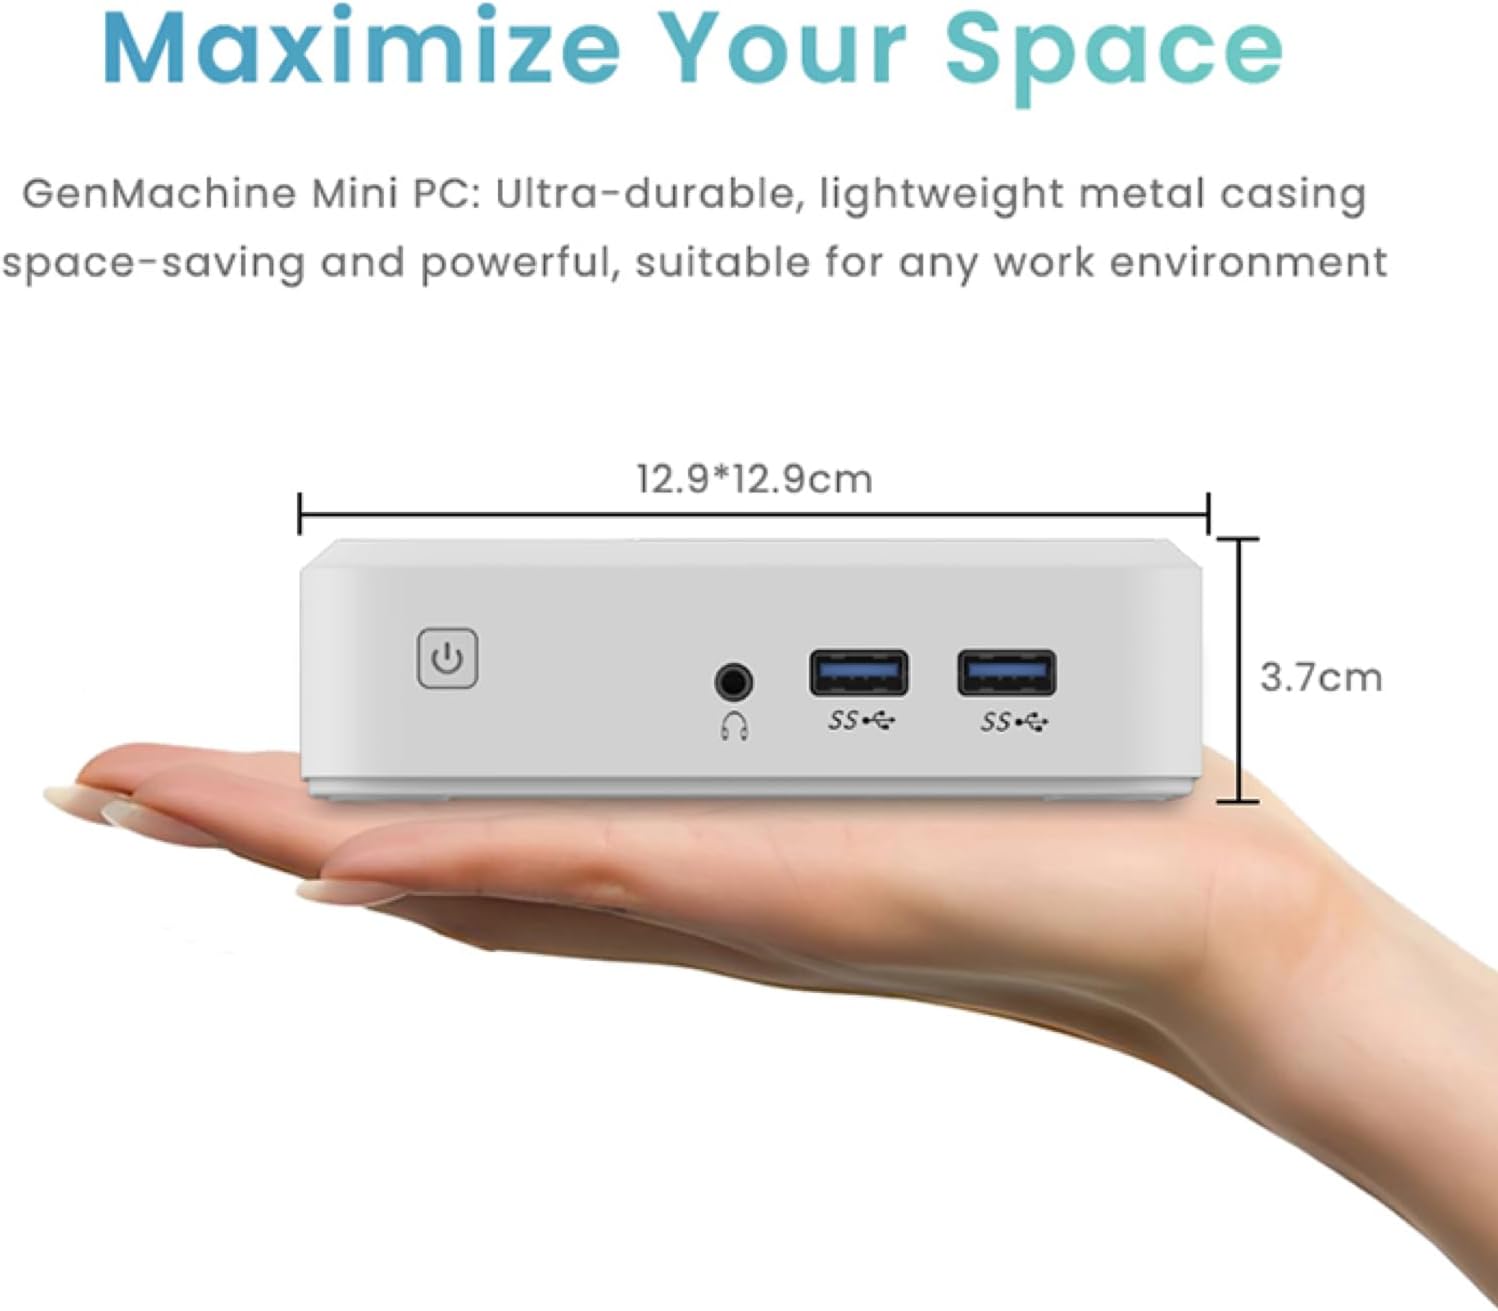
Figure 3.5: Compact size of the GenMachine Mini PC.
വീഡിയോ 3.2: കഴിഞ്ഞുview of the GenMachine Mini PC's features and compact design.
4. സജ്ജീകരണ ഗൈഡ്
Follow these steps to set up your GenMachine Mini PC:
- Unpack the Mini PC: പാക്കേജിംഗിൽ നിന്ന് എല്ലാ ഘടകങ്ങളും ശ്രദ്ധാപൂർവ്വം നീക്കം ചെയ്യുക.
- ഒരു ഡിസ്പ്ലേയിലേക്ക് കണക്റ്റുചെയ്യുക: Use the provided HDMI cable to connect the Mini PC to your monitor or TV. If using a DisplayPort monitor, use a compatible DP cable (not included).
- പെരിഫറലുകൾ ബന്ധിപ്പിക്കുക: നിങ്ങളുടെ കീബോർഡ്, മൗസ്, മറ്റ് ഏതെങ്കിലും യുഎസ്ബി ഉപകരണങ്ങൾ എന്നിവ ലഭ്യമായ യുഎസ്ബി 3.0 പോർട്ടുകളിലേക്ക് പ്ലഗ് ഇൻ ചെയ്യുക.
- നെറ്റ്വർക്കിലേക്ക് കണക്റ്റുചെയ്യുക (ഓപ്ഷണൽ): For a wired internet connection, connect an Ethernet cable to the LAN port. For wireless, ensure your WiFi network is available during initial setup.
- പവർ ബന്ധിപ്പിക്കുക: Plug the power adapter into the DC-in port on the Mini PC, then plug the adapter into a power outlet.
- പവർ ഓൺ: Press the power button on the front of the Mini PC. The system should boot up.
5. പ്രവർത്തന നിർദ്ദേശങ്ങൾ
5.1 പ്രാരംഭ ബൂട്ടും ഓപ്പറേറ്റിംഗ് സിസ്റ്റം സജ്ജീകരണവും
Upon first power-on, the Mini PC will guide you through the operating system setup process. Follow the on-screen prompts to configure language, region, user accounts, and network settings.
5.2 പവർ മാനേജ്മെൻ്റ്
- പവർ ഓൺ: പവർ ബട്ടൺ ഒരിക്കൽ അമർത്തുക.
- ഷട്ട് ഡൗൺ: Access the power options through the operating system's start menu and select 'Shut down'.
- പുനരാരംഭിക്കുക: Access the power options through the operating system's start menu and select 'Restart'.
- സ്ലീപ്പ് മോഡ്: Access the power options through the operating system's start menu and select 'Sleep'.
5.3 വൈഫൈയിലേക്കും ബ്ലൂടൂത്തിലേക്കും കണക്റ്റുചെയ്യുന്നു
To connect to a wireless network or Bluetooth device, use the respective settings within your operating system. The Mini PC supports WiFi 6 and Bluetooth 5.2 for fast and reliable connections.
6. പരിപാലനം
Regular maintenance helps ensure the longevity and optimal performance of your Mini PC:
- വൃത്തിയാക്കൽ: Use a soft, dry cloth to clean the exterior. For dust in vents, use compressed air. Ensure the device is powered off and unplugged before cleaning.
- വെൻ്റിലേഷൻ: Ensure the Mini PC is placed in a well-ventilated area. Do not block the air vents.
- സോഫ്റ്റ്വെയർ അപ്ഡേറ്റുകൾ: Regularly update your operating system, drivers, and applications to ensure security and performance.
- ഡാറ്റ ബാക്കപ്പ്: പ്രധാനപ്പെട്ട ഡാറ്റ ഇടയ്ക്കിടെ ഒരു ബാഹ്യ ഡ്രൈവിലേക്കോ ക്ലൗഡ് സംഭരണത്തിലേക്കോ ബാക്കപ്പ് ചെയ്യുക.
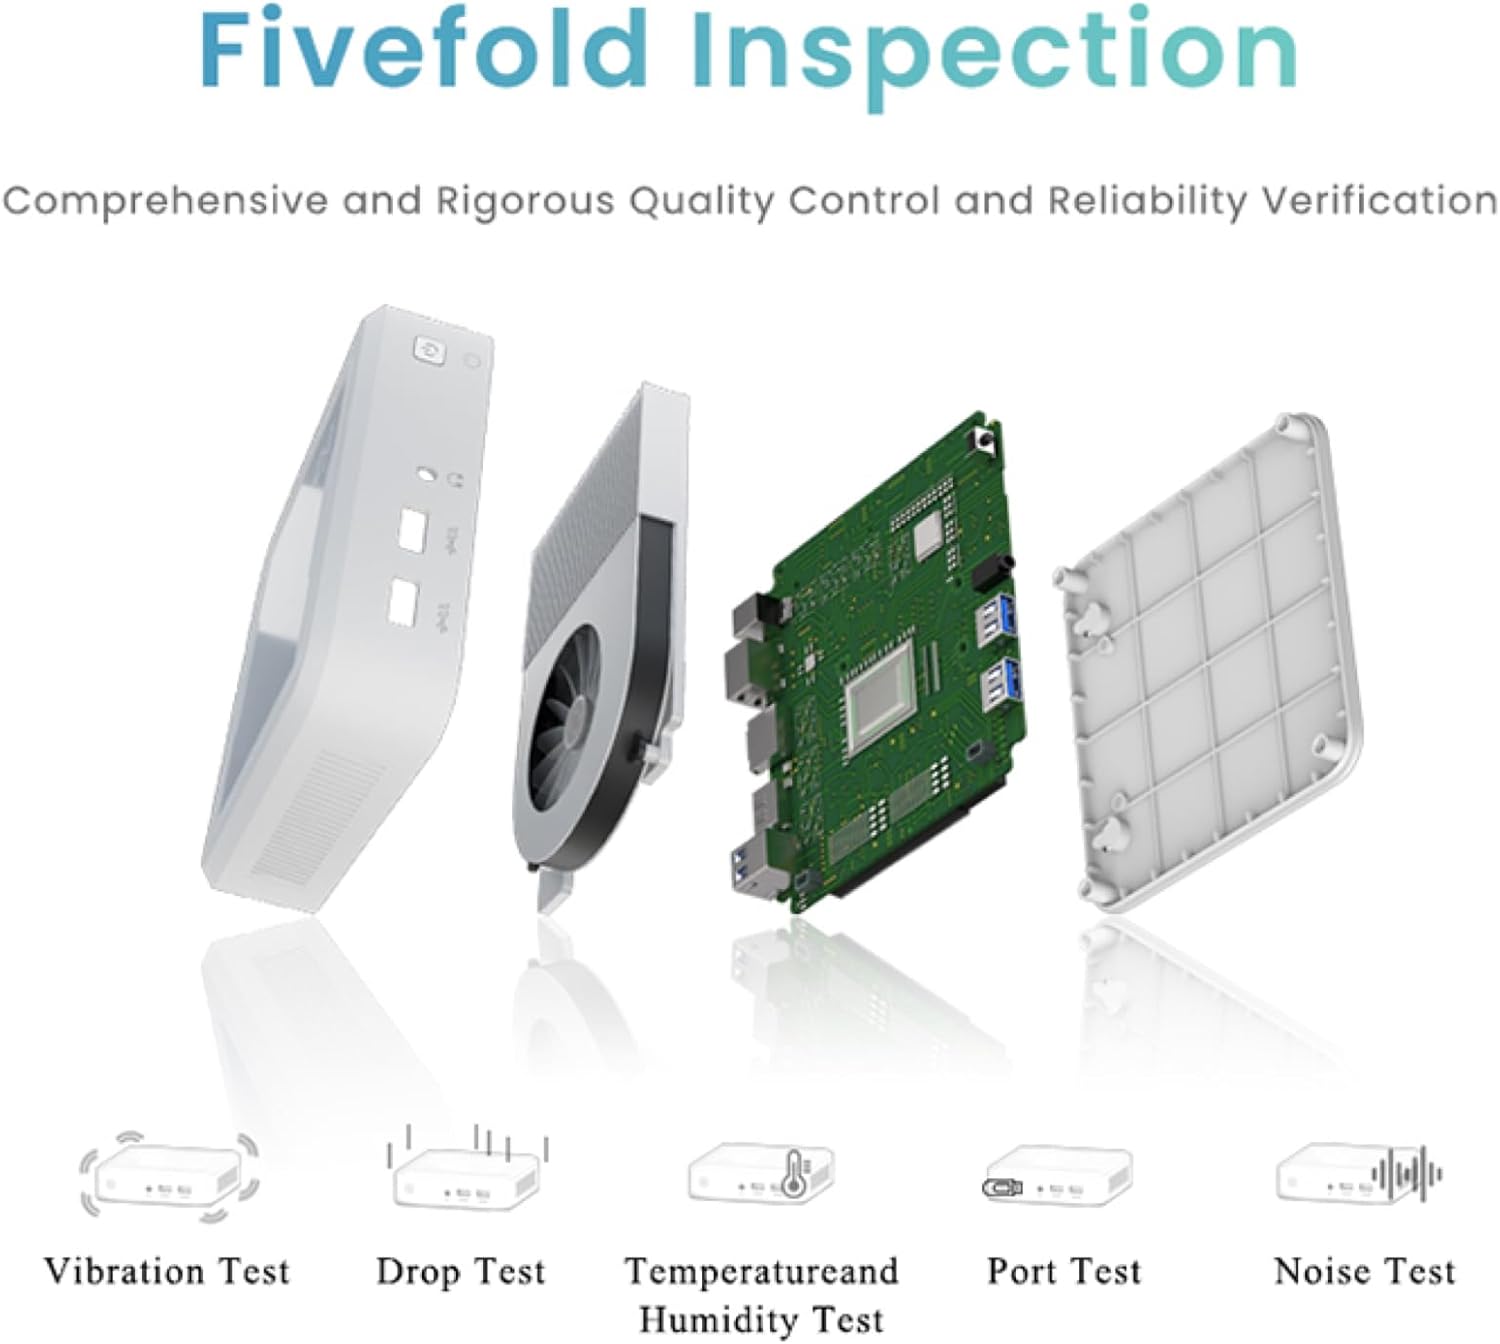
Figure 6.1: GenMachine's Fivefold Inspection process for quality control.
7. പ്രശ്നപരിഹാരം
If you encounter issues with your Mini PC, refer to the following common problems and solutions:
- ശക്തിയില്ല:
- പവർ അഡാപ്റ്റർ മിനി പിസിയിലേക്കും പ്രവർത്തിക്കുന്ന ഒരു പവർ ഔട്ട്ലെറ്റിലേക്കും സുരക്ഷിതമായി ബന്ധിപ്പിച്ചിട്ടുണ്ടെന്ന് ഉറപ്പാക്കുക.
- മറ്റൊരു പവർ ഔട്ട്ലെറ്റ് പരീക്ഷിക്കുക.
- ഡിസ്പ്ലേ ഇല്ല:
- Verify that the HDMI or DisplayPort cable is securely connected to both the Mini PC and the monitor.
- മോണിറ്റർ ഓണാക്കിയിട്ടുണ്ടെന്നും ശരിയായ ഇൻപുട്ട് ഉറവിടത്തിലേക്ക് സജ്ജീകരിച്ചിട്ടുണ്ടെന്നും ഉറപ്പാക്കുക.
- സാധ്യമെങ്കിൽ മറ്റൊരു ഡിസ്പ്ലേ കേബിളോ മോണിറ്ററോ പരീക്ഷിക്കുക.
- System Freezes or Unresponsive:
- Perform a hard reset by holding the power button for 5-10 seconds until the device powers off, then restart.
- Ensure the operating system and drivers are up to date.
- അമിതമായി ചൂടാകുന്നുണ്ടോ എന്ന് പരിശോധിക്കുക; ശരിയായ വായുസഞ്ചാരം ഉറപ്പാക്കുക.
- Run a system diagnostic or memory test if the issue persists.
- ഇൻ്റർനെറ്റ് കണക്ഷൻ ഇല്ല:
- വയർഡ് കണക്ഷനുകൾക്ക്, ഇതർനെറ്റ് കേബിളിന്റെയും റൂട്ടറിന്റെയും നില പരിശോധിക്കുക.
- For Wi-Fi, ensure Wi-Fi is enabled in the operating system and you are connected to the correct network with the correct password.
- നിങ്ങളുടെ റൂട്ടർ/മോഡം പുനരാരംഭിക്കുക.
8 സ്പെസിഫിക്കേഷനുകൾ
| ഫീച്ചർ | സ്പെസിഫിക്കേഷൻ |
|---|---|
| പ്രോസസ്സർ | AMD Ryzen 7 3750H (4 cores, 8 threads, up to 4.0GHz) |
| റാം | 8GB DDR4 |
| സംഭരണം | 256GB SSD (with M.2 NVMe support) |
| ഗ്രാഫിക്സ് കോപ്രൊസസർ | എഎംഡി റേഡിയൻ വേഗ 10 ഗ്രാഫിക്സ് |
| പരമാവധി സ്ക്രീൻ റെസല്യൂഷൻ | 3840 x 2160 പിക്സലുകൾ (4K) |
| വയർലെസ് തരം | 802.11ac (WiFi 6), Bluetooth 5.2 |
| USB പോർട്ടുകൾ | 4 x USB 3.0 |
| വീഡിയോ ഔട്ട്പുട്ടുകൾ | HDMI, ഡിസ്പ്ലേ പോർട്ട് |
| ഓപ്പറേറ്റിംഗ് സിസ്റ്റം | OS (Pre-installed) |
| ഇനത്തിൻ്റെ ഭാരം | 2.1 പൗണ്ട് |
| ഉൽപ്പന്ന അളവുകൾ | 4.9 x 4.9 x 1.4 ഇഞ്ച് |
| നിറം | കറുപ്പ് |
9. വാറൻ്റിയും പിന്തുണയും
For warranty information and technical support, please refer to the warranty card included with your product or visit the official GenMachine webവാറന്റി ക്ലെയിമുകൾക്കുള്ള വാങ്ങലിന്റെ തെളിവായി നിങ്ങളുടെ വാങ്ങൽ രസീത് സൂക്ഷിക്കുക.
If you require further assistance, please contact GenMachine customer support through the channels provided on their official webസൈറ്റ്.


