Pretul SOIN-101MP Mini Inverter Welder User Manual
Model: SOIN-101MP (29961)
1. ആമുഖം
Thank you for choosing the Pretul SOIN-101MP Mini Inverter Welder. This compact and lightweight welding machine is designed for shielded metal arc welding (SMAW) processes, offering higher efficiency and lower power consumption compared to conventional welders. This manual provides essential information for the safe and effective operation, maintenance, and troubleshooting of your new welder.
Please read this manual thoroughly before operating the machine and keep it for future reference.
2 സുരക്ഷാ വിവരങ്ങൾ
മുന്നറിയിപ്പ്: വെൽഡിംഗ് അപകടകരമാണ്. ഗുരുതരമായ പരിക്കുകളോ മരണമോ തടയാൻ എല്ലായ്പ്പോഴും സുരക്ഷാ മുൻകരുതലുകൾ പാലിക്കുക.
- Always wear appropriate personal protective equipment (PPE), including a welding helmet with proper shade, welding gloves, protective clothing, and safety shoes.
- വെൽഡിംഗ് പുക ശ്വസിക്കുന്നത് ഒഴിവാക്കാൻ ജോലിസ്ഥലത്ത് മതിയായ വായുസഞ്ചാരം ഉറപ്പാക്കുക.
- Protect yourself and others from electric shock. Do not touch live electrical parts. Ensure the machine is properly grounded.
- Be aware of fire and explosion hazards. Remove all flammable materials from the welding area. Have a fire extinguisher readily available.
- ആർക്ക് രശ്മികൾ കണ്ണുകളും ചർമ്മവും പൊള്ളിച്ചേക്കാം. ശരിയായ കണ്ണ്, മുഖം സംരക്ഷണം ഉപയോഗിക്കുക.
- നനഞ്ഞ സാഹചര്യങ്ങളിലോ വെള്ളത്തിനടുത്തോ വെൽഡർ പ്രവർത്തിപ്പിക്കരുത്.
- ഏതെങ്കിലും അറ്റകുറ്റപ്പണികൾ അല്ലെങ്കിൽ ക്രമീകരണങ്ങൾ നടത്തുന്നതിന് മുമ്പ് വൈദ്യുതി വിച്ഛേദിക്കുക.
3. പാക്കേജ് ഉള്ളടക്കം
താഴെ ലിസ്റ്റ് ചെയ്തിരിക്കുന്ന എല്ലാ ഇനങ്ങളും നിങ്ങളുടെ പാക്കേജിൽ ഉൾപ്പെടുത്തിയിട്ടുണ്ടെന്ന് ഉറപ്പാക്കുക:
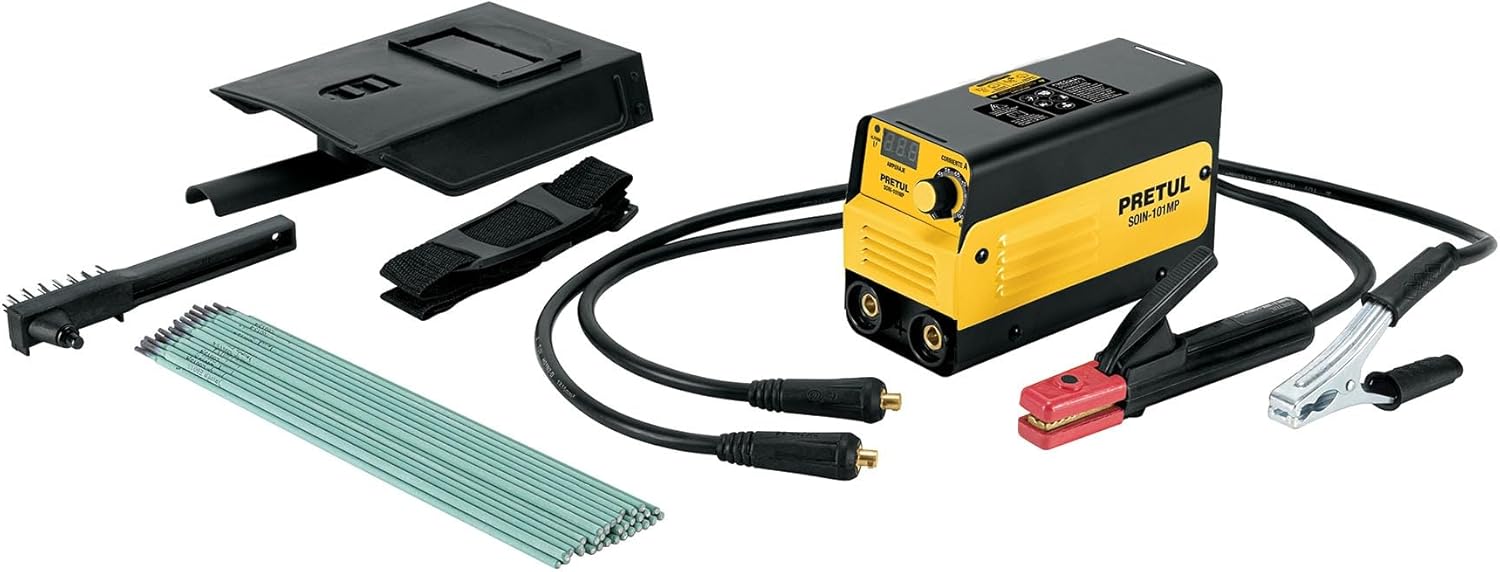
Image: The Pretul SOIN-101MP Mini Inverter Welder shown with all its included accessories: the welding machine, electrode holder cable, ground clamp cable, shoulder strap, protective welding mask, wire brush, power cable with plug, and a pack of welding electrodes.
- 1 x Pretul SOIN-101MP Mini Inverter Welder
- 1 x Electrode Holder Cable (2 m, #7 AWG / 10 mm²)
- 1 x ഗ്രൗണ്ട് Clamp Cable (2 m, #7 AWG / 10 mm²)
- 1 x ഷോൾഡർ സ്ട്രാപ്പ്
- 1 x Protective Welding Mask
- 1 x Wire Brush
- 1 x Power Cable with Plug
- 1 x 1 kg pack of 1/8" E6013-4 Electrodes

Image: A visual list of included accessories, detailing the ground clamp cable, electrode holder cable, strap, protective mask, wire brush, power cable, and electrodes.
4. ഉൽപ്പന്നം കഴിഞ്ഞുview
Familiarize yourself with the main components of your Pretul SOIN-101MP welder:

ചിത്രം: വിശദമായ ഒരു ചിത്രം view of the welder, highlighting key components such as the electronic current adjustment control, power cable input, on/off switch, and quick-change terminals.
- Electronic Control for Current Adjustment: Digital display and knob for precise amperage ക്രമീകരണം.
- പവർ കേബിൾ ഇൻപുട്ട്: Connection point for the main power supply.
- ഓൺ/ഓഫ് സ്വിച്ച്: യൂണിറ്റിനുള്ള പ്രധാന പവർ നിയന്ത്രണം.
- Quick-Change Terminals (Bornes): 3/8" terminals for connecting the electrode holder and ground clamp കേബിളുകൾ.
- കൂളിംഗ് ഫാൻ: Located internally to prevent overheating.
5. സജ്ജീകരണം
- പ്ലേസ്മെൻ്റ്: വെൽഡർ കത്തുന്ന വസ്തുക്കളിൽ നിന്ന് അകലെ, നന്നായി വായുസഞ്ചാരമുള്ള സ്ഥലത്ത് സ്ഥിരതയുള്ളതും നിരപ്പായതുമായ ഒരു പ്രതലത്തിൽ സ്ഥാപിക്കുക. വായു സഞ്ചാരത്തിനായി യൂണിറ്റിന് ചുറ്റും മതിയായ ഇടമുണ്ടെന്ന് ഉറപ്പാക്കുക.
- ഗ്രൗണ്ട് Cl ബന്ധിപ്പിക്കുകamp: ഗ്രൗണ്ട് cl കണക്ട് ചെയ്യുകamp cable to the appropriate quick-change terminal on the welder. Securely attach the ground clamp വെൽഡിംഗ് ടേബിളിന്റെ വർക്ക്പീസിലേക്കോ വൃത്തിയുള്ളതും നഗ്നവുമായ ഒരു ലോഹ ഭാഗത്തേക്കോ ഘടിപ്പിക്കുക, നല്ല വൈദ്യുത സമ്പർക്കം ഉറപ്പാക്കുന്നു.
- Connect Electrode Holder: Connect the electrode holder cable to the other quick-change terminal on the welder. Insert the desired electrode into the electrode holder.
- പവർ കണക്ഷൻ: Ensure the welder's ON/OFF switch is in the "OFF" position. Plug the power cable into a grounded 127 V, 1-phase power outlet.
- വ്യക്തിഗത സംരക്ഷണ ഉപകരണങ്ങൾ (PPE): Before turning on the welder, put on all necessary PPE, including your welding helmet, gloves, and protective clothing.
6. പ്രവർത്തന നിർദ്ദേശങ്ങൾ
- ഓൺ ചെയ്യുക: Flip the ON/OFF switch to the "ON" position. The digital display will illuminate.
- കറന്റ് ക്രമീകരിക്കുക: Use the current adjustment knob to set the desired amperage. The digital display will show the selected current. Refer to the electrode manufacturer's recommendations for appropriate current settings.
- ഇലക്ട്രോഡ് തിരഞ്ഞെടുക്കൽ: This welder is designed for shielded metal arc welding (SMAW) and is compatible with the following electrode types:
- 6013 (Up to 1/8")
- 6011 (Up to 1/8")
- 7018 (Up to 3/32")

Image: A chart illustrating compatible electrode types (6013, 6011, 7018) and their recommended sizes for 1-phase operation with the SMAW process. It also indicates N/A for TIG tungsten.
- വെൽഡിംഗ് ആരംഭിക്കുക: With the electrode in the holder and the ground clamp attached, strike an arc on the workpiece. Maintain a consistent arc length and travel speed for optimal weld quality.
- പോസ്റ്റ്-വെൽഡിങ്ങ്: After completing the weld, turn off the welder. Allow the machine to cool down before storing. Clean the workpiece and remove any slag.
7. പരിപാലനം
പതിവ് അറ്റകുറ്റപ്പണികൾ നിങ്ങളുടെ വെൽഡറുടെ ദീർഘായുസ്സും ഒപ്റ്റിമൽ പ്രകടനവും ഉറപ്പാക്കുന്നു.
- വൃത്തിയാക്കൽ: Periodically clean the exterior of the welder with a dry, soft cloth. Use compressed air to blow out dust and debris from the ventilation openings. Ensure the machine is unplugged before cleaning.
- കേബിൾ പരിശോധന: Regularly inspect all cables (power, electrode, ground) for cuts, fraying, or damaged insulation. Replace any damaged cables immediately.
- ടെർമിനൽ പരിശോധന: Ensure the quick-change terminals are clean and free of corrosion. Tighten connections as needed.
- സംഭരണം: വെൽഡർ വരണ്ടതും വൃത്തിയുള്ളതുമായ അന്തരീക്ഷത്തിൽ സൂക്ഷിക്കുക, നേരിട്ടുള്ള സൂര്യപ്രകാശത്തിൽ നിന്നും കടുത്ത താപനിലയിൽ നിന്നും അകറ്റി നിർത്തുക.
8. പ്രശ്നപരിഹാരം
| പ്രശ്നം | സാധ്യമായ കാരണം | പരിഹാരം |
|---|---|---|
| Welder does not turn on. | No power supply; faulty power cable; internal fault. | Check power outlet and circuit breaker. Inspect power cable. If problem persists, contact support. |
| ആർക്ക് അല്ലെങ്കിൽ ദുർബല ആർക്ക് ഇല്ല. | Poor ground connection; incorrect current setting; damp or incorrect electrode; internal issue. | ഗ്രൗണ്ട് ക്ലീനിംഗ് ഉറപ്പാക്കുകamp has good contact. Adjust current. Use dry, appropriate electrodes. |
| Welder overheats and shuts off. | Exceeded duty cycle; blocked ventilation; high ambient temperature. | Allow welder to cool down. Ensure clear ventilation. Reduce welding time or current. |
| Electrode sticks frequently. | Low current setting; improper arc length; damp ഇലക്ട്രോഡ്. | Increase current. Maintain proper arc length. Use dry electrodes. The Anti-Stick feature helps prevent this. |
9 സ്പെസിഫിക്കേഷനുകൾ

Image: The Pretul SOIN-101MP welder with dimensions indicated: 18 cm height, 25 cm depth, and 10 cm base width.
| ഫീച്ചർ | വിശദാംശങ്ങൾ |
|---|---|
| മോഡൽ നമ്പർ | SOIN-101MP (29961) |
| ഇൻപുട്ട് വോളിയംtage | 1 Phase (127 V) |
| നിലവിലെ ശ്രേണി | 20A DC - 100A DC |
| ഡ്യൂട്ടി സൈക്കിൾ | 60% (at 100A) |
| Electrode Compatibility | 6013, 6011 (up to 1/8"), 7018 (up to 3/32") |
| Quick-Change Terminals | 3/8" |
| അളവുകൾ (L x W x H) | 25 cm x 10 cm x 18 cm (approx. 33 x 27 x 20.7 cm package) |
| ഭാരം | 4.8 കിലോ (പാക്കേജ് ഭാരം) |
| പവർ ഉറവിടം | എസി/ഡിസി |
സാങ്കേതിക സവിശേഷതകൾ:

Image: A list of technical features including IGBT Inverter, Thermal Protect, Arc Force, Anti Stick, Hot Start, and Lift TIG, with brief descriptions.
- IGBT Inverter Technology: Allows operation at any current level, providing stable and efficient welding.
- Thermal Protect: Thermal protection against overload, automatically shutting down the unit to prevent damage.
- ആർക്ക് ഫോഴ്സ്: Adjusts the optimal arc value and allows welding in different positions.
- Anti Stick: Prevents overheating and sticking of the electrode to the workpiece.
- ചർച്ചാവിഷയം: Facilitates arc ignition, making it easier to start welding.
- ലിഫ്റ്റ് TIG: Facilitates arc ignition with the TIG process (Note: This model is primarily for SMAW, TIG functionality may require additional accessories not included).
10. വാറൻ്റിയും പിന്തുണയും
For warranty information and technical support, please refer to the documentation included with your product or contact Pretul customer service directly. Keep your purchase receipt as proof of purchase for warranty claims.
For further assistance, you may visit the official Pretul brand store on Amazon: Pretul Store