1. ആമുഖവും അവസാനവുംview
This manual provides essential information for the safe and effective operation, maintenance, and troubleshooting of your OMTech 100W CO2 Laser Engraver. This industrial-grade laser cutter features a 24"x40" work area, autofocus, autolift, 2-way pass-through, air assist, and a water pump for precision cutting and engraving on various materials including wood, glass, and acrylic.

ചിത്രം: OMTech 100W CO2 ലേസർ എൻഗ്രേവർ, showcasing its robust design and the variety of materials it can process, including a tumbler, ornaments, wooden structures, and a '100W' cutout.

Image: The OMTech 100W CO2 Laser Engraver positioned in a professional workshop environment, highlighting its integration into a creative workspace.
2 സുരക്ഷാ വിവരങ്ങൾ
Operating a CO2 laser engraver requires strict adherence to safety protocols to prevent injury and damage. Always prioritize safety.
2.1. പൊതു സുരക്ഷാ മുൻകരുതലുകൾ
- നേത്ര സംരക്ഷണം: Always wear certified laser safety glasses specifically designed for CO2 laser wavelengths (10600nm) when the laser is in operation or when the laser path is exposed.
- വെൻ്റിലേഷൻ: Ensure adequate ventilation to remove fumes and particulate matter generated during engraving and cutting. Connect a proper fume extraction system.
- അഗ്നി സുരക്ഷ: Keep a fire extinguisher (CO2 or ABC type) readily available. Never leave the machine unattended during operation. Be aware that certain materials are highly flammable.
- മെറ്റീരിയൽ അനുയോജ്യത: Only engrave or cut materials known to be safe for CO2 lasers. Avoid materials that produce toxic fumes (e.g., PVC) or are highly reflective.
- അടിയന്തരമായി നിർത്തുക: Familiarize yourself with the location and function of the emergency stop button. Use it immediately in case of any malfunction or emergency.
2.2. വൈദ്യുത സുരക്ഷ
- മെഷീൻ ശരിയായി നിലത്തുണ്ടെന്ന് ഉറപ്പാക്കുക.
- നനഞ്ഞ കൈകൾ കൊണ്ടോ അല്ലെങ്കിൽ വെള്ളം കെട്ടിയിരിക്കുന്ന അവസ്ഥയിലോ മെഷീൻ പ്രവർത്തിപ്പിക്കരുത്.amp വ്യവസ്ഥകൾ.
- Verify power requirements match your electrical supply.

ചിത്രം: ഒരു ക്ലോസ്-അപ്പ് view of the laser engraver's flame-resistant window, demonstrating safe observation of the engraving process.
3. സജ്ജീകരണം
Proper setup is crucial for the optimal performance and longevity of your laser engraver.
3.1. പായ്ക്ക് ചെയ്യലും പ്ലേസ്മെന്റും
- Carefully unpack the machine and all accessories. Due to its weight (573 lbs), ensure you have adequate assistance and equipment for safe handling.
- Place the engraver on a stable, level surface capable of supporting its weight. Ensure sufficient clearance around the machine for ventilation and access.
3.2. പെരിഫറലുകൾ ബന്ധിപ്പിക്കുന്നു
- വാട്ടർ കൂളിംഗ് സിസ്റ്റം: Connect the provided water pump or an external chiller (recommended for prolonged use) to the laser tube's inlet and outlet ports. Ensure the system is filled with distilled water and free of air bubbles.
- എയർ അസിസ്റ്റ്: Connect the air assist pump to the designated port on the laser head. This helps prevent flare-ups and keeps the lens clean.
- എക്സ്ഹോസ്റ്റ് സിസ്റ്റം: Connect the exhaust fan and ducting to the machine's exhaust port and vent it outdoors or to a suitable filtration system.
- പവർ കണക്ഷൻ: Connect the power cable to a grounded outlet with the correct voltage.

Image: A visual representation of optional accessories that can expand the engraver's capabilities, including a rotary axis for cylindrical objects, a CW-5200 industrial chiller, and an XL-300 fume extractor.
3.3. സോഫ്റ്റ്വെയർ ഇൻസ്റ്റാളേഷനും കണക്ഷനും
- Install the EzCad2 software (compatible with Windows XP, Vista, 7, 8, and 10, 32-bit and 64-bit editions) or other compatible software like LightBurn, CorelDRAW, or AutoCAD.
- Connect the engraver to your computer via USB cable, Ethernet cable, or use a USB flash drive for offline operation.
4. പ്രവർത്തന നിർദ്ദേശങ്ങൾ
Follow these steps for safe and efficient operation of your OMTech laser engraver.
4.1. Powering On and Initial Checks
- Ensure all connections (power, water, air, exhaust) are secure.
- Turn on the water cooling system first, then the laser engraver.
- Verify the laser tube temperature is within the safe operating range.
4.2. Loading Materials
- Place your material securely on either the honeycomb bed or the aluminum blade bed, depending on your application. The machine features dual beds for versatility.
- For larger items, utilize the two-way pass-through doors (42.9"x1.9" opening) to extend your working area beyond the 24"x40" bed.

Image: A diagram illustrating the dual engraving beds: a honeycomb bed for smaller items and an aluminum blade bed for larger or through-cut materials, both within the 24"x40" work area.

Image: The laser engraver demonstrating its two-way pass-through capability, allowing longer materials to be processed by extending beyond the workbed.
4.3. ലേസർ ഫോക്കസ് ചെയ്യൽ
- The machine features an automatic focusing system. Simply press the autofocus button, and the laser head will automatically adjust to the correct focal distance for your material.
- The workbed can also be adjusted up and down via controls on the machine.

ചിത്രം: വിശദമായ ഒരു ചിത്രം view of the laser head's autofocus mechanism, showing how it precisely determines the optimal focal distance on the material surface.
4.4. Using the Ruida Control Panel and Software
- Import your design into the software (e.g., EzCad2, LightBurn).
- Set the appropriate laser power, speed (up to 600 mm/s), and other parameters based on your material and desired outcome.
- Use the Ruida control panel to navigate menus, set origin points, frame your design, and start/pause jobs.
- The included footpad trigger can be used for batch work to streamline the process.
- For engraving cylindrical objects, a rotary axis attachment (not included) can be connected via the plug-and-play 4-pin connection port.

Image: The Ruida control panel, central to operating the laser engraver, shown alongside logos of compatible software such as LightBurn, CorelDRAW, and AutoCAD.

Image: An infographic demonstrating the significant productivity gains (up to 250-300%) achievable with the engraver's maximum speed of 600 mm/s, comparing engraving times for various materials and designs.
5. പരിപാലനം
പതിവ് അറ്റകുറ്റപ്പണികൾ നിങ്ങളുടെ ലേസർ എൻഗ്രേവറിന്റെ ദീർഘായുസ്സും മികച്ച പ്രകടനവും ഉറപ്പാക്കുന്നു.
5.1. Laser Tube and Optics
- ലേസർ ട്യൂബ്: The high-performance Yongli H4 laser tube offers a lifespan of up to 12,000 hours. Ensure proper cooling to maximize its life.
- Cleaning Lenses and Mirrors: Regularly inspect and clean the laser lens and mirrors using specialized optical cleaning solutions and wipes. Dust and debris can significantly reduce laser power and quality.

Image: A cutaway diagram illustrating the internal structure of a high-performance Yongli H4 laser tube, highlighting its design for extended lifespan and efficient laser beam generation.
5.2. തണുപ്പിക്കൽ സംവിധാനം
- Regularly check the water level and quality in your cooling system. Replace distilled water periodically to prevent algae growth and mineral buildup.
- Clean the chiller's radiator and fan to ensure efficient heat dissipation.
5.3. Air Assist and Exhaust Systems
- Clean the air assist nozzle regularly to ensure a clear path for airflow.
- Inspect and clean the exhaust fan and ducting to maintain effective fume extraction.
5.4 ജനറൽ ക്ലീനിംഗ്
- Keep the workbed clean from debris and residue.
- മെഷീനിന്റെ പുറംഭാഗം മൃദുവായ, ഡി-ടച്ച് ഉപയോഗിച്ച് തുടയ്ക്കുക.amp തുണി.
6. പ്രശ്നപരിഹാരം
നിങ്ങളുടെ ലേസർ എൻഗ്രേവറിൽ നിങ്ങൾ നേരിട്ടേക്കാവുന്ന സാധാരണ പ്രശ്നങ്ങളെ ഈ വിഭാഗം അഭിസംബോധന ചെയ്യുന്നു.
6.1. പൊതുവായ പ്രശ്നങ്ങളും പരിഹാരങ്ങളും
| പ്രശ്നം | സാധ്യമായ കാരണം | പരിഹാരം |
|---|---|---|
| ലേസർ വെടിവയ്ക്കുന്നില്ല | Water cooling error, power supply issue, laser tube failure, software settings. | Check water flow and temperature. Verify power connections. Inspect laser tube for damage. Review software settings for laser output. |
| മോശം കൊത്തുപണി/മുറിക്കൽ നിലവാരം | തെറ്റായ ഫോക്കസ്, വൃത്തികെട്ട ഒപ്റ്റിക്സ്, തെറ്റായ പവർ/സ്പീഡ് ക്രമീകരണങ്ങൾ, മെറ്റീരിയൽ പ്രശ്നങ്ങൾ. | Perform autofocus. Clean lenses and mirrors. Adjust power and speed settings. Ensure material is flat and suitable. |
| മെഷീൻ പ്രതികരിക്കുന്നില്ല | Software communication error, emergency stop engaged, loose cables. | Restart software and machine. Check USB/Ethernet connections. Disengage emergency stop if pressed. |
| Overheating laser tube | Insufficient cooling, high ambient temperature, clogged chiller. | Ensure water flow is adequate. Clean chiller radiator. Consider a more powerful chiller if operating in hot environments. |
6.2. When to Contact Support
If you encounter issues that cannot be resolved using the troubleshooting steps above, please contact OMTech customer service. Provide your model number (RYGEL-USB1006US) and a detailed description of the problem.
7 സ്പെസിഫിക്കേഷനുകൾ
Key technical specifications for the OMTech 100W CO2 Laser Engraver:
- മോഡൽ നമ്പർ: റൈഗൽ-USB1006US
- ലേസർ പവർ: 100W CO2
- ലേസർ ട്യൂബ് ആയുസ്സ്: 12,000 മണിക്കൂർ വരെ (യോങ്ലി H4 ട്യൂബ്)
- ജോലി ഏരിയ: 24" x 40" (609.6 മില്ലീമീറ്റർ x 1016 മില്ലീമീറ്റർ)
- പരമാവധി കൊത്തുപണി വേഗത: 600 മിമി/സെ
- Machine Dimensions (L x W x H): 63" x 48.8" x 39.4" (160 സെ.മീ x 123.9 സെ.മീ x 100 സെ.മീ)
- ഇനത്തിൻ്റെ ഭാരം: 573 പൗണ്ട് (259.9 കി.ഗ്രാം)
- ഫ്രണ്ട്/ബാക്ക് പാസ് വലുപ്പം: 42.9" x 1.9" (108.9 സെ.മീ x 4.8 സെ.മീ)
- ഡാറ്റ ട്രാൻസ്മിഷൻ: യുഎസ്ബി കേബിൾ, ഇതർനെറ്റ് കേബിൾ, യുഎസ്ബി ഫ്ലാഷ് ഡ്രൈവ്, ഓഫ്ലൈൻ
- അനുയോജ്യമായ സോഫ്റ്റ്വെയർ: EzCad2, LightBurn, CorelDRAW, AutoCAD
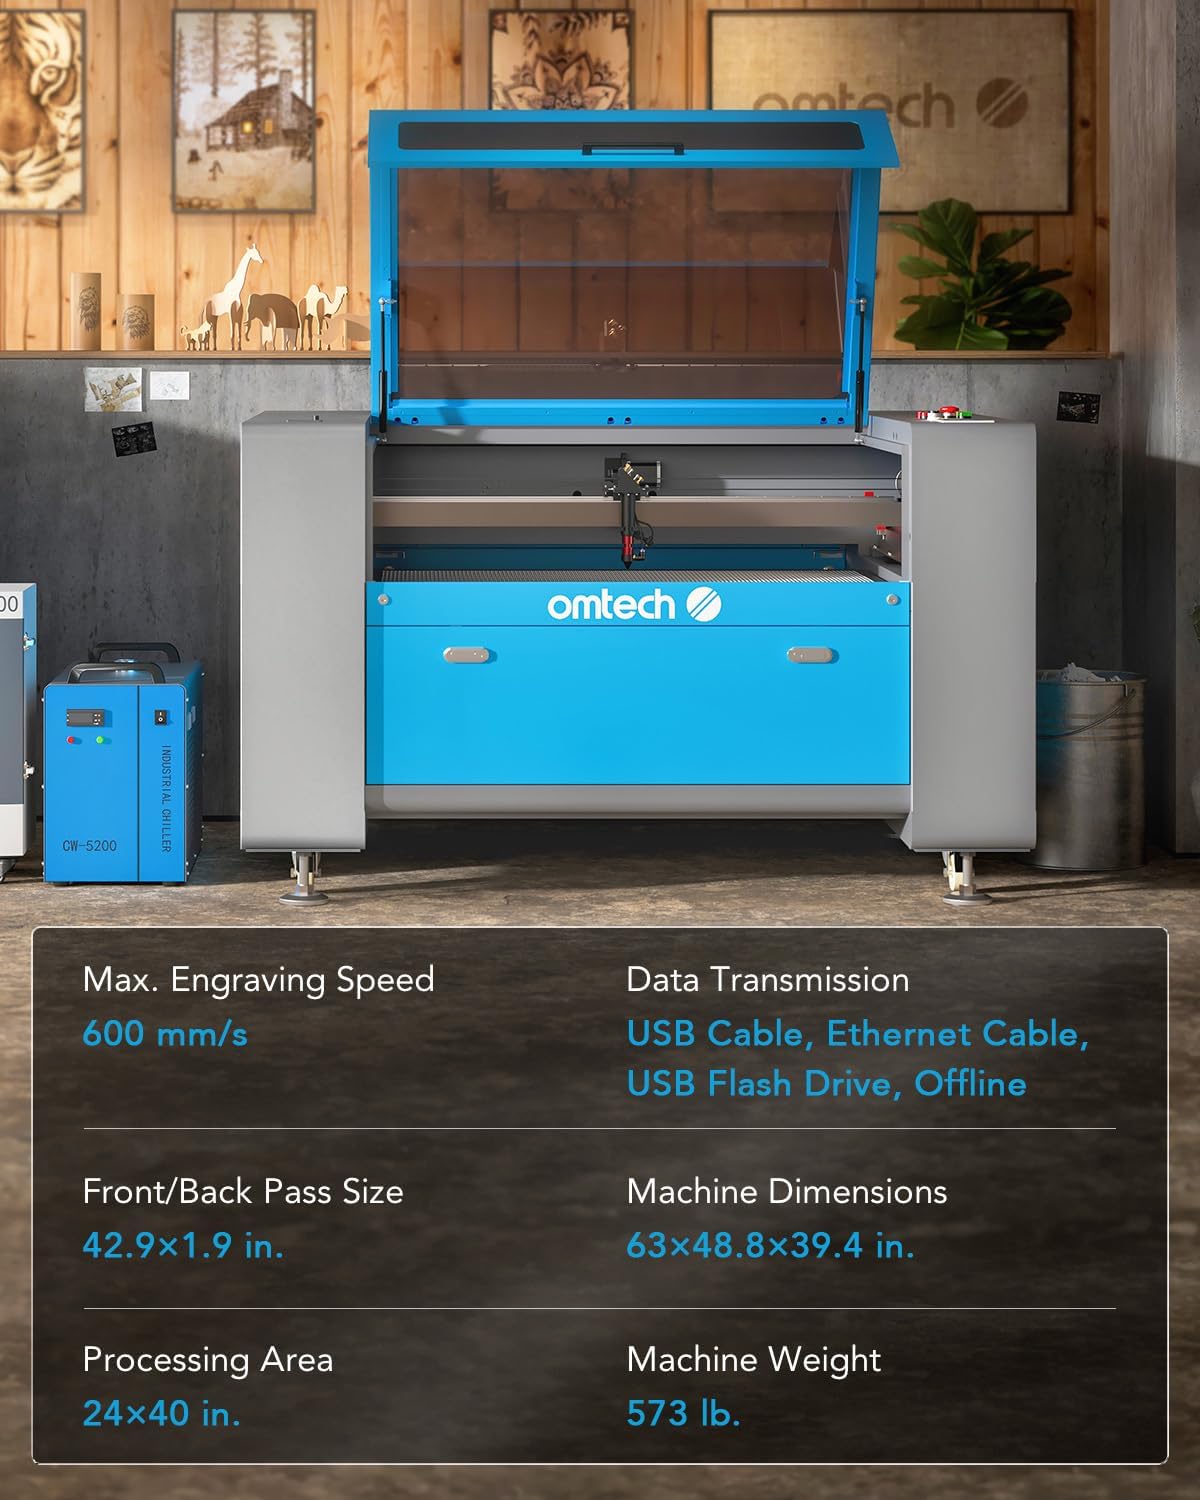
Image: A visual summary of the OMTech 100W CO2 Laser Engraver's key specifications, including maximum engraving speed, work area, machine dimensions, and weight.
8. വാറൻ്റിയും പിന്തുണയും
നിങ്ങളുടെ ലേസർ എൻഗ്രേവറിന് മികച്ച ഉപഭോക്തൃ സേവനവും പിന്തുണയും നൽകുന്നതിന് OMTech പ്രതിജ്ഞാബദ്ധമാണ്.
- വാറൻ്റി: Your OMTech 100W CO2 Laser Engraver comes with a 2-year warranty. Please refer to your purchase documentation for full warranty terms and conditions.
- കസ്റ്റമർ സർവീസ്: OMTech has a 24-hour service team available in the U.S., the Philippines, and China to assist you with any inquiries.
- സാങ്കേതിക സഹായം: Comprehensive and professional technical support is available for pre-sales and after-sales assistance.
- On-Site Experience: Over 60 demo room hosts are available in the U.S. for on-site experience by appointment, with the number continuously increasing.


