ആമുഖം
Thank you for choosing the Vividia CXM-4010 Flexible Joystick Articulation Video Borescope. This device is designed for detailed visual inspection in hard-to-reach areas, featuring a flexible probe with joystick-controlled articulation and a high-resolution camera. This manual provides essential information for the safe and effective operation, maintenance, and troubleshooting of your borescope.
ഉൽപ്പന്നം ഉപയോഗിക്കുന്നതിന് മുമ്പ് ദയവായി ഈ മാനുവൽ നന്നായി വായിക്കുകയും ഭാവി റഫറൻസിനായി സൂക്ഷിക്കുകയും ചെയ്യുക.
സുരക്ഷാ വിവരങ്ങൾ
ഉപകരണത്തിന് പരിക്കേൽക്കുകയോ കേടുപാടുകൾ സംഭവിക്കുകയോ ചെയ്യാതിരിക്കാൻ ഇനിപ്പറയുന്ന സുരക്ഷാ മുൻകരുതലുകൾ എപ്പോഴും പാലിക്കുക:
- Do not immerse the main unit (monitor and handle) in water. Only the probe is waterproof (IP67 rated).
- Avoid bending the flexible probe beyond its natural articulation limits.
- Do not use the device in environments with explosive gases or liquids.
- ശക്തമായ കാന്തിക മണ്ഡലങ്ങളിൽ നിന്ന് ഉപകരണം അകറ്റി നിർത്തുക.
- നിർദ്ദിഷ്ട ചാർജിംഗ് അഡാപ്റ്റർ മാത്രം ഉപയോഗിക്കുക.
- ഉപയോഗത്തിലില്ലാത്തപ്പോൾ തണുത്തതും ഉണങ്ങിയതുമായ സ്ഥലത്ത് ഉപകരണം സൂക്ഷിക്കുക.
പാക്കേജ് ഉള്ളടക്കം
പാക്കേജിൽ എല്ലാ ഇനങ്ങളും ഉണ്ടെന്ന് ഉറപ്പാക്കുക:
- Vividia CXM-4010 Borescope Main Unit (with 4.5" LCD Monitor)
- Flexible Articulating Probe (4mm camera head diameter, 1 meter length)
- യുഎസ്ബി ചാർജിംഗ് കേബിൾ
- ഉപയോക്തൃ മാനുവൽ (ഈ പ്രമാണം)
- MicroSD Card (pre-installed or included separately)
ഉൽപ്പന്നം കഴിഞ്ഞുview

Figure 1: Labeled diagram of the Vividia CXM-4010 Borescope, showing the display, joystick, snapshot button, brightness control, power buttons, card slot, charge jack, insertion tube, and lock button.
The Vividia CXM-4010 consists of a main handle unit with an integrated 4.5-inch LCD monitor and a flexible probe with a camera head. Key components include:
- ഡിസ്പ്ലേ: 4.5-inch LCD for viewing live feed and recorded media.
- ജോയ്സ്റ്റിക്ക്: Controls the 360-degree articulation of the camera head.
- സ്നാപ്പ്ഷോട്ട് ബട്ടൺ: നിശ്ചല ചിത്രങ്ങൾ പകർത്തുന്നു.
- തെളിച്ച നിയന്ത്രണം: Adjusts the intensity of the LED lights on the camera head.
- പവർ ഓൺ/ഓഫ് ബട്ടണുകൾ: Located on the handle and the display unit.
- കാർഡ് സ്ലോട്ട്: For inserting the microSD card.
- ചാർജ് ജാക്ക്: ഉപകരണം ചാർജ് ചെയ്യുന്നതിനുള്ള യുഎസ്ബി പോർട്ട്.
- Insertion Tube: The flexible, metal-mesh covered probe containing the camera.
- ലോക്ക് ബട്ടൺ: Locks the articulation angle of the camera head.

ചിത്രം 2: മുൻഭാഗം view of the Vividia CXM-4010 Borescope, showing the main unit with the monitor displaying an image from the probe, and the flexible probe extending from the top.

ചിത്രം 3: വശം view of the Vividia CXM-4010 Borescope, illustrating the ergonomic handle and the flexible probe's connection point.
സജ്ജമാക്കുക
1 ഉപകരണം ചാർജ് ചെയ്യുന്നു
Before first use, fully charge the borescope. Connect the USB charging cable to the charge jack on the device and to a suitable USB power adapter (not included). The charging indicator lights will show the charging status.

ചിത്രം 4: ക്ലോസപ്പ് view of the charging port and battery indicator lights located at the bottom of the borescope handle.
2. മൈക്രോ എസ്ഡി കാർഡ് ചേർക്കുന്നു
The device comes with a microSD card for storing images and videos. Locate the card slot on the side of the monitor unit. Gently insert the microSD card until it clicks into place. Ensure the card is inserted in the correct orientation.
3. Attaching the Probe
The flexible probe is typically pre-attached. If not, align the connector of the probe with the port on the main unit and secure it firmly.
പ്രവർത്തന നിർദ്ദേശങ്ങൾ
1. പവർ ഓൺ/ഓഫ്
Press and hold the Power ON/OFF button on the handle or the display unit for a few seconds to turn the device on. The LCD monitor will illuminate. To turn off, press and hold the same button until the display shuts down.
2. Adjusting Camera Articulation
Use the joystick located on the main unit to control the direction of the camera head. Moving the joystick will articulate the camera head 360 degrees, allowing for precise viewing angles. To lock the camera head at a specific angle, press the lock button.
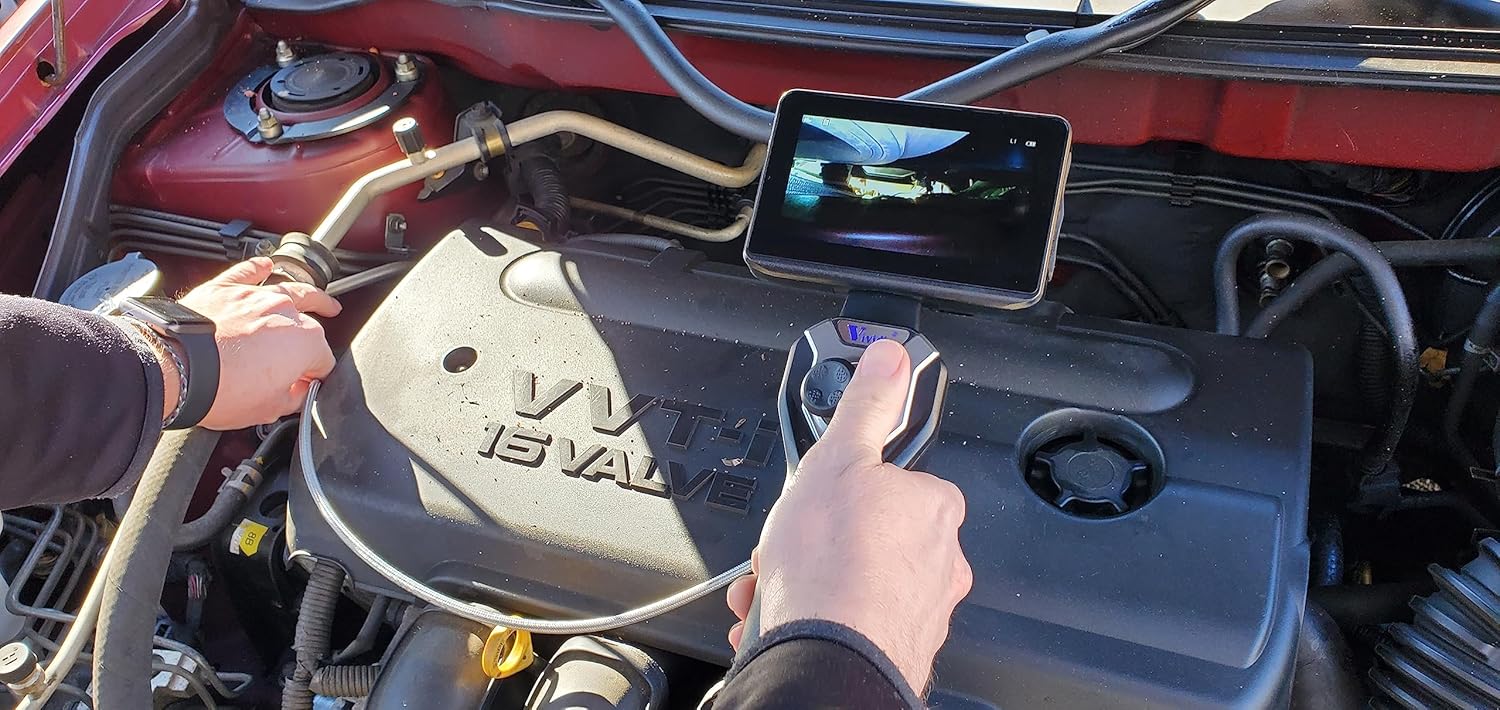
Figure 5: A user demonstrating the operation of the borescope, adjusting the joystick to maneuver the probe within an engine compartment.
3. LED തെളിച്ചം ക്രമീകരിക്കൽ
Press the Brightness control button to cycle through different LED light intensity levels. This helps illuminate dark inspection areas effectively.
4. ചിത്രങ്ങളും വീഡിയോകളും പകർത്തൽ
- ഒരു ഫോട്ടോ എടുക്കാൻ: Press the Snapshot button once. The image will be saved to the microSD card.
- ഒരു വീഡിയോ റെക്കോർഡ് ചെയ്യാൻ: Press and hold the Snapshot button to start recording. Press and hold again to stop recording. Videos are saved to the microSD card.

ചിത്രം 6: ഒരു ക്ലോസ്-അപ്പ് view of the flexible probe, highlighting its metal-mesh covering and the small camera head, demonstrating its maneuverability.
5. Viewമീഡിയ
Access the menu on the display to browse and playback saved images and videos. You can also connect the device to a computer via USB to transfer files.
മെയിൻ്റനൻസ്
1. Cleaning the Probe and Camera Head
After each use, especially in dirty or oily environments, gently wipe the flexible probe and camera head with a soft, damp cloth. For stubborn residue, a mild, non-abrasive cleaning solution can be used. Ensure the camera lens is clean for clear images.
2. ബാറ്ററി പരിചരണം
To prolong battery life, avoid fully discharging the battery frequently. If storing the device for an extended period, charge the battery to approximately 50% and recharge every few months.
3. സംഭരണം
Store the borescope in its original packaging or a protective case in a cool, dry place, away from direct sunlight and extreme temperatures. Avoid coiling the flexible probe too tightly.
ട്രബിൾഷൂട്ടിംഗ്
| പ്രശ്നം | സാധ്യമായ കാരണം | പരിഹാരം |
|---|---|---|
| ഉപകരണം പവർ ഓണാക്കുന്നില്ല. | കുറഞ്ഞ ബാറ്ററി. | ഉപകരണം പൂർണ്ണമായും ചാർജ് ചെയ്യുക. |
| സ്ക്രീനിൽ ചിത്രമൊന്നുമില്ല. | Probe not connected properly. | Ensure the probe is securely connected. |
| Image is blurry or dark. | Camera lens dirty; insufficient lighting. | Clean the camera lens; increase LED brightness. |
| ഫോട്ടോകൾ/വീഡിയോകൾ സംരക്ഷിക്കാൻ കഴിയില്ല. | MicroSD card full or not inserted correctly. | Check microSD card insertion; delete old files or replace card. |
| Joystick articulation not working. | Articulation lock engaged; mechanical obstruction. | Release the lock button; check for obstructions in the probe path. |
സ്പെസിഫിക്കേഷനുകൾ
| ഫീച്ചർ | വിശദാംശങ്ങൾ |
|---|---|
| മോഡൽ നമ്പർ | CXM-4010 |
| ക്യാമറ ഹെഡ് വ്യാസം | 4 മിമി (0.16") |
| അന്വേഷണ ദൈർഘ്യം | 1 മീറ്റർ (3.3 അടി) |
| പ്രോബ് മെറ്റീരിയൽ | Metal-mesh covered flexible tube |
| വാട്ടർപ്രൂഫ് റേറ്റിംഗ് | IP67 (probe and camera head) |
| ആർട്ടിക്കുലേഷൻ | Joystick-controlled, 360-degree all-direction, 180-degree bending back |
| ക്യാമറ റെസല്യൂഷൻ | 1280x720 (1MP HD CMOS sensor) |
| പ്രദർശിപ്പിക്കുക | 4.5 ഇഞ്ച് LCD മോണിറ്റർ |
| പ്രകാശം | 6 തെളിച്ചമുള്ള LED ലൈറ്റുകൾ |
| സ്റ്റോറേജ് മീഡിയ | MicroSD Card (included) |
| ബാറ്ററി | Rechargeable Lithium battery (more than 3h working time) |
| ഇനത്തിൻ്റെ ഭാരം | 12 പൗണ്ട് |
| പാക്കേജ് അളവുകൾ | 20.5 x 16 x 6 ഇഞ്ച് |
വാറൻ്റിയും പിന്തുണയും
Warranty and specific support contact information are not available in the provided product data. Please refer to the product packaging or the manufacturer's official webവാറന്റി കവറേജും ഉപഭോക്തൃ പിന്തുണയും സംബന്ധിച്ച വിശദാംശങ്ങൾക്ക് സൈറ്റ് സന്ദർശിക്കുക.


