1. ആമുഖം
This manual provides detailed instructions for the assembly, operation, and maintenance of your POWERTEC 71391V Precision Table Saw Miter Gauge System. This 3-piece system is designed to enhance the accuracy and efficiency of cross-cutting and miter cuts on your table saw. Please read this manual thoroughly before use to ensure safe and optimal performance.

Figure 1.1: The POWERTEC 71391V Precision Table Saw Miter Gauge System, showing the miter gauge, multi-track fence, and flip stop.
2 സുരക്ഷാ വിവരങ്ങൾ
Always prioritize safety when operating power tools. This miter gauge system is an accessory for a table saw. Adhere to all safety guidelines provided in your table saw's instruction manual in addition to the following:
- Wear appropriate personal protective equipment (PPE), including safety glasses, hearing protection, and dust mask.
- Ensure your table saw is unplugged before making any adjustments or installing accessories.
- Keep hands clear of the saw blade at all times. Use push sticks or push blocks when necessary.
- Verify that all components of the miter gauge system are securely fastened before operation.
- Do not force the workpiece through the saw. Allow the blade to cut at its own pace.
- വൃത്തിയുള്ളതും നല്ല വെളിച്ചമുള്ളതുമായ ജോലിസ്ഥലം പരിപാലിക്കുക.
3. പാക്കേജ് ഉള്ളടക്കം
The POWERTEC 71391V Precision Table Saw Miter Gauge System includes the following components:
- High Precision Miter Gauge
- Multi-Track Fence with Laser Engraved Scale (24 inches long x 3 inches tall)
- 3-inch T-Track Flip Stop (multi-position)
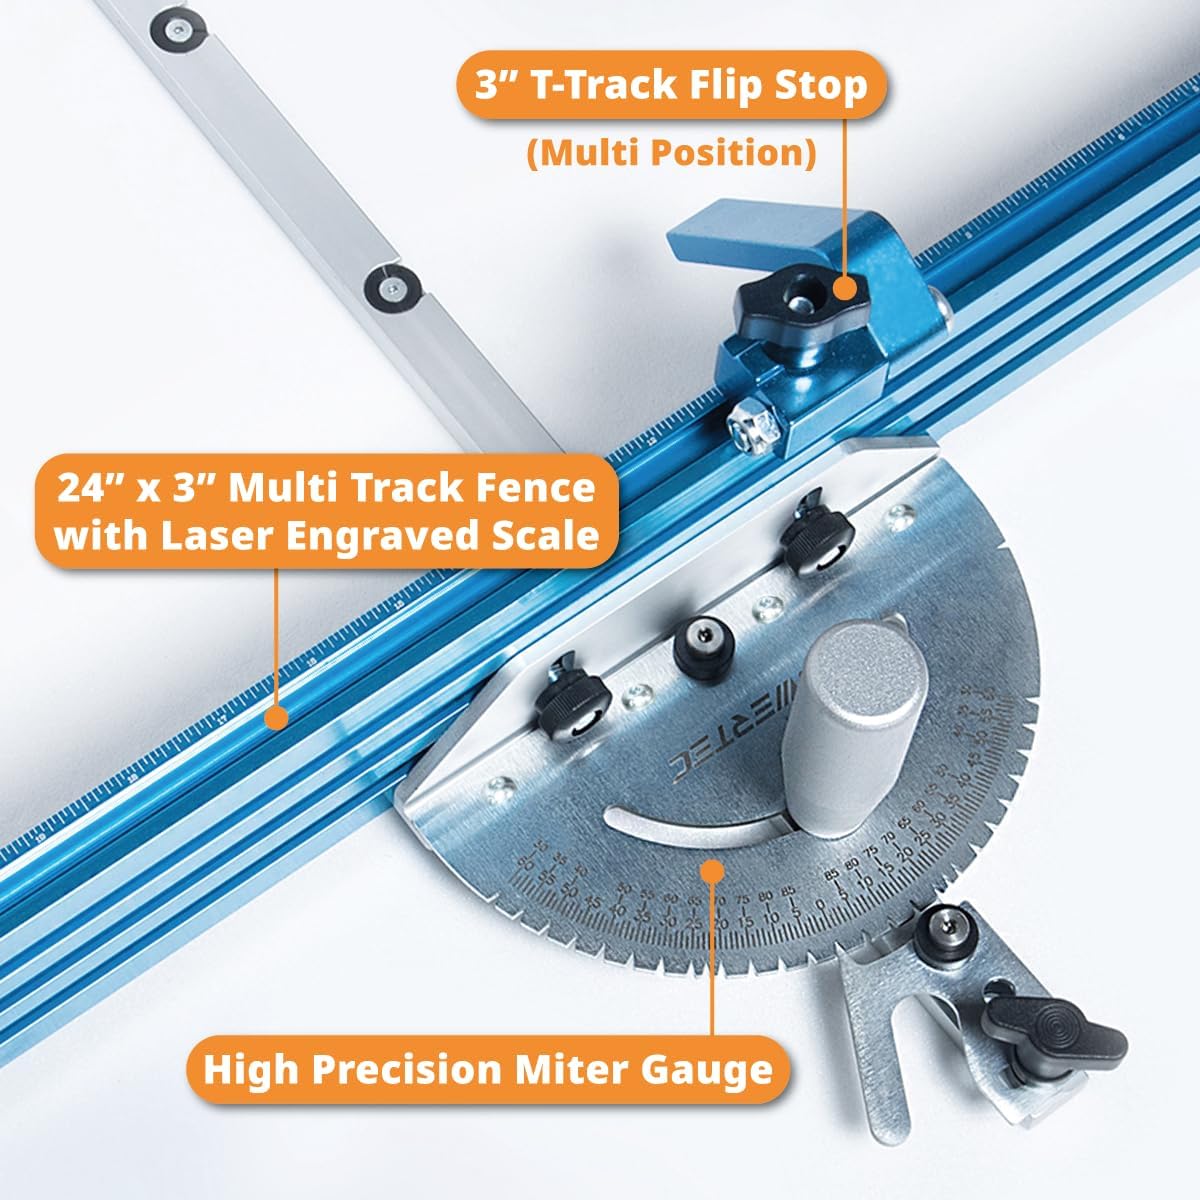
ചിത്രം 3.1: പൊട്ടിത്തെറിച്ചു view of the miter gauge system components, including the miter gauge, multi-track fence, and T-track flip stop.
4. സജ്ജീകരണവും ഇൻസ്റ്റാളേഷനും
Follow these steps to properly set up your miter gauge system:
4.1. Miter Gauge Compatibility
The miter gauge is designed to work with standard 3/4" x 3/8" miter slots, with or without T-slots. It will not work with smaller saws or tools featuring 5/8" miter slots. Ensure your table saw's miter slots match these dimensions.

Figure 4.1: Diagram illustrating compatibility with 3/4" x 3/8" T-miter slots and U-shape slots. The image shows the dimensions for both T-miter slots and U-shape slots, indicating the 3/4 inch width and 3/8 inch depth.
4.2. Attaching the Multi-Track Fence
- Align the Multi-Track Fence with the miter gauge.
- Secure the fence to the miter gauge using the provided hardware. Ensure it is firmly attached and square to the miter gauge body.

Figure 4.2: The multi-track fence attached to the miter gauge, highlighting the 24" x 3" multi-track T-slots and their compatibility with various bolts and accessories.
4.3. Installing the T-Track Flip Stop
- Slide the T-Track Flip Stop into the T-slot of the Multi-Track Fence.
- Position the flip stop as needed for your cut length. The flip stop can be adjusted to work on either the left or right side of the blade.
- Tighten the locking mechanism to secure the flip stop in place.

Figure 4.3: Close-up of the T-Track Flip Stop, demonstrating its quick adjustment capability for positioning on either side of the saw blade.
4.4. Inserting into Table Saw Miter Slot
Carefully slide the assembled miter gauge system into your table saw's miter slot. Ensure it slides smoothly without excessive play or binding. The miter gauge features 4 expansion discs that can be adjusted to remove side play within the miter slot.
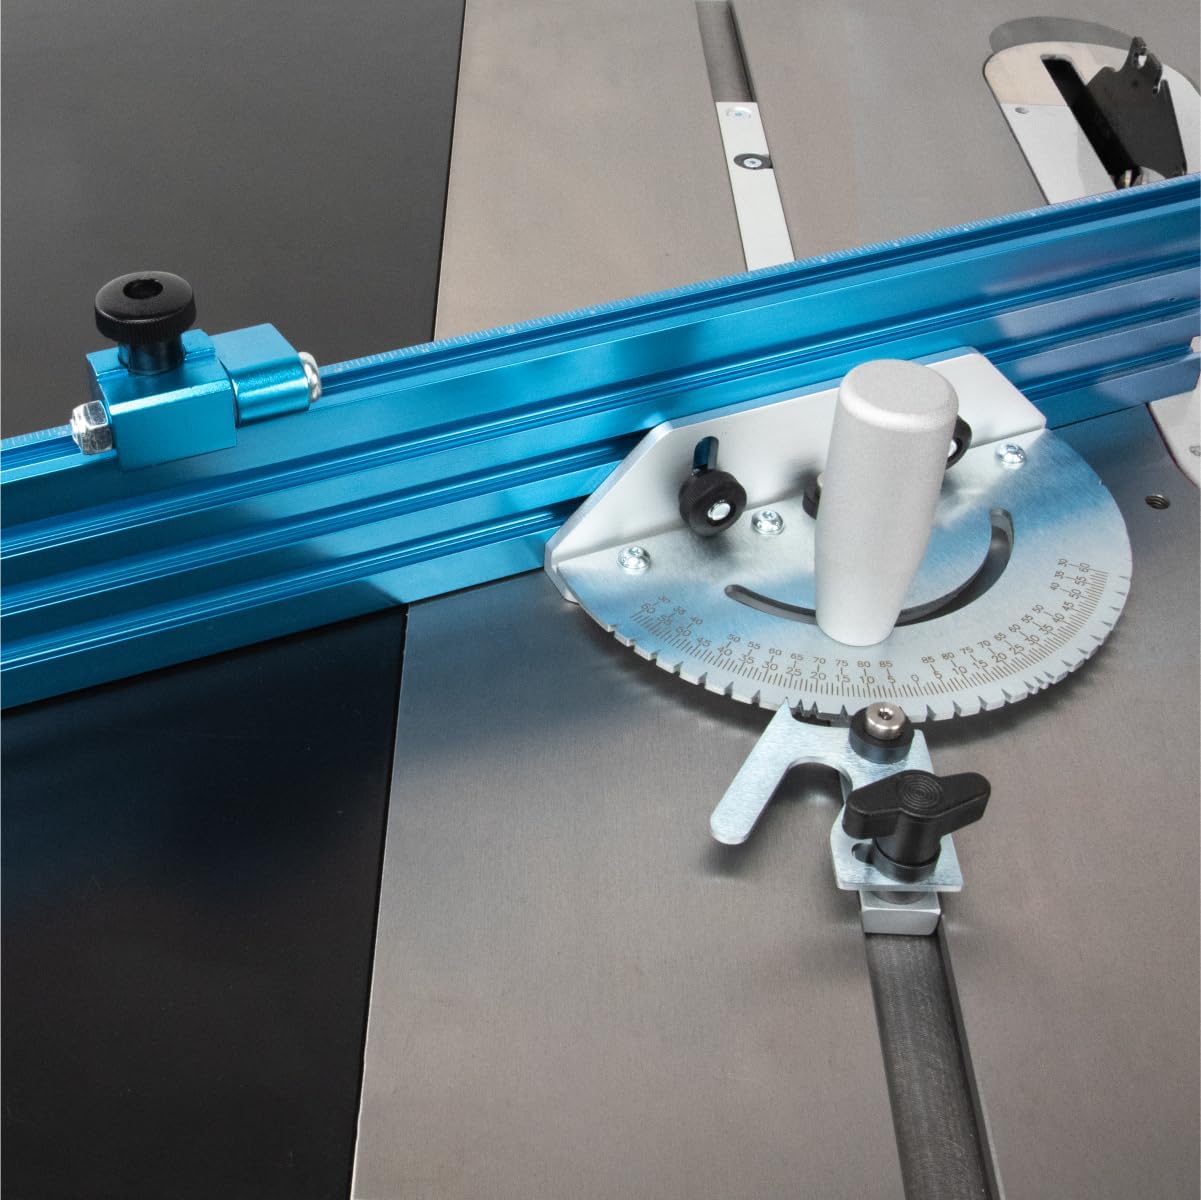
Figure 4.4: The POWERTEC miter gauge system positioned in a table saw's miter slot, ready for operation.
5. പ്രവർത്തന നിർദ്ദേശങ്ങൾ
5.1. Setting Angles
The miter gauge features 27 angle indexing stops, with 1-degree step spacing and positive stops at common angles (0°, 10°, 22.5°, 30°, and 45°), both left and right. To set an angle:
- Loosen the locking knob on the miter gauge.
- Rotate the miter gauge head to the desired angle, aligning the indicator with the scale.
- For positive stops, the mechanism will click into place. For intermediate angles, carefully align and then tighten the locking knob securely.
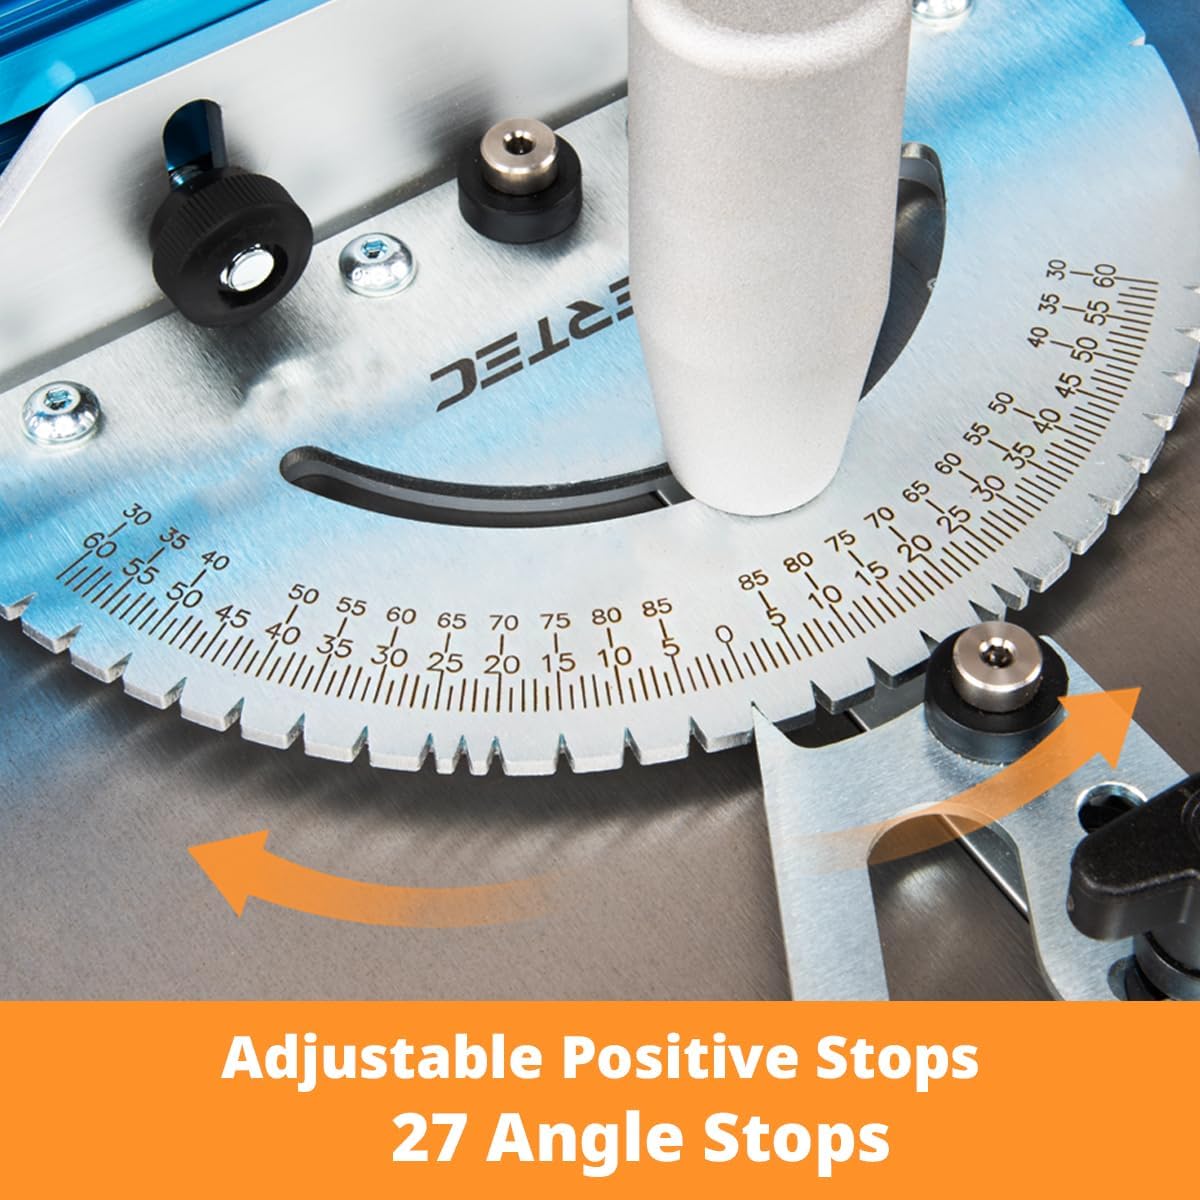
Figure 5.1: Close-up of the miter gauge's angle scale and adjustable positive stops, indicating the 27 available angle settings.
5.2. Using the Flip Stop for Repeat Cuts
The T-Track Flip Stop allows for precise, repeatable cut lengths:
- Measure and position the flip stop on the Multi-Track Fence to the desired cut length. The laser-engraved scale on the fence assists with accurate measurement.
- Tighten the flip stop's locking mechanism.
- Place your workpiece against the fence and the flip stop.
- Make your cut. For subsequent pieces, simply place them against the flip stop for consistent length.
5.3. Making Cross-Cuts and Miter Cuts
- Ensure the miter gauge is securely set to the desired angle.
- Place the workpiece firmly against the fence.
- Hold the workpiece and the miter gauge firmly.
- Turn on the table saw and slowly push the miter gauge and workpiece through the blade. Maintain consistent pressure.
- Once the cut is complete, turn off the saw and wait for the blade to stop before removing the workpiece and offcut.
6. പരിപാലനം
Proper maintenance ensures the longevity and accuracy of your miter gauge system:
- വൃത്തിയാക്കൽ: After each use, wipe down all components to remove sawdust and debris. A dry cloth is usually sufficient. For stubborn residue, a mild cleaner can be used, ensuring all parts are thoroughly dried afterward.
- ലൂബ്രിക്കേഷൻ: Periodically apply a dry lubricant (e.g., silicone spray) to the miter bar to ensure smooth sliding in the table saw slot. Avoid oil-based lubricants that can attract sawdust.
- പരിശോധന: Regularly inspect all fasteners and components for wear or damage. Tighten any loose screws. Replace damaged parts immediately.
- സംഭരണം: Store the miter gauge system in a clean, dry place to prevent corrosion and damage.
7. പ്രശ്നപരിഹാരം
| പ്രശ്നം | സാധ്യമായ കാരണം | പരിഹാരം |
|---|---|---|
| Miter gauge binds or sticks in the slot. | Expansion discs are too tight; sawdust buildup in the slot. | Loosen the expansion discs slightly. Clean the miter slot and miter bar. Apply dry lubricant. |
| Excessive play in the miter slot. | Expansion discs are too loose or not properly adjusted. | Adjust the expansion discs to remove side play. |
| കൃത്യമല്ലാത്ത ആംഗിൾ കട്ടുകൾ. | Miter gauge not locked securely; fence not square to the miter gauge. | Ensure the locking knob is tightened. Check and adjust the fence for squareness. |
| Flip stop does not hold position. | Locking mechanism is loose or damaged. | Tighten the flip stop's locking mechanism. Inspect for damage and replace if necessary. |
8 സ്പെസിഫിക്കേഷനുകൾ
- മോഡൽ: 71391V
- ബ്രാൻഡ്: പവർടെക്
- Miter Gauge Angles: 27 positive stops (1-degree increments, plus 0°, 10°, 22.5°, 30°, 45° left and right)
- Miter Slot Compatibility: Standard 3/4" x 3/8" (with or without T-slots)
- Fence Dimensions: 24" (length) x 3" (height) Multi-Track Fence with laser-engraved scale
- Fence Material: Anodized extruded aluminum
- Flip Stop: 3" T-Track Flip Stop, multi-position
- ഉൾപ്പെടുത്തിയ ഘടകങ്ങൾ: (1) Miter Gauge, (1) Multi-Track Miter Fence, (1) T-Track Flip Stop
- ഇനത്തിൻ്റെ ഭാരം: ഏകദേശം 5.77 പൗണ്ട്
- പാക്കേജ് അളവുകൾ: ഏകദേശം 25.08 x 4.8 x 3.43 ഇഞ്ച്
9. പിന്തുണയും വാറണ്ടിയും
For technical assistance, replacement parts, or warranty information, please contact POWERTEC customer support. Refer to the official POWERTEC webനിലവിലെ കോൺടാക്റ്റ് വിശദാംശങ്ങൾക്ക് സൈറ്റ് അല്ലെങ്കിൽ നിങ്ങളുടെ വാങ്ങൽ ഡോക്യുമെന്റേഷൻ.
ഓൺലൈൻ ഉറവിടങ്ങൾ: ഉദ്യോഗസ്ഥനെ സന്ദർശിക്കുക POWERTEC Store on Amazon കൂടുതൽ ഉൽപ്പന്ന വിവരങ്ങൾക്കും അനുബന്ധ ഉപകരണങ്ങൾക്കും.
വാറൻ്റി: നിർദ്ദിഷ്ട വാറന്റി നിബന്ധനകളും വ്യവസ്ഥകളും വ്യത്യാസപ്പെടാം. വാറന്റി ക്ലെയിമുകൾക്കായി നിങ്ങളുടെ വാങ്ങലിന്റെ തെളിവ് സൂക്ഷിക്കുക.


