
1. ആമുഖം
The Sovol SV07 Plus is a high-performance FDM 3D printer designed for both enthusiasts and professionals, offering a large build volume and advanced features for efficient and precise printing. Equipped with Klipper firmware, it delivers exceptional speed and a user-friendly experience through its intuitive touch screen interface.
This manual provides essential information for setting up, operating, maintaining, and troubleshooting your Sovol SV07 Plus 3D printer. Please read it thoroughly before use to ensure safe and optimal performance.
Official Product Introduction: This video provides a general overview of the Sovol SV07 Plus 3D printer's features and capabilities.
Sovol SV07 Plus is Coming!: A brief promotional video highlighting the arrival of the SV07 Plus.
2 സുരക്ഷാ വിവരങ്ങൾ
പ്രിന്ററിന് പരിക്കേൽക്കുകയോ കേടുപാടുകൾ സംഭവിക്കുകയോ ചെയ്യാതിരിക്കാൻ ഇനിപ്പറയുന്ന സുരക്ഷാ മുൻകരുതലുകൾ എപ്പോഴും പാലിക്കുക:
- പ്രവർത്തന സമയത്ത് കൈകളും വിരലുകളും ചലിക്കുന്ന ഭാഗങ്ങളിൽ നിന്ന് അകറ്റി നിർത്തുക.
- Do not touch the hotend or heated bed during or immediately after printing, as they reach high temperatures.
- നന്നായി വായുസഞ്ചാരമുള്ള സ്ഥലത്ത്, സ്ഥിരതയുള്ളതും നിരപ്പായതുമായ ഒരു പ്രതലത്തിലാണ് പ്രിന്റർ സ്ഥാപിച്ചിരിക്കുന്നതെന്ന് ഉറപ്പാക്കുക.
- Do not leave the printer unattended during operation, especially during long prints.
- Use only recommended filament types and power supply.
- Keep children and pets away from the printer.
- In case of emergency, immediately disconnect the power supply.
3. പാക്കേജ് ഉള്ളടക്കം
Your Sovol SV07 Plus package should include:
- 3D printer*1
- Necessary tools for assembly and maintenance (located in the integrated tool drawer).
- USB drive with test files and software.
- പവർ കേബിൾ.
- Sample filament.
4. പ്രിന്റർ ഓവർview
The Sovol SV07 Plus features a robust design with key components optimized for performance and ease of use.
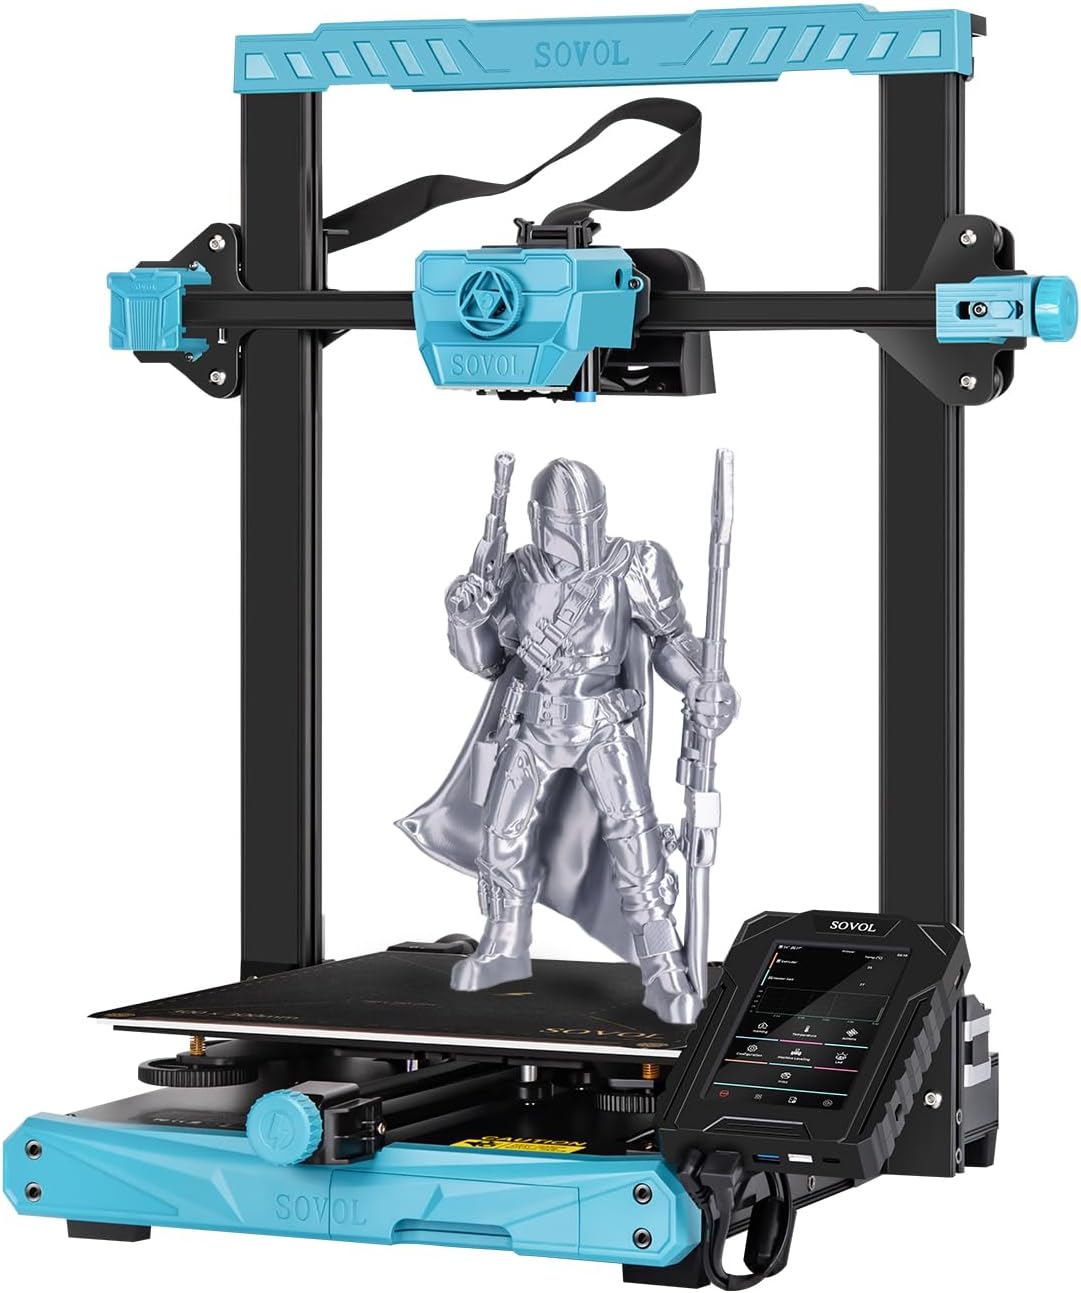
മൊത്തത്തിൽ view of the Sovol SV07 Plus 3D Printer.
പ്രധാന ഘടകങ്ങൾ:
- 5-inch Klipper Touch Screen: High-resolution interface for intuitive control and access to advanced Klipper functions.
- Planetary Dual Gear Direct Drive Extruder: Ensures precise filament extrusion and is ideal for flexible materials.
- All Metal High Flow Hotend: Capable of reaching 300°C for printing a wide range of materials.
- ചൂടാക്കിയ കിടക്ക: Upgraded 420W heated bed for rapid heating and improved adhesion.
- Dual Z-axis: Enhances accuracy and precision of vertical movement.
- Filament Run-out Sensor: Automatically pauses printing when filament runs out or breaks.
- LED ലൈറ്റ്: Illuminates the print area for better visibility during printing and leveling.
- Tool Drawer: Conveniently stores essential tools.
5. Setup and Initial Calibration
5.1 അസംബ്ലി
The Sovol SV07 Plus comes largely pre-assembled. Follow the quick start guide included in the package for final assembly steps, which typically involve attaching the gantry and connecting a few cables.
5.2 Bed Leveling and Z-Offset Calibration
Accurate bed leveling and Z-offset calibration are crucial for successful first layers and overall print quality. The SV07 Plus features a 25-point auto-leveling system.
Guide and Tutorial: How to Level SV07 & SV07 Plus. This video provides a detailed walkthrough of the bed leveling and Z-offset calibration process.
- Initial Manual Adjustment: Before auto-leveling, ensure the bed leveling nuts are tightened counter-clockwise as much as possible, then loosen them two turns clockwise. This provides a good starting point for the auto-leveling system.
- Z-Calibrate: On the touch screen, navigate to 'Machine Leveling' and select 'Z Calibrate'. The printer will auto-home.
- Z-ഓഫ്സെറ്റ് ക്രമീകരിക്കുക: Once the nozzle moves to the center of the bed, place a piece of A4 paper between the nozzle and the hotbed. Adjust the Z-offset using the 'raise nozzle' or 'lower nozzle' buttons until you feel slight resistance when pulling the paper. The nozzle should scratch the paper slightly without completely pressing it.
- സംരക്ഷിച്ച് പുനരാരംഭിക്കുക: Click 'Accept' to apply the values, then confirm and restart the system.
- Bed Level (Screws Adjust): After Z-offset, go back to 'Machine Leveling' and select 'Bed Level'. Click on 'Screws Adjust'. The printer will move the nozzle to each of the four corners. At each corner, use the physical leveling nuts under the bed to adjust the height until the paper test (slight scratch) is achieved. The screen will indicate if you need to turn clockwise (CW) or counter-clockwise (CCW) and by how much. Repeat this process several times until all corners are within acceptable tolerance (e.g., 00:10 or less).
- Bed Mesh: Once the manual screw adjustment is complete, click 'Bed Mesh' on the screen. The printer will perform a detailed 25-point mesh leveling. After the detection is complete, restart the system.
6. പ്രവർത്തന നിർദ്ദേശങ്ങൾ
6.1 Loading Filament
Ensure the hotend is preheated to the appropriate temperature for your filament type. Insert the filament into the extruder until it is gripped by the gears. Use the 'Extrude' function on the touch screen to feed the filament through the hotend until it comes out cleanly.
6.2 ഒരു പ്രിന്റ് ആരംഭിക്കുന്നു
Prepare your 3D model using a slicing software (e.g., Cura with SV07 Plus profile) and save it to a USB drive. Insert the USB drive into the printer's touch screen unit. On the touch screen, navigate to 'Print', select your file from the USB drive, and confirm to start printing.
6.3 Monitoring and Fine-Tuning
During printing, you can monitor progress and fine-tune settings via the touch screen. The Klipper firmware offers various options for real-time adjustments.

The 5-inch Klipper touchscreen provides comprehensive control and monitoring.
If the print nozzle is too close to the bed, resulting in rough printing, fine-tune the Z-offset value upwards. If the print nozzle is too far from the bed, causing adhesion issues, fine-tune the Z-offset value downwards. Always make small adjustments (e.g., 0.01mm or 0.05mm) and observe the effect.
7 പ്രധാന സവിശേഷതകൾ
7.1 High-Speed Printing with Klipper Firmware
The SV07 Plus is powered by Klipper firmware, allowing for a maximum print speed of 500mm/s. This significantly reduces print times while maintaining quality. The 5-inch touch screen provides access to Klipper's advanced features like height mapping and input shaping for optimal performance.

Klipper firmware enables high-speed printing and advanced functionalities.
7.2 Large Build Volume & Fast Heating
With a generous build volume of 300x300x350mm, the SV07 Plus accommodates larger models and batch printing. The 600W power supply and upgraded 420W heated bed ensure rapid heating, reaching 60°C in approximately 90 seconds.

Comparison of SV07 Plus (300x300x350mm) and SV07 (220x220x250mm) build volumes.

The 600W power supply and 420W heated bed ensure stable and fast heating.
7.3 Planetary Dual Gear Direct Drive Extruder
Sovol's self-developed direct drive extruder with a planetary dual gear set provides a higher drive ratio and lighter motor, resulting in precise extrusion. An external knob simplifies filament feeding.

വിശദമായി view of the planetary dual gear direct drive extruder for accurate extrusion.
7.4 All Metal High Flow Hotend (Max 300°C)
The all-metal hotend with a larger melt zone allows for printing at high speeds and with various high-temperature materials, including ABS, PC, ASA, Nylon, Carbon Fiber, and more.

The all-metal hotend supports high-temperature printing for diverse filament types.

The printer is compatible with a wide range of filaments including TPU, PLA, PETG, ABS, ASA, PC, WOOD, Nylon, and Carbon Fiber.
7.5 Improved Cooling Design
Equipped with triple cooling fans, the SV07 Plus ensures efficient cooling of prints, leading to better layering and overall print quality, especially at high speeds.

Triple cooling fans provide effective cooling for high-speed printing.
7.6 Dual Z-axis & Anti-backlash Nut
Dual Z-axis screws and stepper motors improve the accuracy and precision of nozzle vertical movement to 0.001mm. An anti-backlash nut further reduces shaking, contributing to more stable printing.

Dual Z-axis for enhanced stability and precision.

Upgraded anti-slip belts and anti-backlash nut for stable and precise movement.
7.7 Filament Run-out Sensor
The integrated filament run-out sensor automatically detects when filament runs out or breaks, pausing the print to allow for filament replacement and preventing failed prints.

The filament run-out sensor automatically pauses printing for filament changes.
7.8 Double Sided PEI Plate & LED Light
The double-sided PEI plate offers excellent adhesion and easy print removal. If one side gets scratched, the other side can be used. An LED light under the extruder provides illumination for observing the bed leveling process and the first layer, even in low light conditions.

The double-sided PEI plate offers durability and ease of use.

The LED light illuminates the print area for better visibility.
7.9 Integrated Tool Drawer
A convenient pull-out tool drawer is integrated into the printer's base, providing quick storage and easy organization for your tools, keeping your workspace tidy.

The integrated tool drawer keeps your workspace organized.
8. പരിപാലനം
Regular maintenance ensures the longevity and optimal performance of your 3D printer:
- പ്രിന്റ് ബെഡ് വൃത്തിയാക്കുക: Wipe the PEI surface with alcohol before each print to ensure optimal adhesion.
- നോസൽ വൃത്തിയാക്കുക: Regularly clean any filament residue from the nozzle. For clogs, perform a cold pull or use a nozzle cleaning needle.
- ചലിക്കുന്ന ഭാഗങ്ങൾ ലൂബ്രിക്കേറ്റ് ചെയ്യുക: Apply a small amount of lithium grease to the Z-axis lead screws and smooth rods periodically.
- ചെക്ക് ബെൽറ്റുകൾ: Ensure the X and Y-axis belts are properly tensioned. Adjust using the belt tensioner if necessary.
- വയറിംഗ് പരിശോധിക്കുക: Periodically check all electrical connections for looseness or damage.
9. പ്രശ്നപരിഹാരം
ചില സാധാരണ പ്രശ്നങ്ങളും അവയുടെ സാധ്യമായ പരിഹാരങ്ങളും ഇതാ:
| പ്രശ്നം | സാധ്യമായ കാരണം | പരിഹാരം |
|---|---|---|
| Poor First Layer Adhesion | Incorrect Z-offset, dirty bed, warped bed, wrong bed temperature. | Recalibrate Z-offset, clean PEI plate with alcohol, ensure bed is level, adjust bed temperature. |
| ഫിലമെന്റ് പുറത്തെടുക്കുന്നില്ല | Nozzle clog, tangled filament, incorrect temperature, extruder issue. | Clean nozzle, check filament path, verify hotend temperature, inspect extruder gears. |
| Layer Shifting | Loose belts, motor overheating, print speed too high. | Check and tighten belts, ensure proper cooling for motors, reduce print speed. |
| Stringing/Oozing | Incorrect retraction settings, too high temperature. | Adjust retraction distance and speed in slicer, lower hotend temperature slightly. |
10 സ്പെസിഫിക്കേഷനുകൾ

Sovol SV07 Plus with key dimensions.
| ഫീച്ചർ | വിശദാംശങ്ങൾ |
|---|---|
| മോഡൽ | SV07 Plus |
| പ്രിന്റ് സാങ്കേതികവിദ്യ | FDM (ഫ്യൂസ്ഡ് ഡിപ്പോസിഷൻ മോഡലിംഗ്) |
| ബിൽഡ് വോളിയം | 300 x 300 x 350 മിമി (11.8 x 11.8 x 13.8 ഇഞ്ച്) |
| പരമാവധി പ്രിന്റ് വേഗത | 500 മിമി/സെ |
| നോസൽ താപനില | പരമാവധി 300°C |
| ചൂടാക്കിയ കിടക്ക താപനില | Max 100°C (Heats to 60°C in 90 seconds) |
| എക്സ്ട്രൂഡർ തരം | Planetary Dual Gear Direct Drive |
| Leveling Mode | 25-പോയിന്റ് ഓട്ടോ ലെവലിംഗ് |
| ഫേംവെയർ | ക്ലിപ്പർ |
| പ്രദർശിപ്പിക്കുക | 5-inch High Resolution Touch Screen |
| വൈദ്യുതി വിതരണം | 600W |
| കണക്റ്റിവിറ്റി | USB, WiFi (Klipper) |
| പിന്തുണയ്ക്കുന്ന ഫിലമെന്റുകൾ | PLA, ABS, PETG, TPU, ASA, PC, Wood, Nylon, Carbon Fiber |
| ഉൽപ്പന്ന അളവുകൾ | 25 x 23.43 x 10.43 ഇഞ്ച് |
| ഇനത്തിൻ്റെ ഭാരം | 32 പൗണ്ട് (14.54 കി.ഗ്രാം) |
11. വാറൻ്റിയും പിന്തുണയും
Sovol provides customer support for their products. For specific warranty details, technical assistance, or replacement parts, please refer to the official Sovol webസൈറ്റിൽ ബന്ധപ്പെടുകയോ അവരുടെ ഉപഭോക്തൃ സേവനവുമായി നേരിട്ട് ബന്ധപ്പെടുകയോ ചെയ്യുക. വാറന്റി ക്ലെയിമുകൾക്കുള്ള വാങ്ങലിന്റെ തെളിവായി നിങ്ങളുടെ വാങ്ങൽ രസീത് സൂക്ഷിക്കുക.
സ്റ്റാൻഡേർഡ് നിർമ്മാതാവിന്റെ വാറന്റിക്ക് അപ്പുറത്തേക്ക് കവറേജ് വർദ്ധിപ്പിക്കുന്നതിന് അധിക സംരക്ഷണ പദ്ധതികൾ വാങ്ങാൻ ലഭ്യമായേക്കാം.


