1. ആമുഖം
The Smartstitch S-1501 is a high-performance commercial embroidery machine designed for professional and business use. Featuring 15 needles, a large 14"x20" embroidery area, and a maximum speed of 1200 stitches per minute (SPM), this machine offers versatility for various embroidery projects including 3D caps, flat items, and T-shirts. Its intuitive 12-inch touch screen and Wi-Fi connectivity simplify operation and design management.

Figure 1.1: Smartstitch S-1501 Commercial Embroidery Machine overview.
This manual provides essential information for setting up, operating, maintaining, and troubleshooting your Smartstitch S-1501 machine to ensure optimal performance and longevity.
2. ഉൽപ്പന്ന സവിശേഷതകൾ
- 15 Needles: Allows for multi-color designs without frequent thread changes.
- Large Embroidery Area: 14"x20" (35.56 cm x 50.8 cm) hoop for extensive design possibilities.
- ഉയർന്ന വേഗത: Up to 1200 SPM for efficient production.
- 12" ടച്ച് സ്ക്രീൻ: Large, user-friendly interface for easy control and design preview.
- വൈഫൈ കണക്റ്റിവിറ്റി: Enables wireless transfer of embroidery designs (DST/DSB fileഎസ്).
- 270 വൈഡ് ആംഗിൾ ക്യാപ് സിസ്റ്റം: Specialized system for embroidering on caps.
- ലേസർ പൊസിഷനിംഗ്: For precise design placement.
- യാന്ത്രിക വർണ്ണ മാറ്റം: Streamlines multi-color embroidery.
- Smart Control System V5: Advanced algorithm for guaranteed embroidery quality.
- High-Precision Thread Break Sensors: Detects thread breaks to prevent errors.

Figure 2.1: Key features of the Smartstitch S-1501 machine.
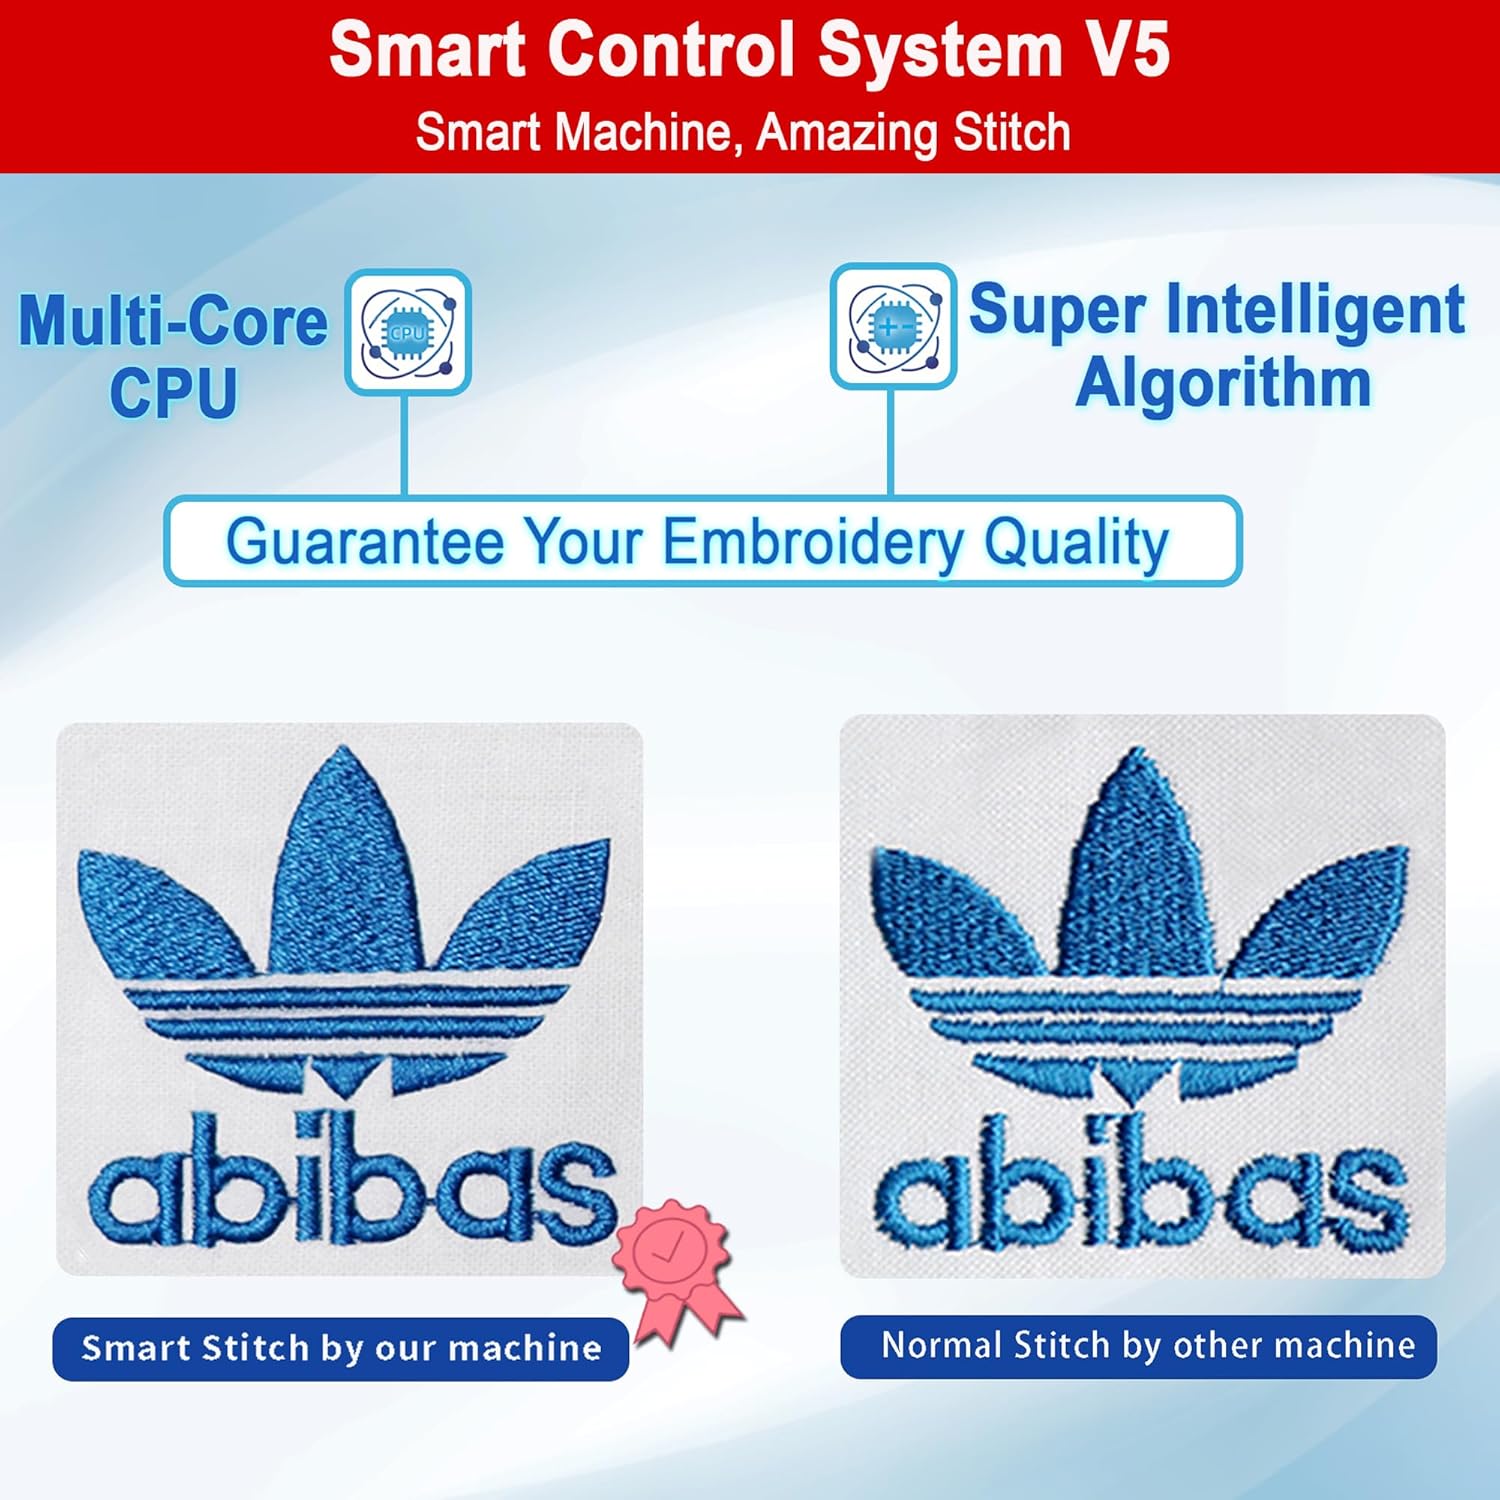
Figure 2.2: Comparison of stitch quality with Smart Control System V5.
3. സജ്ജീകരണ ഗൈഡ്
3.1 അൺപാക്കിംഗും പ്ലേസ്മെന്റും
Carefully unpack the machine and all accessories. Retain the wooden pallet, inner boxes, metal buckles, and fixed bolts for potential future transport or returns. Place the machine on a stable, level surface capable of supporting its weight (approximately 209 lbs / 95 kg).

Figure 3.1: Machine dimensions and weight for proper placement.
3.2 Accessory Identification
Verify that all included accessories are present. The S-1501 comes with a starter pack including machine embroidery threads, stabilizers, and bobbin threads, along with various hoops and tools for different embroidery applications.
- Cap Embroidery System (Cap Hoop, Cap Drive with Shaft, Cap Stand)
- T-Shirt Embroidery Hoops (various sizes: 18.9"x12.6", 10.2"x10.2", 6.3", 4.7", 3.9", 2.4" Armrests)
- Flat Embroidery Accessories (Flat Embroidery Table, Sash Frame 19.7"x13.8", Fixed Aluminium Bars)
- Other Accessories (Rolling Stand, Tool Box, Bobbin Winder)

ചിത്രം 3.2: ഓവർview of included accessories for the Smartstitch S-1501.
3.3 പവർ കണക്ഷൻ
Connect the machine to a stable power source as specified in the electrical requirements section of this manual (refer to specifications). Ensure the power switch is in the OFF position before connecting.
3.4 Initial Threading and Bobbin Winding
Follow the threading path indicated on the machine for each of the 15 needles. Use the included bobbin winder to prepare bobbins with the appropriate thread. Detailed video tutorials for threading are available through Smartstitch support channels.
4. പ്രവർത്തന നിർദ്ദേശങ്ങൾ
4.1 Touch Screen Interface Overview
The 12-inch touch screen provides comprehensive control over the machine's functions. It displays design previews, stitch progress, color sequence menus, and various control buttons for operation.

ചിത്രം 4.1: വിശദമായി view of the 12" touch screen interface.
4.2 Basic Embroidery Operation
Follow these general steps for basic embroidery:
- Step 1: Choose Pattern. Select your desired embroidery design from the machine's memory or import via USB/Wi-Fi.
- Step 2: Choose Frame. Select the appropriate hoop size and type for your project.
- Step 3: Color Sequence. Assign thread colors to the design elements. The machine supports automatic color change.
- Step 4: Start Embroidery. ക്രമീകരണങ്ങൾ സ്ഥിരീകരിച്ച് എംബ്രോയ്ഡറി പ്രക്രിയ ആരംഭിക്കുക.

Figure 4.2: Visual guide to basic embroidery operation.
4.3 3D Cap Embroidery
For 3D cap embroidery, utilize the specialized cap system. The process involves selecting the cap frame, setting the color sequence, and defining the offset point for the design.

Figure 4.3: Steps for performing 3D cap embroidery.
4.4 Repeat Embroidery Function
The machine supports repeating designs. You can set the number of repetitions and the interval between each repeat directly from the touch screen interface.

Figure 4.4: Using the repeat embroidery function.
5. പരിപാലനം
5.1 റെഗുലർ ക്ലീനിംഗ്
Regularly clean lint and dust from the needle area, bobbin case, and tension discs. Use a soft brush or vacuum cleaner designed for electronics. Ensure the machine is powered off and unplugged before cleaning.
5.2 ലൂബ്രിക്കേഷൻ
Apply a small amount of machine oil to designated lubrication points as indicated in the detailed maintenance guide (refer to the PDF user guide for specific points). Proper lubrication ensures smooth operation and extends the machine's lifespan.
5.3 സൂചി മാറ്റിസ്ഥാപിക്കൽ
Replace needles regularly, especially if they become bent, dull, or if you experience frequent thread breaks. Use only needles recommended by Smartstitch for optimal performance.
6. പ്രശ്നപരിഹാരം
This section addresses common issues you might encounter. For more detailed troubleshooting, refer to the comprehensive user guide or contact Smartstitch technical support.
| പ്രശ്നം | സാധ്യമായ കാരണം | പരിഹാരം |
|---|---|---|
| Frequent Thread Breaks | Incorrect threading, dull needle, improper tension, poor thread quality. | Re-thread the machine, replace needle, adjust tension, use high-quality embroidery thread. |
| മോശം തയ്യൽ ഗുണനിലവാരം | Incorrect tension, wrong needle size/type, hooping issues, dirty bobbin case. | Adjust tension, ensure correct needle, re-hoop fabric properly, clean bobbin area. |
| മെഷീൻ ആരംഭിക്കുന്നില്ല | Power supply issue, emergency stop engaged, safety sensor triggered. | Check power connection, disengage emergency stop button, ensure all covers are closed. |
| Design Not Loading | തെറ്റാണ് file ഫോർമാറ്റ്, കേടായി file, USB drive issue, Wi-Fi connectivity problem. | Ensure DST/DSB format, try another USB port/drive, check Wi-Fi connection. |
7 സ്പെസിഫിക്കേഷനുകൾ
| ഫീച്ചർ | വിശദാംശങ്ങൾ |
|---|---|
| മോഡൽ | S-1501Blue |
| സൂചികൾ | 15 |
| പരമാവധി വേഗത | 1200 എസ്പിഎം |
| എംബ്രോയ്ഡറി ഏരിയ | 14" x 20" (35.56 സെ.മീ x 50.8 സെ.മീ) |
| ടച്ച് സ്ക്രീൻ വലിപ്പം | 12 ഇഞ്ച് |
| കണക്റ്റിവിറ്റി | USB, Wi-Fi |
| പിന്തുണച്ചു File ഫോർമാറ്റുകൾ | DST/DSB |
| ഉൽപ്പന്ന അളവുകൾ (L x W x H) | 28.74 x 36.61 x 35.04 ഇഞ്ച് (ഏകദേശം 28"D x 30"W x 32"H) |
| ഇനത്തിൻ്റെ ഭാരം | 209 പൗണ്ട് (95 കി.ഗ്രാം) |
| ക്യാപ് സിസ്റ്റം | 270 വൈഡ് ആംഗിൾ |

ചിത്രം 7.1: ഉദാamples of embroidery projects possible with the S-1501.
8. വാറൻ്റിയും പിന്തുണയും
8.1 വാറൻ്റി വിവരങ്ങൾ
For detailed warranty terms and conditions, please refer to the official Smartstitch warranty documentation provided with your purchase or contact Smartstitch customer service directly. Warranty coverage typically includes manufacturing defects and specific components for a defined period.
8.2 സാങ്കേതിക പിന്തുണ
Smartstitch offers comprehensive training and technical support to assist users. Upon receiving your machine, it is recommended to contact Smartstitch for online assistance from experienced engineers. Local technical support may also be available.
- ഓൺലൈൻ പരിശീലനം: Operation manuals and video tutorials are provided to help you get started quickly.
- Community Assistance: Join the "Smartstitch embroidery machine club" on Facebook for peer support and expert advice.
- Direct Support: Contact Smartstitch via chat services, call services, or schedule a Facetime video call for personalized assistance.
- Live Demos: Appointments for live demonstrations of the embroidery machine can be arranged.

ചിത്രം 8.1: ഓവർview of Smartstitch technical support and training services.
For the most up-to-date support information and resources, please visit the official Smartstitch website or refer to the contact details provided with your machine.


