ആമുഖം
This manual provides essential instructions for the safe and efficient operation of your Sanyo PLC-WXU700A 3LCD Projector. The PLC-WXU700A is a WXGA conference room projector featuring 3LCD technology, delivering 3,800 lumens brightness and a native resolution of 1280x800. Please read this manual thoroughly before using the projector and retain it for future reference.
പാക്കേജ് ഉള്ളടക്കം
നിങ്ങളുടെ പാക്കേജിൽ എല്ലാ ഇനങ്ങളും ഉണ്ടെന്ന് ഉറപ്പാക്കുക:
- Sanyo PLC-WXU700A 3LCD Projector
- റിമോട്ട് കൺട്രോൾ
- പവർ കേബിൾ
- HDMI കേബിൾ
- ഉപയോക്തൃ മാനുവൽ (ഈ പ്രമാണം)
സജ്ജമാക്കുക
1. പ്രൊജക്ടർ പ്ലേസ്മെന്റ്
Position the projector on a stable, flat surface or mount it securely. Ensure adequate ventilation around the projector to prevent overheating. The projector is designed to be portable, allowing for flexible placement in various environments.
2. പവർ ബന്ധിപ്പിക്കുന്നു
- Connect the supplied power cable to the AC inlet on the rear of the projector.
- പവർ കേബിളിന്റെ മറ്റേ അറ്റം ഒരു ഗ്രൗണ്ടഡ് ഇലക്ട്രിക്കൽ ഔട്ട്ലെറ്റിലേക്ക് പ്ലഗ് ചെയ്യുക.
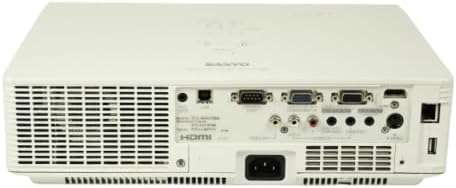
Image: Rear panel of the Sanyo PLC-WXU700A projector, highlighting the power input and connectivity ports.
3. ഇൻപുട്ട് സ്രോതസ്സുകൾ ബന്ധിപ്പിക്കുന്നു
The Sanyo PLC-WXU700A offers multiple connectivity options:
- എച്ച്ഡിഎംഐ: Connect the supplied HDMI cable from your source device (e.g., laptop, Blu-ray player) to the HDMI input port on the projector.
- VGA (D-Sub 15-pin): For analog computer connections, use a VGA cable to connect to the D-Sub 15-pin input ports.
- സംയോജിത വീഡിയോ: Use RCA cables for composite video input.
- ഓഡിയോ ഇൻപുട്ടുകൾ: Separate audio input jacks are available for various sources.

Image: Side-rear perspective of the projector, illustrating the array of input ports and side ventilation grilles.
പ്രവർത്തന നിർദ്ദേശങ്ങൾ
1. പവർ ഓൺ/ഓഫ്
- പവർ ഓണാക്കാൻ: അമർത്തുക പവർ പ്രൊജക്ടറിന്റെ കൺട്രോൾ പാനലിലോ റിമോട്ട് കൺട്രോളിലോ ഉള്ള ബട്ടൺ അമർത്തുക. പവർ ഇൻഡിക്കേറ്റർ ലൈറ്റ് പ്രകാശിക്കും.
- പവർ ഓഫ് ചെയ്യാൻ: അമർത്തുക പവർ button twice. The projector will enter a cooling down cycle before completely shutting off. Do not unplug the projector during the cooling cycle.
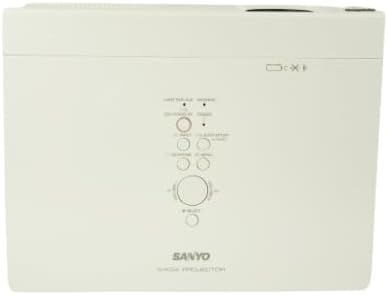
ചിത്രം: മുകളിൽ നിന്ന് താഴേക്ക് view of the projector, displaying the integrated control panel with various buttons for power, menu navigation, and input selection.
2. ഇൻപുട്ട് ഉറവിടം തിരഞ്ഞെടുക്കൽ
അമർത്തുക ഇൻപുട്ട് or ഉറവിടം button on the projector or remote control to cycle through available input sources (HDMI, VGA, Video). Select the input corresponding to your connected device.
3. ചിത്രം ക്രമീകരിക്കുന്നു
- ഫോക്കസ് റിംഗ്: വ്യക്തതയുള്ള ഒരു ചിത്രം ലഭിക്കുന്നതിന് പ്രൊജക്ടർ ലെൻസിലെ ഫോക്കസ് റിംഗ് തിരിക്കുക.
- സൂം ലിവർ: Adjust the zoom lever on the projector lens to change the image size without moving the projector.
- കീസ്റ്റോൺ തിരുത്തൽ: If the image appears trapezoidal, use the keystone correction function (usually found in the projector's menu or via dedicated buttons on the remote) to square the image.
മെയിൻ്റനൻസ്
1. പ്രൊജക്ടർ വൃത്തിയാക്കൽ
- പുറം: പ്രൊജക്ടർ തുടയ്ക്കുക casinമൃദുവായതും ഉണങ്ങിയതുമായ തുണി ഉപയോഗിച്ച് തടവുക. കഠിനമായ അഴുക്കിന്, അല്പം d ഉപയോഗിക്കുക.amp നേരിയ ഡിറ്റർജന്റ് ഉപയോഗിച്ച് തുണി തുടയ്ക്കുക, എന്നിട്ട് ഉണക്കുക.
- ലെൻസ്: Gently clean the projector lens with a lens cleaning cloth or lens paper. Avoid using abrasive materials.
- എയർ ഫിൽട്ടറുകൾ: Regularly check and clean the air filters to ensure proper ventilation and prevent overheating. Refer to the full service manual for filter replacement instructions.
2. എൽamp മാറ്റിസ്ഥാപിക്കൽ
The Sanyo PLC-WXU700A uses a lamp-based illumination system. The lamp has a finite lifespan and will eventually need replacement. When the lamp indicator light illuminates or the image brightness significantly decreases, it is time to replace the lamp.
- Ensure the projector is powered off and completely cooled down before attempting lamp മാറ്റിസ്ഥാപിക്കൽ.
- എൽ കണ്ടെത്തുകamp cover (often on the top or bottom of the projector).
- എൽ അഴിക്കുകamp cover and carefully remove the old lamp മൊഡ്യൂൾ.
- Install a new, genuine Sanyo replacement lamp module, ensuring it is securely seated.
- എൽ മാറ്റിസ്ഥാപിക്കുകamp സ്ക്രൂകൾ മൂടി ശക്തമാക്കുക.
- എൽ പുനഃസജ്ജമാക്കുകamp timer in the projector's OSD (On-Screen Display) menu.
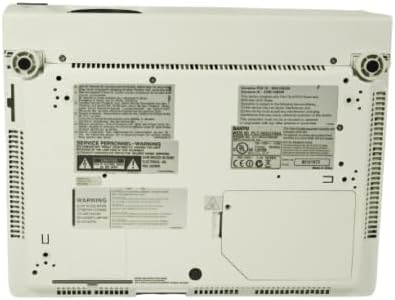
Image: Underside of the projector, displaying product labels, warning information, and potential access panels for maintenance like lamp മാറ്റിസ്ഥാപിക്കൽ.
ട്രബിൾഷൂട്ടിംഗ്
നിങ്ങളുടെ പ്രൊജക്ടറിൽ പ്രശ്നങ്ങൾ നേരിടുകയാണെങ്കിൽ, ഇനിപ്പറയുന്ന പൊതുവായ പ്രശ്നങ്ങളും പരിഹാരങ്ങളും പരിശോധിക്കുക:
- ചിത്രമൊന്നും പ്രദർശിപ്പിച്ചിട്ടില്ല:
- പ്രൊജക്ടർ ഓണാക്കിയിട്ടുണ്ടെന്നും പവർ കേബിൾ സുരക്ഷിതമായി ബന്ധിപ്പിച്ചിട്ടുണ്ടെന്നും ഉറപ്പാക്കുക.
- Verify that the input source is correctly selected on the projector.
- Check the connection cable (HDMI, VGA) between the source device and the projector. Try a different cable if possible.
- Ensure the source device is outputting a signal.
- ചിത്രം മങ്ങിയതാണ്:
- പ്രൊജക്ടർ ലെൻസിൽ ഫോക്കസ് റിംഗ് ക്രമീകരിക്കുക.
- പ്രൊജക്ടർ സ്ക്രീനിൽ നിന്ന് ഉചിതമായ അകലത്തിലാണെന്ന് ഉറപ്പാക്കുക.
- ചിത്രം ട്രപസോയിഡൽ ആണ്:
- Adjust the keystone correction setting in the projector's menu.
- പ്രൊജക്ടർ കഴിയുന്നത്രയും സ്ക്രീനിന് ലംബമായി സ്ഥാപിച്ചിട്ടുണ്ടെന്ന് ഉറപ്പാക്കുക.
- Projector Overheats or Shuts Down:
- Ensure all ventilation vents are clear and not obstructed.
- എയർ ഫിൽട്ടറുകൾ വൃത്തിയാക്കുക.
- നന്നായി വായുസഞ്ചാരമുള്ള സ്ഥലത്ത് പ്രൊജക്ടർ പ്രവർത്തിപ്പിക്കുക.
- റിമോട്ട് കൺട്രോൾ പ്രവർത്തിക്കുന്നില്ല:
- റിമോട്ട് കൺട്രോളിലെ ബാറ്ററികൾ പരിശോധിച്ച് മാറ്റിസ്ഥാപിക്കുക.
- റിമോട്ടിനും പ്രൊജക്ടറിന്റെ ഐആർ റിസീവറിനും ഇടയിൽ തടസ്സങ്ങളൊന്നുമില്ലെന്ന് ഉറപ്പാക്കുക.
സ്പെസിഫിക്കേഷനുകൾ
| ഫീച്ചർ | വിശദാംശങ്ങൾ |
|---|---|
| ബ്രാൻഡ് | Sanyo (Tekswamp) |
| മോഡൽ | PLC-WXU700A |
| ഡിസ്പ്ലേ ടെക്നോളജി | 3എൽസിഡി |
| വെളുത്ത തെളിച്ചം | 3,800 ആൻസി ലുമെൻസ് |
| നേറ്റീവ് റെസല്യൂഷൻ | 1280x800 (ഡബ്ല്യുഎക്സ്ജിഎ) |
| കോൺട്രാസ്റ്റ് റേഷ്യോ | 500:1 |
| കണക്റ്റിവിറ്റി ടെക്നോളജി | എച്ച്ഡിഎംഐ, വിജിഎ |
| ഉൽപ്പന്ന അളവുകൾ | 10 x 13.1 x 3.1 ഇഞ്ച് |
| പ്രത്യേക ഫീച്ചർ | പോർട്ടബിൾ |
| ശുപാർശ ചെയ്യുന്ന ഉപയോഗങ്ങൾ | ബിസിനസ്സ് |
വാറൻ്റിയും പിന്തുണയും
For warranty information and technical support, please refer to the documentation provided at the time of purchase or contact your vendor. Keep your purchase receipt as proof of purchase for warranty claims.