ആമുഖം
This manual provides comprehensive instructions for the installation, operation, and maintenance of your Solaris Balcony Power Station Bracket. Designed for attaching solar panels to grid balconies, this high-quality bracket ensures a stable and secure mounting solution.
The Solaris bracket is made of lightweight and sturdy aluminum, offering two mounting options: a 0° attachment and an infinitely adjustable angle (approximately 30-45° depending on solar panel size). It includes protective rubber to prevent scratches on your railing and is designed for easy, drill-free installation.
ഉൽപ്പന്നം കഴിഞ്ഞുview

An illustration showing the Solaris Balcony Power Station Bracket securely installed on a grid balcony railing, supporting a solar panel. The image highlights the robust attachment mechanism and the overall integration with the balcony structure.
- Extremely Stable: Our photovoltaic bracket for balcony railings offers an extremely stable attachment that is secure against falling out.
- For Grid Balcony Railings: Specifically designed for vertical grid balconies, providing a practical solution for photovoltaic mounting.
- Easy Installation without Drilling: The mounting kit includes rails, hooks, and screws for attaching a photovoltaic module. Fits most PV module sizes.
- ക്രമീകരിക്കാവുന്ന ആംഗിൾ: Allows for 0° mounting as well as infinitely adjustable angle adjustment to optimally align the PV module.
- Protection against Scratches: Includes protective rubber for self-adhesion, reliably protecting your balcony railing from scratches.
- പരിസ്ഥിതി സൗഹൃദം: Enables the use of clean solar energy, contributing to environmental preservation.
സജ്ജീകരണവും ഇൻസ്റ്റാളേഷനും
Follow these steps for a secure and efficient installation of your Solaris Balcony Power Station Bracket.
1. ഘടകങ്ങൾ അൺപാക്ക് ചെയ്യുക

എ വിശദമായി view of all components included in the mounting kit for one PV module. This includes various rails, hooks, screws, and end caps, designed for easy, drill-free attachment to grid balconies.
Carefully unpack all components. Ensure all parts listed in the kit are present: rails, hooks, screws, and protective rubber.
2. Prepare Railing with Protective Rubber

Close-up image showing the application of the self-adhesive protective rubber strips to the mounting material. This step is crucial for protecting your balcony railing from scratches during and after installation.
Before attaching the bracket, apply the included protective rubber strips to the parts of the mounting material that will come into contact with your balcony railing. This prevents scratches and provides additional safety.
3. Attach Hooks to Balcony Railing
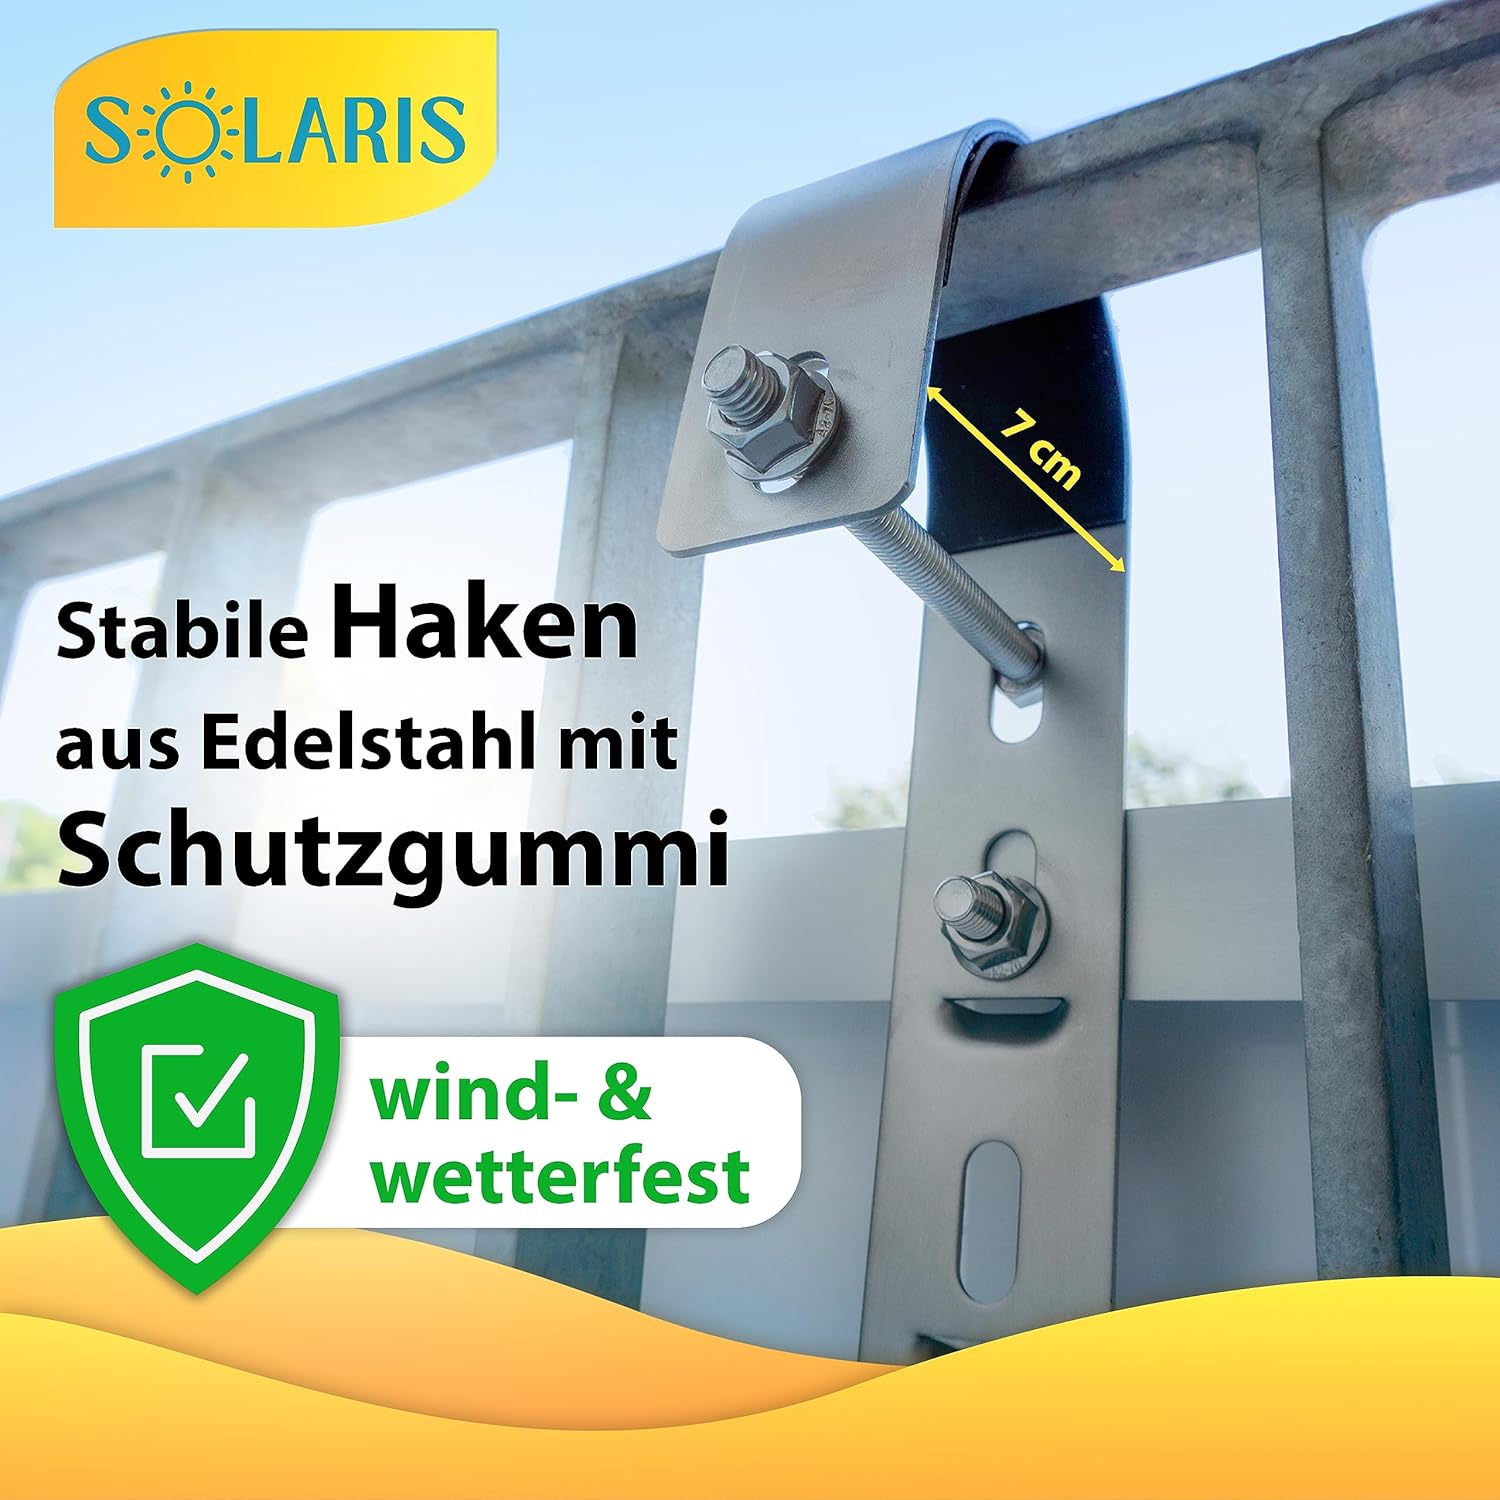
A close-up of one of the stable stainless steel hooks, featuring protective rubber, securely fastened to a balcony railing. The image highlights the robust design and the 7 cm dimension of the hook, ensuring wind and weather resistance.
Securely attach the stable stainless steel hooks to your grid balcony railing using the provided screws. Ensure they are tightened firmly for maximum stability. The hooks are designed to be wind and weather resistant.
4. Mount Solar Panel to Bracket

An image illustrating the two primary mounting options for the solar panel bracket: a flat 0° attachment for minimal projection, and an infinitely adjustable angle option for optimizing solar exposure. Both methods ensure secure fastening to the balcony railing.
Attach your solar panel to the bracket rails. The bracket offers two main mounting options:
- 0° Flat Attachment: For a flush mounting against the railing.
- Infinitely Adjustable Angle: Allows you to set the solar panel at an optimal angle (approx. 30-45°) for maximum sun exposure, depending on your specific panel size and location. Adjust the angle by loosening and tightening the appropriate screws on the bracket.
Ensure all screws are securely fastened once the desired angle is set. The system is designed to be extremely stable and safe.

A view of the Solaris Balcony Power Station Bracket with a solar panel, successfully installed on a balcony railing of a house. This image demonstrates the aesthetic integration and practical application of the bracket in a residential setting.
പ്രവർത്തന നിർദ്ദേശങ്ങൾ
The Solaris Balcony Power Station Bracket is primarily a static mounting solution. Its "operation" involves setting and, if necessary, adjusting the angle of your solar panel to optimize energy capture.
- ആംഗിൾ അഡ്ജസ്റ്റ്മെൻ്റ്: To change the angle of your solar panel, carefully loosen the adjustment screws on the bracket. Adjust the panel to the desired tilt, then firmly re-tighten all screws to ensure stability. This adjustment should be done safely and, if possible, with assistance.
- Fixed 0° Position: If you prefer a flat mounting, ensure the bracket is configured for the 0° attachment option as described in the setup section. No further adjustment is needed for this position.
Once installed and the angle is set, the bracket requires no further active operation. It provides a stable platform for your solar panel to generate power.
മെയിൻ്റനൻസ്
Regular maintenance ensures the longevity and continued performance of your Solaris Balcony Power Station Bracket.
- ആനുകാലിക പരിശോധന: Annually, or more frequently in harsh weather conditions, inspect all screws, bolts, and connections to ensure they remain tight. Re-tighten any loose fasteners.
- ശുചിത്വം: While the bracket itself requires minimal cleaning, you may wipe it down with a damp cloth to remove dust or grime. Avoid abrasive cleaners.
- Protective Rubber Check: Periodically check the protective rubber strips for wear or damage. If they show signs of degradation, consider replacing them to continue protecting your railing.
- നാശ പരിശോധന: Although made of aluminum, which is corrosion-resistant, inspect for any signs of unusual corrosion, especially around fasteners.
ട്രബിൾഷൂട്ടിംഗ്
This section addresses common concerns you might encounter with your bracket.
| പ്രശ്നം | സാധ്യമായ കാരണം | പരിഹാരം |
|---|---|---|
| Bracket feels unstable or wobbly. | Fasteners are loose; incorrect installation. | Ensure all screws and bolts are tightened firmly. Review installation steps to confirm correct assembly. |
| Scratches appearing on balcony railing. | Protective rubber not applied or damaged. | Ensure the protective rubber strips are correctly applied to all contact points. Replace damaged rubber if necessary. |
| Difficulty adjusting the angle. | Screws are too tight; mechanism is stiff. | Loosen adjustment screws sufficiently before attempting to change the angle. Apply a small amount of lubricant if the mechanism is stiff. |
സ്പെസിഫിക്കേഷനുകൾ
| ആട്രിബ്യൂട്ട് | വിശദാംശങ്ങൾ |
|---|---|
| ഭാഗം നമ്പർ | 4170000125235 |
| ഇനത്തിൻ്റെ ഭാരം | 2.49 കിലോഗ്രാം |
| ഉൽപ്പന്ന അളവുകൾ (L x W x H) | 39 x 16 x 8 സെ.മീ |
| മെറ്റീരിയൽ | അലുമിനിയം |
| നിറം | ലോഹം |
| ഫിനിഷ് തരം | കറുപ്പ് |
| മൗണ്ടിംഗ് തരം | റെയിലിംഗ് മൗണ്ട് |
| ക്രമീകരിക്കാവുന്ന ആംഗിൾ | 0° and Infinitely Adjustable (approx. 30-45°) |
വാറൻ്റിയും പിന്തുണയും
For information regarding warranty coverage and customer support, please refer to the documentation provided at the time of purchase or contact Solaris customer service directly. Keep your proof of purchase for any warranty claims.
For further assistance or technical inquiries, please visit the official Solaris webസൈറ്റ് അല്ലെങ്കിൽ അവരുടെ പിന്തുണാ ചാനലുകളുമായി ബന്ധപ്പെടുക.


