1. ആമുഖം
This manual provides detailed instructions for the safe and efficient operation of your NexiGo Aurora Pro Ultra Short Throw 4K Tri-Color Laser Projector. Please read this manual thoroughly before using the product and retain it for future reference.
The NexiGo Aurora Pro is designed to deliver a high-quality home cinema experience with its 4K resolution, tri-color laser technology, and ultra-short throw capabilities.
2 സുരക്ഷാ വിവരങ്ങൾ
പ്രധാനപ്പെട്ട സുരക്ഷാ നിർദ്ദേശങ്ങൾ:
- Do not look directly into the projector lens when the projector is on. The laser light source is powerful and can cause eye damage.
- Ensure proper ventilation around the projector. Do not block ventilation openings.
- പ്രൊജക്ടറിനൊപ്പം നൽകിയിരിക്കുന്ന പവർ അഡാപ്റ്റർ മാത്രം ഉപയോഗിക്കുക.
- തീയോ വൈദ്യുതാഘാതമോ തടയാൻ പ്രൊജക്ടർ മഴയിലോ ഈർപ്പത്തിലോ തുറന്നുകാട്ടരുത്.
- റേഡിയേറ്ററുകൾ, ഹീറ്റ് രജിസ്റ്ററുകൾ, സ്റ്റൗകൾ അല്ലെങ്കിൽ താപം ഉൽപ്പാദിപ്പിക്കുന്ന മറ്റ് ഉപകരണങ്ങൾ പോലുള്ള താപ സ്രോതസ്സുകളിൽ നിന്ന് പ്രൊജക്ടറെ അകറ്റി നിർത്തുക.
- ഇടിമിന്നൽ ഉണ്ടാകുമ്പോഴോ ദീർഘനേരം ഉപയോഗിക്കാതിരിക്കുമ്പോഴോ പ്രൊജക്ടർ പ്ലഗ് ഊരിവയ്ക്കുക.
- എല്ലാ സേവനങ്ങളും യോഗ്യതയുള്ള സേവന ഉദ്യോഗസ്ഥർക്ക് റഫർ ചെയ്യുക.
3. പാക്കേജ് ഉള്ളടക്കം
നിങ്ങളുടെ പാക്കേജിൽ എല്ലാ ഇനങ്ങളും ഉണ്ടെന്ന് ഉറപ്പാക്കുക:
- NexiGo Aurora Pro Projector
- റിമോട്ട് കൺട്രോൾ
- പവർ കേബിൾ
- ഉപയോക്തൃ മാനുവൽ (ഈ പ്രമാണം)
- ഓപ്ഷണൽ: 100/120 Fresnel Screen (if purchased as a bundle)
- ഓപ്ഷണൽ: 3D Glasses (if purchased as a bundle)
4. ഉൽപ്പന്നം കഴിഞ്ഞുview
4.1 പ്രൊജക്ടർ ഘടകങ്ങൾ
Familiarize yourself with the main components of your NexiGo Aurora Pro projector.

ചിത്രം 1: ഫ്രണ്ട് view of the NexiGo Aurora Pro projector, showcasing its sleek design and front speaker grille.

ചിത്രം 2: പിൻഭാഗം view of the NexiGo Aurora Pro projector, highlighting the various input and output ports for connectivity.
The projector features multiple connectivity options including HDMI ports, USB ports, and an Ethernet port for network connectivity. One HDMI port supports eARC.
4.2 വിദൂര നിയന്ത്രണം
The included remote control allows for easy navigation and control of the projector's functions. It features backlit keys for use in dark environments.
5. സജ്ജീകരണം
5.1 പ്ലേസ്മെൻ്റ്
The Aurora Pro is an Ultra Short Throw (UST) projector, designed to project a large image from a very short distance to the screen or wall. Proper placement is crucial for optimal image quality.

ചിത്രം 3: Diagram illustrating the recommended placement distances for various screen sizes (80-150 inches) for the NexiGo Aurora Pro projector.
Refer to the table below for recommended distances from the screen based on desired image size:
| സ്ക്രീൻ വലുപ്പം (ഡയഗണൽ) | A: Screen to Front | B: Screen to Rear | C: Screen to Top | D: Screen to Foot | E: Y+D |
|---|---|---|---|---|---|
| 80" | 20.00 | 3.96 | 6.95 | 11.76 | 50.98 |
| 90" | 21.92 | 5.88 | 7.91 | 12.72 | 56.71 |
| 100" | 23.84 | 7.80 | 8.87 | 13.68 | 62.66 |
| 110" | 25.76 | 9.72 | 9.83 | 14.64 | 68.57 |
| 120" | 27.56 | 11.52 | 10.91 | 15.72 | 74.54 |
| 135" | 30.44 | 14.40 | 12.35 | 17.16 | 83.35 |
| 150" | 33.32 | 17.28 | 13.79 | 18.60 | 92.10 |
Note: The unit for values in the table is inches. Measurements do not include the screen border size.
5.2 ബന്ധിപ്പിക്കുന്ന പവർ
- പ്രൊജക്ടറിന്റെ പവർ ഇൻപുട്ട് പോർട്ടിലേക്ക് പവർ കേബിൾ ബന്ധിപ്പിക്കുക.
- പവർ കേബിളിന്റെ മറ്റേ അറ്റം ഒരു ഗ്രൗണ്ടഡ് ഇലക്ട്രിക്കൽ ഔട്ട്ലെറ്റിലേക്ക് പ്ലഗ് ചെയ്യുക.
5.3 ഉപകരണങ്ങൾ ബന്ധിപ്പിക്കുന്നു
The Aurora Pro offers various ports for connecting external devices:
- എച്ച്ഡിഎംഐ: Connect Blu-ray players, gaming consoles, streaming devices, or computers. HDMI 1 supports eARC.
- USB: Connect USB drives for media playback or external accessories.
- ഒപ്റ്റിക്കൽ ഓഡിയോ: ബാഹ്യ ഓഡിയോ സിസ്റ്റങ്ങളുമായി ബന്ധിപ്പിക്കുക.
- ഇഥർനെറ്റ്: വയർഡ് നെറ്റ്വർക്ക് കണക്ഷനായി.
പ്രൊജക്ടർ ഓൺ ചെയ്യുന്നതിന് മുമ്പ് എല്ലാ കേബിളുകളും സുരക്ഷിതമായി ബന്ധിപ്പിച്ചിട്ടുണ്ടെന്ന് ഉറപ്പാക്കുക.
6. പ്രവർത്തന നിർദ്ദേശങ്ങൾ
6.1 പവർ ഓൺ/ഓഫ്
- പവർ ഓൺ ചെയ്യാൻ, പ്രൊജക്ടറിലോ റിമോട്ട് കൺട്രോളിലോ ഉള്ള പവർ ബട്ടൺ അമർത്തുക.
- To power off, press the power button again. A confirmation prompt may appear.
6.2 പ്രാരംഭ സജ്ജീകരണ വിസാർഡ്
Upon first power-on, the projector will guide you through an initial setup wizard to configure language, network settings, and image adjustments.
6.3 ഇമേജ് അഡ്ജസ്റ്റ്മെന്റ്
The Aurora Pro features automatic screen adoption and dynamic dimming. Manual adjustments can be made via the settings menu.
- ഫോക്കസ്: Adjust the focus using the remote control or on-screen menu to achieve a sharp image.
- കീസ്റ്റോൺ തിരുത്തൽ: If the image is not perfectly rectangular, use keystone correction to adjust. Note that excessive keystone correction can reduce image quality.
- സ്ക്രീൻ വിന്യാസം: Fine-tune the image position to fit your screen perfectly.
6.4 ഇൻപുട്ട് ഉറവിട തിരഞ്ഞെടുപ്പ്
Press the "Input" button on the remote control to select between connected HDMI devices, USB media, or internal smart TV applications.
6.5 ഓഡിയോ ക്രമീകരണങ്ങൾ
The projector includes built-in 60W stereo speakers with Dolby Atmos support. You can adjust volume and audio modes through the settings menu. For external audio systems, connect via HDMI eARC or optical audio output.

ചിത്രം 4: Visual representation of the immersive sound experience provided by the projector's 60W speakers, supporting Dolby Atmos and DTS HD.
6.6 Smart Features and Apps
The projector includes a smart TV interface. Navigate using the remote control to access pre-installed applications or download new ones from the app store.
കുറിപ്പ്: Some streaming applications may require specific external devices for 4K content or may have compatibility limitations.
6.7 ഗെയിമിംഗ് മോഡ്
For an optimized gaming experience, enable Gaming Mode in the settings. This mode reduces input lag to 8ms (tested at 1080p 240Hz) and supports 4K@120Hz input, providing smoother motion.
ചിത്രം 5: A user engaged in gaming on a large projected screen, demonstrating the projector's low latency and 4K 120Hz input capabilities for a smooth gaming experience.
7. പരിപാലനം
7.1 പ്രൊജക്ടർ വൃത്തിയാക്കൽ
- പുറം: Use a soft, dry cloth to wipe the projector's exterior. Do not use abrasive cleaners or solvents.
- ലെൻസ്: Gently clean the projector lens with a lens cleaning cloth specifically designed for optical surfaces. Avoid touching the lens directly with your fingers.
7.2 Air Filter (if applicable)
Check the user manual for specific instructions regarding air filter cleaning or replacement, if your model is equipped with one. Regular cleaning ensures optimal performance and prevents overheating.
7.3 ഫേംവെയർ അപ്ഡേറ്റുകൾ
Periodically check for firmware updates through the projector's settings menu. Updates can improve performance, add features, and resolve issues.
8. പ്രശ്നപരിഹാരം
നിങ്ങളുടെ പ്രൊജക്ടറിൽ പ്രശ്നങ്ങൾ നേരിടുകയാണെങ്കിൽ, ഇനിപ്പറയുന്ന പൊതുവായ പ്രശ്നങ്ങളും പരിഹാരങ്ങളും പരിശോധിക്കുക:
| പ്രശ്നം | സാധ്യമായ കാരണം | പരിഹാരം |
|---|---|---|
| ചിത്രമൊന്നും പ്രദർശിപ്പിച്ചിട്ടില്ല | പവർ കേബിൾ അയഞ്ഞിരിക്കുന്നു, തെറ്റായ ഇൻപുട്ട് ഉറവിടം, ഉപകരണം ബന്ധിപ്പിച്ചിട്ടില്ല. | Check power connections. Select correct input source. Ensure source device is on and connected. |
| ചിത്രം മങ്ങിയതാണ് | Out of focus, dirty lens, incorrect placement. | Adjust focus. Clean the lens. Verify projector placement according to guidelines. |
| ശബ്ദമില്ല | Volume too low, incorrect audio output setting, external audio system issue. | Increase volume. Check audio output settings on projector and source. Verify external audio system connections. |
| റിമോട്ട് കൺട്രോൾ പ്രവർത്തിക്കുന്നില്ല | ബാറ്ററികൾ കുറവാണ്, തടസ്സമുണ്ട്, റിമോട്ട് ജോടിയാക്കിയിട്ടില്ല. | Replace batteries. Remove obstructions. Re-pair remote if necessary (refer to remote control section in full manual). |
| Smart apps not working or slow | Network connectivity issues, outdated app, insufficient memory. | Check Wi-Fi/Ethernet connection. Update the app. Restart the projector. |
For further assistance, please contact NexiGo customer support.
9 സ്പെസിഫിക്കേഷനുകൾ
| ഫീച്ചർ | വിശദാംശങ്ങൾ |
|---|---|
| മോഡൽ നമ്പർ | PJ92 |
| ഡിസ്പ്ലേ റെസല്യൂഷൻ | 3840 x 2160 (4K UHD) |
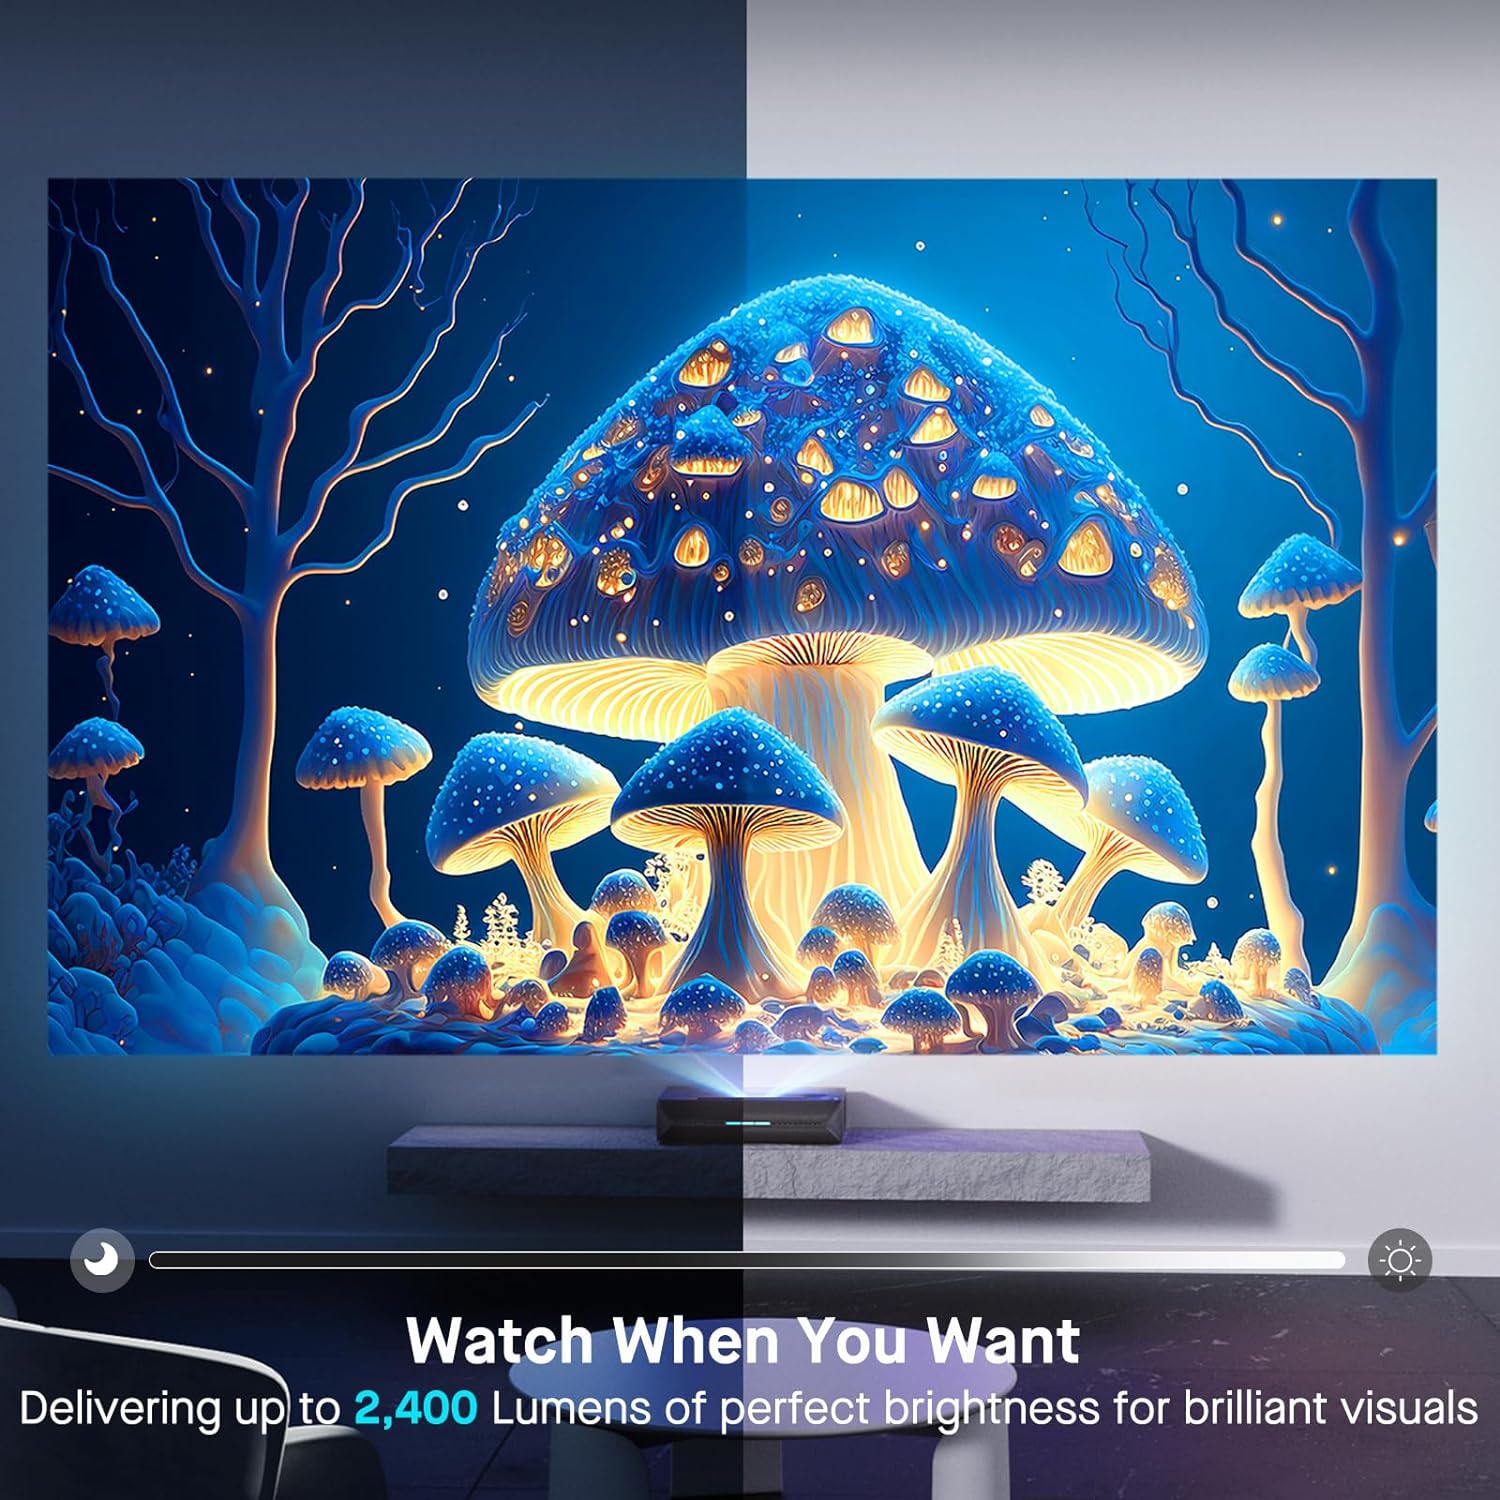
| തെളിച്ചം | 2400 ല്യൂമെൻസ് |
| പ്രകാശ സ്രോതസ്സ് | Tri-Color Laser (ALPD 4.0 RGB+) |
| നേറ്റീവ് കോൺട്രാസ്റ്റ് റേഷ്യോ | 3000:1 |
| ഡൈനാമിക് കോൺട്രാസ്റ്റ് റേഷ്യോ | >6000:1 (with dynamic laser dimming) |
| വർണ്ണ ഗാമറ്റ് | 107% റെക്ക.2020 |
| HDR പിന്തുണ | ഡോൾബി വിഷൻ, HDR10+, HLG |
| 3D പിന്തുണ | സജീവ 3D |
| ഇൻപുട്ട് ലാഗ് | 8ms (tested at 1080p 240Hz) |
| Max Input Resolution/Refresh Rate | 4K@120Hz |
| MEMC | Yes (120Hz) |
| ഓഡിയോ ഔട്ട്പുട്ട് | 60W Stereo Speakers (2x15W Woofers, 2x15W Tweeters), Dolby Atmos, eARC |
| കണക്റ്റിവിറ്റി | HDMI (3, one with eARC), USB, Optical Audio, Ethernet |
| ഉൽപ്പന്ന അളവുകൾ | 21.54 x 16.04 x 4.81 ഇഞ്ച് |
| ഇനത്തിൻ്റെ ഭാരം | 22 പൗണ്ട് |
| ദൃശ്യമായ സ്ക്രീൻ ഡയഗണൽ | 80" - 150" (381 cm max) |
| ലേസർ ആയുസ്സ് | 25,000 മണിക്കൂർ |
10. വാറൻ്റിയും പിന്തുണയും
NexiGo provides customer support and warranty services for its products. For specific warranty terms and conditions, please refer to the warranty card included with your product or visit the official NexiGo webസൈറ്റ്.
ഉപഭോക്തൃ പിന്തുണ:
- For technical assistance, troubleshooting, or product inquiries, please contact NexiGo customer support.
- Contact information can typically be found on the NexiGo webസൈറ്റ് അല്ലെങ്കിൽ ഉൽപ്പന്ന പാക്കേജിംഗിൽ.
- NexiGo offers 24-hour customer support and lifetime technical support.
റിട്ടേണുകളും എക്സ്ചേഞ്ചുകളും:
- Refer to your purchase agreement or retailer's policy for details on returns and exchanges. NexiGo typically offers a 30-day return or exchange period.


