ആമുഖം
This manual provides comprehensive instructions for the operation, maintenance, and troubleshooting of the FCAR F804 Heavy Duty Truck Diagnostic Tool. The F804 is designed for professional diagnostics of construction machinery and heavy-duty trucks, offering features such as DPF regeneration, full system scanning, and OBDII/Diesel OBD capabilities. Please read this manual thoroughly before using the device to ensure proper and safe operation.
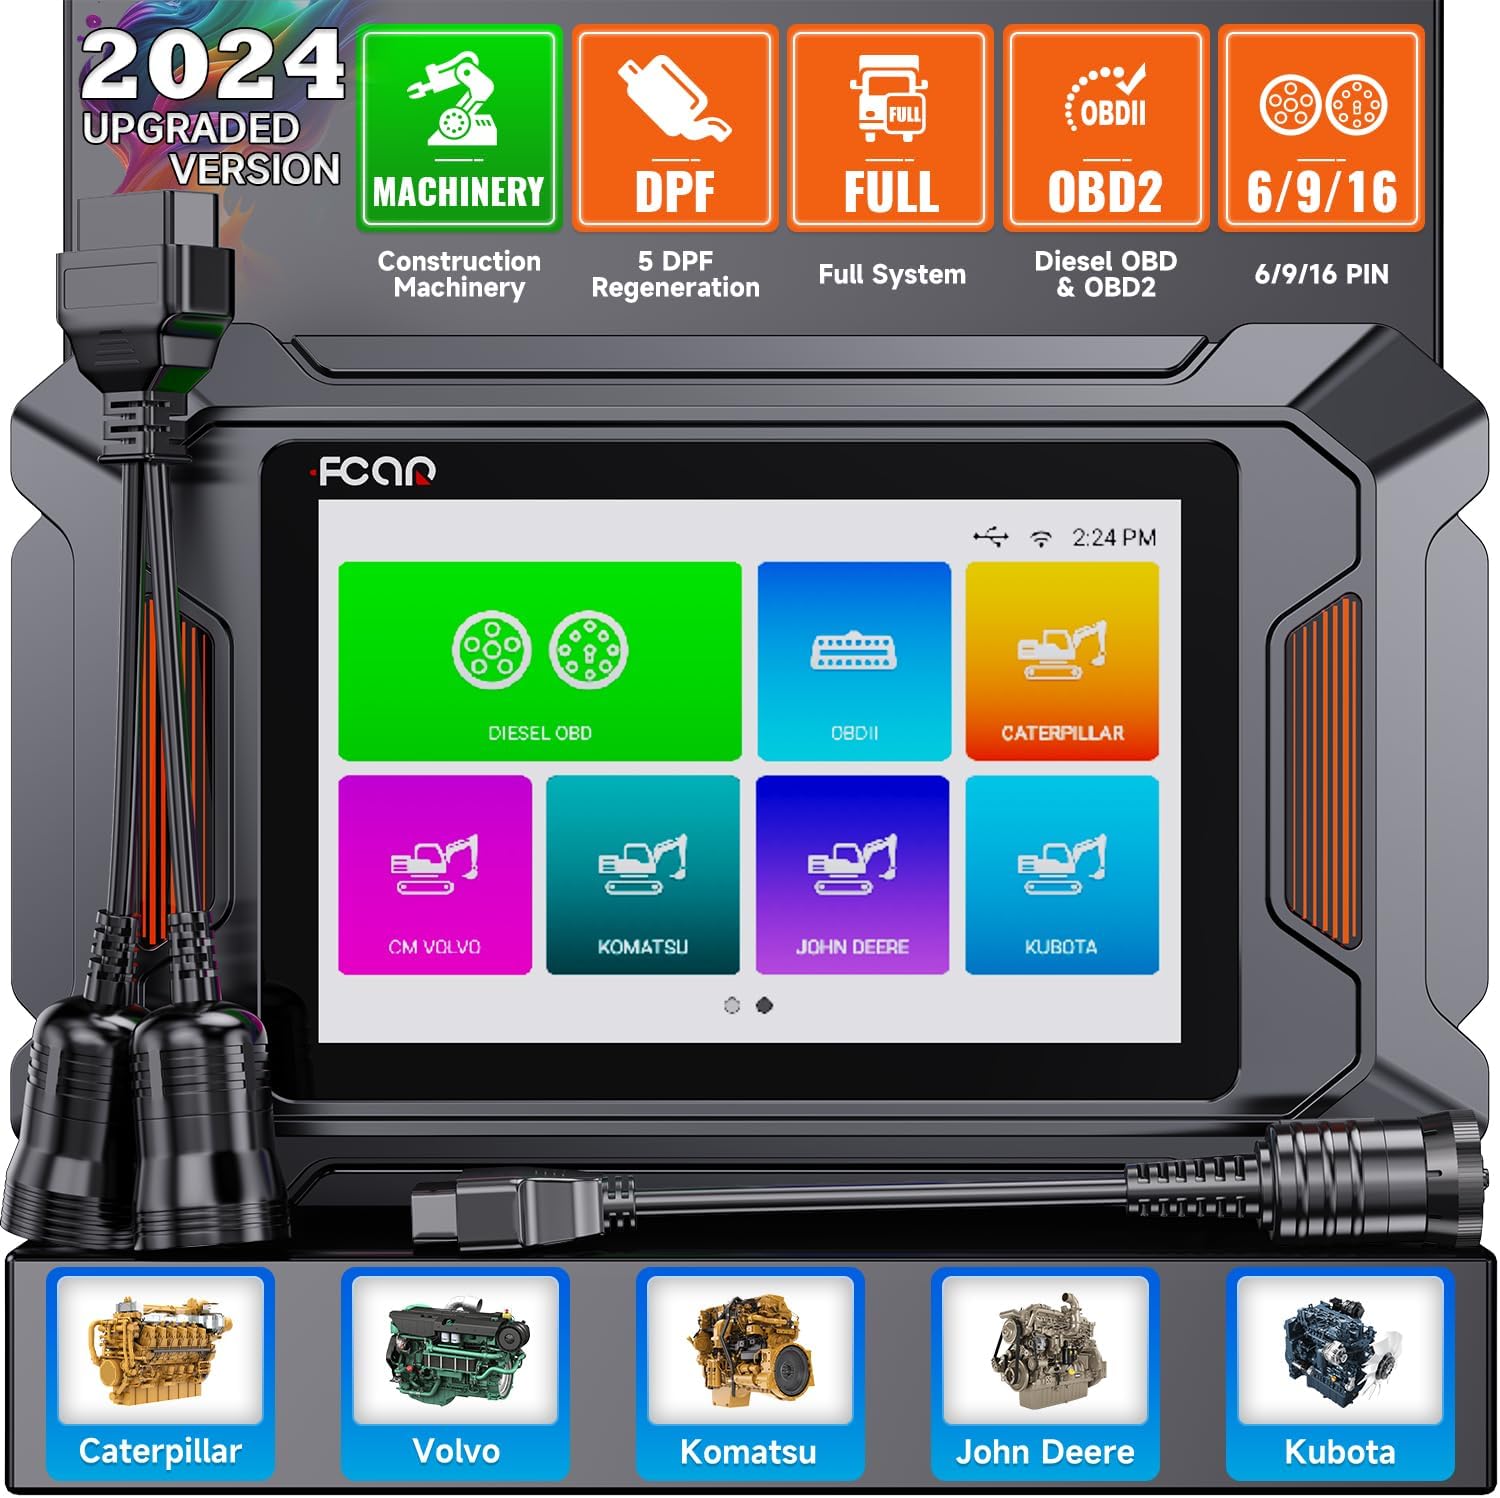
Figure 1: FCAR F804 Diagnostic Tool and included cables.
ഉൽപ്പന്നം കഴിഞ്ഞുview കൂടാതെ പ്രധാന സവിശേഷതകൾ
The FCAR F804 is an advanced diagnostic scanner equipped with a 5-inch LCD display, 1GB RAM, and 8GB flash memory. It supports a wide range of diagnostic functions for various construction machinery and heavy-duty trucks.
Comprehensive Diagnostic Capabilities
- DPF Regeneration & Reset: Supports 5 DPF regeneration functions for Caterpillar, Volvo, Komatsu, John Deere, and Kubota construction machinery.
- പൂർണ്ണ സിസ്റ്റം ഡയഗ്നോസ്റ്റിക്സ്: Capable of scanning all major systems including Engine, ABS, Transmission, SRS, Hydraulic System, Steering Control, and more.
- OBDII & Diesel OBD Support: Compatible with standard OBDII protocols and private Diesel OBD protocols for comprehensive engine diagnostics.
- Read/Clear Trouble Codes: Quickly identify and clear diagnostic trouble codes (DTCs).
- തത്സമയ ഡാറ്റ സ്ട്രീം: View real-time data parameters in text or graph format.
- ECU വിവരങ്ങൾ: Retrieve Electronic Control Unit information.
- I/M സന്നദ്ധത: Check emission system readiness.
- O2 Monitor Test & On-Board Monitor Test: Perform specific monitor tests.
- ഘടക പരിശോധന: Test specific components of the vehicle.
- വാഹന വിവരം: Access vehicle identification details.
- Driving Test: Conduct specific driving cycle tests.
- DTC ലുക്ക്അപ്പ്: Built-in library for quick code definitions.

ചിത്രം 2: ഓവർview of supported diagnostic systems.

Figure 3: Professional DPF Regeneration and Reset Functionality.

Figure 4: Supported OBD II and Diesel OBD Standard Protocols & Private Protocols.
അനുയോജ്യത
The F804 is highly compatible with a wide range of construction machinery and heavy-duty trucks, including but not limited to:
- കാറ്റർപില്ലർ
- വോൾവോ
- കൊമത്സു
- ജോൺ ഡിയർ
- കുബോട്ട
- കേസ്
- ഹിറ്റാച്ചി
- യാൻമാർ
- And other major construction and heavy-duty vehicle brands.

Figure 5: Extensive compatibility with construction machinery.
സജ്ജീകരണവും പ്രാരംഭ ഉപയോഗവും
Before first use, ensure the device is fully charged and connected to a stable Wi-Fi network for updates.
- അൺപാക്ക് ചെയ്യുന്നു: Carefully remove all components from the packaging. Verify all items listed in the "Packing List" section are present.
- പവർ ഓൺ: ഉപകരണം ഓണാക്കാൻ പവർ ബട്ടൺ അമർത്തിപ്പിടിക്കുക.
- ഭാഷ തിരഞ്ഞെടുക്കൽ: നിങ്ങളുടെ ഇഷ്ടപ്പെട്ട ഭാഷ തിരഞ്ഞെടുക്കാൻ ഓൺ-സ്ക്രീൻ നിർദ്ദേശങ്ങൾ പാലിക്കുക.
- Wi-Fi കണക്ഷൻ: Navigate to the settings menu and connect the device to a stable Wi-Fi network. This is crucial for software updates and online features.
- സോഫ്റ്റ്വെയർ അപ്ഡേറ്റ്: After connecting to Wi-Fi, check for available software updates. It is highly recommended to update the software to the latest version for optimal performance and compatibility.
- വാഹനവുമായി ബന്ധിപ്പിക്കുന്നു:
- Locate the diagnostic port on your vehicle (typically a 6-pin, 9-pin, or 16-pin OBDII connector).
- Select the appropriate diagnostic cable (Main cable, Diesel 6 & 9 pin connector, or CAT-9 connector) and connect it to the F804 and the vehicle's diagnostic port.
- സുരക്ഷിതമായ കണക്ഷൻ ഉറപ്പാക്കുക.

Figure 6: Wi-Fi connection and advanced features for setup and operation.
പ്രവർത്തന നിർദ്ദേശങ്ങൾ
Once connected to the vehicle, the F804 will automatically detect the vehicle's system. Follow these steps for common diagnostic operations:
Performing a Diagnostic Scan
- വാഹന തിരിച്ചറിയൽ: The tool will attempt to automatically identify the vehicle. If unsuccessful, you may need to manually select the vehicle make, model, and year.
- സിസ്റ്റം തിരഞ്ഞെടുപ്പ്: From the main menu, select the desired diagnostic function (e.g., "Diesel OBD", "OBDII", "Caterpillar", "Volvo", "Komatsu", "John Deere", "Kubota").
- ഫംഗ്ഷൻ തിരഞ്ഞെടുക്കൽ: Choose the specific function you wish to perform, such as "Read Fault Code", "Erase Fault Code", "Live Data", or "DPF Regeneration".
- Executing Function: Follow the on-screen prompts to execute the selected function.

Figure 7: Full System Diagnostic Scanner interface.

Figure 8: OBD-Level Diagnostic on Engine functions.
DPF Regeneration Procedure (Example: Volvo)
The DPF regeneration process may vary slightly between vehicle models. Always refer to the vehicle's specific service manual for detailed instructions. The following is a general guide:
- From the main menu, select the vehicle brand (e.g., "Volvo").
- Navigate to the "DPF" function.
- Select "Start Test" or similar option.
- Confirm vehicle details if prompted.
- Choose "Diesel Particulate Filter Service Regeneration" or equivalent.
- Follow all on-screen instructions and safety warnings. Ensure the vehicle is in a well-ventilated area and meets all conditions for regeneration (e.g., engine temperature, fuel level).

Figure 9: Step-by-step guide for DPF function usage.
Data Management and Reporting
The F804 allows for efficient management of diagnostic data:
- റിപ്പോർട്ട് ജനറേഷൻ: സൃഷ്ടിക്കുക ഒപ്പം view diagnostic reports directly on the device. These reports can be saved and reviewed പിന്നീട്.
- സ്ക്രീൻഷോട്ട് പ്രവർത്തനം: Capture screenshots of diagnostic results or live data for documentation.
- ഫീഡ്ബാക്ക്: Submit feedback directly through the device.
- CodeScan Manager: Manage and review scanned codes.

Figure 10: Data Management and Pin Detect features.

Figure 11: Data Management and Report generation capabilities.
ട്രബിൾഷൂട്ടിംഗ്
This section addresses common issues you might encounter with the FCAR F804 diagnostic tool.
| പ്രശ്നം | സാധ്യമായ കാരണം | പരിഹാരം |
|---|---|---|
| ഉപകരണം പവർ ഓണാക്കുന്നില്ല. | Low battery or faulty power adapter. | Charge the device using the provided power adapter. If issue persists, contact support. |
| വാഹനവുമായി ആശയവിനിമയമില്ല. | Incorrect cable connection, faulty vehicle diagnostic port, or incorrect vehicle selection. |
|
| Wi-Fi കണക്ഷൻ പരാജയപ്പെട്ടു. | Incorrect password, weak signal, or network issue. |
|
| Software update failure. | Unstable Wi-Fi connection or insufficient storage. |
|

Figure 12: Humanized Pin Detect Function for connection troubleshooting.
സ്പെസിഫിക്കേഷനുകൾ
| ഫീച്ചർ | വിശദാംശങ്ങൾ |
|---|---|
| ബ്രാൻഡ് | ഓട്ടോഫിക്സ് |
| മോഡൽ നമ്പർ | F804 |
| ഉൽപ്പന്ന അളവുകൾ | 11.02 x 5.91 x 3.94 ഇഞ്ച് |
| സ്ക്രീൻ വലിപ്പം | 5 ഇഞ്ച് |
| റാം | 1 ജിബി |
| ഫ്ലാഷ് മെമ്മറി | 8 ജിബി |
| കണക്റ്റിവിറ്റി | 2.4GHz Wi-Fi, Type-C interface |
| ഡയഗ്നോസ്റ്റിക് പോർട്ടുകൾ | OBDII, Diesel 6/9 pin, CAT-9 |
മെയിൻ്റനൻസ്
Proper maintenance ensures the longevity and optimal performance of your FCAR F804 diagnostic tool.
- വൃത്തിയാക്കൽ: ഉപകരണം വൃത്തിയാക്കാൻ മൃദുവായതും ഉണങ്ങിയതുമായ തുണി ഉപയോഗിക്കുക. അബ്രസീവ് ക്ലീനറുകളോ ലായകങ്ങളോ ഉപയോഗിക്കുന്നത് ഒഴിവാക്കുക.
- സംഭരണം: Store the device in a cool, dry place away from direct sunlight and extreme temperatures. Keep it in its original case or a protective pouch when not in use.
- കേബിൾ കെയർ: Inspect diagnostic cables regularly for any signs of wear, cuts, or damage. Replace damaged cables immediately to prevent electrical hazards or communication issues. The F804 features reinforced cables for durability.
- സോഫ്റ്റ്വെയർ അപ്ഡേറ്റുകൾ: Regularly check for and install software updates to ensure compatibility with new vehicle models and to benefit from performance enhancements and bug fixes.
- ബാറ്ററി കെയർ: If the device has a built-in rechargeable battery, avoid fully discharging it frequently. Charge it regularly, even if not in active use, to maintain battery health.

Figure 13: Reinforced diagnostic cables for enhanced durability.
പായ്ക്കിംഗ് ലിസ്റ്റ്
The following items are included in the FCAR F804 package:
- FCAR F804 Diagnostic Tool Unit
- Main Diagnostic Cable
- Diesel 6 & 9 Pin Connector
- CAT-9 Connector
- ഉപയോക്തൃ മാനുവൽ
- Storage Case (if applicable, not explicitly listed but implied by images)

Figure 14: Contents of the FCAR F804 Packing List.
വാറൻ്റിയും പിന്തുണയും
AUTOPHIX is committed to providing excellent customer service and support for the FCAR F804 diagnostic tool.
- വാറൻ്റി: The product comes with a 36-month worry-free warranty.
- സാങ്കേതിക സഹായം: Enjoy 7*24h professional technical support.
- സോഫ്റ്റ്വെയർ അപ്ഡേറ്റുകൾ: Benefit from lifetime free software updates, ensuring your tool remains current with the latest vehicle data and diagnostic capabilities.
For any questions, technical assistance, or warranty claims, please contact AUTOPHIX customer service through their official channels.

Figure 15: Professional team for satisfied service.


