1. ആമുഖം
Thank you for choosing the VONLUCE 52-inch Ceiling Fan with Lights. This manual provides detailed instructions for the safe installation, operation, and maintenance of your new ceiling fan. Please read this manual thoroughly before installation and keep it for future reference.

Image 1: VONLUCE 52-inch Ceiling Fan and included accessories.
2 സുരക്ഷാ വിവരങ്ങൾ
To reduce the risk of electric shock, fire, or personal injury, always follow these basic safety precautions:
- ഫാൻ ഇൻസ്റ്റാൾ ചെയ്യുന്നതിന് മുമ്പ് എല്ലാ നിർദ്ദേശങ്ങളും വായിക്കുക.
- Ensure the installation site is suitable for supporting the fan's weight (minimum 35 lbs).
- എല്ലാ വയറിംഗും ദേശീയ, പ്രാദേശിക ഇലക്ട്രിക്കൽ കോഡുകൾക്ക് അനുസൃതമായിരിക്കണം. വയറിംഗിൽ നിങ്ങൾക്ക് പരിചയമില്ലെങ്കിൽ, യോഗ്യതയുള്ള ഒരു ഇലക്ട്രീഷ്യനെ സമീപിക്കുക.
- Disconnect power at the circuit breaker or fuse box before beginning installation or performing any maintenance.
- Do not operate the fan with damaged parts. Replace any damaged components before use.
- ഫാൻ പ്രവർത്തിക്കുമ്പോൾ കൈകൾ, വസ്ത്രങ്ങൾ, മറ്റ് വസ്തുക്കൾ എന്നിവ ഫാൻ ബ്ലേഡുകളിൽ നിന്ന് മാറ്റി വയ്ക്കുക.
- Do not use the fan in areas exposed to direct water spray or excessive moisture. This fan is suitable for covered damp സ്ഥാനങ്ങൾ.
3. പാക്കേജ് ഉള്ളടക്കം
Verify that all components listed below are included in your package. If any parts are missing or damaged, contact customer support before proceeding with installation.
- സീലിംഗ് ഫാൻ മോട്ടോർ ഹൗസിംഗ്
- ഫാൻ ബ്ലേഡുകൾ (3)
- എൽഇഡി ലൈറ്റ് കിറ്റ്
- റിമോട്ട് കൺട്രോൾ
- Remote Control Wall Mount Bracket
- Downrods (5-inch and 10-inch options)
- മൌണ്ടിംഗ് ബ്രാക്കറ്റ്
- Hardware Pack (screws, wire nuts, washers)
- ഇൻസ്ട്രക്ഷൻ മാനുവൽ
4 സ്പെസിഫിക്കേഷനുകൾ
| ഫീച്ചർ | സ്പെസിഫിക്കേഷൻ |
|---|---|
| മോഡലിൻ്റെ പേര് | VONLUCE 52 18W LED Ceiling Fan |
| ഫാൻ വലിപ്പം | 52 ഇഞ്ച് |
| മോട്ടോർ തരം | ഡിസി മോട്ടോർ |
| ബ്ലേഡുകളുടെ എണ്ണം | 3 |
| ഫാൻ വേഗത | 6 ലെവലുകൾ |
| ലൈറ്റ് തരം | സംയോജിത എൽഇഡി |
| വാട്ട്tagഇ (വെളിച്ചം) | 22W |
| തിളങ്ങുന്ന ഫ്ലക്സ് | 2200 ല്യൂമെൻസ് |
| വർണ്ണ താപനില | 3000K - 6500K (Stepless Adjustment) |
| മങ്ങുന്നു | 10% - 100% (Stepless Adjustment) |
| വാല്യംtage | 110 വോൾട്ട് |
| നിയന്ത്രണ രീതി | റിമോട്ട് കൺട്രോൾ |
| ടൈമർ പ്രവർത്തനം | 2, 4, അല്ലെങ്കിൽ 8 മണിക്കൂർ |
| ശബ്ദ നില | 35dB-ൽ താഴെ |
| ഇൻസ്റ്റലേഷൻ തരം | സെമി ഫ്ലഷ് മൗണ്ട് |
| ഇൻഡോർ/ഔട്ട്ഡോർ ഉപയോഗം | Covered Outdoor (Damp റേറ്റുചെയ്തത്) |

Image 2: Fan dimensions, mounting options, and room suitability.
5. സജ്ജീകരണവും ഇൻസ്റ്റാളേഷനും
Professional installation is recommended. Ensure power is disconnected before starting.
5.1 പ്രീ-ഇൻസ്റ്റലേഷൻ ചെക്ക്ലിസ്റ്റ്
- പ്രധാന സർക്യൂട്ട് ബ്രേക്കറിൽ പവർ ഓഫ് ചെയ്യുക.
- ഇലക്ട്രിക്കൽ ബോക്സ് സുരക്ഷിതമായി ഘടിപ്പിച്ചിട്ടുണ്ടെന്നും ഫാനിന്റെ ഭാരം താങ്ങാൻ കഴിവുള്ളതാണെന്നും ഉറപ്പാക്കുക.
- Gather all necessary tools: screwdriver, wire strippers, electrical tape, ladder.
5.2 മൗണ്ടിംഗ് ബ്രാക്കറ്റ് ഇൻസ്റ്റലേഷൻ
- Attach the mounting bracket to the ceiling electrical box using the screws provided. Ensure it is firmly secured.
5.3 Downrod Assembly
- Select either the 5-inch or 10-inch downrod based on your ceiling height and preference.
- Feed the fan wires through the chosen downrod.
- Secure the downrod to the fan motor housing with the provided pin and clip.
5.4 വയറിംഗ് കണക്ഷനുകൾ
- Carefully lift the fan assembly and hang it on the mounting bracket hook (if available) or have someone assist in holding it.
- Connect the fan's electrical wires to the household wiring according to the wiring diagram in the full instruction manual. Typically:
- കറുപ്പ് (തത്സമയം) മുതൽ കറുപ്പ് (തത്സമയം) വരെ
- വെള്ള (നിഷ്പക്ഷം) മുതൽ വെള്ള (നിഷ്പക്ഷം) വരെ
- Green/Bare Copper (Ground) to Green/Bare Copper (Ground)
- വയർ നട്ടുകളും ഇലക്ട്രിക്കൽ ടേപ്പും ഉപയോഗിച്ച് എല്ലാ കണക്ഷനുകളും സുരക്ഷിതമാക്കുക.
5.5 ബ്ലേഡ് അറ്റാച്ച്മെന്റ്
- Attach each fan blade to the motor housing using the screws provided. Ensure all screws are tightened securely.
5.6 ലൈറ്റ് കിറ്റ് ഇൻസ്റ്റാളേഷൻ
- Connect the light kit wires to the corresponding wires from the fan motor.
- Secure the light kit to the bottom of the fan motor housing.
5.7 മേലാപ്പ് ഇൻസ്റ്റാളേഷൻ
- Slide the canopy up against the ceiling and secure it to the mounting bracket with the provided screws.
6. പ്രവർത്തന നിർദ്ദേശങ്ങൾ
Your VONLUCE ceiling fan is operated via the included remote control.

Image 3: Remote Control Functions.
6.1 വിദൂര നിയന്ത്രണ പ്രവർത്തനങ്ങൾ
- പവർ ഓൺ/ഓഫ്: ഫാനും ലൈറ്റും ഓണാക്കുകയോ ഓഫാക്കുകയോ ചെയ്യുന്നു.
- ഫാൻ വേഗത (1-6): Adjusts the fan speed from level 1 (lowest) to level 6 (highest).
- Auto Speed Mode: Activates a natural breeze simulation mode.
- Reversible Fan Direction (F/R): Changes the direction of blade rotation for summer (downward airflow) or winter (upward airflow).
- ലൈറ്റ് ഓൺ/ഓഫ്: Turns the LED light on or off independently of the fan.
- തെളിച്ച ക്രമീകരണം: Increases or decreases the light brightness (10% to 100%).
- വർണ്ണ താപനില ക്രമീകരണം: Adjusts the light color from warm white (3000K) to cool white (6500K).
- Timer (1H, 4H, 8H): 1, 4, അല്ലെങ്കിൽ 8 മണിക്കൂറിനു ശേഷം ഫാൻ യാന്ത്രികമായി ഓഫാകാൻ സജ്ജമാക്കുന്നു.
6.2 ഫാൻ പ്രവർത്തനം
Use the speed buttons (1-6) on the remote to select your desired airflow. The fan operates quietly, ensuring a peaceful environment.

Image 4: Six adjustable fan speeds for customized comfort.
6.3 ലൈറ്റ് ഓപ്പറേഷൻ
The integrated LED light offers stepless dimming and color temperature adjustment. Use the dedicated buttons on the remote to customize your lighting.

Image 5: Stepless dimming and color temperature adjustment.
6.4 Reversible DC Motor
The reversible DC motor allows you to change the direction of airflow for year-round comfort. In summer, downward airflow creates a cooling effect. In winter, upward airflow helps circulate warm air trapped near the ceiling.
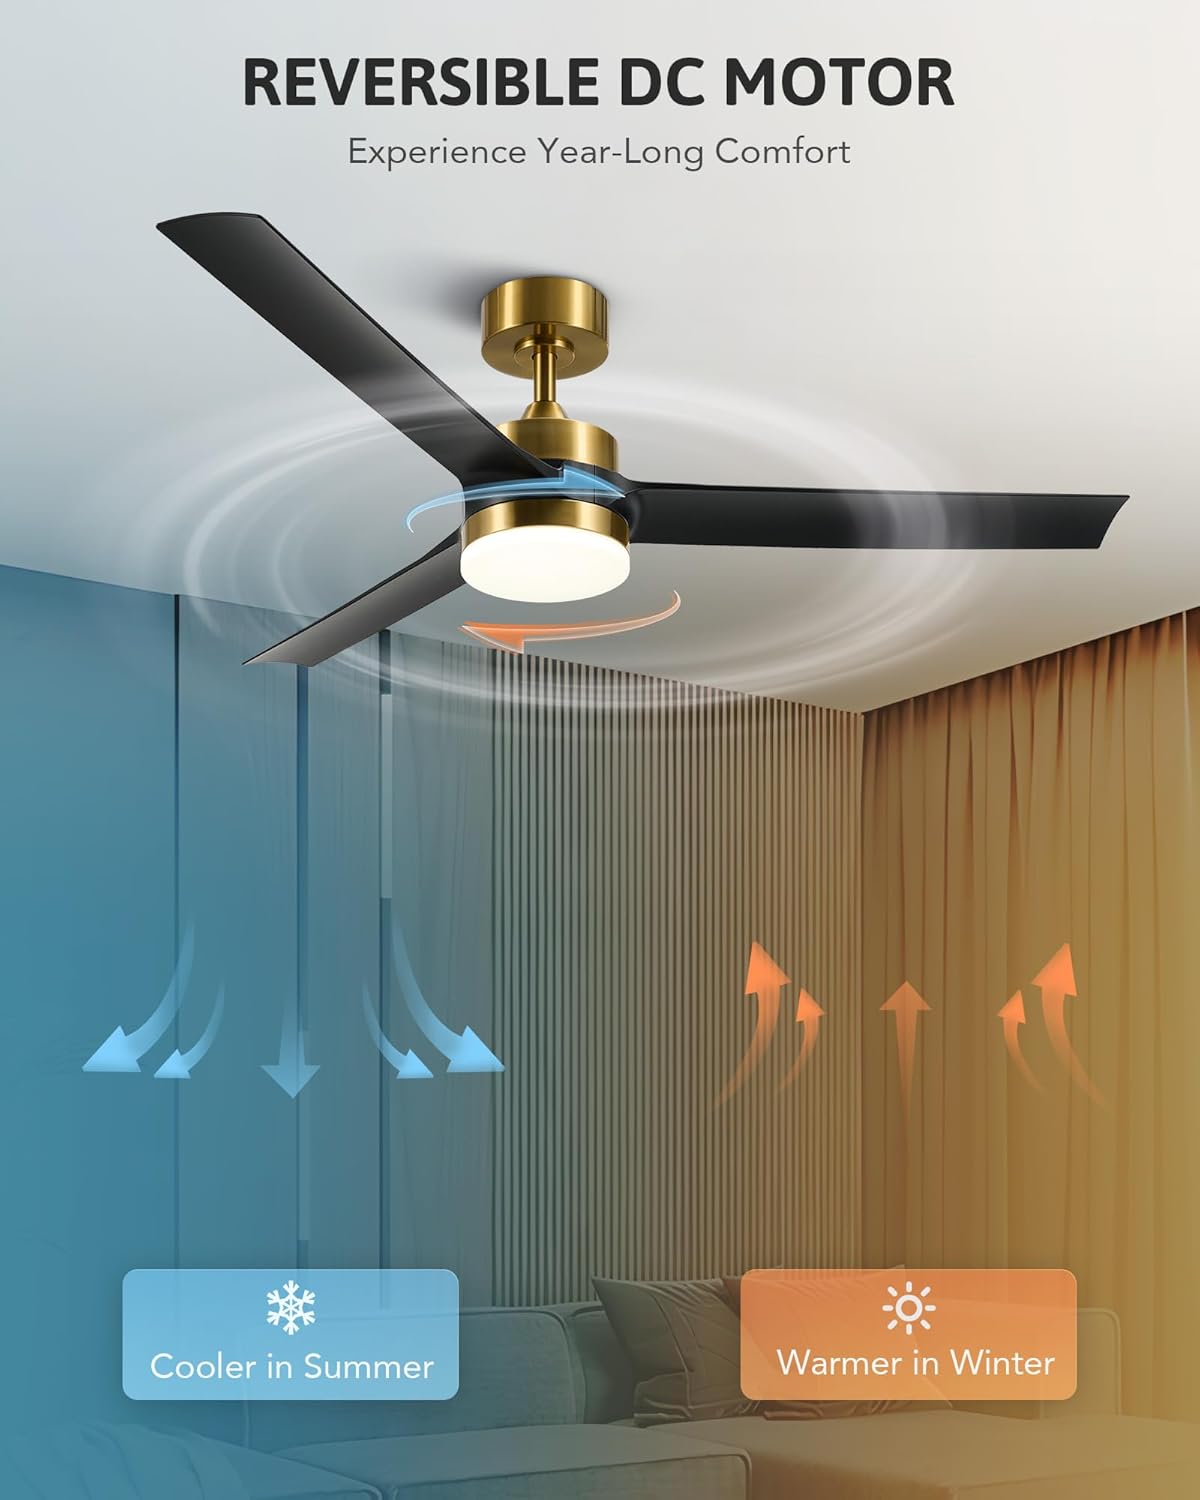
Image 6: Reversible DC motor for seasonal comfort.
6.5 മെമ്മറി പ്രവർത്തനം
The fan features a memory function. If the fan and light operate for more than 10 seconds before being turned off via the remote, they will resume their last settings (light brightness, color temperature, and fan speed) when turned on again.
7. പരിപാലനം
പതിവ് അറ്റകുറ്റപ്പണികൾ മികച്ച പ്രകടനം ഉറപ്പാക്കുകയും നിങ്ങളുടെ ഫാനിന്റെ ആയുസ്സ് വർദ്ധിപ്പിക്കുകയും ചെയ്യുന്നു.
- വൃത്തിയാക്കൽ: ഫാൻ വൃത്തിയാക്കാൻ, മൃദുവായ, ഡി തുണി ഉപയോഗിച്ച് തുടയ്ക്കുക.amp തുണി. അബ്രാസീവ് ക്ലീനറുകളോ ലായകങ്ങളോ ഉപയോഗിക്കരുത്, കാരണം ഇവ ഫിനിഷിനോ ഇലക്ട്രിക്കൽ ഘടകങ്ങൾക്കോ കേടുവരുത്തും.
- ബ്ലേഡ് ക്ലീനിംഗ്: ഫാൻ ബ്ലേഡുകൾ പതിവായി പൊടി തുടയ്ക്കുക, പൊടി അടിഞ്ഞുകൂടുന്നത് തടയാൻ ഇത് ഫാൻ ബാലൻസിനെയും പ്രകടനത്തെയും ബാധിക്കും.
- മുറുകുന്ന സ്ക്രൂകൾ: Periodically check all screws on the fan and mounting hardware to ensure they are tight. Loose screws can cause noise or wobbling.
- LED ലൈറ്റ്: The LED light is integrated and not user-replaceable. If the light fails, contact customer support.
Always ensure the power is turned off at the circuit breaker before performing any cleaning or maintenance.
8. പ്രശ്നപരിഹാരം
If you experience issues with your fan, refer to the following common problems and solutions. If the problem persists, contact customer support.
| പ്രശ്നം | സാധ്യമായ കാരണം | പരിഹാരം |
|---|---|---|
| ഫാൻ ആരംഭിക്കുന്നില്ല | ഫാനിലേക്ക് വൈദ്യുതിയില്ല; അയഞ്ഞ വയർ കണക്ഷനുകൾ; റിമോട്ട് കൺട്രോൾ ബാറ്ററി കുറവോ ജോടിയാക്കിയിട്ടില്ല. | സർക്യൂട്ട് ബ്രേക്കർ പരിശോധിക്കുക; എല്ലാ വയർ കണക്ഷനുകളും സുരക്ഷിതമാണെന്ന് ഉറപ്പാക്കുക; റിമോട്ട് ബാറ്ററി മാറ്റിസ്ഥാപിക്കുക അല്ലെങ്കിൽ റിമോട്ട് വീണ്ടും ജോടിയാക്കുക. |
| വെളിച്ചം പ്രവർത്തിക്കുന്നില്ല | Loose wire connection to light kit; Integrated LED failure. | Check light kit wiring; If LED fails, contact customer support. |
| ഫാൻ കുലുങ്ങുന്നു | അയഞ്ഞ ബ്ലേഡ് സ്ക്രൂകൾ; അസന്തുലിതമായ ബ്ലേഡുകൾ; അയഞ്ഞ മൗണ്ടിംഗ് ബ്രാക്കറ്റ്. | Tighten all blade screws; Ensure blades are installed correctly; Check mounting bracket for secure attachment. |
| ശബ്ദായമാനമായ പ്രവർത്തനം | Loose screws; Motor noise; Blades hitting an obstruction. | Check and tighten all screws; Ensure no obstructions are near blades. If motor noise persists, contact support. |
| റിമോട്ട് പ്രതികരിക്കുന്നില്ല | Low or dead battery; Remote not paired; Interference. | Replace remote battery; Re-pair remote control (refer to full manual for pairing instructions); Ensure no strong interference sources are nearby. |
9. വാറൻ്റിയും പിന്തുണയും
VONLUCE products are designed for quality and reliability. For warranty information or technical support, please refer to the warranty card included with your product or visit the official VONLUCE webസൈറ്റ്. പിന്തുണയുമായി ബന്ധപ്പെടുമ്പോൾ നിങ്ങളുടെ മോഡൽ നമ്പറും (43959460233438) വാങ്ങൽ തീയതിയും ലഭ്യമാക്കുക.
For further assistance, you may contact VONLUCE customer service through their official channels.


