1. ആമുഖം
Thank you for choosing the MUSETEX G07S Mid Tower Gaming PC Case. This manual provides detailed instructions for the installation, operation, and maintenance of your new PC case. Please read this manual carefully before beginning assembly to ensure proper setup and optimal performance. The G07S case is designed for enthusiasts, featuring pre-installed PWM ARGB fans, double tempered glass panels, and extensive compatibility for various components.

ചിത്രം 1.1: മുൻഭാഗം view of the MUSETEX G07S PC Case with illuminated ARGB fans.
2 പ്രധാന സവിശേഷതകൾ
- Pre-installed 6 PWM ARGB Fans: Equipped with six addressable RGB fans that offer adjustable speed for optimal airflow and cooling. Supports 16.8 million colors and motherboard synchronization (requires 5V3PIN RGB interface).
- Double Tempered Glass Panels: High-transparent tempered glass on the side and front provides a clear view of internal components and enhances durability.
- വിശാലമായ ഇൻ്റീരിയർ: Supports ATX, Micro ATX, and Mini ITX motherboards. Accommodates GPUs up to 340mm and PSUs up to 205mm.
- ഫ്ലെക്സിബിൾ സ്റ്റോറേജ് ഓപ്ഷനുകൾ: Space for up to 4 storage drives (3 x 2.5" SSD + 1 x 3.5" HDD).
- ഒപ്റ്റിമൈസ് ചെയ്ത വായുപ്രവാഹം: Designed with multiple airflow channels to ensure efficient heat dissipation.
- സൗകര്യപ്രദമായ I/O പാനൽ: Features two USB 3.0 ports and HD Audio with signal shielding for clear sound.
- എളുപ്പമുള്ള പരിപാലനം: Includes magnetic dust filters on the top and a pull-out dust filter on the bottom for effective dust protection.

Image 2.1: Comparison of PWM ARGB fans highlighting features like speed adjustment and light synchronization.

Image 2.2: Airflow diagram demonstrating the cooling path within the G07S case.
3 സ്പെസിഫിക്കേഷനുകൾ
| ഫീച്ചർ | സ്പെസിഫിക്കേഷൻ |
|---|---|
| കേസ് തരം | മിഡ് ടവർ |
| മദർബോർഡ് പിന്തുണ | എടിഎക്സ്, മൈക്രോ എടിഎക്സ്, മിനി ഐടിഎക്സ് |
| മുൻകൂട്ടി ഇൻസ്റ്റാൾ ചെയ്ത ഫാനുകൾ | 6 x PWM ARGB Fans |
| GPU ദൈർഘ്യം ക്ലിയറൻസ് | Up to 340mm (13.39") |
| PSU Length Clearance | Up to 205mm (8.07") |
| സിപിയു കൂളർ ഉയരം | Up to 176mm (Max) |
| റേഡിയേറ്റർ സപ്പോർട്ട് (മുകളിൽ) | 280 മിമി / 240 മിമി / 120 മിമി |
| സ്റ്റോറേജ് ഡ്രൈവ് ബേകൾ | 3 x 2.5" SSD, 1 x 3.5" HDD |
| I/O പോർട്ടുകൾ | 2 x USB 3.0, HD Audio |
| മെറ്റീരിയൽ | ടെമ്പർഡ് ഗ്ലാസ്, സ്റ്റീൽ |

Image 3.1: Internal layout and component clearance specifications for the G07S case.
4. സജ്ജീകരണ ഗൈഡ്
4.1 കേസ് തയ്യാറാക്കൽ
- Unpack the PC case and remove all packaging materials.
- Carefully remove the tempered glass side panel by unscrewing the thumb screws (if present) or by gently pulling it open if it's a hinged design.

ചിത്രം 4.1: എക്സ്പ്ലോഡഡ് view of the G07S case, illustrating its modular design and removable panels.
4.2 മദർബോർഡ് ഇൻസ്റ്റാളേഷൻ
- Identify the correct standoff positions for your ATX, Micro ATX, or Mini ITX motherboard. Install any necessary standoffs.
- സ്ക്രൂ ദ്വാരങ്ങൾ വിന്യസിച്ചുകൊണ്ട്, നിങ്ങളുടെ മദർബോർഡ് സ്റ്റാൻഡ്ഓഫുകളിൽ ശ്രദ്ധാപൂർവ്വം വയ്ക്കുക.
- നൽകിയിരിക്കുന്ന സ്ക്രൂകൾ ഉപയോഗിച്ച് മദർബോർഡ് സുരക്ഷിതമാക്കുക.
4.3 GPU and PSU Installation
- Install your Graphics Processing Unit (GPU) into the appropriate PCIe slot. Ensure it is securely fastened. The case supports GPUs up to 340mm in length.
- Mount your Power Supply Unit (PSU) into the dedicated compartment at the bottom of the case. Secure it with screws from the rear. The case supports PSUs up to 205mm in length.
4.4 സ്റ്റോറേജ് ഡ്രൈവ് ഇൻസ്റ്റലേഷൻ
- For 2.5" SSDs, mount them onto the dedicated trays located behind the motherboard tray.
- For 3.5" HDDs, use the removable drive cage in the PSU shroud area. Slide the HDD into the tray and secure it.
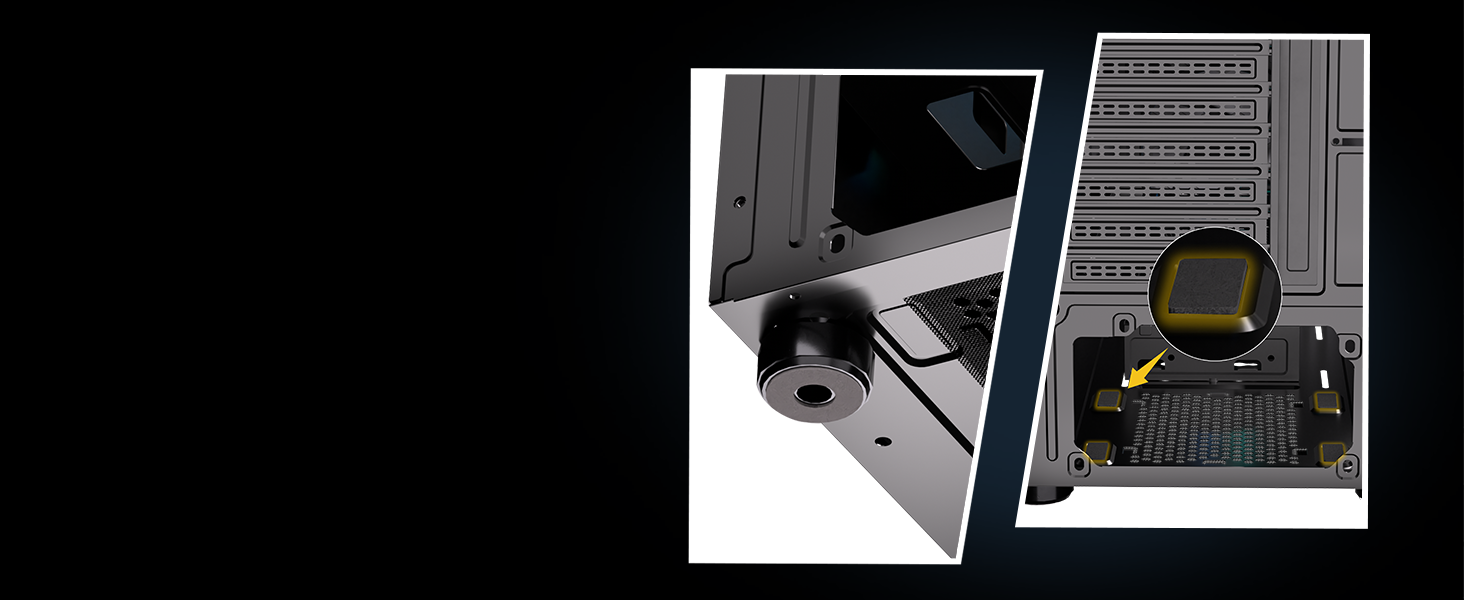
Image 4.2: Illustration of storage drive mounting locations for SSDs and HDDs.
4.5 ഫാൻ, റേഡിയേറ്റർ ഇൻസ്റ്റാളേഷൻ
The G07S comes with 6 PWM ARGB fans pre-installed. If you wish to add more fans or a liquid cooling radiator:
- മുകളിൽ: Supports 280mm, 240mm, or 120mm radiators, or 2 x 120/140mm fans.
- പിൻഭാഗം: Supports 1 x 120mm fan.
- മുൻഭാഗം: Supports 3 x 120mm fans (pre-installed).
- മധ്യഭാഗം: 2 x 120mm ഫാനുകൾ പിന്തുണയ്ക്കുന്നു.

Image 4.3: Fan and radiator mounting locations and sizes supported by the G07S case.
4.6 Connecting Front I/O Panel
Connect the cables from the front I/O panel to the corresponding headers on your motherboard. These include:
- USB 3.0 തലക്കെട്ടുകൾ
- HD Audio header
- Power button, Reset button, Power LED, HDD LED headers

Image 4.4: Front I/O panel featuring USB 3.0 ports and HD Audio jacks.
4.7 ARGB Fan Connection
The pre-installed ARGB fans require a 5V3PIN RGB interface on your motherboard for lighting control and synchronization. Ensure your motherboard has this interface before connecting the ARGB cables.
വീഡിയോ 4.1: വിശദമായ ഒരു വിവരണംview of the MUSETEX G07S PC case, demonstrating its features, internal layout, and component compatibility. This video highlights the pre-installed fans, tempered glass, and various installation points for motherboards, GPUs, PSUs, and storage drives, as well as the front I/O panel and ARGB fan connections.
5. പ്രവർത്തന നിർദ്ദേശങ്ങൾ
5.1 ഫാൻ വേഗത നിയന്ത്രണം (PWM)
The pre-installed PWM ARGB fans allow for dynamic speed adjustment. Connect the fan PWM cables to your motherboard's fan headers. You can control fan speeds through your motherboard's BIOS/UEFI settings or through compatible software provided by your motherboard manufacturer. This allows for balancing cooling performance and noise levels.
5.2 ARGB ലൈറ്റിംഗ് നിയന്ത്രണം
The ARGB lighting of the fans can be controlled via your motherboard's 5V3PIN RGB header and its associated software (e.g., ASUS Aura Sync, MSI Mystic Light Sync, Gigabyte RGB Fusion, ASRock Polychrome Sync). This enables synchronization of lighting effects across compatible components and customization with 16.8 million colors.
6. പരിപാലനം
6.1 പൊടി ഫിൽറ്റർ വൃത്തിയാക്കൽ
To maintain optimal airflow and prevent dust buildup, regularly clean the dust filters:
- ടോപ്പ് ഡസ്റ്റ് ഫിൽട്ടർ: The magnetic dust filter on the top panel can be easily removed for cleaning.
- അടിഭാഗത്തെ പൊടി ഫിൽറ്റർ: The pull-out dust filter at the bottom, beneath the PSU, can be slid out for cleaning.
Use compressed air or a soft brush to remove accumulated dust. Ensure filters are completely dry before reattaching.

Image 6.1: Location and removal of the magnetic top dust filter and pull-out bottom dust filter.
7. പ്രശ്നപരിഹാരം
- ശക്തിയില്ല: Ensure all power cables (24-pin ATX, 8-pin CPU, GPU PCIe) are securely connected. Check PSU switch and wall outlet.
- ഫാനുകൾ കറങ്ങുന്നില്ല/RGB ഇല്ല: Verify fan power cables are connected to motherboard headers. For ARGB, ensure the 5V3PIN header is correctly connected and motherboard RGB software is configured.
- ഫ്രണ്ട് I/O പ്രവർത്തിക്കുന്നില്ല: Check that all front panel headers (USB 3.0, HD Audio, power/reset switches) are correctly plugged into the motherboard.
- അമിത ചൂടാക്കൽ: Ensure all fans are spinning correctly and are oriented for proper airflow (intake/exhaust). Clean dust filters. Verify CPU cooler and GPU cooler are properly seated.
8. വാറൻ്റിയും പിന്തുണയും
For any issues or questions regarding your MUSETEX G07S PC case, please contact MUSETEX customer support. You can typically find support contact information on the official MUSETEX website or through the retailer where you purchased the product. Please have your product model (G07S) and purchase details ready when contacting support.
MUSETEX is committed to providing quality products and customer satisfaction. Refer to your purchase documentation for specific warranty terms and conditions.


