1. ആമുഖം
This manual provides detailed instructions for the assembly, operation, and maintenance of your MUSETEX K2 ATX Mid Tower PC Case. Designed for both visual appeal and ease of installation, the K2 offers a spacious interior with full view tempered glass panels, catering to high-performance PC builds.
വീഡിയോ 1.1: Official MUSETEX K2 White PC case overview, കാണിക്കുകasing its 270° full view tempered glass design, internal layout, and various component compatibility.
2 പ്രധാന സവിശേഷതകൾ
- 270° Full View Dual Tempered Glass: വിപുലമായത് വാഗ്ദാനം ചെയ്യുന്നു view of internal components and custom builds.
- Pre-Installed Fans: Includes 3 non-LED fans for immediate cooling.
- High-Speed I/O Panel: Equipped with 2x USB 3.0 and 1x Type-C interface for fast data transfer and connectivity.
- വിശാലമായ ഇൻ്റീരിയർ: Supports GPU up to 420mm, CPU cooling height up to 178mm, top-mounted liquid radiators up to 360mm, and PSUs up to 238mm.
- ഒപ്റ്റിമൈസ് ചെയ്ത വായുപ്രവാഹം: Innovative air duct design with side panel apertures and pre-installed side fans for efficient cooling.
- പൊടി ഫിൽട്രേഷൻ: Features magnetic dust filters at the top and a power supply dust filter at the bottom to minimize dust accumulation.

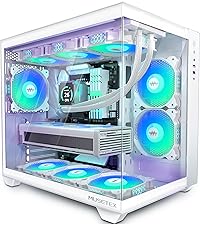
ചിത്രം 2.1: The MUSETEX K2 PC Case featuring its 270° full view dual tempered glass design, providing an unobstructed view ആന്തരിക ഘടകങ്ങളുടെ.
3. പാക്കേജ് ഉള്ളടക്കം
Upon unpacking your MUSETEX K2 PC Case, please ensure all the following items are present:
- MUSETEX K2 ATX Mid Tower PC Case
- ഇൻസ്ട്രക്ഷൻ മാനുവൽ
- Accessory Box (containing various screws for power supply, motherboard, and other components)
- കേബിൾ മാനേജ്മെന്റിനുള്ള സിപ്പ് ടൈകൾ
- Long Screws for mounting bottom fans
4. സജ്ജീകരണവും ഇൻസ്റ്റാളേഷനും
4.1. പൊതു സുരക്ഷാ മുൻകരുതലുകൾ
Before attempting to remove any panels, especially the tempered glass, it is highly recommended to lay the PC case flat on a stable, soft surface to prevent accidental damage or breakage. Always handle glass panels with extreme care.
4.2. സൈഡ് പാനലുകൾ നീക്കംചെയ്യൽ
To access the interior of the case, you will need to remove the tempered glass side panel. This panel is secured by four thumb screws. Carefully remove these screws and gently lift the glass panel. For the rear metal panel, remove the two silver thumb screws and pull the panel straight back to detach it.

ചിത്രം 4.1: The MUSETEX K2 PC Case with the side tempered glass panel removed, showing the interior layout.
4.3. മദർബോർഡ് ഇൻസ്റ്റാളേഷൻ
The K2 case supports ATX, M-ATX, and Mini ITX motherboards. Install your motherboard onto the pre-installed standoffs. Ensure all mounting screws are securely fastened.

ചിത്രം 4.2: ആന്തരികം view highlighting the spacious layout and compatibility with ATX, M-ATX, and Mini ITX motherboards.
4.4. ജിപിയു ഇൻസ്റ്റാളേഷൻ
The case accommodates graphics cards up to 420mm in length. It supports both horizontal and vertical GPU mounting. For vertical mounting, remove the dedicated bracket at the rear of the case (secured by a single thumb screw) and install your vertical GPU mount (not included).

ചിത്രം 4.3: Close-up of the GPU mounting area, illustrating the space available for large graphics cards and the vertical mounting bracket.
4.5. സംഭരണ ഇൻസ്റ്റാളേഷൻ
The K2 offers versatile storage options. It supports up to three 2.5" SSDs and two 3.5" HDDs. Two 2.5" SSD mounts are located behind the motherboard tray, accessible by removing a thumb screw. A removable drive cage at the bottom of the case supports two 3.5" HDDs or can be adapted for additional 2.5" SSDs.

ചിത്രം 4.4: Internal layout showing designated areas for SSD and HDD installation, including the removable drive cage.
4.6. പവർ സപ്ലൈ ഇൻസ്റ്റലേഷൻ
Install your power supply unit (PSU) at the bottom rear of the case. The maximum supported PSU length is 238mm. Slide the PSU into position and secure it with screws. Soft pads are provided to protect the PSU and case from scratches.

ചിത്രം 4.5: The power supply mounting area at the bottom of the case, indicating maximum PSU length and protective pads.
4.7. ഫാൻ, റേഡിയേറ്റർ ഇൻസ്റ്റാളേഷൻ
The K2 case offers extensive cooling options:
- മുകളിൽ: Supports up to three 120mm or two 140mm fans, or a liquid radiator up to 360mm/280mm/240mm.
- വശം: Supports two 120mm fans.
- പിൻഭാഗം: Supports one 120mm or 140mm fan, or a 120mm/140mm radiator.
- താഴെ: Supports three 120mm fans.
The case comes with 3 non-LED fans pre-installed. If you wish to install additional fans or radiators, use the appropriate screws provided in the accessory kit.

ചിത്രം 4.6: Diagram illustrating the various fan and radiator mounting locations and supported sizes within the MUSETEX K2 case.
4.8. ഫ്രണ്ട് I/O കേബിളുകൾ ബന്ധിപ്പിക്കുന്നു
Connect the front I/O panel cables to your motherboard. These include connectors for USB 3.0, Type-C, HD Audio (microphone and headphone jacks), power button, reset button, and LED indicators. Use the provided Velcro straps for cable management to maintain a clean interior.

ചിത്രം 4.7: Close-up of the top I/O panel, showing the USB 3.0, Type-C, and audio ports.
5. നിങ്ങളുടെ പിസി കേസ് പ്രവർത്തിപ്പിക്കൽ
Once all components are installed and connected, you can power on your system using the power button on the top I/O panel. The reset button is available for system restarts. Utilize the USB 3.0 and Type-C ports for connecting peripherals and external storage devices, and the audio jacks for headphones and microphones.
6. പരിപാലനം
Regular maintenance helps ensure optimal performance and longevity of your PC components. The MUSETEX K2 case is designed with ease of maintenance in mind:
- പൊടി ഫിൽട്ടറുകൾ: The top panel features a magnetic dust filter that can be easily removed for cleaning. A dedicated dust filter is also located at the bottom for the power supply. Regularly clean these filters to prevent dust buildup and maintain efficient airflow.
- പൊതുവായ ശുചീകരണം: Use a soft, dry cloth to clean the exterior and glass panels. For interior cleaning, use compressed air to remove dust from fans and components.
ചിത്രം 6.1: The magnetic dust filter on the top panel, designed for easy removal and cleaning.
7. പ്രശ്നപരിഹാരം
If you encounter any issues during installation or operation, please consider the following:
- ഘടക ഫിറ്റ്: Ensure all components (GPU, CPU cooler, PSU) adhere to the maximum dimensions specified in this manual.
- Glass Panel Handling: Always lay the case flat when removing or installing glass panels to prevent damage.
- Power/Connectivity: Double-check all internal cable connections, especially the front I/O panel cables, to ensure they are correctly seated on the motherboard.
8 സ്പെസിഫിക്കേഷനുകൾ
| ഫീച്ചർ | വിശദാംശങ്ങൾ |
|---|---|
| ബ്രാൻഡ് | മ്യൂസെറ്റെക്സ് |
| മോഡലിൻ്റെ പേര് | K2 |
| കേസ് തരം | മിഡ് ടവർ |
| നിറം | വെള്ള |
| മെറ്റീരിയൽ | മെറ്റൽ, ടെമ്പർഡ് ഗ്ലാസ് |
| മദർബോർഡ് അനുയോജ്യത | ATX, M-ATX, Mini ITX |
| GPU ദൈർഘ്യം (പരമാവധി) | 420 മിമി (16.54") |
| CPU കൂളർ ഉയരം (പരമാവധി) | 178 മി.മീ |
| PSU Length (Max) | 238 മിമി (9.37") |
| ടോപ്പ് റേഡിയേറ്റർ പിന്തുണ | Up to 360mm/280mm/240mm |
| പിൻ ഫാൻ പിന്തുണ | 120mm/140mm |
| Side Fan Support | 2x 120 മി.മീ |
| Bottom Fan Support | 3x 120 മി.മീ |
| മുൻകൂട്ടി ഇൻസ്റ്റാൾ ചെയ്ത ഫാനുകൾ | 3x Non-LED Fans |
| ഫ്രണ്ട് ഐ / ഒ പോർട്ടുകൾ | 2x USB 3.0, 1x Type-C, Audio (Headphone/Mic) |
| ഇനത്തിൻ്റെ ഭാരം | 19.66 പൗണ്ട് |
| ഉൽപ്പന്ന അളവുകൾ (LxWxH) | 16.7 x 9.05 x 18.5 ഇഞ്ച് |
9. വാറൻ്റിയും പിന്തുണയും
MUSETEX is committed to providing excellent customer support. If you encounter any problems with your K2 PC case, please do not hesitate to contact us. You can reach out by clicking on "Sold by MUSETEX" on the product page and then selecting "Ask a question" or "Contact seller."

ചിത്രം 9.1: Visual guide on how to locate MUSETEX support options on the product page.


