1. ആമുഖം
വെർട്ടിവ് വിആർ 100x800x1100 റാക്ക് ബേസിന്റെ സുരക്ഷിതവും കാര്യക്ഷമവുമായ ഇൻസ്റ്റാളേഷൻ, പ്രവർത്തനം, പരിപാലനം എന്നിവയ്ക്കുള്ള സമഗ്രമായ നിർദ്ദേശങ്ങൾ ഈ മാനുവൽ നൽകുന്നു. ഏതെങ്കിലും ഇൻസ്റ്റാളേഷനോ പ്രവർത്തനമോ തുടരുന്നതിന് മുമ്പ് ദയവായി ഈ മാനുവൽ നന്നായി വായിക്കുക.
സെർവർ റാക്കുകൾക്കും മറ്റ് ഐടി ഉപകരണങ്ങൾക്കും സുസ്ഥിരവും സുരക്ഷിതവുമായ അടിത്തറ നൽകുന്നതിനും ശരിയായ വായുപ്രവാഹവും പിന്തുണയും ഉറപ്പാക്കുന്നതിനുമാണ് വെർട്ടിവ് വിആർ 100x800x1100 റാക്ക് ബേസ് രൂപകൽപ്പന ചെയ്തിരിക്കുന്നത്. ഇത് ഈടുനിൽക്കുന്ന അലുമിനിയം കൊണ്ടാണ് നിർമ്മിച്ചിരിക്കുന്നത്, ഇൻസ്റ്റാൾ ചെയ്യാൻ എളുപ്പമുള്ള രൂപകൽപ്പനയും ഇതിന്റെ സവിശേഷതയാണ്.
2 സുരക്ഷാ വിവരങ്ങൾ
മുന്നറിയിപ്പ്: ഈ സുരക്ഷാ നിർദ്ദേശങ്ങൾ പാലിക്കുന്നതിൽ പരാജയപ്പെടുന്നത് ഉപകരണങ്ങൾക്ക് പരിക്കോ കേടുപാടുകളോ ഉണ്ടാക്കാം.
- ഇൻസ്റ്റാളേഷൻ ഏരിയ എപ്പോഴും വ്യക്തവും നല്ല വെളിച്ചമുള്ളതുമാണെന്ന് ഉറപ്പാക്കുക.
- ഇൻസ്റ്റാളേഷൻ സമയത്ത് കയ്യുറകൾ, സുരക്ഷാ ഗ്ലാസുകൾ പോലുള്ള ഉചിതമായ വ്യക്തിഗത സംരക്ഷണ ഉപകരണങ്ങൾ (പിപിഇ) ഉപയോഗിക്കുക.
- റാക്ക് ബേസ്, ഒരിക്കൽ കൂട്ടിയോജിപ്പിച്ച് ലോഡ് ചെയ്തുകഴിഞ്ഞാൽ, ഭാരമുള്ളതായിരിക്കും. ശരിയായ ലിഫ്റ്റിംഗ് ടെക്നിക്കുകൾ ഉപയോഗിക്കുന്നുണ്ടെന്ന് ഉറപ്പാക്കുക അല്ലെങ്കിൽ സഹായം തേടുക.
- റാക്ക് ബേസിന്റെ പരമാവധി ലോഡ് കപ്പാസിറ്റി കവിയരുത് (സ്പെസിഫിക്കേഷനുകൾ കാണുക).
- റാക്ക് ബേസിൽ ഏതെങ്കിലും ഉപകരണങ്ങൾ സ്ഥാപിക്കുന്നതിന് മുമ്പ് എല്ലാ ഘടകങ്ങളും സുരക്ഷിതമായി ഉറപ്പിച്ചിട്ടുണ്ടെന്ന് ഉറപ്പാക്കുക.
- ഇൻസ്റ്റലേഷൻ ഏരിയയിൽ നിന്ന് കുട്ടികളെയും വളർത്തുമൃഗങ്ങളെയും അകറ്റി നിർത്തുക.
3. പാക്കേജ് ഉള്ളടക്കം
ഇൻസ്റ്റാളേഷൻ ആരംഭിക്കുന്നതിന് മുമ്പ് താഴെ ലിസ്റ്റ് ചെയ്തിരിക്കുന്ന എല്ലാ ഘടകങ്ങളും നിലവിലുണ്ടെന്നും കേടുപാടുകൾ സംഭവിച്ചിട്ടില്ലെന്നും ഉറപ്പാക്കുക. ഏതെങ്കിലും ഇനങ്ങൾ നഷ്ടപ്പെട്ടിട്ടുണ്ടെങ്കിലോ കേടുപാടുകൾ സംഭവിച്ചിട്ടുണ്ടെങ്കിലോ, വെർട്ടിവ് ഉപഭോക്തൃ പിന്തുണയുമായി ബന്ധപ്പെടുക.
- വെർട്ടിവ് VR 100x800x1100 റാക്ക് ബേസ് ഫ്രെയിം (1 യൂണിറ്റ്)
- സുഷിരങ്ങളുള്ള പാനലുകൾ (100 കഷണങ്ങൾ)
- അസംബ്ലി ഹാർഡ്വെയർ (സ്ക്രൂകൾ, നട്ടുകൾ, വാഷറുകൾ മുതലായവ)
- നിർദ്ദേശ മാനുവൽ (ഈ പ്രമാണം)
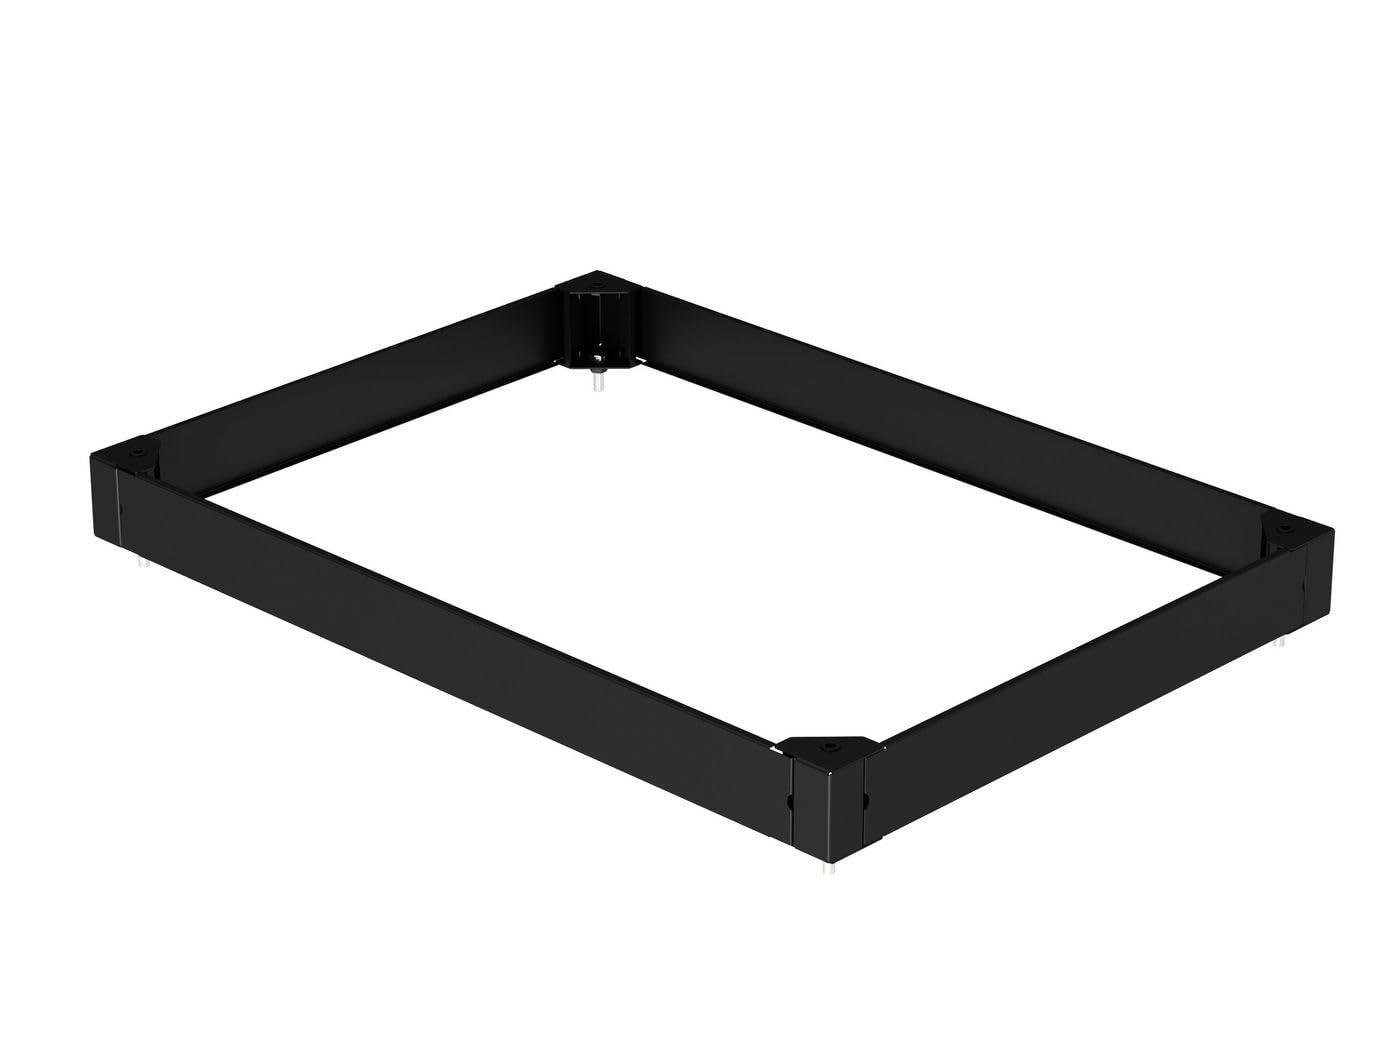
ചിത്രം 3.1: വെർട്ടിവ് വിആർ 100x800x1100 റാക്ക് ബേസ് ഫ്രെയിം. കറുത്ത അലുമിനിയം കൊണ്ട് നിർമ്മിച്ച റാക്ക് ബേസിന്റെ ചതുരാകൃതിയിലുള്ള ഫ്രെയിം ഈ ചിത്രം കാണിക്കുന്നു, കോർണർ ബ്രാക്കറ്റുകളും താഴത്തെ കോണുകളിൽ ചെറിയ പാദങ്ങളും ദൃശ്യമാണ്.
4. സജ്ജീകരണവും ഇൻസ്റ്റാളേഷനും
നിങ്ങളുടെ വെർട്ടിവ് വിആർ റാക്ക് ബേസ് കൂട്ടിച്ചേർക്കുന്നതിനും ഇൻസ്റ്റാൾ ചെയ്യുന്നതിനും ഈ ഘട്ടങ്ങൾ ശ്രദ്ധാപൂർവ്വം പാലിക്കുക.
- അൺപാക്ക് ചെയ്യുന്നു: പാക്കേജിംഗിൽ നിന്ന് എല്ലാ ഘടകങ്ങളും ശ്രദ്ധാപൂർവ്വം നീക്കം ചെയ്യുക. ആവശ്യമെങ്കിൽ ഭാവിയിലെ ഗതാഗതത്തിനോ സംഭരണത്തിനോ വേണ്ടി പാക്കേജിംഗ് വസ്തുക്കൾ സൂക്ഷിക്കുക.
- ഘടകം തിരിച്ചറിയൽ: എല്ലാ ഭാഗങ്ങളും നിരത്തി "പാക്കേജ് ഉള്ളടക്കങ്ങൾ" ലിസ്റ്റിൽ തിരിച്ചറിയുക.
- ഫ്രെയിം അസംബ്ലി:
- നൽകിയിരിക്കുന്ന അസംബ്ലി ഹാർഡ്വെയർ ഉപയോഗിച്ച് അലുമിനിയം ഫ്രെയിം ഭാഗങ്ങൾ ബന്ധിപ്പിക്കുക. എല്ലാ കണക്ഷനുകളും സുരക്ഷിതമാണെന്ന് ഉറപ്പാക്കുക, പക്ഷേ തുടക്കത്തിൽ അമിതമായി മുറുക്കരുത്.
- എല്ലാ ഫാസ്റ്റനറുകളും പൂർണ്ണമായി മുറുക്കുന്നതിന് മുമ്പ് ഫ്രെയിം ചതുരാകൃതിയിലുള്ളതും നിരപ്പുള്ളതുമാണെന്ന് ഉറപ്പാക്കുക.
- സുഷിരങ്ങളുള്ള പാനൽ ഇൻസ്റ്റാളേഷൻ:
- പ്രധാന ഫ്രെയിം കൂട്ടിച്ചേർത്തുകഴിഞ്ഞാൽ, സുഷിരങ്ങളുള്ള പാനലുകൾ റാക്ക് ബേസിലെ അവയുടെ നിയുക്ത സ്ലോട്ടുകളിലോ അറ്റാച്ച്മെന്റ് പോയിന്റുകളിലോ സ്ഥാപിക്കുക. വായുപ്രവാഹത്തിനും പിന്തുണയ്ക്കും ഈ പാനലുകൾ നിർണായകമാണ്.
- ഓരോ പാനലും ദൃഢമായി ഇരിപ്പുണ്ടെന്നും സുരക്ഷിതമാണെന്നും ഉറപ്പാക്കുക.
- പ്ലേസ്മെൻ്റ്: കൂട്ടിച്ചേർത്ത റാക്ക് ബേസ് അതിന്റെ അന്തിമ ആവശ്യമുള്ള സ്ഥാനത്ത് സ്ഥാപിക്കുക. തറ നിരപ്പാണെന്നും റാക്ക് ബേസിന്റെയും അത് കൈവശം വയ്ക്കുന്ന ഉപകരണങ്ങളുടെയും സംയോജിത ഭാരം താങ്ങാൻ കഴിവുള്ളതാണെന്നും ഉറപ്പാക്കുക.
- ലെവലിംഗ്: റാക്ക് ബേസ് തികച്ചും ലെവലാണെന്ന് ഉറപ്പാക്കാൻ ക്രമീകരിക്കാവുന്ന പാദങ്ങളോ (ലഭ്യമാണെങ്കിൽ) ഷിമ്മുകളോ ഉപയോഗിക്കുക. റാക്കിന്റെയും ഉപകരണങ്ങളുടെയും സ്ഥിരതയ്ക്ക് ഇത് നിർണായകമാണ്.
- അന്തിമ പരിശോധന: ഏതെങ്കിലും ഉപകരണങ്ങൾ ലോഡുചെയ്യുന്നതിനുമുമ്പ്, എല്ലാ കണക്ഷനുകളും ഇറുകിയതാണെന്നും, അടിത്തറ നിരപ്പാണെന്നും, തടസ്സങ്ങളൊന്നുമില്ലെന്നും ഉറപ്പാക്കാൻ ഒരു അന്തിമ ദൃശ്യ പരിശോധന നടത്തുക.
5. പ്രവർത്തന നിർദ്ദേശങ്ങൾ
ഘടനാപരമായ പിന്തുണ നൽകുന്നതിനായി രൂപകൽപ്പന ചെയ്തിരിക്കുന്ന ഒരു നിഷ്ക്രിയ ഘടകമാണ് വെർട്ടിവ് വിആർ റാക്ക് ബേസ്. ഇതിന്റെ "പ്രവർത്തനത്തിൽ" പ്രധാനമായും ശരിയായ ലോഡിംഗും പരിപാലനവും ഉൾപ്പെടുന്നു.
- ലോഡിംഗ് ഉപകരണങ്ങൾ: നിങ്ങളുടെ സെർവർ റാക്ക് അല്ലെങ്കിൽ മറ്റ് ഉപകരണങ്ങൾ കൂട്ടിച്ചേർത്ത റാക്ക് ബേസിൽ ശ്രദ്ധാപൂർവ്വം വയ്ക്കുക. സ്ഥിരത നിലനിർത്താൻ ഭാരം തുല്യമായി വിതരണം ചെയ്യുക.
- വായുപ്രവാഹ നിയന്ത്രണം: വായുസഞ്ചാരം സുഗമമാക്കുന്നതിനാണ് സുഷിരങ്ങളുള്ള പാനലുകൾ രൂപകൽപ്പന ചെയ്തിരിക്കുന്നത്. ഉപകരണങ്ങളുടെ സ്ഥാനം ഈ സുഷിരങ്ങളെ തടസ്സപ്പെടുത്തുന്നില്ലെന്ന് ഉറപ്പാക്കുക, നിങ്ങളുടെ ഐടി ഇൻഫ്രാസ്ട്രക്ചറിന് അനുയോജ്യമായ തണുപ്പ് നിലനിർത്തുക.
- സ്ഥിരത പരിശോധന: പ്രത്യേകിച്ച് ഉപകരണങ്ങൾ ചേർത്തതിനോ നീക്കം ചെയ്തതിനോ ശേഷം, റാക്ക് ബേസിന്റെ സ്ഥിരത ഇടയ്ക്കിടെ പരിശോധിക്കുക.
6. പരിപാലനം
നിങ്ങളുടെ വെർട്ടിവ് വിആർ റാക്ക് ബേസിന്റെ ദീർഘായുസ്സും തുടർച്ചയായ പ്രകടനവും പതിവ് അറ്റകുറ്റപ്പണികൾ ഉറപ്പാക്കുന്നു.
- വൃത്തിയാക്കൽ: മൃദുവായതും ഉണങ്ങിയതുമായ തുണി ഉപയോഗിച്ച് റാക്ക് ബേസ് ഇടയ്ക്കിടെ വൃത്തിയാക്കുക. കഠിനമായ അഴുക്കിന്, അല്പം ഡി.amp നേരിയ സോപ്പ് ഉള്ള തുണി ഉപയോഗിക്കാം, തുടർന്ന് ഉണക്കുക. ഉരച്ചിലുകൾ ഉള്ള ക്ലീനറുകളോ ലായകങ്ങളോ ഒഴിവാക്കുക.
- ഫാസ്റ്റനർ പരിശോധന: എല്ലാ വർഷവും അല്ലെങ്കിൽ ആവശ്യാനുസരണം, എല്ലാ സ്ക്രൂകളും ഫാസ്റ്റനറുകളും പരിശോധിച്ച് അവ ഇറുകിയതായി ഉറപ്പാക്കണം. അയഞ്ഞ കണക്ഷനുകൾ വീണ്ടും മുറുക്കുക.
- ലെവലിംഗ് പരിശോധന: റാക്ക് ബേസ് ലെവലിൽ തന്നെ തുടരുന്നുവെന്ന് ഉറപ്പാക്കുക, പ്രത്യേകിച്ച് റാക്ക് നീക്കിയിട്ടുണ്ടെങ്കിൽ അല്ലെങ്കിൽ ഭാരമേറിയ ഉപകരണങ്ങൾ ചേർത്തിട്ടുണ്ടെങ്കിൽ/നീക്കം ചെയ്തിട്ടുണ്ടെങ്കിൽ.
- നാശനഷ്ട പരിശോധന: അലുമിനിയം ഫിനിഷും സുഷിരങ്ങളുള്ള പാനലുകളും പരിശോധിച്ച് കേടുപാടുകൾ, നാശന അല്ലെങ്കിൽ രൂപഭേദം എന്നിവയുടെ ലക്ഷണങ്ങൾ കണ്ടെത്തൂ. എന്തെങ്കിലും പ്രശ്നങ്ങൾ ഉണ്ടെങ്കിൽ ഉടനടി പരിഹരിക്കുക.
7. പ്രശ്നപരിഹാരം
നിങ്ങളുടെ റാക്ക് ബേസിൽ നിങ്ങൾ നേരിട്ടേക്കാവുന്ന പൊതുവായ പ്രശ്നങ്ങളെ ഈ വിഭാഗം അഭിസംബോധന ചെയ്യുന്നു.
| പ്രശ്നം | സാധ്യമായ കാരണം | പരിഹാരം |
|---|---|---|
| റാക്ക് ബേസ് അസ്ഥിരമാണ് അല്ലെങ്കിൽ ഇളകുന്നു. | തറ അസമമാണ്; അയഞ്ഞ ഫാസ്റ്റനറുകൾ; അനുചിതമായ അസംബ്ലി. | തറ നിരപ്പാണെന്ന് ഉറപ്പാക്കുക. ലെവലിംഗ് കാലുകൾ ക്രമീകരിക്കുക. എല്ലാ അസംബ്ലി ഫാസ്റ്റനറുകളും പരിശോധിച്ച് ശക്തമാക്കുക. |
| സുഷിരങ്ങളുള്ള പാനലുകൾ അയഞ്ഞതാണ്. | പാനലുകൾ ശരിയായി സ്ഥാപിച്ചിട്ടില്ല അല്ലെങ്കിൽ ഉറപ്പിച്ചിട്ടില്ല. | പാനലുകൾ അവയുടെ സ്ലോട്ടുകളിൽ വീണ്ടും ഉറപ്പിച്ച് ഉറപ്പിക്കുക. ഏതെങ്കിലും സുരക്ഷിത ക്ലിപ്പുകളോ സ്ക്രൂകളോ സ്ഥാപിച്ചിട്ടുണ്ടെന്ന് ഉറപ്പാക്കുക. |
| ഫ്രെയിം കൂട്ടിച്ചേർക്കുന്നതിൽ ബുദ്ധിമുട്ട്. | ഭാഗങ്ങളുടെ തെറ്റായ ക്രമീകരണം; തെറ്റായ ഹാർഡ്വെയർ. | വിഭാഗം 4 കാണുക: സജ്ജീകരണവും ഇൻസ്റ്റാളേഷനും. ഭാഗങ്ങൾ ശരിയായി ഓറിയന്റഡ് ചെയ്തിട്ടുണ്ടെന്ന് ഉറപ്പാക്കുക. ഓരോ കണക്ഷനും നിങ്ങൾ ശരിയായ ഹാർഡ്വെയർ ഉപയോഗിക്കുന്നുണ്ടെന്ന് ഉറപ്പാക്കുക. ഘടകങ്ങൾ നിർബന്ധിക്കരുത്. |
8 സ്പെസിഫിക്കേഷനുകൾ
വെർട്ടിവ് വിആർ 100x800x1100 റാക്ക് ബേസിന്റെ (മോഡൽ: W128434806) സാങ്കേതിക സവിശേഷതകൾ താഴെ കൊടുക്കുന്നു.
| ആട്രിബ്യൂട്ട് | മൂല്യം |
|---|---|
| ബ്രാൻഡ് | വെർട്ടീവ് |
| മോഡൽ നമ്പർ | W128434806 |
| ഉൽപ്പന്ന തരം | റാക്ക് ബേസ് |
| അളവുകൾ (H x W x D) | 100mm x 800mm x 1100mm (ഏകദേശം 3.9 x 31.5 x 43.3 ഇഞ്ച്) |
| എക്സ്റ്റീരിയർ ഫിനിഷ് | അലുമിനിയം |
| നിറം | ബഹുവർണ്ണം (സാധാരണയായി ചിത്രത്തിൽ കാണിച്ചിരിക്കുന്നതുപോലെ കറുപ്പ്) |
| പ്രത്യേക ഫീച്ചർ | ഇൻസ്റ്റാൾ ചെയ്യാൻ എളുപ്പമാണ് |
| ഉൾപ്പെടുത്തിയ ഘടകങ്ങൾ | സുഷിരങ്ങളുള്ള പാനലുകൾ (100 കഷണങ്ങൾ), മാനുവൽ |
| ഇനത്തിൻ്റെ ഭാരം | 1.76 പൗണ്ട് (0.8 കി.ഗ്രാം) - കുറിപ്പ്: ഇത് പാക്കേജിംഗ് ഭാരത്തെയോ ഒരു ഘടകത്തെയോ സൂചിപ്പിക്കാം. പൂർണ്ണമായി കൂട്ടിച്ചേർത്ത അടിത്തറയ്ക്ക് കൂടുതൽ ഭാരം ഉണ്ടായേക്കാം. |
| പാക്കേജ് അളവുകൾ | 9.84 x 6.69 x 6.69 ഇഞ്ച് (25 x 17 x 17 സെ.മീ) |
9. വാറൻ്റിയും പിന്തുണയും
വാറന്റി കവറേജ്, സാങ്കേതിക പിന്തുണ, അല്ലെങ്കിൽ മാറ്റിസ്ഥാപിക്കൽ ഭാഗങ്ങൾ എന്നിവയെക്കുറിച്ചുള്ള വിവരങ്ങൾക്ക്, ദയവായി വെർട്ടിവിനെ നേരിട്ട് ബന്ധപ്പെടുക അല്ലെങ്കിൽ അവരുടെ ഉദ്യോഗസ്ഥനെ സന്ദർശിക്കുക. webസൈറ്റ്.
വെർട്ടിവ് ഒഫീഷ്യൽ Webസൈറ്റ്: www.vertiv.com
പിന്തുണയുമായി ബന്ധപ്പെടുമ്പോൾ നിങ്ങളുടെ മോഡൽ നമ്പറും (W128434806) വാങ്ങൽ വിവരങ്ങളും തയ്യാറായി വയ്ക്കുക.


