1. ആമുഖം
This manual provides detailed instructions for the installation, operation, and maintenance of your VSDISPLAY 8-Inch 1280x800 IPS Mini LCD Monitor (Model: VS080ZJ-001). Please read this manual thoroughly before using the product to ensure proper functionality and to prevent damage.
The VSDISPLAY mini LCD monitor is designed for various applications, including use as a secondary display for PC cases, laptops, and DIY computer projects. It features an IPS panel for wide viewing angles and a 1280x800 resolution for clear image display.
2 പ്രധാന സവിശേഷതകൾ
- കോംപാക്റ്റ് ഡിസൈൻ: Small and portable, measuring 7.44 x 4.64 inches (H x V), making it convenient for various setups.
- IPS പാനൽ: Offers a full viewing angle of 178 degrees, providing clear and vivid image display from multiple perspectives.
- ഉയർന്ന മിഴിവ്: 1280x800 resolution for sharp and detailed visuals.
- ബഹുമുഖ ആപ്ലിക്കേഷൻ: Ideal as an extra portable LCD monitor for PC/laptop/computer DIY projects, compatible with PC cases that support 120x120mm fan replacements (e.g., H9/H6 flow PC gaming cases).
- എളുപ്പമുള്ള കണക്റ്റിവിറ്റി: Supports video input via Mini HDMI and power via USB-C, offering plug-and-play functionality.
- മൗണ്ടിംഗ് ഓപ്ഷനുകൾ: Equipped with mounting holes for easy installation on desks or walls, or integration into PC cases.
3. പാക്കിംഗ് ലിസ്റ്റ്
പാക്കേജിൽ എല്ലാ ഇനങ്ങളും ഉണ്ടെന്ന് ഉറപ്പാക്കുക:
- 1 × VSDISPLAY 8-Inch 1280x800 IPS Mini LCD Monitor (Model: VS080ZJ-001)
- 1 × USB-C പവർ കേബിൾ
- 1 × Mini HDMI to HDMI Signal Cable
- Mounting Screws (for installation)

Image: Contents of the VSDISPLAY 8-inch monitor package, including the monitor, USB-C power cable, and Mini HDMI signal cable.
4. സജ്ജീകരണ നിർദ്ദേശങ്ങൾ
Follow these steps to set up your VSDISPLAY mini LCD monitor:
4.1. കേബിളുകൾ ബന്ധിപ്പിക്കുന്നു
- പവർ കണക്ഷൻ: Connect one end of the provided USB-C power cable to the USB-C port on the side of the monitor. Connect the other end to a USB power source (e.g., a computer USB port, a USB wall adapter).
- Video Signal Connection: Connect the Mini HDMI end of the signal cable to the Mini HDMI port on the side of the monitor. Connect the standard HDMI end to an available HDMI port on your PC, laptop, or other video source.

Image: The Mini HDMI port (for signal transmission) and USB-C port (for power only) located on the side of the monitor.
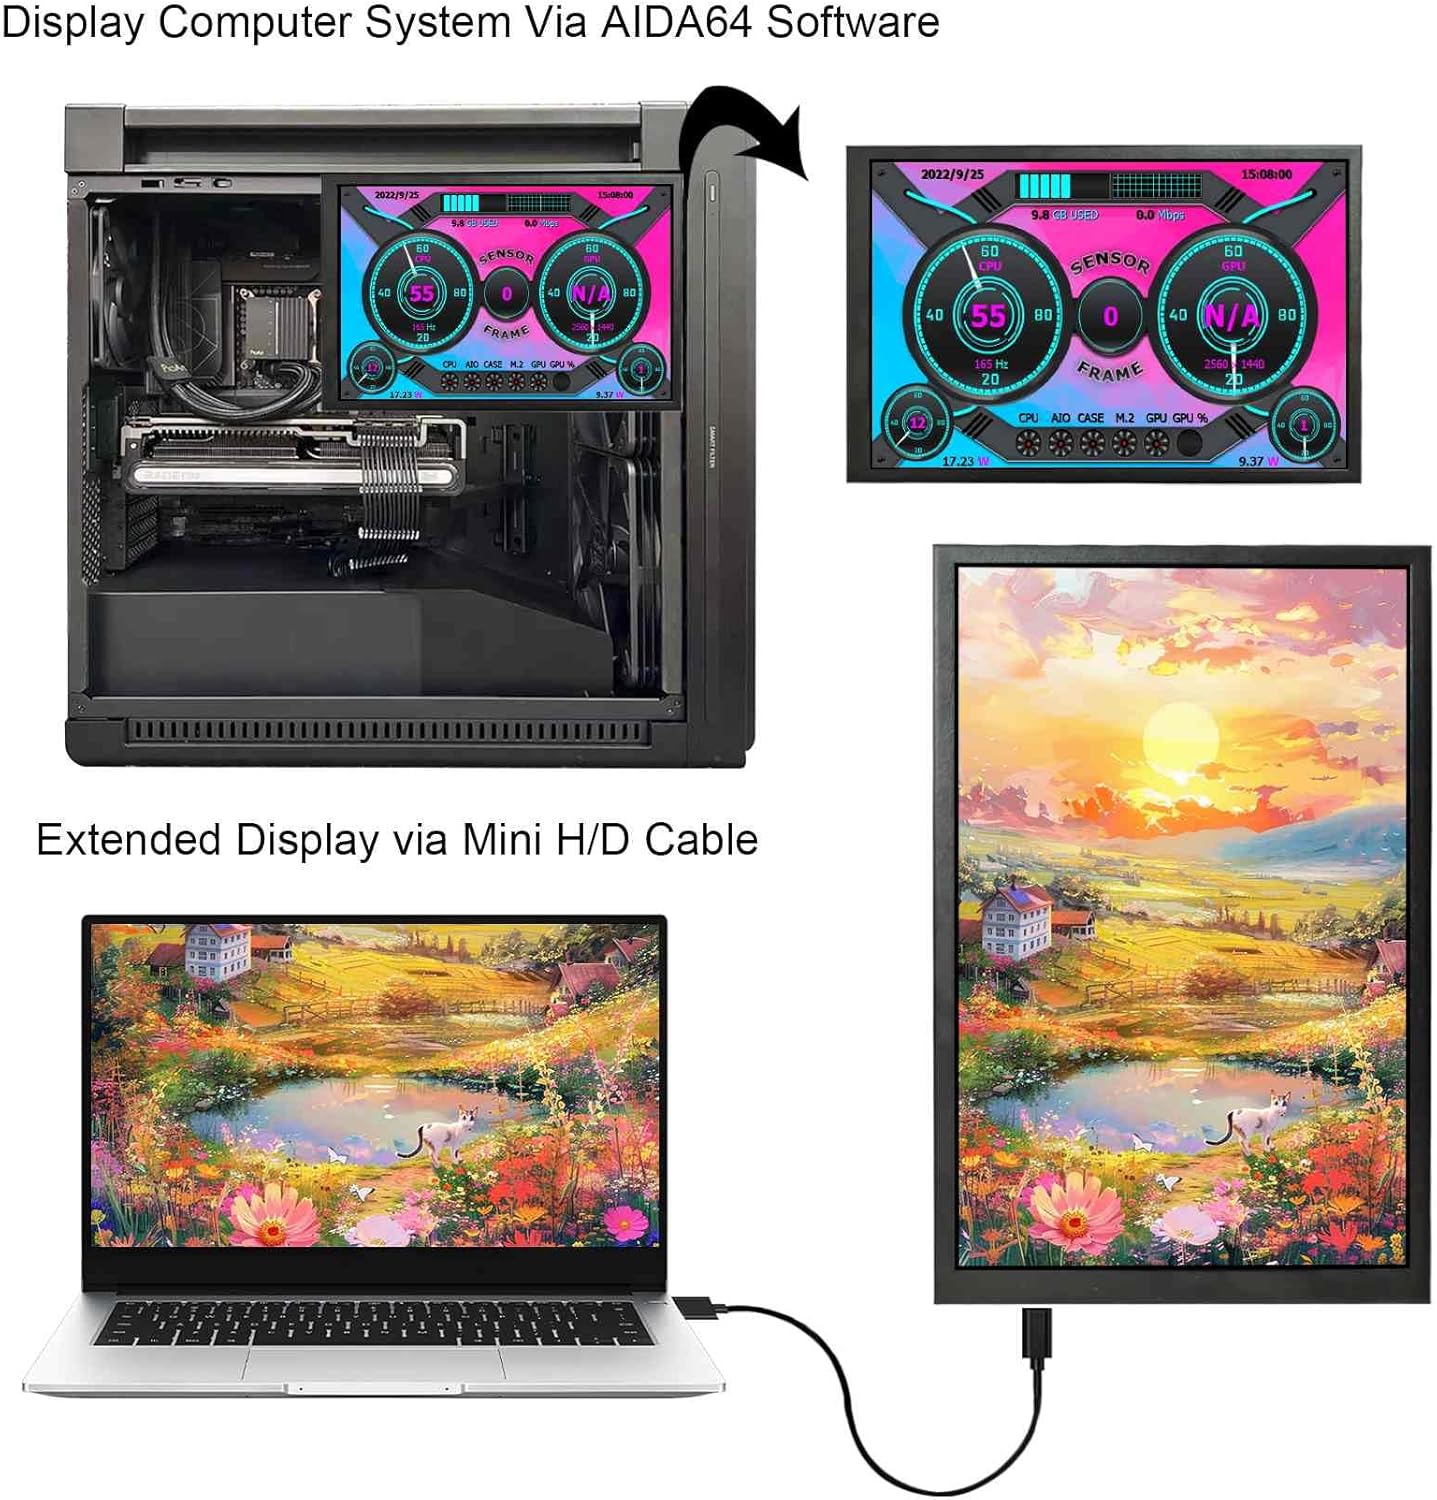
Image: The included USB-C power cable and Mini HDMI to HDMI signal cable, both featuring right-angle connectors for convenient routing.
4.2. Initial Power-On and Display Configuration
- Once both power and signal cables are connected, the monitor should automatically power on and display content from your source device.
- If the display does not appear automatically, ensure your computer's display settings are configured to detect and extend/duplicate the display. On Windows, right-click on the desktop, select "Display settings," and adjust as needed.
- The monitor is plug-and-play, requiring no additional driver installation for basic functionality.
5 ഇൻസ്റ്റലേഷൻ ഓപ്ഷനുകൾ
The VSDISPLAY monitor offers flexible installation options:
5.1. PC Case Integration (e.g., 120x120mm Fan Slot)
This monitor is designed to fit into standard 120x120mm fan slots, commonly found in PC cases like the H9/H6 flow. This allows for an internal display to monitor system performance or display custom visuals.
- Identify an available 120x120mm fan mounting location within your PC case.
- Secure the monitor using the provided mounting screws through the designated holes on the back of the monitor and into the fan mounting points.
- Route the USB-C power cable and Mini HDMI signal cable neatly to their respective ports on your motherboard/graphics card.
Video: Demonstration of installing the VSDISPLAY mini monitor into a PC case, replacing a 120x120mm fan. This video illustrates the physical installation process and cable management within a computer chassis.
വീഡിയോ: ഒരു ചെറിയ ക്ലിപ്പ് ഷോasing the VSDISPLAY mini monitor integrated into a PC case, displaying system information. This video highlights the aesthetic and functional benefits of using the monitor as an internal display.

Image: The VSDISPLAY 8-inch monitor mounted inside a PC case, showing real-time system performance data such as CPU and GPU usage, temperatures, and fan speeds.

Image: The VSDISPLAY 8-inch monitor integrated into a PC case, displaying a custom image of an anime character, demonstrating its use for aesthetic customization.

Image: The VSDISPLAY 8-inch monitor mounted inside a PC case, showcasing a vibrant system monitoring interface with various gauges and statistics.
5.2. Desktop/Wall Stand Installation
The monitor can also be used as a standalone display on a desk or mounted to a wall using compatible brackets (not included).
- Attach a compatible VESA mount or desktop stand to the mounting holes on the back of the monitor.
- Position the monitor as desired on your desk or wall.
6. മോണിറ്റർ പ്രവർത്തിപ്പിക്കുക
6.1. അടിസ്ഥാന പ്രവർത്തനം
- The monitor automatically detects the video signal from the Mini HDMI input.
- Brightness adjustment can be performed using the button located on the back of the monitor. Press the button to cycle through brightness levels.
6.2. Using as a System Monitoring Display
To use the monitor for displaying real-time PC performance data (CPU/GPU temperature, usage, etc.), you will need third-party software. Popular options include:
- AIDA64 Extreme (requires license)
- മഴമീറ്റർ (free, open-source)
These applications allow you to create custom layouts and display various system metrics on the monitor. Refer to the software's documentation for detailed configuration instructions.

Image: The VSDISPLAY 8-inch monitor showcasing a personalized system monitoring interface, providing an overview of critical PC components.

Image: The VSDISPLAY 8-inch monitor displaying a comprehensive system monitoring dashboard, including CPU, GPU, RAM, and network performance metrics.

Image: The VSDISPLAY 8-inch monitor connected to a laptop via Mini HDMI, demonstrating its capability as an extended display for increased screen real estate.
7. പരിപാലനം
- Keep the monitor clean by gently wiping the screen with a soft, lint-free cloth. Avoid abrasive cleaners or solvents.
- Ensure proper ventilation around the monitor, especially if installed inside a PC case, to prevent overheating.
- തീവ്രമായ താപനിലയിലോ ഈർപ്പത്തിലോ മോണിറ്റർ തുറന്നുകാട്ടുന്നത് ഒഴിവാക്കുക.
8. പ്രശ്നപരിഹാരം
- ഡിസ്പ്ലേ ഇല്ല:
- Check if the USB-C power cable is securely connected and receiving power.
- Verify that the Mini HDMI signal cable is properly connected to both the monitor and the video source.
- Ensure your computer's display settings are configured to detect and output to the external monitor.
- Try connecting the monitor to a different video source or using different cables to rule out faulty components.
- മിന്നിമറയുന്ന/അസ്ഥിരമായ ഡിസ്പ്ലേ:
- എല്ലാ കേബിളുകളും സുരക്ഷിതമായി ബന്ധിപ്പിച്ചിട്ടുണ്ടെന്ന് ഉറപ്പാക്കുക.
- Reduce the cable length if possible, or use higher quality cables.
- Check for electromagnetic interference from other devices.
- Incorrect Resolution/Aspect Ratio:
- Adjust the display resolution and aspect ratio settings in your computer's operating system. The native resolution of this monitor is 1280x800.
9 സ്പെസിഫിക്കേഷനുകൾ
| ഫീച്ചർ | വിശദാംശങ്ങൾ |
|---|---|
| മോഡൽ നമ്പർ | VS080ZJ-001 |
| സ്ക്രീൻ വലിപ്പം | 8 ഇഞ്ച് |
| റെസലൂഷൻ | 1280x800 |
| പാനൽ തരം | IPS (ഇൻ-പ്ലെയിൻ സ്വിച്ചിംഗ്) |
| വീക്ഷണാനുപാതം | 16:10 |
| Viewing ആംഗിൾ | നിറഞ്ഞു Viewആംഗിൾ (178°) |
| ചിത്രത്തിന്റെ തെളിച്ചം | 350 കാൻഡെല (നിറ്റ്സ്) |
| വീഡിയോ ഇൻപുട്ട് | മിനി HDMI |
| പവർ ഇൻപുട്ട് | USB-C (for power only) |
| ഉൽപ്പന്ന അളവുകൾ | 0.55 x 7.44 x 4.64 ഇഞ്ച് |
| ഇനത്തിൻ്റെ ഭാരം | 1.39 പൗണ്ട് |

Image: Detailed product dimensions of the VSDISPLAY 8-inch monitor, illustrating its compact form factor.
10. വാറൻ്റിയും പിന്തുണയും
For warranty information or technical support, please refer to the official VSDISPLAY webസൈറ്റിൽ ബന്ധപ്പെടുക അല്ലെങ്കിൽ അവരുടെ ഉപഭോക്തൃ സേവനവുമായി നേരിട്ട് ബന്ധപ്പെടുക. വാറന്റി ക്ലെയിമുകൾക്കായി നിങ്ങളുടെ വാങ്ങൽ രസീത് സൂക്ഷിക്കുക.
നിർമ്മാതാവ്: വിഎസ് ഡിസ്പ്ലേ
ആദ്യം ലഭ്യമായ തീയതി: 4 ജനുവരി 2024


