ആമുഖം
The Keychron Q0 Max is a versatile, full-metal custom mechanical numpad designed for enhanced productivity and customization. It offers multiple connectivity options, hot-swappable switches, and QMK/VIA support for personalized key mapping. This manual provides essential information for setting up, operating, and maintaining your Q0 Max numpad.
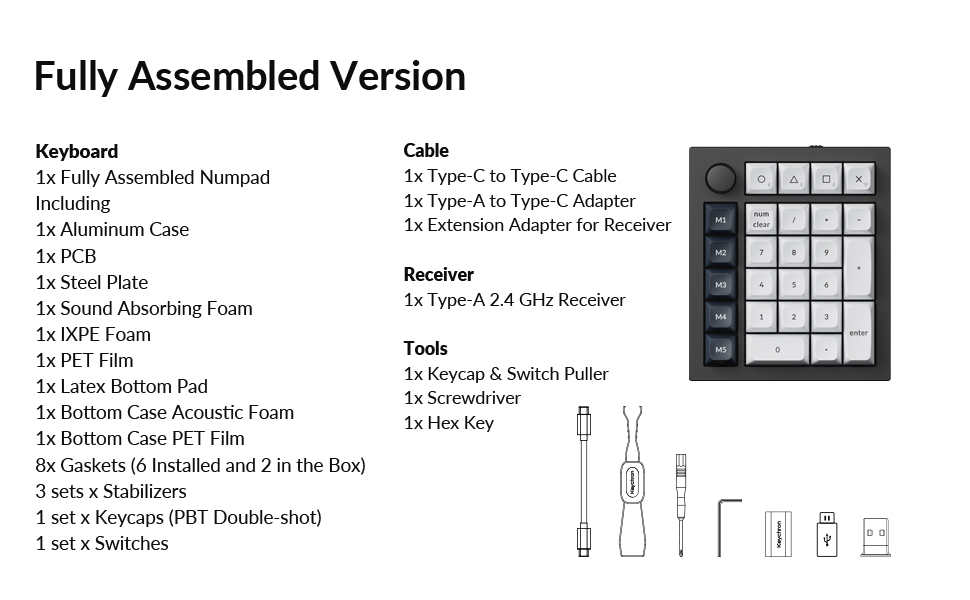
Image: The Keychron Q0 Max numpad shown alongside a full-sized keyboard, highlighting its compact design and integration into a desktop setup.
പാക്കേജ് ഉള്ളടക്കം
Verify that all items are present in your Keychron Q0 Max package:
- കീബോർഡ്:
- 1x Fully Assembled Numpad (including Aluminum Case, PCB, Steel Plate, Sound Absorbing Foam, IXPE Foam, PET Film, Latex Bottom Pad, Bottom Case Acoustic Foam, Bottom Case PET Film, 8x Gaskets (6 Installed and 2 in the Box), 3 sets x Stabilizers, 1 set x Keycaps (PBT Double-shot), 1 set x Switches)
- കേബിൾ:
- 1x ടൈപ്പ്-സി മുതൽ ടൈപ്പ്-സി കേബിൾ വരെ
- 1x ടൈപ്പ്-എ മുതൽ ടൈപ്പ്-സി അഡാപ്റ്റർ വരെ
- റിസീവറിനായുള്ള 1x എക്സ്റ്റൻഷൻ അഡാപ്റ്റർ
- റിസീവർ:
- 1x ടൈപ്പ്-എ 2.4 GHz റിസീവർ
- ഉപകരണങ്ങൾ:
- 1x കീക്യാപ്പ് & സ്വിച്ച് പുള്ളർ
- 1x സ്ക്രൂഡ്രൈവർ
- 1x ഹെക്സ് കീ

Image: A visual representation of the Keychron Q0 Max numpad and its included accessories, such as cables, adapters, tools, and extra components.
ഫീച്ചറുകൾ
- Full-Metal Construction: The Q0 Max features a durable body crafted from 6063 aluminum, processed through CNC machining, polishing, anodizing, and sandblasting for a robust and premium feel.
- ട്രൈ-മോഡ് കണക്റ്റിവിറ്റി: Connect wirelessly via 2.4 GHz (1000 Hz polling rate) or Bluetooth 5.1 (up to 3 devices), or use the wired USB-C connection.
- ഹോട്ട്-സ്വാപ്പബിൾ സ്വിച്ചുകൾ: Easily change every switch on the Q0 Max without soldering. It supports almost all MX mechanical switches on the market.
- Enhanced Acoustic Design: Features premium acoustic foams (IXPE, PET, Latex) and a double-gasket design, combined with screw-in stabilizers, to provide a satisfying typing experience.
- QMK/VIA പ്രോഗ്രാമബിലിറ്റി: Customize key assignments, macros, and lighting effects with open-source QMK firmware and VIA software.
- Programmable Rotary Knob: The rotary encoder knob can be programmed for various functions, such as volume control or zoom.
- തെക്ക് അഭിമുഖമായുള്ള RGB ബാക്ക്ലൈറ്റ്: Enjoy customizable RGB lighting with south-facing LEDs for optimal illumination with various keycap profiles.
- പിബിടി കീക്യാപ്പുകൾ: Equipped with KSA profile double-shot non-backlight shine-through PBT keycaps, offering excellent oil resistance and durability.


സജ്ജമാക്കുക
1. Charging the Numpad
Before initial use, fully charge the Keychron Q0 Max. Connect the provided Type-C to Type-C cable to the numpad's USB-C port and to a power source. The LED indicator will show charging status.
2. Connecting the Numpad
The Q0 Max supports three connection modes: 2.4 GHz wireless, Bluetooth 5.1, and wired USB-C.
- 2.4 GHz വയർലെസ്:
- Locate the 2.4 GHz receiver (USB-A dongle) in the package.
- Plug the receiver into an available USB-A port on your computer. If your computer only has USB-C ports, use the provided Type-A to Type-C adapter.
- Switch the mode toggle on the side of the numpad to 'G' (2.4 GHz mode).
- The numpad should automatically connect.
- ബ്ലൂടൂത്ത് 5.1:
- Switch the mode toggle on the side of the numpad to 'BT' (Bluetooth mode).
- നിങ്ങളുടെ കമ്പ്യൂട്ടറിലോ ഉപകരണത്തിലോ, Bluetooth പ്രവർത്തനക്ഷമമാക്കി പുതിയ ഉപകരണങ്ങൾക്കായി തിരയുക.
- Select 'Keychron Q0 Max' from the list of available devices to pair.
- The numpad can store up to three Bluetooth profiles. Use the Fn + 1/2/3 keys to switch between paired devices.
- വയർഡ് USB-C:
- Connect the provided Type-C to Type-C cable from the numpad's USB-C port to a USB-C port on your computer.
- Switch the mode toggle on the side of the numpad to 'Cable' (wired mode).
- The numpad will function as a wired device and charge simultaneously.

ചിത്രം: ഒരു വശം view of the Keychron Q0 Max, showing the toggle switch for selecting between 2.4 GHz, Bluetooth, and wired USB-C modes.
ഓപ്പറേഷൻ
1. അടിസ്ഥാന കീ പ്രവർത്തനങ്ങൾ
The Q0 Max functions as a standard numeric keypad. Keys are pre-programmed for typical numeric input and arithmetic operations. The 'M1' through 'M5' keys on the left column are macro keys, and the rotary knob provides additional functionality.
2. Customizing with QMK/VIA
The Keychron Q0 Max is fully compatible with QMK firmware and VIA software, allowing for extensive customization of key functions, macros, and RGB lighting.
- VIA സോഫ്റ്റ്വെയർ ഡൗൺലോഡ് ചെയ്യുക: ഔദ്യോഗിക കീക്രോൺ സന്ദർശിക്കുക website to download the latest VIA software or use the web-based Keychron Launcher.
- Connect Numpad: Ensure your Q0 Max is connected to your computer via USB-C cable for VIA detection.
- കീ റീമാപ്പിംഗ്: Use the VIA interface to remap any key, assign macros, or configure the rotary knob. The software provides a visual layout of the numpad for easy customization.
- ലൈറ്റിംഗ് നിയന്ത്രണം: Adjust RGB effects, brightness, and colors through the VIA software.

Image: A screenshot of the Keychron Launcher interface, demonstrating how users can program and remap keys on the Q0 Max numpad across different layers.
മെയിൻ്റനൻസ്
1. വൃത്തിയാക്കൽ
To clean your numpad, disconnect it from your computer. Use a soft, dry cloth to wipe the aluminum case. For keycaps, a damp cloth with mild soap can be used, ensuring no liquid enters the switches. Use a keycap puller to remove keycaps for thorough cleaning.
2. സ്വിച്ചും കീക്യാപ്പ് മാറ്റിസ്ഥാപിക്കലും
The Q0 Max features hot-swappable switches, allowing for easy replacement without soldering.
- കീക്യാപ്പുകൾ നീക്കംചെയ്യുന്നു: Use the provided keycap puller to gently remove keycaps by hooking onto two sides and pulling upwards.
- സ്വിച്ചുകൾ നീക്കംചെയ്യുന്നു: Use the provided switch puller. Align the prongs with the clips on the top and bottom of the switch, squeeze, and pull upwards.
- സ്വിച്ചുകൾ ഇൻസ്റ്റാൾ ചെയ്യുന്നു: Ensure the switch pins are straight. Align the pins with the holes on the PCB and press down firmly until the switch clicks into place. Do not force switches if they don't align, as this can bend pins.
- കീക്യാപ്പുകൾ ഇൻസ്റ്റാൾ ചെയ്യുന്നു: Align the keycap stem with the switch stem and press down gently until it is secure.
ട്രബിൾഷൂട്ടിംഗ്
- Numpad Not Responding:
- Ensure the numpad is charged.
- Check the connection mode switch (2.4 GHz, BT, or Cable) matches your connection method.
- For 2.4 GHz, ensure the receiver is properly plugged in.
- For Bluetooth, ensure Bluetooth is enabled on your device and the numpad is paired. Try re-pairing if necessary.
- For wired, ensure the USB-C cable is securely connected to both the numpad and your computer.
- രജിസ്റ്റർ ചെയ്യാത്ത കീകൾ:
- If individual keys are not working, the switch might be faulty or improperly seated. Use the switch puller to remove and re-insert the switch.
- കീക്യാപ്പിനോ സ്വിച്ചിനോ കീഴിൽ അവശിഷ്ടങ്ങൾ അടിഞ്ഞുകൂടുന്നില്ലെന്ന് ഉറപ്പാക്കുക.
- VIA/QMK Software Issues:
- Ensure the numpad is connected via USB-C cable when using VIA for programming.
- Download the latest version of VIA software or Keychron Launcher from the official webസൈറ്റ്.
- Restart the software and reconnect the numpad.
- ബാറ്ററി പെട്ടെന്ന് തീർന്നു:
- High RGB brightness and complex lighting effects consume more power. Reduce brightness or simplify effects to extend battery life.
- Ensure the numpad is turned off or enters sleep mode when not in use.
സ്പെസിഫിക്കേഷനുകൾ
| ബ്രാൻഡ് | കീക്രോൺ |
| മോഡൽ | Q0 പരമാവധി |
| കണക്റ്റിവിറ്റി ടെക്നോളജി | 2.4 GHz, ബ്ലൂടൂത്ത് 5.1, യുഎസ്ബി-സി |
| കീബോർഡ് വിവരണം | Custom Mechanical Numpad Keyboard, Wireless, QMK/VIA, Hot-swappable, RGB, for Mac, Windows and Linux, Number Pad, Aluminum |
| അനുയോജ്യമായ ഉപകരണങ്ങൾ | Laptop (Mac, Windows, Linux) |
| പ്രത്യേക സവിശേഷതകൾ | Backlit, Hot-Swappable, Programmable Keys, Rechargeable, Screw-In PCB Stabilizers |
| മെറ്റീരിയൽ | CNC അലുമിനിയം |
| ഇനത്തിൻ്റെ ഭാരം | 2.38 പൗണ്ട് |
| ബാറ്ററികൾ | 1 ബാറ്ററി ആവശ്യമാണ് (ഉൾപ്പെടുത്തിയിരിക്കുന്നു) |
വാറൻ്റിയും പിന്തുണയും
Keychron products are covered by a limited warranty. For detailed warranty information, technical support, or to access additional resources, please visit the official Keychron webസൈറ്റിൽ ബന്ധപ്പെടുക അല്ലെങ്കിൽ അവരുടെ ഉപഭോക്തൃ സേവനവുമായി ബന്ധപ്പെടുക. വാറന്റി ക്ലെയിമുകൾക്കായി നിങ്ങളുടെ വാങ്ങിയതിന്റെ തെളിവ് സൂക്ഷിക്കുക.


