ആമുഖം
This instruction manual provides comprehensive guidance for the installation and operation of the Idatalink Maestro HRN-SR-VW1 T-Harness. This product is designed to facilitate the replacement of a factory radio in select Volkswagen vehicles manufactured between 2002 and 2016, while ensuring the retention of essential factory features such as steering wheel controls and the use of the factory amplifier. For optimal performance and safety, please read this manual thoroughly before proceeding with installation.
ബോക്സിൽ എന്താണുള്ളത്
- Idatalink Maestro HRN-SR-VW1 T-Harness
അനുയോജ്യത
The HRN-SR-VW1 T-Harness is specifically designed for use with the iDatalink Maestro ADS-MSR module (sold separately) and is compatible with select Volkswagen and Audi vehicles. It is crucial to verify your vehicle's make, model, and year against the compatibility charts provided to ensure proper functionality.
Volkswagen Compatibility
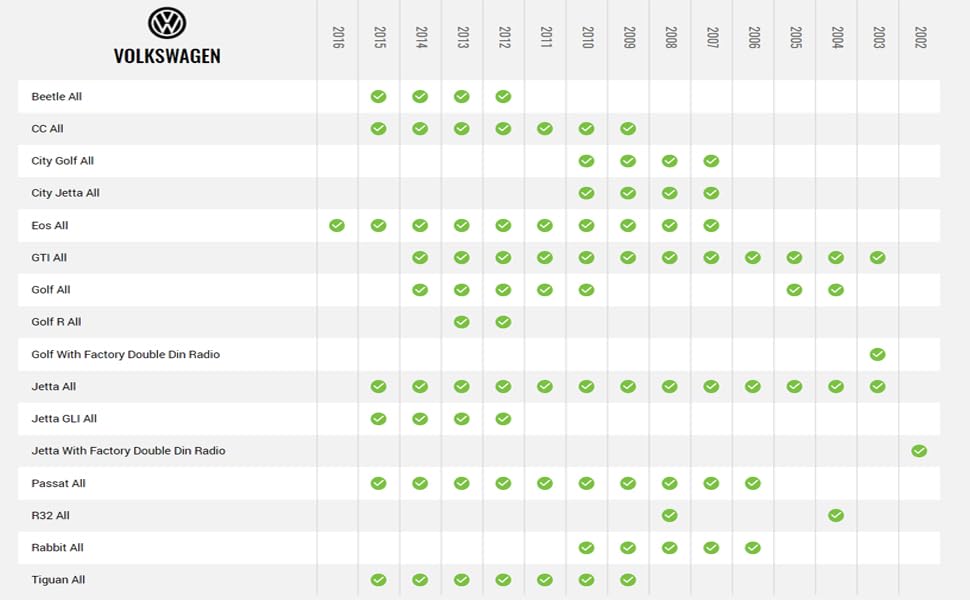
Image: Volkswagen vehicle compatibility chart for the HRN-SR-VW1 T-Harness, showing various models and compatible years from 2002 to 2016.
Audi Compatibility

Image: Audi vehicle compatibility chart for the HRN-SR-VW1 T-Harness, showing various models and compatible years from 2002 to 2016.
സജ്ജീകരണവും ഇൻസ്റ്റാളേഷനും
The installation process involves connecting the HRN-SR-VW1 T-Harness with an iDatalink Maestro ADS-MSR module and a corresponding Head-Unit specific T-Harness (e.g., ACC-HU-ALP1, ACC-HU-PIO1, ACC-HU-SON1, ACC-HU-KEN1/2/3, ACC-HU-BOS1), all sold separately. This system simplifies radio replacement while retaining key factory features.
ആവശ്യമായ ഘടകങ്ങൾ
- iDatalink Maestro ADS-MSR module
- Corresponding Head-Unit specific T-Harness (e.g., ACC-HU-ALP1 for Alpine, ACC-HU-PIO1 for Pioneer, etc.)

Image: The Idatalink Maestro HRN-SR-VW1 T-Harness, shown with its packaging, ready for installation.

ചിത്രം: ഒരു ക്ലോസ്-അപ്പ് view of the HRN-SR-VW1 T-Harness connected to the compact ADS-MSR module, illustrating the plug-and-play design.
WebLink Desktop Programming Tutorial
Video: This tutorial guides users through downloading and installing WebLink Desktop on a Windows PC, creating a WebLink account, and flashing the Maestro module with the correct firmware for their vehicle and aftermarket radio.
Key Installation Features
- ലളിതമായ ഇൻസ്റ്റാളേഷൻ: Works exclusively with the iDatalink Maestro ADS-MSR module for streamlined radio replacement.
- സ്റ്റിയറിംഗ് വീൽ കൺട്രോൾ നിലനിർത്തൽ: Maintains original steering wheel controls for functions like volume and track seeking.
- ഫാക്ടറി Amplifier Retention: Preserves the functionality of any factory-installed ampജീവൻ.
- പ്ലഗ് ആൻഡ് പ്ലേ ഡിസൈൻ: Features dedicated plugs for quick and accurate connections, ensuring seamless integration.
Operating the Maestro SR System
Once installed and programmed, the Maestro SR system enhances your driving experience by integrating aftermarket radio features with your vehicle's existing functionalities.
iDatalink Maestro SR Overview
വീഡിയോ: ഈ വീഡിയോയിൽ ഒരു ഓവർ നൽകുന്നുview of the iDatalink Maestro SR module, highlighting its features for radio replacement, steering wheel control retention, and vehicle settings integration.
സ്റ്റിയറിംഗ് വീൽ നിയന്ത്രണങ്ങൾ
The Maestro SR system allows you to retain and customize your vehicle's factory steering wheel controls. Through the WebLink Desktop application, you can configure each button to perform specific commands on your new aftermarket radio, including single press and press-and-hold functions.
Vehicle Settings Retention
Many modern vehicles allow control over various settings (e.g., lighting, door locks, safety features) via the factory radio. The Maestro SR ensures these settings remain accessible. If using a Maestro-compatible aftermarket radio, these settings can be controlled directly from the radio's touchscreen. For non-Maestro compatible radios, the Maestro Central mobile app (available on App Store and Google Play) can be used via Bluetooth to access and adjust vehicle settings.
ക്യാമറ ഇൻ്റഗ്രേഷൻ
The Maestro SR supports the retention of factory reverse cameras, 360-degree cameras, and cargo cameras. It can also integrate aftermarket front or side-view ക്യാമറകൾ. Views can be controlled via steering wheel buttons, and advanced camera settings allow for triggering side-view cameras with turn signals and front cameras based on transmission position.
പ്രോഗ്രാമബിൾ ഔട്ട്പുട്ടുകൾ
The Maestro SR module features two programmable outputs. These outputs can be configured to trigger various accessories, such as additional lighting or cameras, or to convert digital data messages from the vehicle into analog outputs for specific functions. For example, outputs can be programmed to activate when the brake is pressed, headlights are turned on, or the vehicle shifts into drive.
സ്പെസിഫിക്കേഷനുകൾ
- ഇനം മോഡൽ നമ്പർ: HRN-SR-VW1
- മെറ്റീരിയൽ: അക്രിലോണിട്രൈൽ ബ്യൂട്ടാഡൈൻ സ്റ്റൈറൈൻ
- ഇനത്തിൻ്റെ ഭാരം: 0.13 കിലോഗ്രാം (ഏകദേശം 4.41 ഔൺസ്)
- പാക്കേജ് അളവുകൾ: 7.72 x 4.8 x 1.85 ഇഞ്ച്
- UPC: 627780004822
- നിർമ്മാതാവ്: ഐഡേറ്റലിങ്ക്
ട്രബിൾഷൂട്ടിംഗ്
If you encounter any issues during installation or operation, please refer to the detailed installation guide downloaded from the WebLink Desktop application. Ensure all connections are secure and that the module has been programmed with the correct firmware for your specific vehicle and aftermarket radio. For further assistance, consult the official Idatalink support resources.
വാറൻ്റിയും പിന്തുണയും
This product is covered by the manufacturer's warranty. Please retain your proof of purchase for any warranty claims. For technical support, additional guides, or to contact customer service, visit the official Idatalink webസൈറ്റ്: www.idatalink.com.
For vehicle compatibility inquiries, you may also use the QR code found on the product packaging or visit https://l.ead.me/bbSyLG.


