ആമുഖം
This manual provides detailed instructions for the installation, operation, and maintenance of your JUBEST 48" Concealed Barn Door Hardware Kit. Please read all instructions carefully before beginning installation to ensure proper function and safety. Retain this manual for future reference.
സുരക്ഷാ വിവരങ്ങൾ
- Always wear appropriate safety gear, including eye protection and gloves, during installation.
- Ensure the mounting surface (wall) is structurally sound and capable of supporting the weight of the door and hardware.
- Use the correct tools for each step as specified.
- ഇൻസ്റ്റാളേഷൻ സമയത്ത് കുട്ടികളെയും വളർത്തുമൃഗങ്ങളെയും ജോലിസ്ഥലത്ത് നിന്ന് അകറ്റി നിർത്തുക.
- ഏതെങ്കിലും ഘട്ടത്തെക്കുറിച്ച് നിങ്ങൾക്ക് ഉറപ്പില്ലെങ്കിൽ, യോഗ്യതയുള്ള ഒരു പ്രൊഫഷണലിനെ സമീപിക്കുക.
പാക്കേജ് ഉള്ളടക്കം
Please verify that all components are present before beginning installation. The package includes:
- 1 Top track
- 1 Top roller
- 2 Soft close mechanisms
- 2 എൻഡ് ക്യാപ്സ്
- 2 Bottom rollers
- 1 Bottom track
- 1 ഫ്ലോർ ഗൈഡ്
- Necessary screws and wrench
- Detailed instructions (this manual)

Image: All components of the JUBEST Concealed Barn Door Hardware Kit, including tracks, rollers, soft close mechanisms, and fasteners.
സ്പെസിഫിക്കേഷനുകൾ
| ബ്രാൻഡ് | ജുബെസ്റ്റ് |
| മോഡൽ നമ്പർ | TSQAL22-48IN സവിശേഷതകൾ |
| നിറം | വെള്ളി |
| മെറ്റീരിയൽ | അലുമിനിയം |
| ഡോർ വെയ്റ്റ് കപ്പാസിറ്റി | 176 പൗണ്ട് വരെ (80 കി.ഗ്രാം) |
| അനുയോജ്യമായ വാതിൽ കനം | 1-1/4" to 1-3/4" |
| Suitable Door Opening Width | 40" മുതൽ 44" വരെ |
| Top Track Length | 47.75" |
| Bottom Track Length | 43.42" |
| ഇനത്തിൻ്റെ ഭാരം | 5.39 പൗണ്ട് |
കുറിപ്പ്: The tracks can be cut to fit smaller door panels. Exercise caution and precision when cutting.
സജ്ജീകരണവും ഇൻസ്റ്റാളേഷനും
This section guides you through the installation process for the JUBEST Concealed Barn Door Hardware Kit. Prior to installation, ensure your door panel is prepared with L and U channels for track fitting, and remove any existing baseboard or door frame if necessary.
Video: A visual guide demonstrating the installation process for a concealed sliding door system. This video covers the steps from preparing the door to final adjustments.
Door Preparation and Dimensions
Before installing the hardware, ensure your door meets the specified dimensions and has the necessary grooves. An L-groove must be cut into the top of the door, and a U-channel for the bottom track.
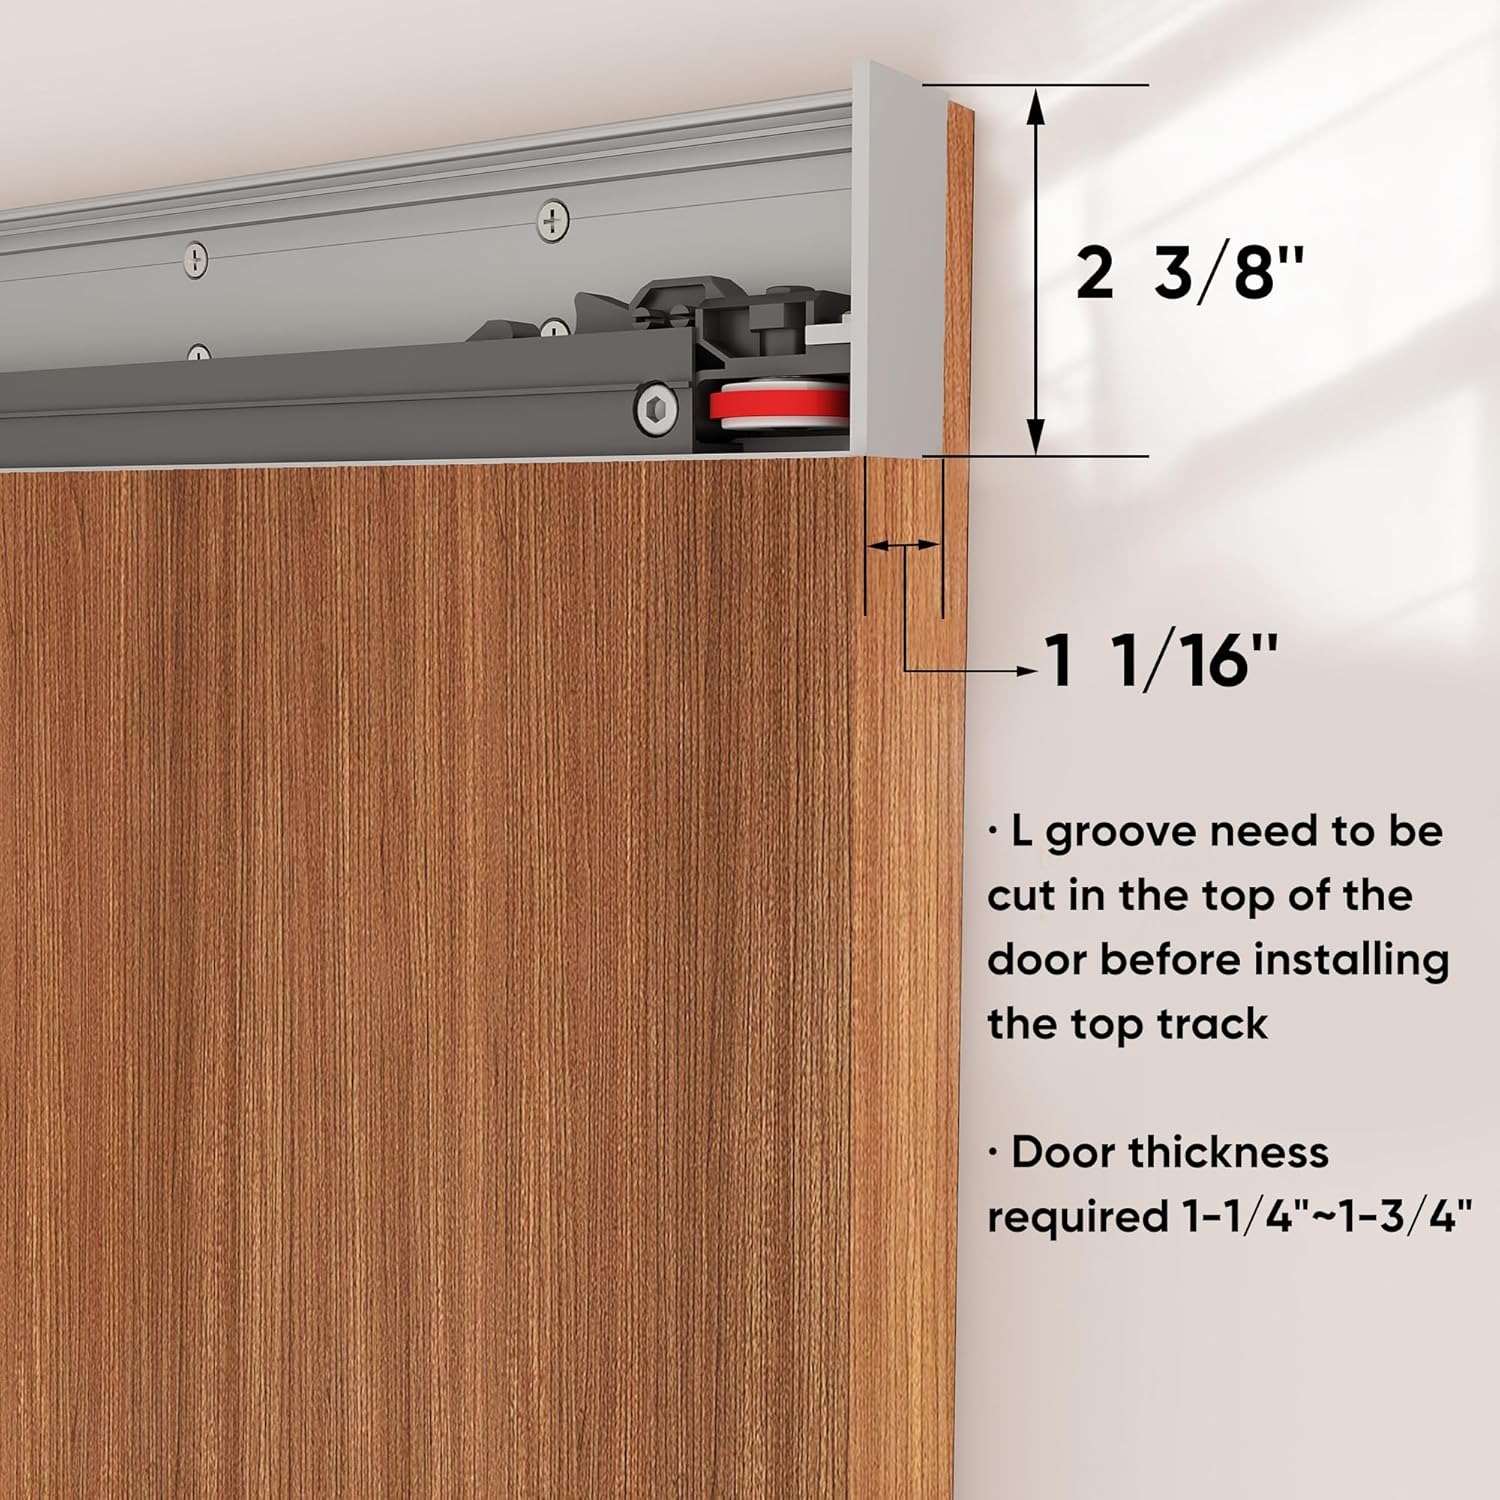
Image: Detailed diagram illustrating the required L-groove cut in the top of the door and the acceptable door thickness range (1-1/4" to 1-3/4") for proper installation.
ഇൻസ്റ്റലേഷൻ ഘട്ടങ്ങൾ
- Step 1: Cut Top Track to Length
Cut the top track to the required length (Door Width - 20mm). Loosen the soft close screws and place both soft close mechanisms on both ends of the top track.

Image: Illustration of cutting the top track to the correct length and positioning the soft close mechanisms at each end.
- Step 2: Fasten Top Track onto Door Slot
Securely fasten the prepared top track into the L-shaped slot on the top edge of your door panel using the provided screws.

Image: Visual representation of fastening the top track into the pre-cut L-slot on the door panel.
- Step 3: Tighten Soft Close Screws
Ensure the soft close mechanisms are flush and even with either end of the track, then tighten their respective screws to secure them in place.

Image: Illustration of tightening the screws on the soft close mechanisms to ensure they are properly aligned and secured.
- Step 4: Install Bottom Rollers
Remove the wheel part from the bottom roller body. Fasten the bottom roller body into the U-channel slot on the bottom of the door. Reinsert the wheel part back into the body.

Image: Close-up of the bottom wheel mechanism, designed to fix the bottom track sides and ensure smooth sliding. The door requires a groove for this component.
- Step 5: Cut Bottom Track to Length
Cut the bottom track to the required length (Door Width - 130mm). Insert the cut bottom track inside the bottom slot of the door.

Image: Illustration of cutting the bottom track to the specified length and placing it within the door's bottom groove.
- Step 6: Mount Hanger onto the Wall
Remove the anti-jump block from the hanger. Mark and drill holes on the wall according to the provided measurements (DH-1 7/32" (31mm) from the top of the door opening, and 5/32" (4mm) from the wall edge). Securely mount the hanger onto the wall using the appropriate fasteners.

Image: Step-by-step guide for removing the anti-jump block from the hanger and marking/drilling holes for wall mounting.
- Step 7: Mount Floor Guide
Position the floor guide on the floor, ensuring it aligns with the door's path. Mark and drill holes, then securely fasten the floor guide to the floor.

Image: Illustration of marking and drilling holes for the floor guide, followed by its secure installation on the floor.
- Step 8: Hang Door Panel
Carefully put the floor guide inside the bottom slot of the door. Then, hang the door panel onto the hanger, ensuring the hanger is positioned in the middle of the top track. Rotate the screw to adjust the height of the wheel for complete rail fitting. Finally, tighten the anti-jump block screws.

Image: Visual guide for hanging the door panel, adjusting the wheel height for proper rail fit, and tightening the anti-jump block screws.
- Step 9: Test Soft Close Actuator
Move the door both left and right to ensure the actuator is correctly positioned between the fins of the soft close mechanism. This confirms proper engagement for smooth operation.

Image: Illustration demonstrating the movement of the door to verify the correct positioning and function of the soft close actuator.
- Step 10: Adjust Door Parallelism
If the door panel is not parallel with the wall, first loosen both screws on the hanger. Hold the door parallel with the wall by hand, then tighten both screws to secure the adjustment. This ensures smooth and aligned sliding.

Image: Guide on adjusting the door's parallelism with the wall by loosening, aligning, and retightening the hanger screws.
പ്രവർത്തന നിർദ്ദേശങ്ങൾ
Your JUBEST Concealed Barn Door Hardware Kit is designed for smooth and quiet operation. The soft-close mechanisms ensure the door gently slows down and closes without slamming.
- To open the door, gently push or pull the door panel. The rollers will glide along the top track.
- As the door approaches its fully open or fully closed position, the soft-close mechanism will engage, slowing the door's movement for a quiet and controlled stop.
- Avoid forcing the door or attempting to override the soft-close mechanism, as this may cause damage.

ചിത്രം: ഒരു മുൻ കാമുകൻample of the JUBEST concealed barn door hardware installed, showcasing its sleek, hidden design and smooth operation in a modern setting.
മെയിൻ്റനൻസ്
Regular maintenance will help ensure the longevity and smooth operation of your hardware kit.
- വൃത്തിയാക്കൽ: Periodically wipe down the tracks and rollers with a soft, damp പൊടിയും അവശിഷ്ടങ്ങളും നീക്കം ചെയ്യാൻ തുണി ഉപയോഗിക്കുക. ഉരച്ചിലുകൾ ഉള്ള ക്ലീനറുകൾ ഒഴിവാക്കുക.
- ലൂബ്രിക്കേഷൻ: If the door's movement becomes stiff, apply a small amount of silicone-based lubricant to the rollers and inside the tracks. Do not use oil-based lubricants as they can attract dirt.
- ഹാർഡ്വെയർ പരിശോധന: Annually inspect all screws and fasteners to ensure they are tight. Re-tighten any loose components.
- റോളർ പരിശോധന: Check the rollers for any signs of wear or damage. Replace if necessary.
ട്രബിൾഷൂട്ടിംഗ്
| പ്രശ്നം | സാധ്യമായ കാരണം | പരിഹാരം |
|---|---|---|
| വാതിൽ സുഗമമായി നീങ്ങുന്നില്ല. | Dirt or debris in tracks; lack of lubrication; misaligned door. | Clean tracks, lubricate rollers, check door parallelism (refer to Step 10). |
| Soft-close mechanism not engaging. | Actuator not correctly positioned; mechanism damaged. | Verify actuator position (refer to Step 9), ensure soft close screws are tight (refer to Step 3). |
| Door is wobbly or unstable. | Loose fasteners; improper wall mounting; door not parallel. | Check and tighten all fasteners, ensure hanger is securely mounted, adjust door parallelism (refer to Step 10). |
| Door scrapes against the floor. | Incorrect door height adjustment. | Adjust the height of the top roller wheel (refer to Step 8). |
വാറൻ്റിയും പിന്തുണയും
JUBEST products are manufactured with quality and durability in mind. For specific warranty details, please refer to the warranty card included with your purchase or contact JUBEST customer service.
If you encounter any issues or have questions regarding your JUBEST Concealed Barn Door Hardware Kit, please contact our professional customer service team for assistance. We are dedicated to customer satisfaction.
ബന്ധപ്പെടാനുള്ള വിവരങ്ങൾ: Please refer to the product packaging or the official JUBEST webഏറ്റവും പുതിയ ഉപഭോക്തൃ പിന്തുണ കോൺടാക്റ്റ് വിശദാംശങ്ങൾക്കായുള്ള സൈറ്റ്.


