ആമുഖം
This user manual provides essential information for operating and maintaining your UIKICON 8K Digital Camera Model W05. Please read this manual thoroughly before using the camera to ensure proper function and to maximize your user experience. Keep this manual for future reference.
പാക്കേജ് ഉള്ളടക്കം
താഴെ ലിസ്റ്റ് ചെയ്തിരിക്കുന്ന എല്ലാ ഇനങ്ങളും നിങ്ങളുടെ പാക്കേജിൽ ഉൾപ്പെടുത്തിയിട്ടുണ്ടെന്ന് ഉറപ്പാക്കുക:
- UIKICON 8K Digital Camera x1
- 32GB TF കാർഡ് x1
- USB കേബിൾ x1
- Neck Strap x1
- 3000mAh Li-ion Battery x1
- ഉപയോക്തൃ മാനുവൽ x1
- ക്ലീനിംഗ് തുണി x1
- ലെൻസ് ഹുഡ് x1
- Lens Cap x1

Image: The UIKICON 8K Digital Camera shown with its complete set of accessories, including the lens hood, neck strap, USB cable, 32GB TF card, and battery.
ഉൽപ്പന്നം കഴിഞ്ഞുview
ക്യാമറയുടെ ഘടകങ്ങളും നിയന്ത്രണങ്ങളും പരിചയപ്പെടുക.
ക്യാമറ സവിശേഷതകൾ

ചിത്രം: ഒരു ഓവർview of the UIKICON 8K Digital Camera, illustrating its main features such as 8K video, 64MP photos, flash, dual camera, Wi-Fi, webcam functionality, autofocus, filters, 16X digital zoom, 4-inch touchscreen, and 3000mAh battery.
- 8K വീഡിയോ റെസല്യൂഷൻ: Records high-definition video.
- 64 Megapixels: Captures detailed still images.
- 4.0 ഇഞ്ച് ടച്ച്സ്ക്രീൻ: For intuitive navigation and settings adjustment.
- Dual-Lens Design: Enhances versatility for various shooting scenarios.
- 16X ഡിജിറ്റൽ സൂം: Allows for magnification of subjects.
- ഓട്ടോഫോക്കസ്: വ്യക്തമായ ചിത്രങ്ങൾക്കായി ഫോക്കസ് യാന്ത്രികമായി ക്രമീകരിക്കുന്നു.
- അന്തർനിർമ്മിത വൈഫൈ: വയർലെസ്സിനായി file കൈമാറ്റവും വിദൂര നിയന്ത്രണവും.
- Webക്യാമറ പ്രവർത്തനം: Connects to a computer for live streaming or video calls.
- ബിൽറ്റ്-ഇൻ ഫിൽ ലൈറ്റ്: കുറഞ്ഞ വെളിച്ചത്തിൽ അധിക പ്രകാശം നൽകുന്നു.
- Cold Shoe Interface: For attaching external accessories like microphones or additional lights.
ബട്ടൺ ആമുഖം
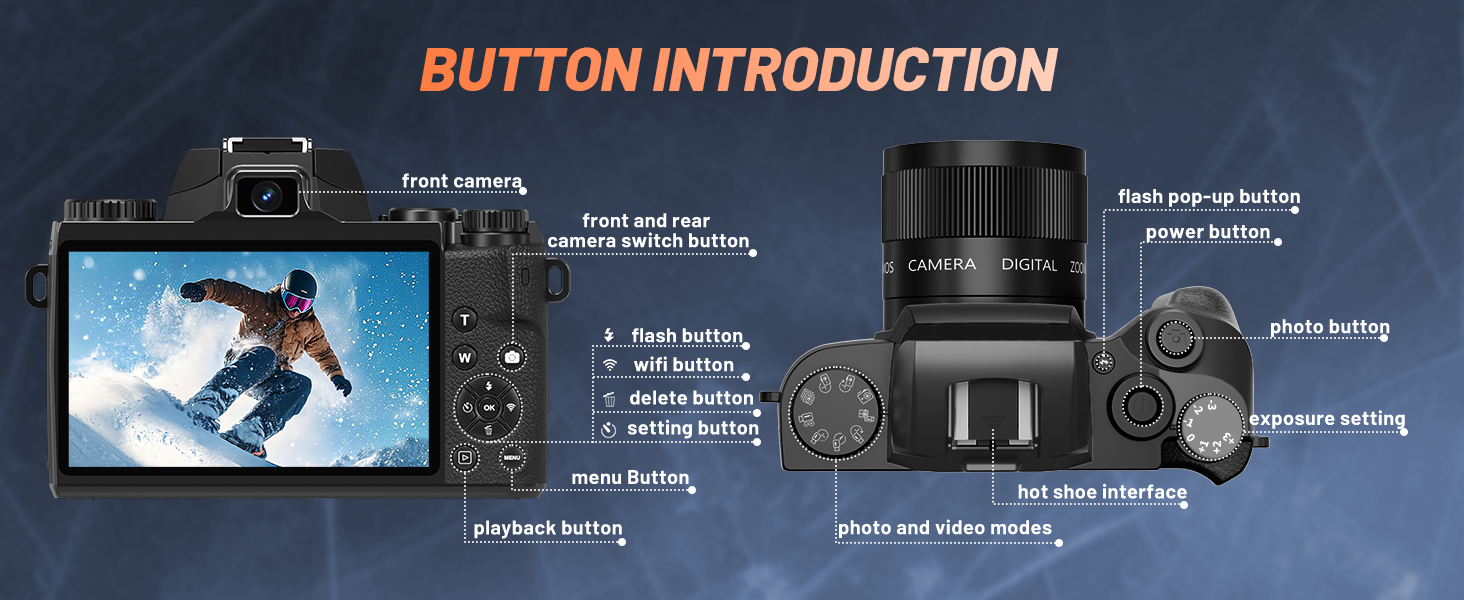
Image: A detailed diagram labeling the various buttons and interfaces on the UIKICON 8K Digital Camera, including the front camera, flash pop-up button, power button, photo button, exposure setting dial, hot shoe interface, photo and video modes dial, menu button, playback button, setting button, delete button, Wi-Fi button, and flash button.
- പവർ ബട്ടൺ: ക്യാമറ ഓൺ അല്ലെങ്കിൽ ഓഫ് ചെയ്യുന്നു.
- ഫോട്ടോ ബട്ടൺ: നിശ്ചല ചിത്രങ്ങൾ പകർത്തുന്നു.
- Video Button (integrated with mode dial): വീഡിയോ റെക്കോർഡിംഗ് ആരംഭിക്കുകയും നിർത്തുകയും ചെയ്യുന്നു.
- മോഡ് ഡയൽ: Selects between photo, video, and other shooting modes.
- മെനു ബട്ടൺ: Accesses the camera's main menu.
- പ്ലേബാക്ക് ബട്ടൺ: Reviews captured photos and videos.
- Setting Button (OK/Confirm): മെനുകളിലെ തിരഞ്ഞെടുപ്പുകൾ സ്ഥിരീകരിക്കുന്നു.
- നാവിഗേഷൻ ബട്ടണുകൾ (മുകളിലേക്ക്/താഴേക്ക്/ഇടത്/വലത്): മെനുകളിലൂടെയും ക്രമീകരണങ്ങളിലൂടെയും നാവിഗേറ്റ് ചെയ്യുന്നു.
- ഫ്ലാഷ് ബട്ടൺ: Controls the built-in flash settings.
- Wi-Fi ബട്ടൺ: വൈഫൈ കണക്റ്റിവിറ്റി സജീവമാക്കുന്നു അല്ലെങ്കിൽ നിർജ്ജീവമാക്കുന്നു.
- ഇല്ലാതാക്കുക ബട്ടൺ: തിരഞ്ഞെടുത്തവ ഇല്ലാതാക്കുന്നു files.
- Exposure Setting Dial: Adjusts exposure compensation.
- Flash Pop-up Button: Manually raises the built-in flash.
- Front/Rear Camera Switch Button: Toggles between front and rear lenses.
സജ്ജമാക്കുക
1. ബാറ്ററി ഇൻസ്റ്റാളേഷൻ
- ക്യാമറയുടെ അടിയിൽ ബാറ്ററി കമ്പാർട്ട്മെന്റ് കവർ കണ്ടെത്തുക.
- കവർ തുറക്കാൻ ലാച്ച് സ്ലൈഡ് ചെയ്യുക.
- Insert the 3000mAh Li-ion battery into the compartment, ensuring the correct orientation as indicated inside the compartment.
- ബാറ്ററി കമ്പാർട്ട്മെന്റ് കവർ സുരക്ഷിതമായി സ്ഥലത്ത് ക്ലിക്ക് ചെയ്യുന്നത് വരെ അടയ്ക്കുക.
2 TF കാർഡ് ഇൻസ്റ്റലേഷൻ
- Locate the TF card slot, usually adjacent to the battery compartment.
- Insert the 32GB TF card into the slot with the metal contacts facing the correct direction (refer to the diagram or camera markings).
- Push the card gently until it clicks into place. To remove, push the card again until it springs out.
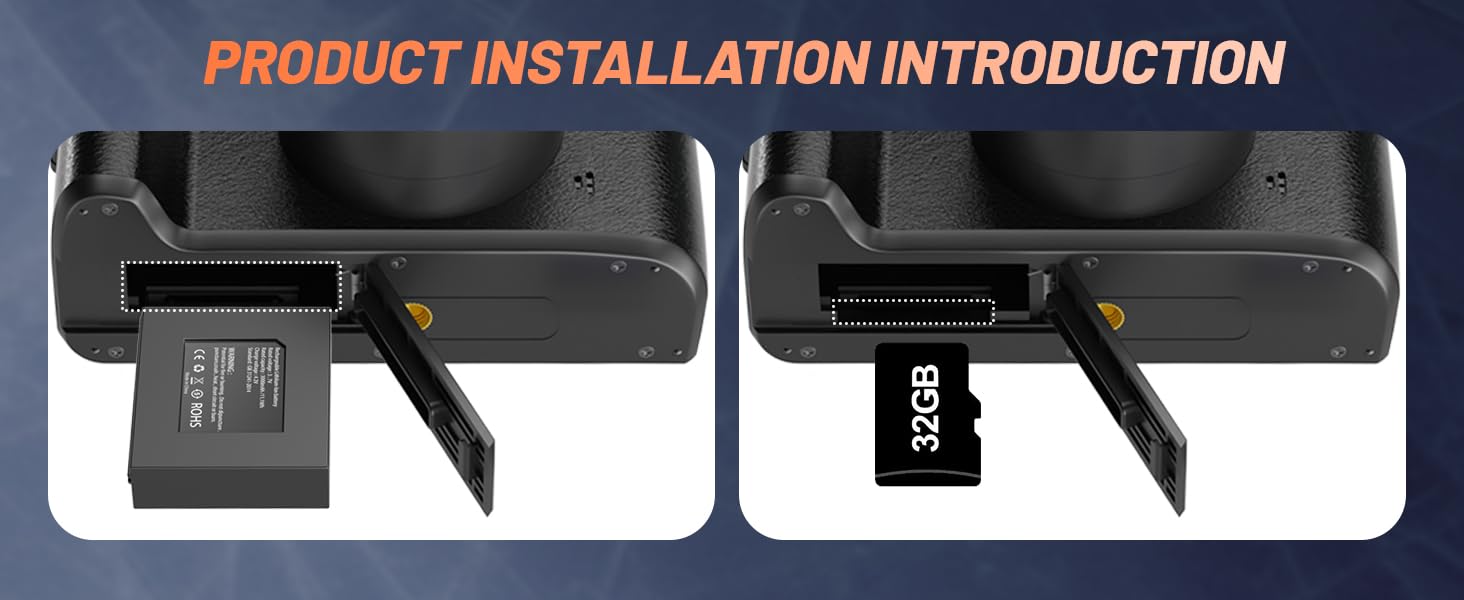
Image: Visual guide for installing the battery (left) and the TF card (right) into their respective compartments on the camera.
3. പ്രാരംഭ പവർ ഓൺ
Press and hold the Power Button until the screen illuminates. Follow any on-screen prompts for initial setup, such as setting the date and time.
പ്രവർത്തന നിർദ്ദേശങ്ങൾ
Basic Photo and Video Capture
- Turn on the camera using the Power Button.
- Rotate the Mode Dial to select either photo or video mode.
- Frame your shot using the 4-inch touchscreen.
- Press the Photo Button halfway to engage autofocus, then press fully to capture an image or start/stop video recording.
ടച്ച്സ്ക്രീൻ ഉപയോഗിക്കുന്നു
The 4.0-inch touchscreen allows for intuitive control. Tap icons to change settings, swipe to navigate through menus or review images. Ensure the screen is clean to maintain touch responsiveness.
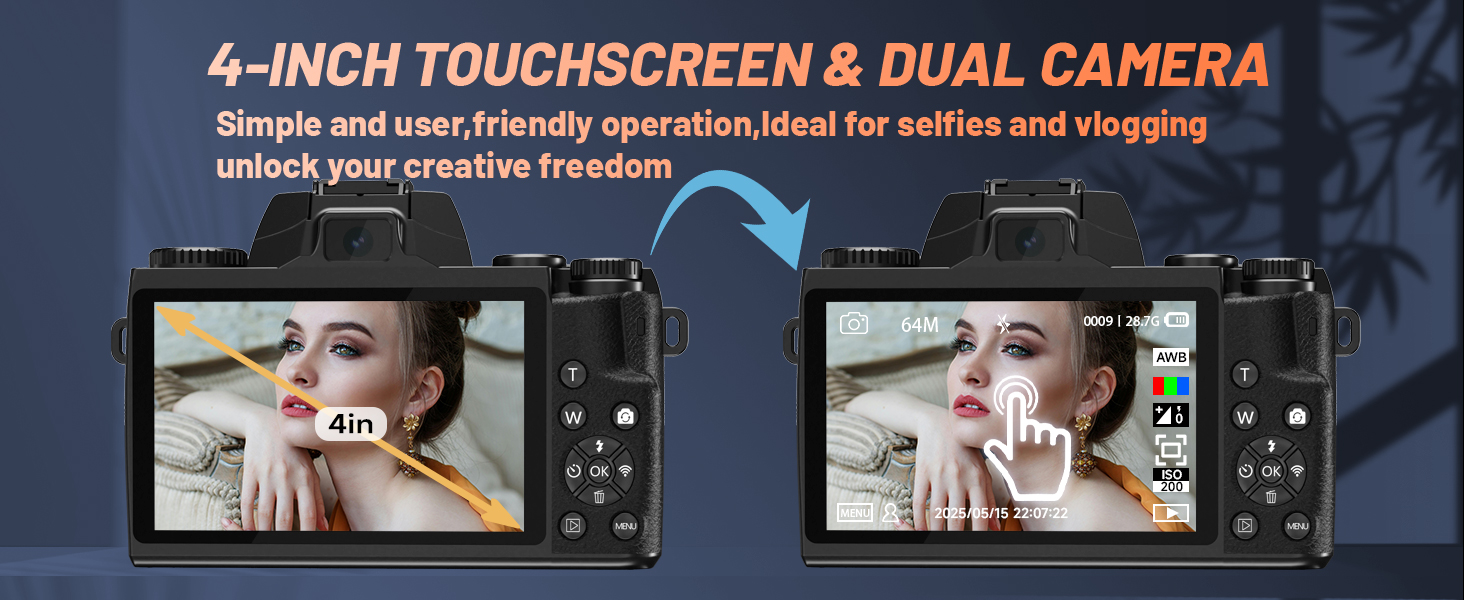
Image: The camera's 4-inch touchscreen displaying a live view and menu options, demonstrating its touch functionality and dual-camera capability for selfies.
Autofocus and Digital Zoom
The camera features ultra-fast autofocus for precise subject recognition. Use the 16X digital zoom to magnify your subject. Note that digital zoom may reduce image quality compared to optical zoom.

Image: A demonstration of the camera's autofocus system, showing green focus boxes around subjects in a crowd, indicating intelligent subject recognition.
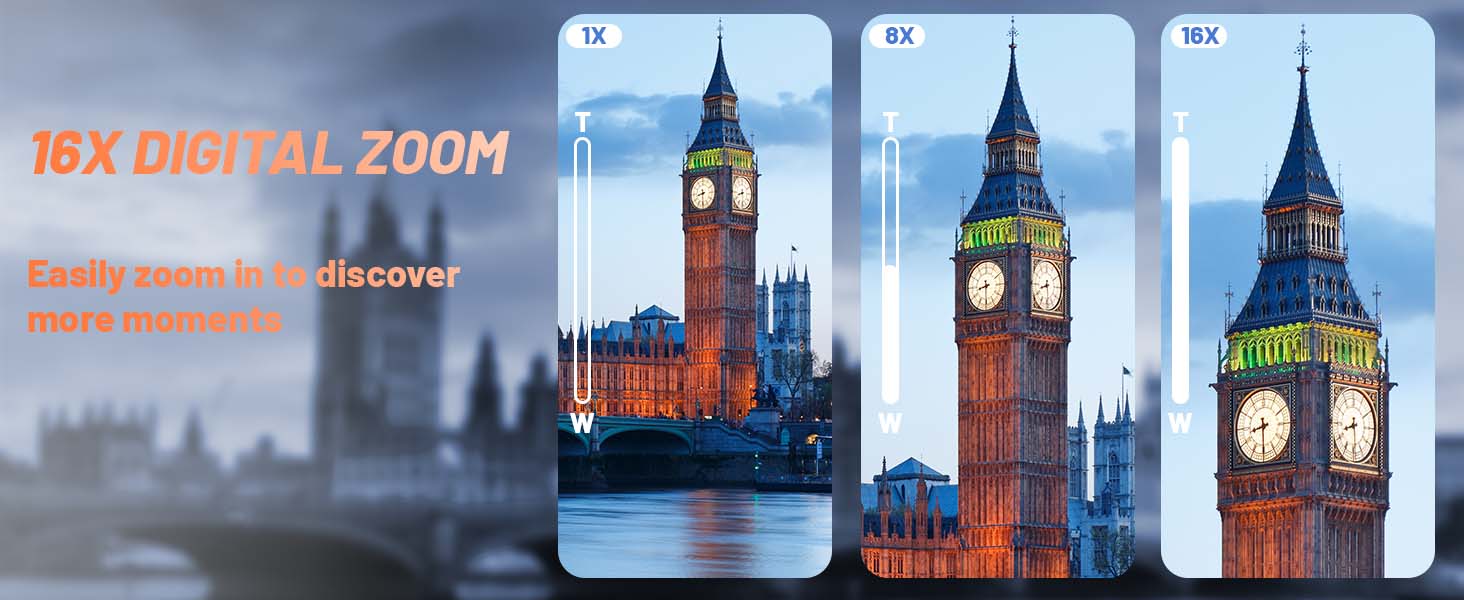
Image: A visual representation of the camera's 16X digital zoom capability, showing a landmark at 1X, 8X, and 16X magnification.
Shooting Modes and Filters
The camera offers various shooting modes, including Photo, Auto, Burst, Timer, Video, Slow Motion, and Time-Lapse. Select your desired mode using the mode dial. Additionally, multiple creative filters are available to enhance your images.
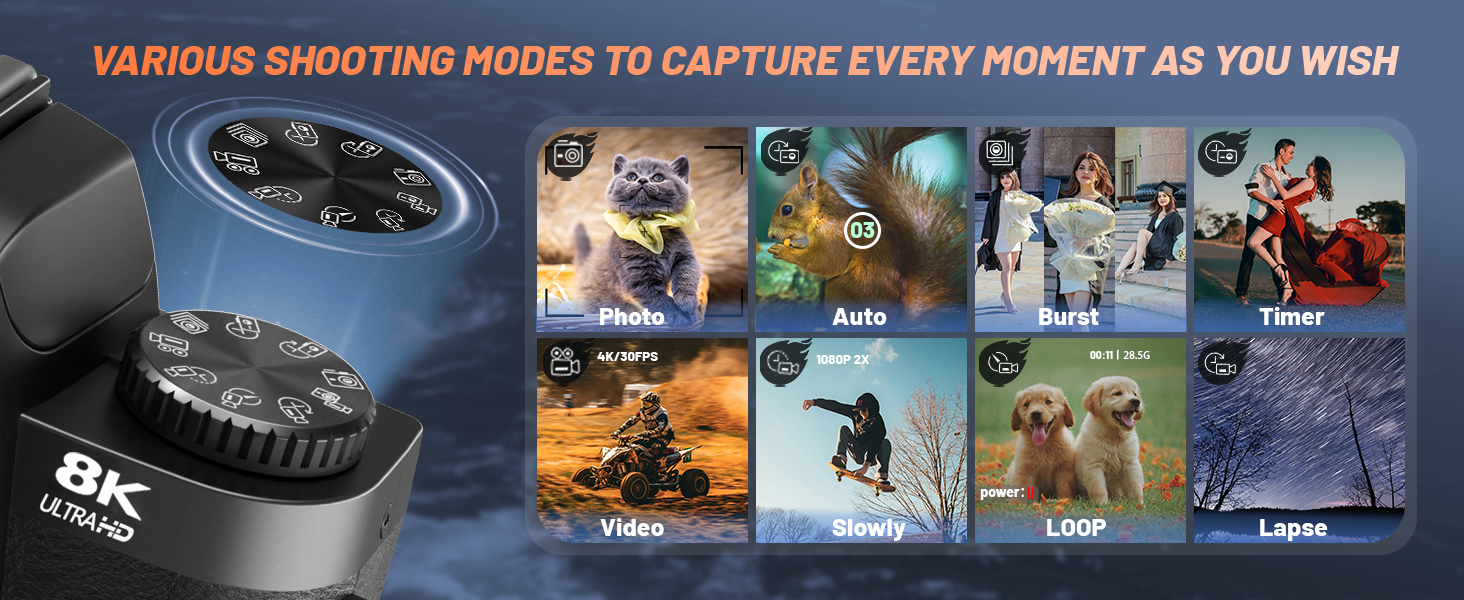
Image: A graphic illustrating the camera's mode dial and various shooting options, such as Photo, Auto, Burst, Timer, Video, Slow Motion, Loop Recording, and Time-Lapse.
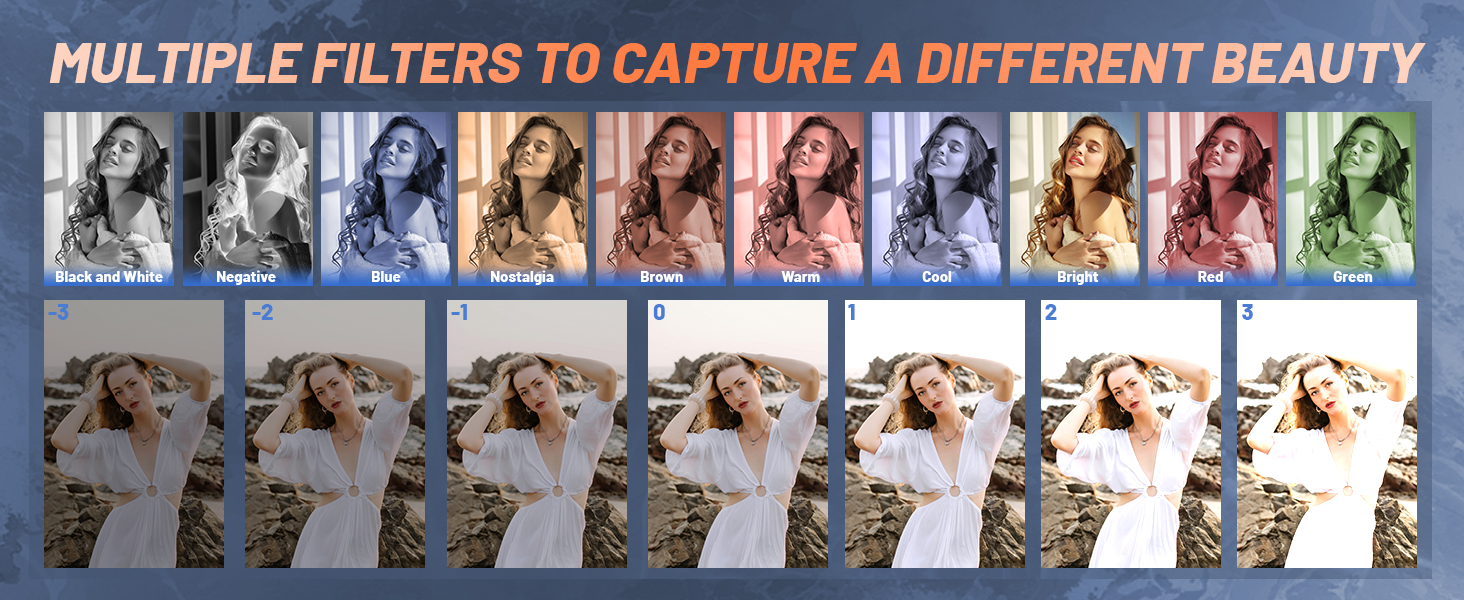
ചിത്രം: ഉദാamples of various creative filters available on the camera, including Black and White, Negative, Blue, Nostalgia, Brown, Warm, Cool, Bright, Red, and Green, applied to a portrait.
Webക്യാം പ്രവർത്തനം
ക്യാമറ എ ആയി ഉപയോഗിക്കാൻ webക്യാം:
- നൽകിയിരിക്കുന്ന USB കേബിൾ ഉപയോഗിച്ച് നിങ്ങളുടെ കമ്പ്യൂട്ടറിലേക്ക് ക്യാമറ ബന്ധിപ്പിക്കുക.
- On the camera screen, select "PC Camera" mode.
- നിങ്ങളുടെ കമ്പ്യൂട്ടർ ക്യാമറയെ ഒരു ആയി തിരിച്ചറിയണം webcam for video conferencing or streaming applications.

Image: The UIKICON 8K Digital Camera connected via USB to a laptop, demonstrating its use as a high-definition webcam for streaming or video calls.
Wi-Fi and HDMI Output
The camera supports Wi-Fi for wireless file transfer and remote control, and HDMI for connecting to external displays.
വൈഫൈ കണക്റ്റിവിറ്റി:
- Download the "IDC CAM" application on your mobile device.
- Enable Wi-Fi on both your camera and mobile device.
- Connect to the camera's Wi-Fi network (SSID: W05-8K, Password: 123456789).
- ക്യാമറകൾ ആക്സസ് ചെയ്യുക files and control functions through the "IDC CAM" app.
HDMI ഔട്ട്പുട്ട്:
Connect an HDMI cable (not included) from the camera's HDMI port to an external monitor or TV to view your content on a larger screen.
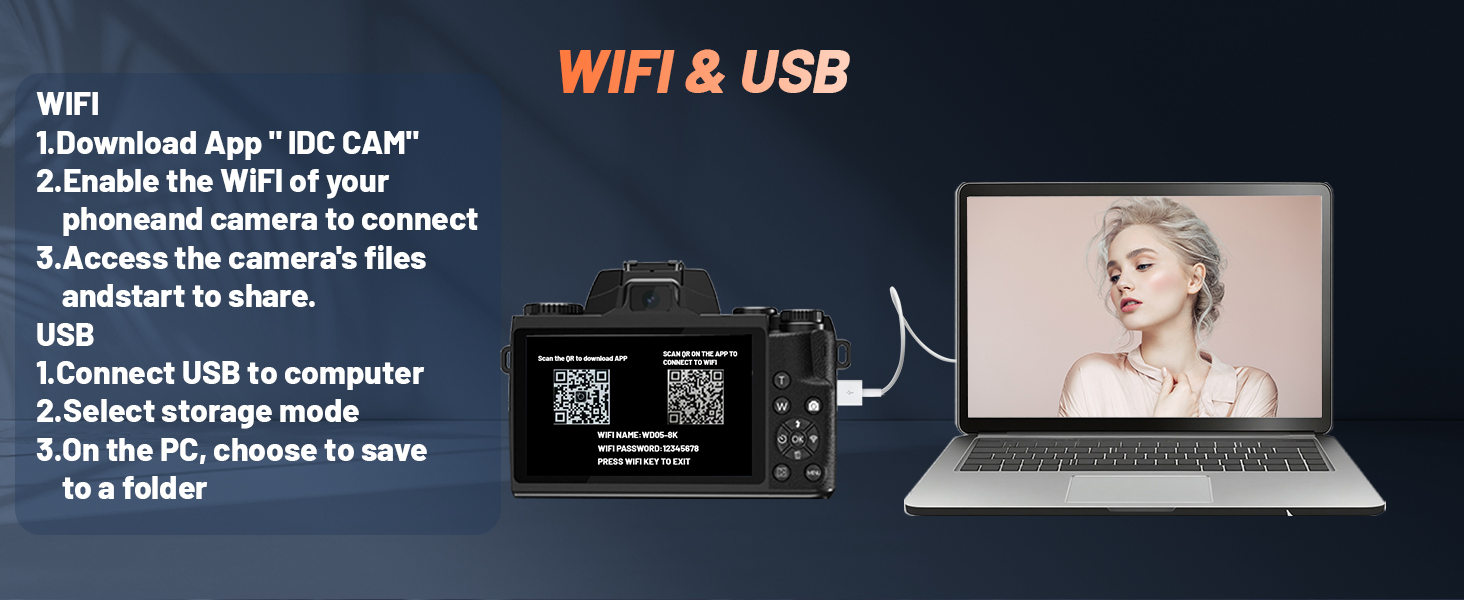
Image: Instructions for connecting the camera via Wi-Fi to a smartphone using the "IDC CAM" app and via USB to a computer for file കൈമാറ്റം അല്ലെങ്കിൽ webക്യാം മോഡ്.
Built-in Fill Light
The camera includes a built-in fill light to improve image quality in low-light environments. Activate it using the dedicated flash button or through the camera's menu settings.
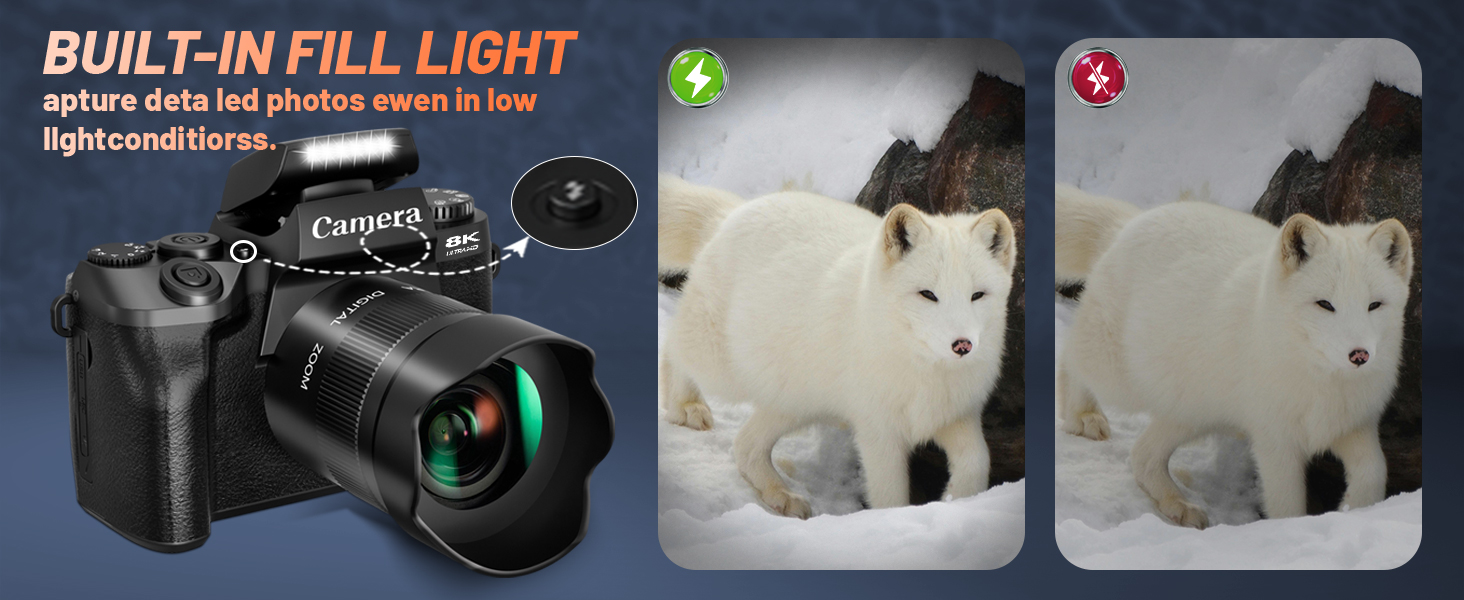
Image: A comparison showing the effect of the camera's built-in fill light, with one image taken without flash and another with the fill light activated, improving visibility in a low-light scene.
മെയിൻ്റനൻസ്
ക്യാമറ വൃത്തിയാക്കുന്നു
- നൽകിയിരിക്കുന്ന ക്ലീനിംഗ് തുണി ഉപയോഗിച്ച് ക്യാമറ ബോഡിയും സ്ക്രീനും സൌമ്യമായി തുടയ്ക്കുക.
- For the lens, use a specialized lens cleaning solution and cloth to avoid scratches.
- Keep the touchscreen clean to ensure optimal responsiveness.
ബാറ്ററി കെയർ
- Charge the 3000mAh battery fully before first use.
- അങ്ങേയറ്റത്തെ താപനിലയിലേക്ക് ബാറ്ററി തുറന്നുകാട്ടുന്നത് ഒഴിവാക്കുക.
- If the camera is not used for an extended period, remove the battery.
- Note: Prolonged use may cause the camera to become warm, which is normal. If the system becomes unresponsive due to high temperature, allow it to cool down.
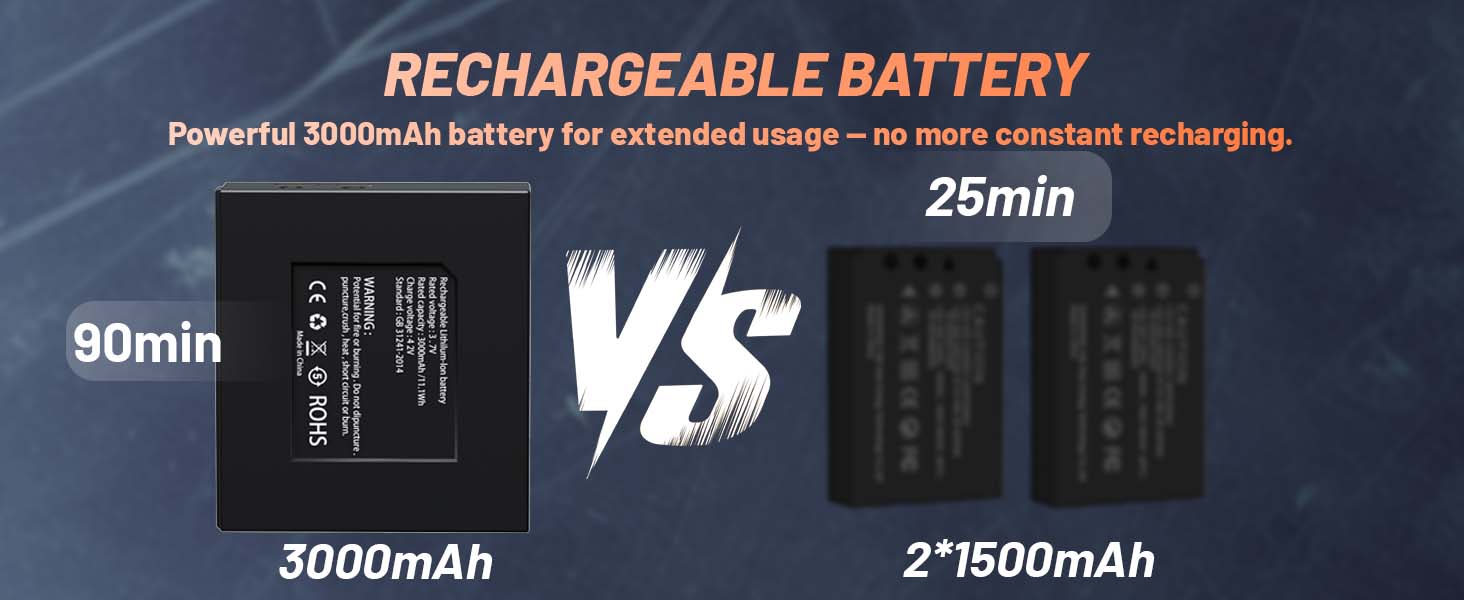
Image: A comparison illustrating the extended usage time of the 3000mAh battery (90 minutes) versus two 1500mAh batteries (25 minutes each).
ട്രബിൾഷൂട്ടിംഗ്
| പ്രശ്നം | സാധ്യമായ കാരണം | പരിഹാരം |
|---|---|---|
| ക്യാമറ പവർ ഓൺ ചെയ്യുന്നില്ല. | ബാറ്ററി തീർന്നിരിക്കുന്നു അല്ലെങ്കിൽ തെറ്റായി ഇൻസ്റ്റാൾ ചെയ്തിരിക്കുന്നു. | ബാറ്ററി പൂർണ്ണമായും ചാർജ് ചെയ്യുക. ശരിയായ പോളാരിറ്റിയോടെ ബാറ്ററി ചേർത്തിട്ടുണ്ടെന്ന് ഉറപ്പാക്കുക. |
| System becomes unresponsive. | Prolonged use causing high temperature. | Turn off the camera and allow it to cool down before resuming use. |
| Poor image quality in bright sunlight. | Camera struggles with exposure/focus in direct sunlight. | Try adjusting exposure settings manually or repositioning to avoid direct harsh sunlight. Use the lens hood to reduce glare. |
| വൈഫൈ കണക്ഷൻ പ്രശ്നങ്ങൾ. | Incorrect Wi-Fi settings or app not installed. | Ensure "IDC CAM" app is installed. Verify Wi-Fi SSID and password. Restart camera and mobile device. |
| ടച്ച്സ്ക്രീൻ പ്രതികരിക്കുന്നില്ല. | Screen is dirty or system is frozen. | Clean the screen with a soft cloth. If frozen, power cycle the camera. |
സ്പെസിഫിക്കേഷനുകൾ
| ഫീച്ചർ | വിശദാംശങ്ങൾ |
|---|---|
| ബ്രാൻഡ് | UIKICON |
| മോഡലിൻ്റെ പേര് | W05 |
| വീഡിയോ റെസല്യൂഷൻ | 8K |
| ഫോട്ടോ സെൻസർ റെസല്യൂഷൻ | 64 എം.പി |
| ഫോട്ടോ സെൻസർ ടെക്നോളജി | CMOS |
| സ്ക്രീൻ വലിപ്പം | 4 ഇഞ്ച് |
| ഡിസ്പ്ലേ തരം | LCD, Adaptive Touchscreen |
| ഡിജിറ്റൽ സൂം | 16 x |
| ഇമേജ് സ്റ്റെബിലൈസേഷൻ | ഡിജിറ്റൽ |
| ബാറ്ററി തരം | 3000mAh ലിഥിയം-അയൺ റീചാർജ് ചെയ്യാവുന്ന ബാറ്ററി |
| ബാറ്ററി ശരാശരി ആയുസ്സ് | 2.5 മണിക്കൂർ (ഏകദേശം) |
| കണക്റ്റിവിറ്റി ടെക്നോളജി | HDMI, USB, വൈ-ഫൈ |
| പിന്തുണച്ചു File ഫോർമാറ്റ് | MP4 (Video), JPEG (Image) |
| ബാഹ്യ മെമ്മറി വലുപ്പം | 32 GB (TF card included) |
| ഇനത്തിൻ്റെ ഭാരം | 0.7 കിലോഗ്രാം |
| നിറം | കറുപ്പ് |
| ഫോക്കസ് തരം | ഓട്ടോ ഫോക്കസ്, മാനുവൽ ഫോക്കസ് |
| ഫ്ലാഷ് മോഡുകൾ | Auto, Fill Flash |
വാറൻ്റിയും പിന്തുണയും
UIKICON provides customer support for this product. For any questions or assistance, please contact our customer service team. We offer 24-hour online customer service to address your inquiries.
Please refer to your purchase documentation for specific warranty details and contact information.


