ആമുഖം
Welcome to the user manual for your XTU Wireless Doorbell with Camera. This device is designed to enhance your home security and convenience with its advanced features. Please read this manual carefully before installation and use to ensure optimal performance and safety.
Key features include 2K HD video resolution, PIR motion detection, two-way audio communication, and night vision capabilities. It is also compatible with smart home systems like Amazon Alexa and Google Home.
ഉൽപ്പന്നം കഴിഞ്ഞുview
ഘടകങ്ങൾ
Your XTU Wireless Doorbell package typically includes:
- XTU Wireless Doorbell Unit
- ഇൻഡോർ ചൈം യൂണിറ്റ്
- മൌണ്ടിംഗ് ബ്രാക്കറ്റ്
- മൗണ്ടിംഗ് സ്ക്രൂകളും ആങ്കറുകളും
- യുഎസ്ബി ചാർജിംഗ് കേബിൾ
- ഉപയോക്തൃ മാനുവൽ (ഈ പ്രമാണം)

Image: The XTU Wireless Doorbell unit, the indoor chime, and a smartphone displaying the doorbell's live feed.
ഫീച്ചറുകൾ
- 2K HD Video Quality: Provides clear and detailed video recordings day and night, ensuring you don't miss any important details.
- പിആർ മോഷൻ കണ്ടെത്തൽ: Advanced passive infrared motion detection technology instantly alerts you to visitors or suspicious activity at your door.
- Multi-Angle Support: The adjustable mounting bracket allows you to set the doorbell at one of five different angles (-45°, -22.5°, 0°, 22.5°, 45°) to optimize your field of view.
- ടു-വേ ഓഡിയോ & വോയ്സ് ചേഞ്ചർ: Communicate with visitors in real-time through the built-in microphone and speaker. The voice changer feature can be used to mask your true voice for added privacy.
- സ്മാർട്ട് ഹോം അനുയോജ്യത: Seamlessly integrates with Amazon Alexa and Google Home devices (specifically Echo Show and Google Nest Hub) for a smarter home experience.
- ലോക്കൽ & ക്ലൗഡ് സംഭരണം: Supports local storage via a micro SD card (up to 128GB, not included) and offers a free basic lifetime cloud service for storing key video clips.
- വാട്ടർപ്രൂഫ് ഡിസൈൻ: Engineered to be waterproof, ensuring reliable operation outdoors in various weather conditions.
- രാത്രി കാഴ്ച: Equipped with infrared night vision, the doorbell provides clear video recording even in low light or complete darkness.

Image: A delivery person approaching a house, with a blue overlay indicating the PIR motion detection zone. A smartphone screen shows a timeline of detected events.
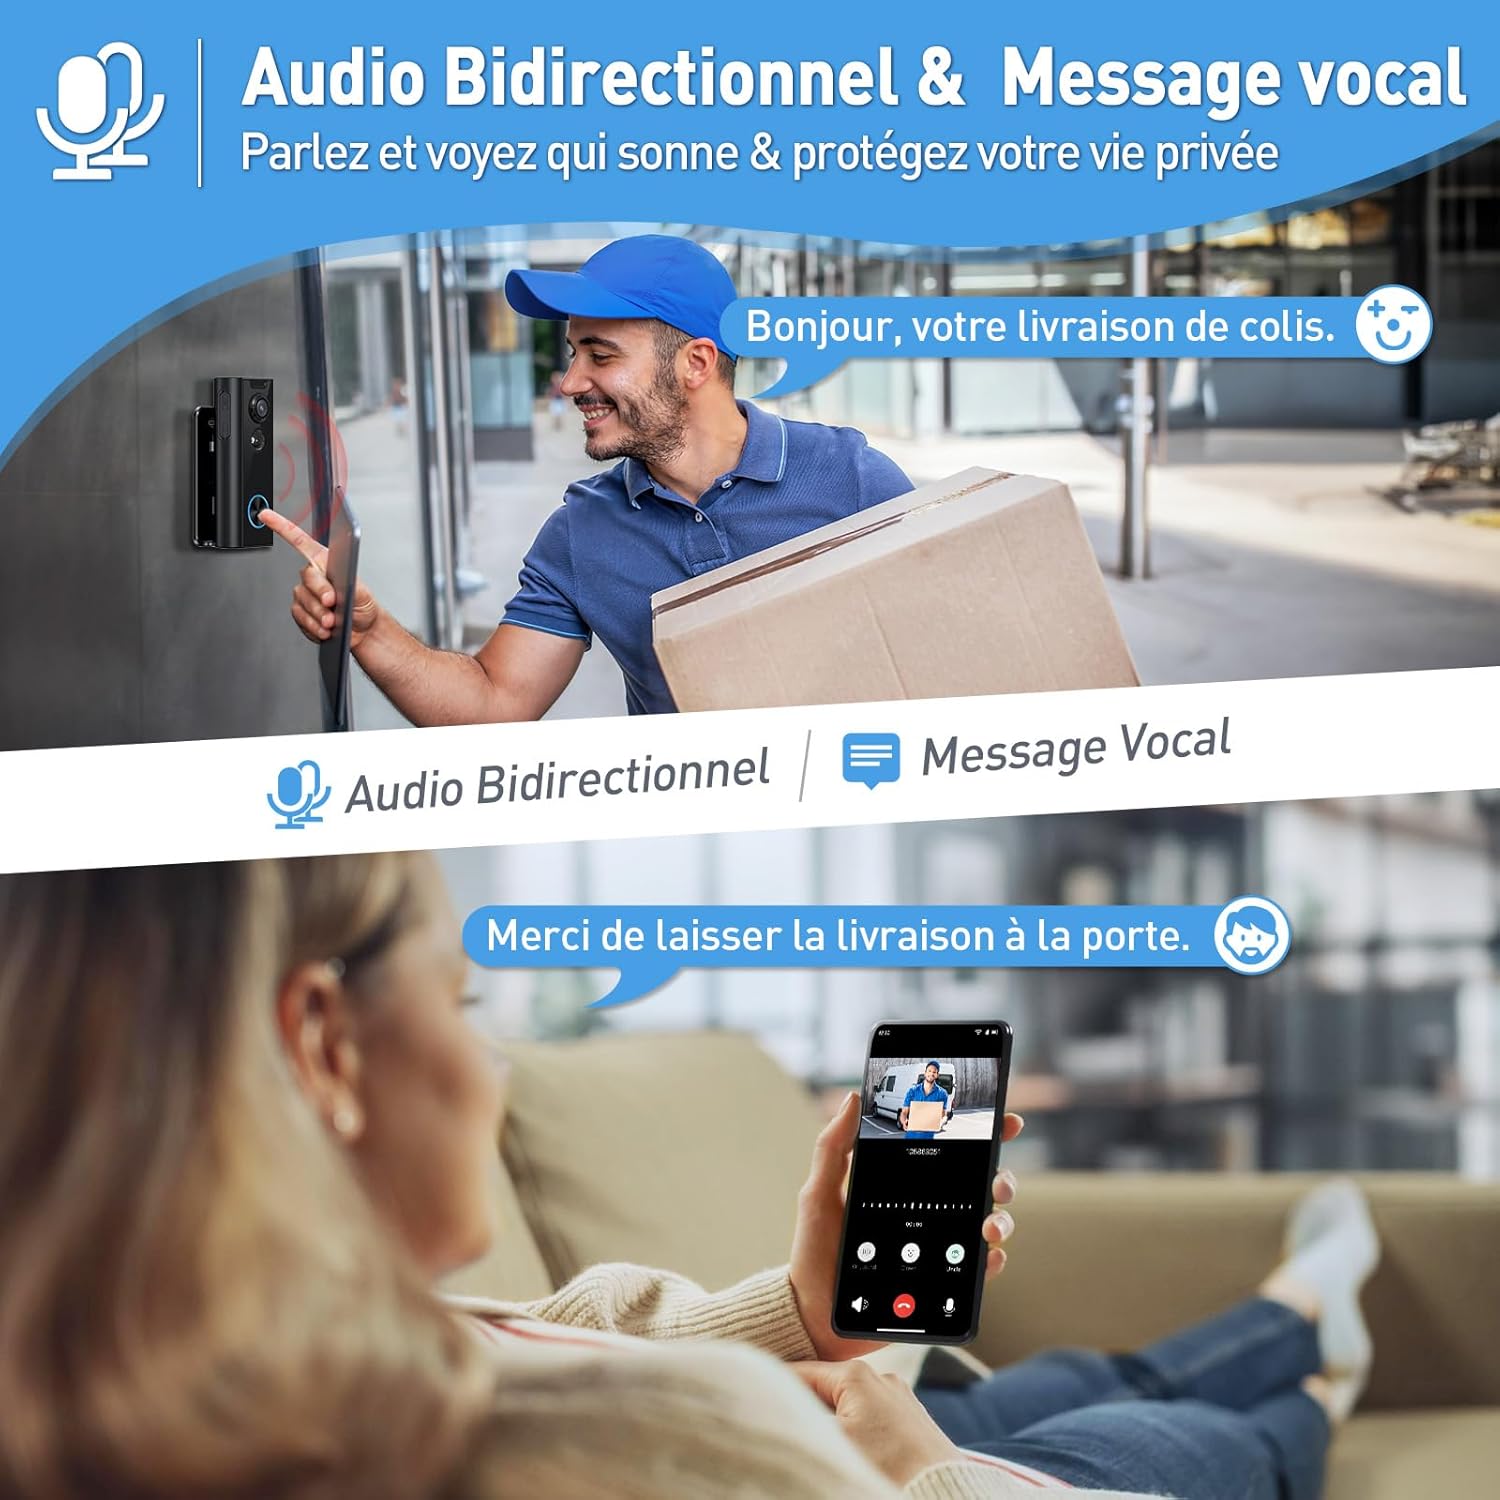
Image: Top part shows a person at the doorbell and a speech bubble saying "Hello, your package delivery." Bottom part shows a person on a couch interacting with the doorbell via a smartphone, with a speech bubble saying "Please leave the delivery at the door."
സജ്ജീകരണ ഗൈഡ്
1. ഡോർബെൽ ചാർജ് ചെയ്യുന്നു
Before installation, fully charge the doorbell unit using the provided USB cable. A full charge ensures optimal performance and battery life. The app will notify you when the battery needs charging.
2. ആപ്പ് ഇൻസ്റ്റാളേഷനും അക്കൗണ്ട് സൃഷ്ടിയും
Download the "CloudEdge" app from your smartphone's app store (available for iOS and Android). Follow the in-app instructions to create an account and log in.
3. Pairing the Doorbell with the App
In the CloudEdge app, select "Add Device" and follow the prompts to connect your doorbell to your home Wi-Fi network. Ensure your Wi-Fi signal is strong at the intended installation location for stable connectivity.
4. ഡോർബെൽ ഘടിപ്പിക്കൽ
- Release the mounting bracket from the doorbell unit.
- Mark the screw holes on your wall using the mounting bracket as a template.
- Install the bracket on your wall using the provided screws and anchors. For flat, smooth surfaces, you may also use the included adhesive.
- Attach the doorbell to the fixed bracket.
- Adjust the angle of the doorbell using the adjustable support and secure it with the security screw. You can choose from 5 different angles (-45°, -22.5°, 0°, 22.5°, 45°) to optimize your view.

Image: A six-step diagram illustrating the installation process of the doorbell, from detaching the bracket to securing the doorbell and adjusting its angle.

Image: A hand using a screwdriver to adjust the angle of the doorbell on its mounting bracket, with illustrations of five possible angle settings below.
പ്രവർത്തന നിർദ്ദേശങ്ങൾ
തത്സമയം View അറിയിപ്പുകളും
Once installed and connected, you can access the live video feed from your doorbell via the CloudEdge app at any time. You will receive instant notifications on your smartphone when motion is detected or the doorbell button is pressed.
ടു-വേ ആശയവിനിമയം
When a visitor rings the doorbell or motion is detected, you can initiate a two-way conversation through the app. Use the voice changer feature to mask your voice for added privacy. You can also set up pre-recorded voice messages for quick responses, such as instructing delivery personnel.

Image: A smartphone screen showing an incoming call from the doorbell, with options to answer or send a quick pre-recorded message like "Please leave the package at the door."
മോഷൻ ഡിറ്റക്ഷൻ ക്രമീകരണങ്ങൾ
Customize motion detection zones within the app to focus on specific areas and reduce false alarms from passing vehicles or pets. Adjust sensitivity levels to suit your environment for optimal performance.

Image: An illustration of a house with a yard, showing a person walking in a highlighted yellow zone, indicating a customized motion detection area, while a dog outside the zone does not trigger an alert.
സ്റ്റോറേജ് ഓപ്ഷനുകൾ
Video recordings can be stored on a micro SD card (up to 128GB, not included) inserted into the doorbell unit. A basic free lifetime cloud service is also available for storing important video clips, providing a convenient backup solution.

Image: A smartphone displaying a list of recorded video clips, with icons for cloud storage and a micro SD card, indicating storage options.
സ്മാർട്ട് ഹോം ഇൻ്റഗ്രേഷൻ
Connect your XTU doorbell with Amazon Alexa or Google Home devices (specifically Echo Show and Google Nest Hub) to enable voice commands and view your doorbell's live feed on compatible smart displays, enhancing your smart home ecosystem.

Image: A woman in a kitchen interacting with an Echo Show device, which displays the live feed from the doorbell showing two children at the door. Logos for "works with Google Home" and "works with Alexa" are present.
മെയിൻ്റനൻസ്
ബാറ്ററി ചാർജിംഗ്
The doorbell is powered by a rechargeable battery. The CloudEdge app will notify you when the battery level is low. To charge, remove the doorbell unit from its mounting bracket and connect it to a power source using the provided USB charging cable. A full charge can last for an extended period depending on usage and environmental factors.
വൃത്തിയാക്കൽ
Periodically wipe the camera lens and the doorbell's exterior with a soft, damp cloth to ensure clear video quality and proper operation. Avoid using harsh chemicals or abrasive materials that could damage the device.
ട്രബിൾഷൂട്ടിംഗ്
| പ്രശ്നം | സാധ്യമായ കാരണം | പരിഹാരം |
|---|---|---|
| ഡോർബെൽ വൈഫൈയിലേക്ക് കണക്റ്റ് ചെയ്യുന്നില്ല. | Weak Wi-Fi signal; incorrect password; too far from router. | Ensure doorbell is within Wi-Fi range. Double-check Wi-Fi password. Consider a Wi-Fi extender if the signal is consistently weak. |
| പതിവ് തെറ്റായ ചലന മുന്നറിയിപ്പുകൾ. | Motion detection sensitivity too high; wide detection zone. | Adjust motion detection sensitivity in the app. Define custom motion zones to exclude busy areas like public sidewalks or roads. |
| ചെറിയ ബാറ്ററി ലൈഫ്. | Frequent motion detections; extreme temperatures; continuous live view. | Reduce motion detection sensitivity or frequency. Ensure optimal operating temperature. Limit continuous live view. Consider a compatible solar panel charger for continuous power. |
| മോശം വീഡിയോ നിലവാരം. | Dirty lens; poor lighting; unstable network connection. | Clean the camera lens with a soft cloth. Ensure adequate lighting in the viewing area. Check Wi-Fi connection stability and signal strength. |
| Chime not ringing. | Chime not paired; volume too low; power issue. | Ensure the chime is properly paired with the doorbell. Check the chime's volume settings. Verify the chime is plugged into a working power outlet. |
സ്പെസിഫിക്കേഷനുകൾ
- മോഡലിൻ്റെ പേര്: J10
- നിറം: കറുപ്പ്
- വീഡിയോ റെക്കോർഡിംഗ് മിഴിവ്: 2K HD
- കണക്റ്റിവിറ്റി ടെക്നോളജി: വയർലെസ് (വൈ-ഫൈ)
- ഊർജ്ജ സ്രോതസ്സ്: ബാറ്ററി പവർ
- Viewഇൻ ആംഗിൾ: 120 ഡിഗ്രി
- നൈറ്റ് വിഷൻ ശ്രേണി: 10 മീറ്റർ
- ജല പ്രതിരോധ നില: വാട്ടർപ്രൂഫ്
- കൺട്രോളർ തരം: CloudEdge ആപ്പ്
- ശുപാർശ ചെയ്യുന്ന ഉപയോഗം: ഔട്ട്ഡോർ സെക്യൂരിറ്റി
- അളവുകൾ (L x W x H): Approximately 50 x 50 x 50 millimeters (5 x 5 x 5 cm)
- ഭാരം: 460 ഗ്രാം
വാറൻ്റിയും പിന്തുണയും
XTU is committed to providing high-quality products and excellent customer service. Your satisfaction is our priority.
- 30-Day Amazon Return Policy: Enjoy peace of mind with Amazon's standard return policy.
- 12-Month Warranty Service: Your product is covered by a 12-month warranty from the date of purchase, protecting against manufacturing defects.
- ആജീവനാന്ത ഉപഭോക്തൃ പിന്തുണ: XTU offers lifetime customer assistance for any inquiries or issues you may encounter with your product.
- സ്പെയർ പാർട്സ് ലഭ്യത: വാങ്ങിയ തീയതി മുതൽ 2 വർഷത്തേക്ക് സ്പെയർ പാർട്സ് ലഭ്യമാണ്.
For support, please contact XTU customer service at support.eu@xtucam.com. Please include your model number and a detailed description of your issue for faster assistance.

Image: A graphic illustrating the 30-day Amazon return, 12-month warranty, and lifetime customer support.


