1. ആമുഖം
Thank you for choosing the JONSBO TK-3 White ATX Mid Tower PC Case. This manual provides detailed instructions for the proper installation, operation, and maintenance of your new PC case. Please read this manual thoroughly before beginning assembly to ensure optimal performance and longevity of your components.

Figure 1: JONSBO TK-3 White ATX Mid Tower PC Case. This image displays the overall design of the white PC case, highlighting its one-piece curved glass panel and compact form factor.
2. ഉൽപ്പന്ന സവിശേഷതകൾ
The JONSBO TK-3 White PC Case is designed for high compatibility and efficient cooling, featuring a unique aesthetic and practical internal layout.
- One-Piece Curved Glass: Offers a 270-degree side view, providing a column-less display of internal hardware. A 2H hardness glass protection film is applied to the glass surfaces.
- BTF Motherboard Support: Compatible with back-plug (BTF) motherboards (ATX, Micro-ATX, ITX) for cleaner cable routing.
- വിപുലമായ തണുപ്പിക്കൽ സംവിധാനം: Supports dual 360mm All-In-One (AIO) liquid coolers (top and bottom) and up to 10 fan positions for optimal airflow and heat dissipation.
- High Hardware Compatibility: Accommodates ATX power supplies up to 220mm, CPU coolers up to 165mm in height, and graphics cards up to 420mm in length.
- ഫ്ലെക്സിബിൾ സ്റ്റോറേജ് ഓപ്ഷനുകൾ: Supports various drive configurations including 2.5" SSDs and 3.5" HDDs.
- ഫ്രണ്ട് I/O പോർട്ടുകൾ: Includes 1x USB 3.2 Gen2 Type-C and 2x USB 3.0 ports for convenient connectivity.

Figure 2: Curved Glass Panel. This image illustrates the one-piece curved glass design, showcasing the internal components without obstruction.
3. സജ്ജീകരണവും ഇൻസ്റ്റാളേഷനും
Before starting, ensure you have all necessary components and tools. Handle all parts with care, especially the glass panel. Do not remove the curved-glass explosion-proof film.
3.1 മദർബോർഡ് ഇൻസ്റ്റാളേഷൻ
- Carefully remove the side panels to access the interior of the case.
- Install the necessary motherboard standoffs for your ATX, Micro-ATX, or ITX motherboard.
- Align your motherboard with the standoffs and I/O shield, then secure it with screws. For BTF motherboards, ensure all back-plug connections are accessible and properly aligned.

Figure 3: BTF Motherboard Layout. This diagram illustrates the internal layout for BTF (back-plug) motherboard installation, showing designated areas for various connectors (auxiliary power, 24-pin power, audio/pre-interface, SATA/USB interface).
3.2 Cooling System Installation (Fans & AIO)
The TK-3 supports extensive cooling configurations.
- ഫാൻ സ്ഥാനങ്ങൾ:
- Top: 3x 120mm or 2x 140mm fans
- Bottom: 3x 120mm fans
- Motherboard Side: 3x 120mm fans
- പിൻഭാഗം: 1x 120mm ഫാൻ
- AIO Support:
- Top: 360mm or 280mm AIO
- Bottom: 360mm AIO
- 2x 2.5" SSDs + 1x 3.5" HDD
- OR 1x 2.5" SSD + 2x 3.5" HDDs
Install fans or AIO radiators in the desired positions, ensuring proper airflow direction. The case is designed for vertical upward airflow to prevent heat accumulation.

Figure 4: Cooling System Support. This diagram illustrates the various fan and AIO radiator mounting positions within the JONSBO TK-3 case, highlighting the potential for dual 360mm AIO setups and multiple fan configurations.
3.3 ഗ്രാഫിക്സ് കാർഡ് (GPU) ഇൻസ്റ്റാളേഷൻ
The case supports graphics cards up to 420mm in length. Remove the necessary PCI expansion slot covers, insert your GPU, and secure it with screws.
3.4 പവർ സപ്ലൈ യൂണിറ്റ് (PSU) ഇൻസ്റ്റാളേഷൻ
The TK-3 supports ATX power supplies up to 220mm. Install the PSU in the designated rear mount area, typically in the separated compartment for improved cable management.
3.5 ഡ്രൈവ് ഇൻസ്റ്റാളേഷൻ
കേസ് വഴക്കമുള്ള സംഭരണ ഓപ്ഷനുകൾ വാഗ്ദാനം ചെയ്യുന്നു:
Mount your drives in the dedicated bays, typically located in the rear compartment for efficient cable routing.
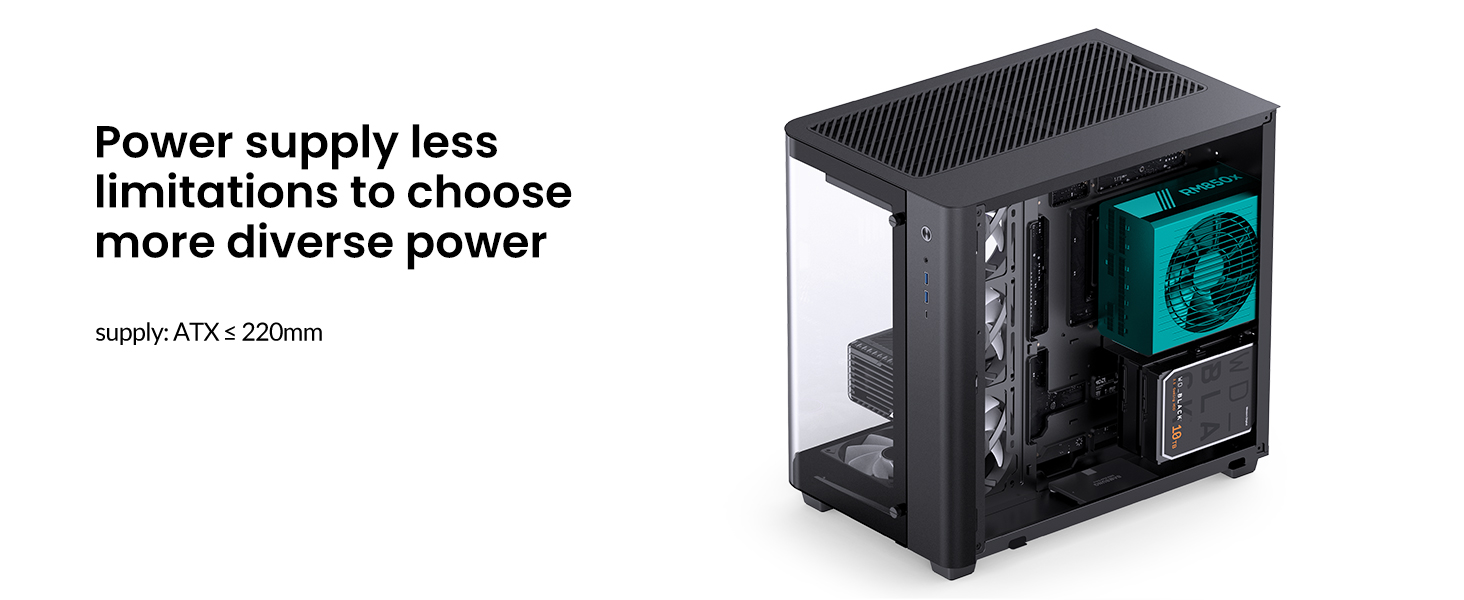
Figure 5: Drive Bay Configuration. This image illustrates the flexible drive bay options, showing how 2.5" SSDs and 3.5" HDDs can be installed in various combinations within the case's separated compartment.
3.6 ഫ്രണ്ട് I/O കണക്ഷനുകൾ
Connect the front panel cables (USB 3.2 Gen2 Type-C, USB 3.0, audio, power, reset) to their corresponding headers on your motherboard. Refer to your motherboard manual for specific header locations.

Figure 6: Front I/O Ports. This image details the front panel connectivity, including the USB 3.2 Gen2 Type-C port, USB 3.0 ports, and audio jacks.
4. ഓപ്പറേഷൻ
Once all components are installed and secured, connect your peripherals and power cable. Press the power button on the front panel to start your system.
4.1 എയർഫ്ലോ മാനേജ്മെന്റ്
The JONSBO TK-3 is designed with a vertical upward airflow path to minimize heat accumulation. Ensure your installed fans are oriented correctly to facilitate this airflow. Bottom intake fans and top/rear exhaust fans are generally recommended for optimal cooling performance.
5. പരിപാലനം
Regular maintenance helps ensure the longevity and performance of your PC components.
- പൊടി വൃത്തിയാക്കൽ: പൊടി ഫിൽട്ടറുകളും (ലഭ്യമാണെങ്കിൽ) ആന്തരിക ഘടകങ്ങളും കംപ്രസ് ചെയ്ത വായു ഉപയോഗിച്ച് ഇടയ്ക്കിടെ വൃത്തിയാക്കുക. വൃത്തിയാക്കുന്നതിന് മുമ്പ് സിസ്റ്റം ഓഫ് ചെയ്തിട്ടുണ്ടെന്നും പ്ലഗ് ഇൻ ചെയ്തിട്ടുണ്ടെന്നും ഉറപ്പാക്കുക.
- Glass Panel Care: Clean the curved glass panel with a soft, lint-free cloth and a mild glass cleaner. Avoid abrasive materials that could scratch the surface.
- കേബിൾ മാനേജുമെന്റ്: Periodically check cable routing to ensure no cables are obstructing airflow or fan operation.
6. പ്രശ്നപരിഹാരം
അസംബ്ലി അല്ലെങ്കിൽ ഓപ്പറേഷൻ സമയത്ത് നിങ്ങൾ നേരിട്ടേക്കാവുന്ന സാധാരണ പ്രശ്നങ്ങളെ ഈ വിഭാഗം അഭിസംബോധന ചെയ്യുന്നു.
- ഘടക ഫിറ്റ് പ്രശ്നങ്ങൾ: If a component (e.g., large GPU, CPU cooler) does not fit, double-check the maximum supported dimensions listed in the specifications. Ensure all cables are routed efficiently to avoid obstruction.
- മോശം വായുപ്രവാഹം/ഉയർന്ന താപനില: Verify that all fans are installed in the correct orientation (intake/exhaust) and that dust filters are clean. Ensure no cables are blocking airflow paths.
- ഫ്രണ്ട് പാനൽ I/O പ്രവർത്തിക്കുന്നില്ല: Check all front panel header connections to the motherboard. Ensure they are securely seated and connected to the correct pins as per your motherboard manual.
- Loose Screws/Panels: Ensure all screws, especially for the glass panels, are tightened gently but firmly. Avoid over-tightening to prevent stripping.
If you encounter persistent issues, refer to your individual component manuals or contact JONSBO customer support.
7 സ്പെസിഫിക്കേഷനുകൾ
| ഫീച്ചർ | വിശദാംശങ്ങൾ |
|---|---|
| മോഡലിൻ്റെ പേര് | TK-3 White |
| കേസ് തരം | മിഡ് ടവർ |
| അളവുകൾ (L x W x H) | 438mm x 288mm x 415mm (17.24 x 11.34 x 16.34 inches, including foot) |
| മെറ്റീരിയൽ | 0.7mm Steel, Tempered Glass |
| മദർബോർഡ് അനുയോജ്യത | ATX, Micro-ATX, ITX (BTF support) |
| പിസിഐ വിപുലീകരണ സ്ലോട്ടുകൾ | 7 |
| Max. GPU Length | 420 മിമി (16.53 ഇഞ്ച്) |
| പരമാവധി. സിപിയു കൂളർ ഉയരം | 165 മിമി (6.49 ഇഞ്ച്) |
| പരമാവധി. PSU ദൈർഘ്യം | 220 മിമി (8.66 ഇഞ്ച്) |
| ഡ്രൈവ് ബേകൾ | 2x 2.5" SSD + 1x 3.5" HDD OR 1x 2.5" SSD + 2x 3.5" HDD |
| ആരാധക പിന്തുണ | മുകളിൽ: 3x 120mm / 2x 140mm Bottom: 3x 120mm MB Side: 3x 120mm പിൻ: 1x 120mm |
| AIO റേഡിയേറ്റർ പിന്തുണ | Top: 360mm / 280mm താഴെ: 360 മി.മീ |
| ഫ്രണ്ട് ഐ / ഒ പോർട്ടുകൾ | 1x USB 3.2 Gen2 Type-C, 2x USB 3.0, Audio (2-in-1) |
| ഇനത്തിൻ്റെ ഭാരം | 16.09 pounds (7.3 KG) |

Figure 7: Case Dimensions. This diagram provides a visual representation of the JONSBO TK-3 PC case dimensions (width, depth, height) in millimeters.
8. വാറൻ്റിയും പിന്തുണയും
JONSBO products are manufactured to high-quality standards. For warranty information, please refer to the specific warranty card included with your product or visit the official JONSBO website. If you require technical assistance or have questions regarding your JONSBO TK-3 White PC Case, please contact JONSBO customer support through their official channels.