1. ആമുഖം
This manual provides comprehensive instructions for the TP-Link Festa F65 Ultra-Slim Wi-Fi 6 AX3000 Indoor Wireless Access Point. The Festa F65 is designed to deliver high-speed Wi-Fi 6 connectivity with advanced features such as Mesh Wi-Fi, seamless roaming, MU-MIMO, and WPA3 security. It supports flexible powering options including PoE+, Passive PoE, and DC adapter. Centralized cloud management is available free of charge via the Festa app or web portal, simplifying network administration for small businesses and home offices. Please note that the Festa F65 is not compatible with TP-Link Omada controllers.

ചിത്രം 1: മുകളിൽ view of the TP-Link Festa F65 Ultra-Slim Wireless Access Point.
2. ബോക്സിൽ എന്താണുള്ളത്?
The TP-Link Festa F65 package includes the following items:
- ഫെസ്റ്റ F65 വയർലെസ് ആക്സസ് പോയിൻ്റ്
- പവർ അഡാപ്റ്റർ
- Ceiling/Wall Mounting Kit
- ഇൻസ്റ്റലേഷൻ ഗൈഡ്
3 പ്രധാന സവിശേഷതകൾ
The Festa F65 offers a range of features designed for optimal wireless performance and network management:
- അൾട്രാ-ഫാസ്റ്റ് വൈ-ഫൈ 6 വേഗത: Achieves dual-band Wi-Fi speeds up to 3000 Mbps with 1024-QAM and Long OFDM Symbol, supporting up to 2402 Mbps on 5 GHz and 574 Mbps on 2.4 GHz.
- അൾട്രാ സ്ലിം ഡിസൈൻ: Compact and elegant design for seamless integration into various environments.
- Free Centralized Cloud Management: Manage your network remotely via the Festa app or web portal without additional costs.
- നൂതന വയർലെസ് സാങ്കേതികവിദ്യകൾ: Supports Mesh Wi-Fi, Seamless Roaming, WPA3 security, Band Steering, Load Balancing, Airtime Fairness, and Beamforming.
- Multiple Powering Options: Compatible with 802.3at PoE+, 48V Passive PoE, and 12V/1.2A DC power supply for flexible deployment.
- എളുപ്പമുള്ള സജ്ജീകരണവും ഉപയോഗവും: Features Self-Organizing Networking and Zero-Touch Provisioning for simplified installation without requiring professional IT assistance.

ചിത്രം 2: ഓവർview of Festa F65 key features.
4. സജ്ജീകരണവും ഇൻസ്റ്റാളേഷനും
This section guides you through the initial setup and installation of your TP-Link Festa F65 Access Point using the Festa Cloud-Based Controller (CBC).
4.1 ഭൗതിക ബന്ധങ്ങൾ
To build your network, connect the WAN port of your Festa gateway to the internet. Then, connect the LAN port of the gateway to the PoE switch. Finally, connect the Festa F65 Access Point and any other wired clients to the PoE switch.
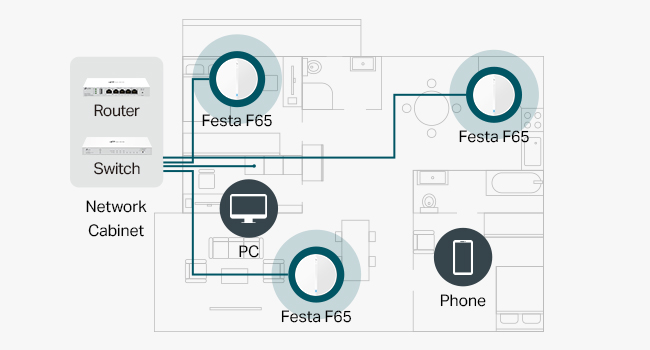
Figure 3: Festa F65 device ports.
4.2 Cloud Controller Setup
The Festa F65 is managed via the Festa Cloud-Based Controller (CBC). You will need a TP-Link ID to access this service.
- Create TP-Link ID: Go to the Festa Web പോർട്ടൽ https://festa.tplinkcloud.com. If you don't have a TP-Link ID, sign up for one.
- ലോഗിൻ: Log in to the Festa Cloud with your TP-Link ID.
- Add Controller: Click 'Add Controller' to register a new Cloud-Based Controller. Follow the setup wizard to configure your controller settings, including controller name, country/region, time zone, and device account credentials.
- സൈറ്റ് സൃഷ്ടിക്കുക: During the setup wizard, create a new site (e.g., 'Cafe 1') and select the appropriate application scenario (e.g., 'Restaurant').
- Adopt Devices: Before adopting devices, ensure all your Festa devices have internet access. Navigate to the 'Devices' menu and click 'Add Devices'. Enter the serial number (S/N) of each device (Gateway, Switch, AP). For multiple devices, use the 'Import' option. Confirm the addition. Wait for the devices to be successfully adopted and provisioned by the controller.

Figure 4: Festa networking solution overview.

Figure 5: Festa App and Web മാനേജ്മെന്റിനുള്ള ഇന്റർഫേസ്.
4.3 Video Guide: Configuring Cloud Solution
For a visual walkthrough of configuring your Festa network using the Cloud-Based Controller, please watch the official video below:
Video 1: Configuring Cloud Solution for TP-Link Festa devices. This video demonstrates the step-by-step process of setting up and managing your Festa network using the cloud controller, including device adoption, VLAN configuration, Wi-Fi setup, and ACL rules.
5. പ്രവർത്തന നിർദ്ദേശങ്ങൾ
This section details the configuration of VLANs, Wi-Fi networks, and Access Control List (ACL) rules to segment your network for different user groups (Owner, Staff, Customer).
5.1 Setting Up VLANs
To enhance security and manage network access, we will create separate VLANs for staff and customers. The default LAN (VLAN 1) will serve as the core network for the owner.
- Access LAN Settings: പോകുക Settings > Wired Networks > LAN.
- Create Staff VLAN (VLAN 10):
- Click 'Create New LAN'.
- സെറ്റ് പേര്: Staff_VLAN10.
- Purpose: Select ഇൻ്റർഫേസ്.
- LAN Interfaces: Select all LAN ports on the gateway that should belong to this VLAN.
- VLAN Type: Select സിംഗിൾ.
- VLAN ID: Set to 10.
- Gateway/Subnet: Set to 192.168.10.1/24. Click 'Update DHCP Range'.
- Ensure DHCP Server is enabled.
- Click 'Save'.
- Create Customer VLAN (VLAN 20):
- Repeat the process for a new LAN.
- സെറ്റ് പേര്: Customer_VLAN20.
- VLAN ID: Set to 20.
- Gateway/Subnet: Set to 192.168.20.1/24. Click 'Update DHCP Range'.
- Click 'Save'.
5.2 Setting Up Wi-Fi Networks (SSIDs)
Create three separate Wi-Fi networks (SSIDs) for the owner, staff, and customers, associating them with the respective VLANs.
- Access WLAN Settings: പോകുക Settings > Wireless Networks > WLAN.
- Create Owner Wi-Fi:
- Click 'Create New Wireless Network'.
- Network Name (SSID): Set to Cafe Owner.
- Set a strong Security Key.
- Keep other settings on default.
- Click 'Apply'.
- Create Staff Wi-Fi:
- Click 'Create New Wireless Network'.
- Network Name (SSID): Set to Cafe Staff.
- Set a strong Security Key.
- Under 'Advanced Settings', enable VLAN and set VLAN ID to 10.
- Click 'Apply'.
- Create Customer Wi-Fi:
- Click 'Create New Wireless Network'.
- Network Name (SSID): Set to Cafe Customer.
- Set a strong Security Key.
- പ്രവർത്തനക്ഷമമാക്കുക അതിഥി നെറ്റ്വർക്ക് to prevent clients from reaching private IP subnets.
- Under 'Advanced Settings', enable VLAN and set VLAN ID to 20.
- ഇഷ്ടാനുസൃതമാക്കുക Client Rate Limit Profile to limit download and upload speeds for customers (e.g., Download Limit: 1000 Kbps, Upload Limit: 500 Kbps).
- Click 'Apply'.
5.3 Setting Up ACL Rules
To prevent clients in different VLANs from accessing the core network or communicating with each other, configure Access Control List (ACL) rules.
- Access ACL Settings: പോകുക Network Security > ACL > Gateway ACL.
- Create Staff VLAN 10 ACL Rule:
- Click 'Create New Rule'.
- പേര്: Staff_VLAN10_ACL.
- Status: Ensure പ്രവർത്തനക്ഷമമാക്കുക പരിശോധിക്കുന്നു.
- Direction: Select LAN-LAN.
- Policy: Select നിഷേധിക്കുക.
- Protocols: Select എല്ലാം.
- ഉറവിട തരം: നെറ്റ്വർക്ക്. തിരഞ്ഞെടുക്കുക Staff_VLAN10.
- Destination Type: നെറ്റ്വർക്ക്. തിരഞ്ഞെടുക്കുക ലാൻ (for core network) and Customer_VLAN20.
- Click 'Create'.
- Create Customer VLAN 20 ACL Rule:
- Click 'Create New Rule'.
- പേര്: Customer_VLAN20_ACL.
- Status: Ensure പ്രവർത്തനക്ഷമമാക്കുക പരിശോധിക്കുന്നു.
- Direction: Select LAN-LAN.
- Policy: Select നിഷേധിക്കുക.
- Protocols: Select എല്ലാം.
- ഉറവിട തരം: നെറ്റ്വർക്ക്. തിരഞ്ഞെടുക്കുക Customer_VLAN20.
- Destination Type: നെറ്റ്വർക്ക്. തിരഞ്ഞെടുക്കുക ലാൻ (for core network) and Staff_VLAN10.
- Click 'Create'.
These ACL rules ensure that staff and customer networks are isolated from each other and from the core network, enhancing overall security.
6. പരിപാലനം
Regular maintenance ensures optimal performance and security of your Festa F65 Access Point.
- ഫേംവെയർ അപ്ഡേറ്റുകൾ: Periodically check for and install the latest firmware updates via the Festa Cloud portal to benefit from new features, performance improvements, and security patches.
- നെറ്റ്വർക്ക് നിരീക്ഷണം: Utilize the Festa Cloud dashboard to monitor network status, device health, client activity, and alerts.
- ശാരീരിക പരിശോധന: Ensure the device is free from dust and debris. Check cable connections for secure fit.
- കോൺഫിഗറേഷൻ ബാക്കപ്പ്: Regularly back up your network configurations through the Festa Cloud portal to facilitate quick recovery in case of unforeseen issues.
7. പ്രശ്നപരിഹാരം
If you encounter issues with your Festa F65, refer to the following troubleshooting tips:
- ഇൻ്റർനെറ്റ് ആക്സസ് ഇല്ല:
- Verify the internet connection to your Festa gateway.
- Check all cable connections between the gateway, switch, and access point.
- Ensure the Festa F65 is powered on and its indicator light is stable.
- കുറഞ്ഞ വൈ-ഫൈ വേഗത:
- മറ്റ് വയർലെസ് ഉപകരണങ്ങളിൽ നിന്നുള്ള ഇടപെടൽ പരിശോധിക്കുക.
- Ensure the device is placed optimally for coverage.
- Review client rate limit settings in the Festa Cloud, especially for guest networks.
- Monitor network traffic via the Festa Cloud dashboard for high usage.
- Device Not Adopting:
- Ensure the device has internet access.
- Verify the serial number entered in the Festa Cloud is correct.
- Check that the device firmware is compatible with the Festa Cloud.
- Cannot Access Internal Network from Guest Wi-Fi:
- This is expected behavior if Guest Network is enabled and ACL rules are correctly configured.
- Review ACL rules in the Festa Cloud to ensure proper isolation.
- ഫാക്ടറി പുന et സജ്ജമാക്കുക: If issues persist, you may perform a factory reset on the device. Refer to the Installation Guide for specific instructions on how to reset your Festa F65.
8 സ്പെസിഫിക്കേഷനുകൾ
| ഉൽപ്പന്ന അളവുകൾ | 6.3 x 6.3 x 1.51 ഇഞ്ച് |
| ഇനത്തിൻ്റെ ഭാരം | 14.1 ഔൺസ് |
| മോഡൽ നമ്പർ | ഫെസ്റ്റ F65 |
| ബ്രാൻഡ് | ടിപി-ലിങ്ക് |
| വയർലെസ് കമ്മ്യൂണിക്കേഷൻ സ്റ്റാൻഡേർഡ് | 802.11ac, 802.11ax (Wi-Fi 6), 802.11b, 802.11g, 802.11n |
| ഫ്രീക്വൻസി ബാൻഡ് ക്ലാസ് | ഡ്യുവൽ-ബാൻഡ് (2.4 GHz & 5 GHz) |
| പ്രത്യേക ഫീച്ചർ | Access Point Mode, Mesh Wi-Fi, Seamless Roaming, Cloud Management |
| കണക്റ്റിവിറ്റി ടെക്നോളജി | ഇഥർനെറ്റ് |
| പവർ ചെയ്യാനുള്ള ഓപ്ഷനുകൾ | 802.3at PoE+, 48V Passive PoE, 12V/1.2A DC |
| ശുപാർശ ചെയ്യുന്ന ഉപയോഗങ്ങൾ | ബിസിനസ്, വീട് |
9. വാറൻ്റിയും പിന്തുണയും
Your TP-Link Festa F65 is backed by a 3-year warranty. For technical assistance, please refer to the following contact information:
- ഫോൺ പിന്തുണ: (866) 225-8139
- Web പിന്തുണ: myproducts.tp-link.com/us (www.myproducts.tp-link.com) എന്ന വിലാസത്തിൽ നിന്നും നിങ്ങൾക്ക് ഏറ്റവും പുതിയ വിവരങ്ങൾ ലഭിക്കും.
- ഇമെയിൽ പിന്തുണ: support.USA@tp-link.com
- പിന്തുണ സമയം: 6am to 6pm PST, Monday to Friday.
TP-Link is committed to cybersecurity and privacy, being a signatory of the U.S. Cybersecurity and Infrastructure Security Agency's (CISA) Secure-by-Design pledge.


