ആമുഖം
Thank you for choosing the TONOR Wireless Microphones System TW360. This system is designed to provide high-quality audio transmission for various applications, including karaoke, public speaking, church events, and live performances. Featuring 4x10 adjustable UHF channels and a robust design, it ensures stable signal transmission and excellent sound clarity. This manual provides detailed instructions for setting up, operating, maintaining, and troubleshooting your wireless microphone system.

Figure 1: The TONOR TW360 Wireless Microphones System, including the receiver unit and four handheld microphones (two grey, two red).
സജ്ജീകരണ ഗൈഡ്
Follow these steps to set up your TONOR Wireless Microphones System.
1. അൺബോക്സിംഗും ഘടക പരിശോധനയും
Carefully unpack all components and verify that all items listed in the package contents are present and undamaged.

Figure 2: Included accessories: 4 anti-slip rings, 4 mic covers, 1 x 6.35mm audio cable, 1 x power adapter, and 1 x manual.
2. റിസീവർ കണക്ഷൻ
Connect the receiver to a power source using the provided power adapter. Ensure the power switch on the receiver is in the 'OFF' position before connecting. Connect the receiver's audio output to your mixer, karaoke machine, amplifier, or PA speaker system using the 6.35mm audio cable or XLR cables (not included).

ചിത്രം 3: മുന്നിലും പിന്നിലും View of the Receiver. Key components include (1) Power Switch, (2) Channel A/B/C/D Volume controls, (3) Receiving Antennas, (4) 6.35mm (1/4") Audio Output Jack, and (5) Balanced XLR Outputs for each channel.
3. മൈക്രോഫോൺ ബാറ്ററി ഇൻസ്റ്റാളേഷൻ
Each handheld microphone requires two AA batteries (not included). Unscrew the bottom part of the microphone to access the battery compartment. Insert the batteries, ensuring correct polarity (+/-). Screw the bottom part back on securely.

Figure 4: Each microphone is powered by two AA batteries (not included). The display shows real-time battery status.
4. Optimum Boot Order
For optimal performance and to prevent unexpected noise, follow this boot order:
- Audio Mixer (if applicable)
- ഓഡിയോ Ampലൈഫയർ (ബാധകമെങ്കിൽ)
- സ്പീക്കർ
- റിസീവർ
- മൈക്രോഫോൺ
പ്രവർത്തന നിർദ്ദേശങ്ങൾ
1. പവർ ഓൺ/ഓഫ്
Press the power button on the receiver to turn it on. The receiver will automatically sync with the microphone's frequency. To turn on each microphone, press and hold the power button on the microphone until the display illuminates.

Figure 5: Power On/Off with One Button on the microphone.
2. വോളിയം ക്രമീകരിക്കുന്നു
Adjust the individual volume for each microphone channel (A, B, C, D) using the corresponding volume knobs on the receiver. Ensure the volume on your connected audio device (mixer, amplifier) is also set appropriately.
3. Changing Frequencies
Each microphone offers ten adjustable frequencies. If you experience interference, you can switch frequencies. To change the frequency, briefly press the channel switch button on the microphone. The display will show the new frequency. The receiver will automatically synchronize with the new frequency.

Figure 6: Each microphone has 10 adjustable frequencies, allowing up to 40 simultaneous connections. Use the channel switch button to cycle through frequencies.
4. Microphone Usage Tips
- Hold the microphone approximately 2-6 inches from your mouth for optimal sound pickup.
- Avoid covering the microphone grille with your hand, as this can affect sound quality and signal reception.
- The dynamic cardioid pickup pattern effectively isolates the main sound source and reduces background noise.
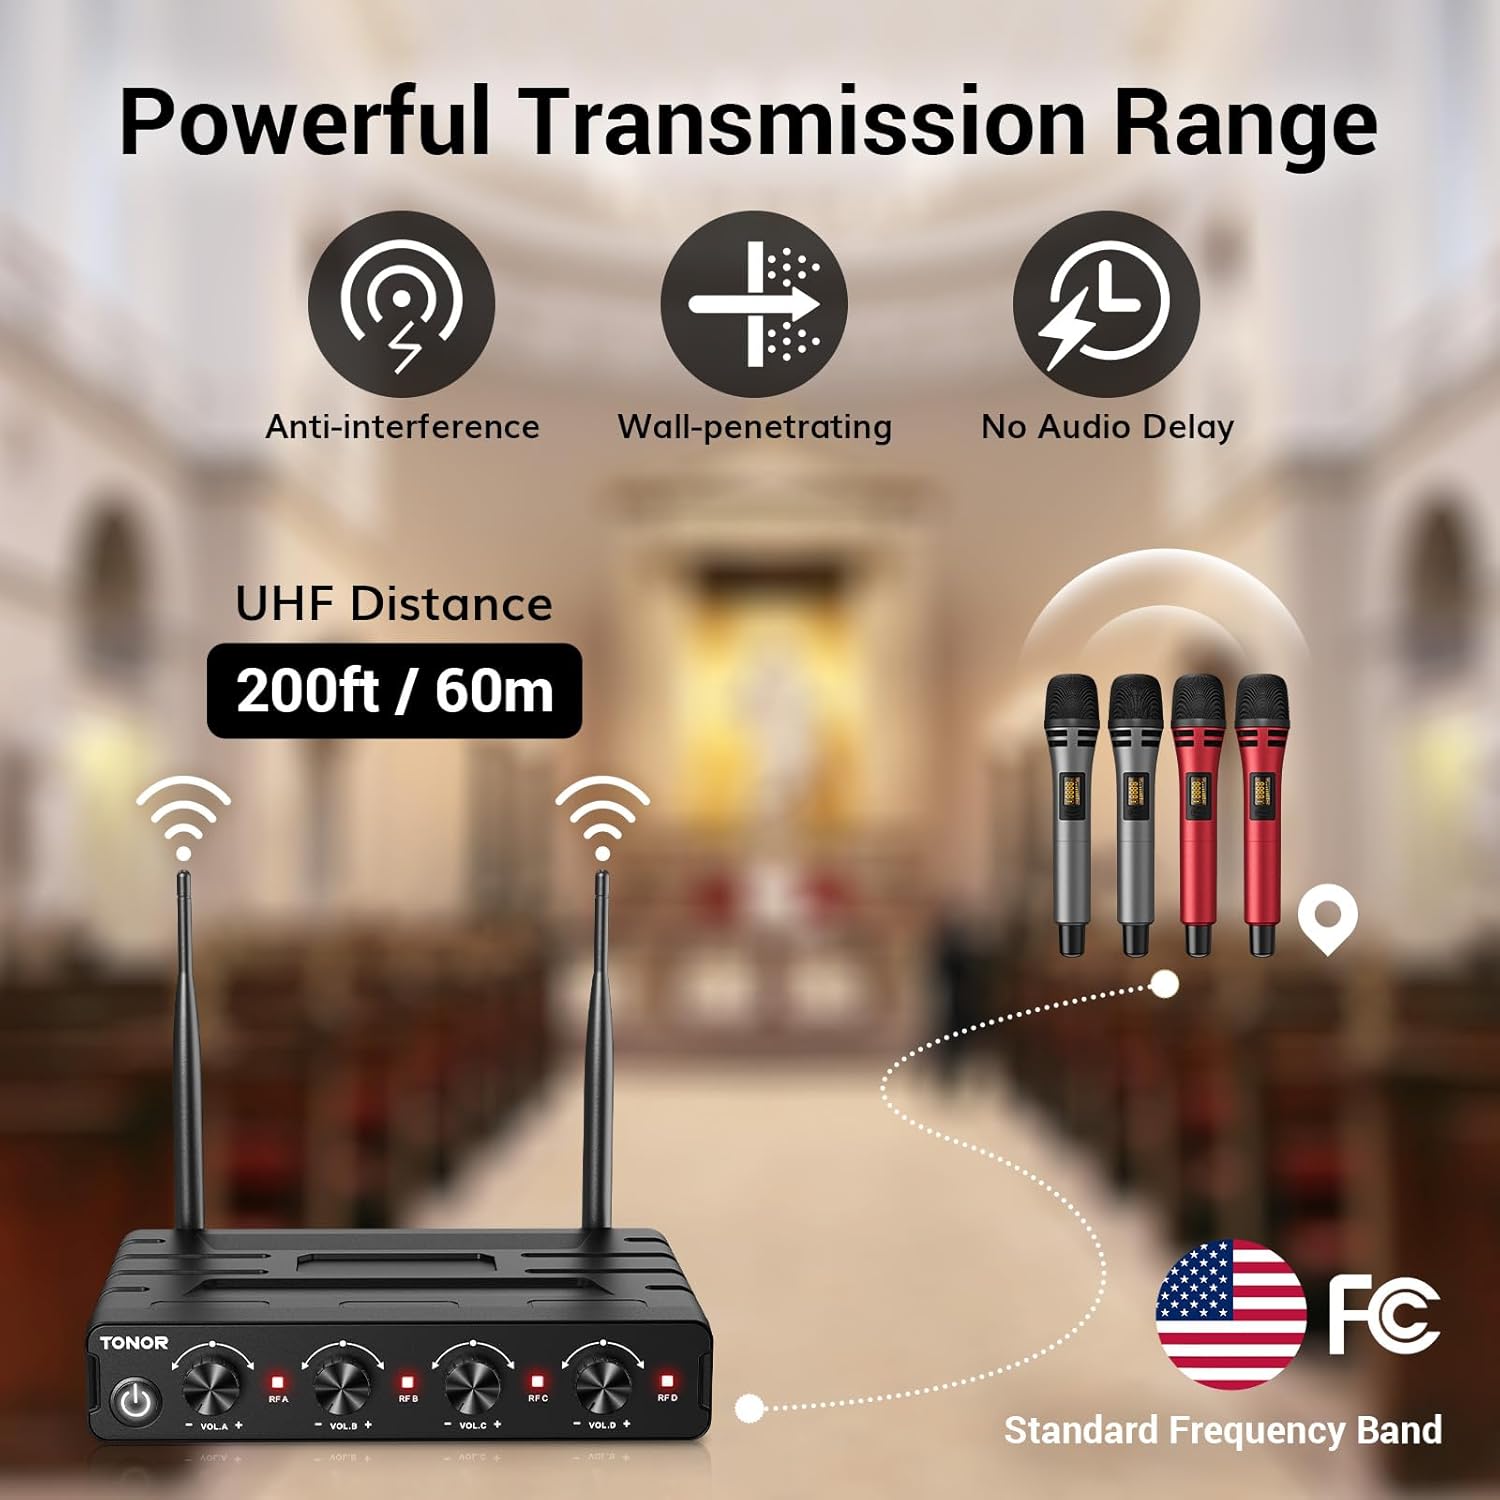
Figure 7: Dynamic Microphone Capsule picking up high-quality sound with noise reduction and anti-drop net cover.
5. വിശാലമായ അനുയോജ്യത
The system is compatible with various audio devices. Ensure you plug the 6.35mm audio cable into the 'MIC IN' input on your speaker or mixer, not the 'AUX' or 'LINE IN' input, for proper sound output.
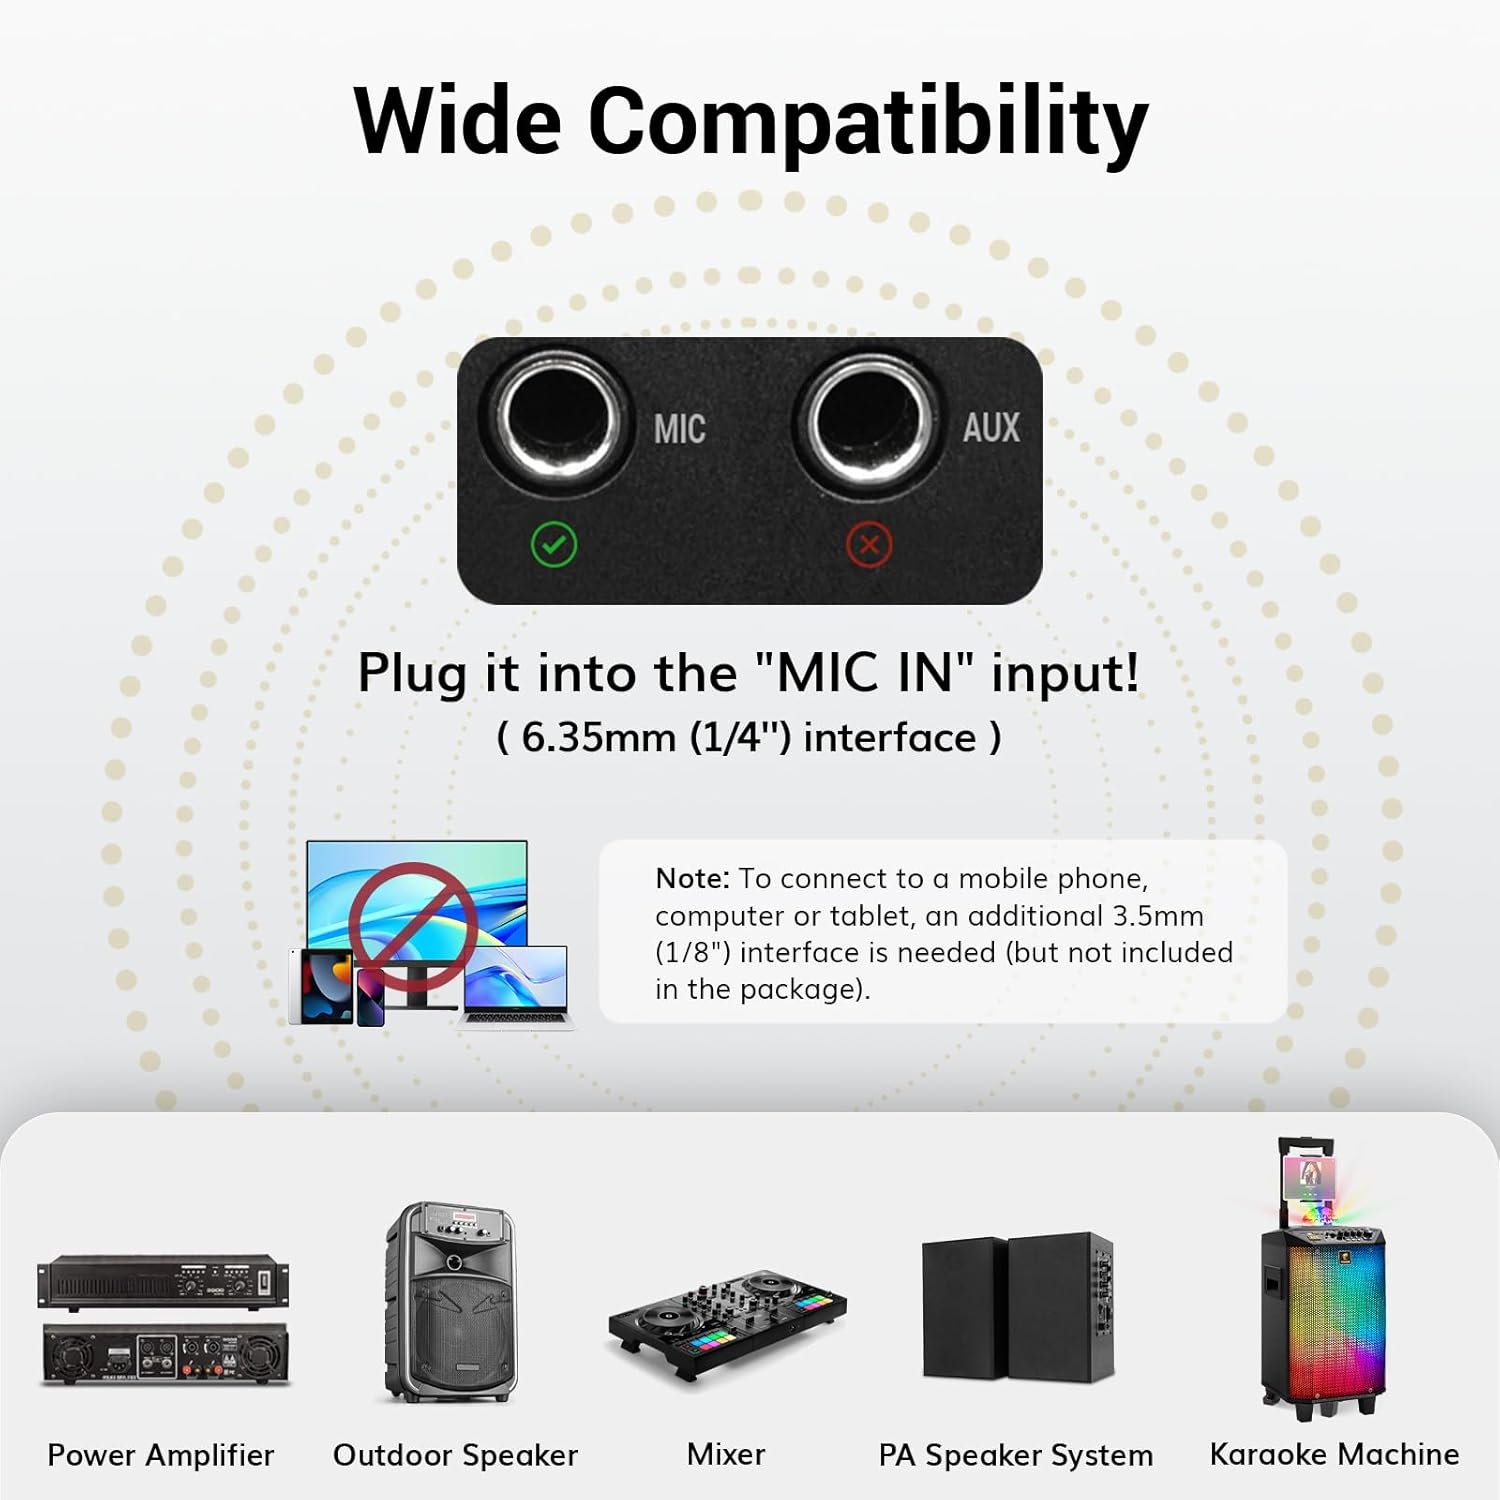
Figure 8: Wide Compatibility with various devices. Always use the 'MIC IN' input for optimal performance.
6. Optimum Shutdown Order
To prevent sudden loud noises or damage, follow this shutdown order:
- മൈക്രോഫോൺ
- റിസീവർ
- സ്പീക്കർ
- ഓഡിയോ Ampലൈഫയർ (ബാധകമെങ്കിൽ)
- Audio Mixer (if applicable)
മെയിൻ്റനൻസ്
1. വൃത്തിയാക്കൽ
Wipe the receiver and microphones with a soft, dry cloth. Do not use liquid cleaners or abrasive materials, as they may damage the finish or internal components.
2. ബാറ്ററി പരിചരണം
Remove batteries from the microphones if they will not be used for an extended period to prevent leakage and damage. Dispose of used batteries responsibly according to local regulations.
3. സംഭരണം
Store the system in a cool, dry place away from direct sunlight, extreme temperatures, and high humidity. Keep it in its original packaging or a protective case to prevent dust accumulation and physical damage.
ട്രബിൾഷൂട്ടിംഗ്
If you encounter issues with your TONOR Wireless Microphones System, refer to the following common problems and solutions:
| പ്രശ്നം | സാധ്യമായ കാരണം | പരിഹാരം |
|---|---|---|
| സൗണ്ട് ഔട്ട്പുട്ട് ഇല്ല | Microphone or receiver not powered on; incorrect cable connection; low microphone battery; incorrect input on audio device. | Ensure both microphone and receiver are powered on. Check all cable connections are secure and plugged into the 'MIC IN' port. Replace microphone batteries. Verify audio device input settings. |
| Interference/Static Noise | Nearby electronic devices; conflicting frequencies; operating range exceeded. | Move away from other wireless devices or sources of electromagnetic interference. Change the microphone's frequency. Ensure you are within the 200ft (60m) operating range. |
| Weak/Distorted Sound | Low microphone battery; microphone too far from mouth; volume levels too low/high. | Replace microphone batteries. Hold microphone closer to your mouth. Adjust volume knobs on receiver and connected audio device. |
| Microphone Disconnects Frequently | തടസ്സം; പരിധിക്ക് പുറത്താണ്; ബാറ്ററി കുറവാണ്. | Change microphone frequency. Ensure you are within operating range. Replace microphone batteries. |
| Receiver Does Not Power On | Power adapter not connected; faulty power outlet. | Ensure power adapter is securely connected to the receiver and a working power outlet. Try a different outlet. |
സാങ്കേതിക സവിശേഷതകൾ
| ഫീച്ചർ | സ്പെസിഫിക്കേഷൻ |
|---|---|
| മോഡലിൻ്റെ പേര് | TW360 |
| മൈക്രോഫോൺ ഫോം ഫാക്ടർ | ഹാൻഡ്ഹെൽഡ് |
| കണക്റ്റിവിറ്റി ടെക്നോളജി | UHF |
| ചാനലുകളുടെ എണ്ണം | 40 (10 per mic) |
| പ്രവർത്തന ശ്രേണി | 200 അടി / 60 മീറ്റർ വരെ |
| പോളാർ പാറ്റേൺ | ഏകദിശയിലുള്ള (കാർഡിയോയിഡ്) |
| സിഗ്നൽ-ടു-നോയിസ് അനുപാതം | 65 ഡി.ബി |
| പവർ സ്രോതസ്സ് (മൈക്രോഫോൺ) | 2 x AA ബാറ്ററികൾ (ഉൾപ്പെടുത്തിയിട്ടില്ല) |
| പവർ സ്രോതസ്സ് (റിസീവർ) | അഡാപ്റ്റർ (ഉൾപ്പെടുന്നു) |
| കണക്റ്റർ തരം | 6.35 എംഎം ജാക്ക്, എക്സ്എൽആർ |
| മെറ്റീരിയൽ | പ്ലാസ്റ്റിക് |
| ഉൽപ്പന്ന അളവുകൾ (L x W x H) | 12.99 x 11.81 x 4.33 ഇഞ്ച് |
| ഇനത്തിൻ്റെ ഭാരം | 3.46 പൗണ്ട് (ഏകദേശം 1570 ഗ്രാം) |
| ഉൾപ്പെടുത്തിയ ഘടകങ്ങൾ | 1 x receiver, 4 x handheld wireless microphone, 1 x adapter |
വാറൻ്റി വിവരങ്ങൾ
For detailed warranty information, please refer to the warranty card included with your product or visit the official TONOR webസൈറ്റ്. വാറന്റി നിബന്ധനകളും വ്യവസ്ഥകളും പ്രദേശത്തിനും ഉൽപ്പന്നത്തിനും അനുസരിച്ച് വ്യത്യാസപ്പെടാം.
ഉപഭോക്തൃ പിന്തുണ
If you require further assistance or have questions not covered in this manual, please contact TONOR customer support through their official website or the contact information provided in your product packaging. Please have your model number (TW360) and purchase details ready when contacting support.


